
Styrofoam Box Bok Choy: Who knew growing your own delicious, crisp bok choy could be so simple and sustainable? I’m excited to share a fantastic DIY trick that transforms a humble styrofoam box into a thriving mini-garden! Forget those expensive raised beds and complicated setups. This method is perfect for beginners, apartment dwellers, or anyone looking to add a touch of green to their lives without breaking the bank.
Bok choy, also known as pak choi, has been a staple in Asian cuisine for centuries, with roots tracing back to ancient China. Its mild, slightly sweet flavor and nutritional benefits have made it a beloved vegetable worldwide. But what if you could enjoy freshly harvested bok choy right from your own home, regardless of your gardening experience?
That’s where this DIY styrofoam box bok choy hack comes in! Many of us struggle with limited space, poor soil conditions, or simply the time commitment required for traditional gardening. This method bypasses those challenges, offering a low-cost, low-maintenance solution. Plus, repurposing styrofoam boxes is a fantastic way to reduce waste and contribute to a more sustainable lifestyle. Imagine the satisfaction of harvesting your own organic bok choy, knowing you grew it yourself in a recycled container! Let’s dive in and discover how easy it is to create your own styrofoam box bok choy garden.
Grow Your Own Bok Choy in a Styrofoam Box: A Beginner’s Guide
Hey there, fellow gardening enthusiasts! Ever thought about growing your own fresh veggies, but felt intimidated by the whole process? Well, I’m here to tell you that it’s easier than you think, and you can even start with something as simple as a styrofoam box! Today, I’m going to walk you through how to grow your very own bok choy using a recycled styrofoam box. It’s a fun, eco-friendly, and rewarding project. Let’s get started!
What You’ll Need
Before we dive in, let’s gather all the necessary materials. Trust me, having everything ready beforehand will make the whole process much smoother.
* A Styrofoam Box: This is your container! Look for a sturdy one, preferably one that’s been used for food delivery (like seafood or produce). Make sure it’s clean!
* Potting Soil: Don’t skimp on this! Good quality potting soil is crucial for healthy bok choy growth. Avoid using garden soil, as it can be too dense and doesn’t drain well in containers.
* Bok Choy Seeds: You can find these at most garden centers or online. Choose a variety that suits your climate.
* Drill or Screwdriver: For creating drainage holes.
* Watering Can or Hose: For watering your bok choy.
* Optional: Fertilizer: A balanced, water-soluble fertilizer can give your bok choy a boost.
* Optional: Seed Starting Tray or Small Pots: If you prefer to start your seeds indoors.
Preparing Your Styrofoam Box
This is a crucial step to ensure your bok choy has a healthy environment to grow in.
1. Clean the Box: Thoroughly clean the styrofoam box with soap and water. Rinse it well to remove any residue. This is important to prevent any contamination that could harm your plants.
2. Drill Drainage Holes: This is probably the most important step! Bok choy needs good drainage to prevent root rot. Use a drill or screwdriver to create several drainage holes in the bottom of the box. I usually aim for about 6-8 holes, evenly spaced. Make sure the holes are large enough to allow water to drain freely, but not so large that the soil will fall out.
3. Optional: Line the Box (If Necessary): If your styrofoam box has any cracks or seems flimsy, you can line it with a plastic bag. Make sure to poke holes in the bag to align with the drainage holes you created. This will help prevent the box from deteriorating and keep the soil contained.
Starting Your Bok Choy Seeds
You have two options here: direct sowing or starting seeds indoors. I’ll explain both.
Option 1: Direct Sowing
This is the easiest method, especially for beginners.
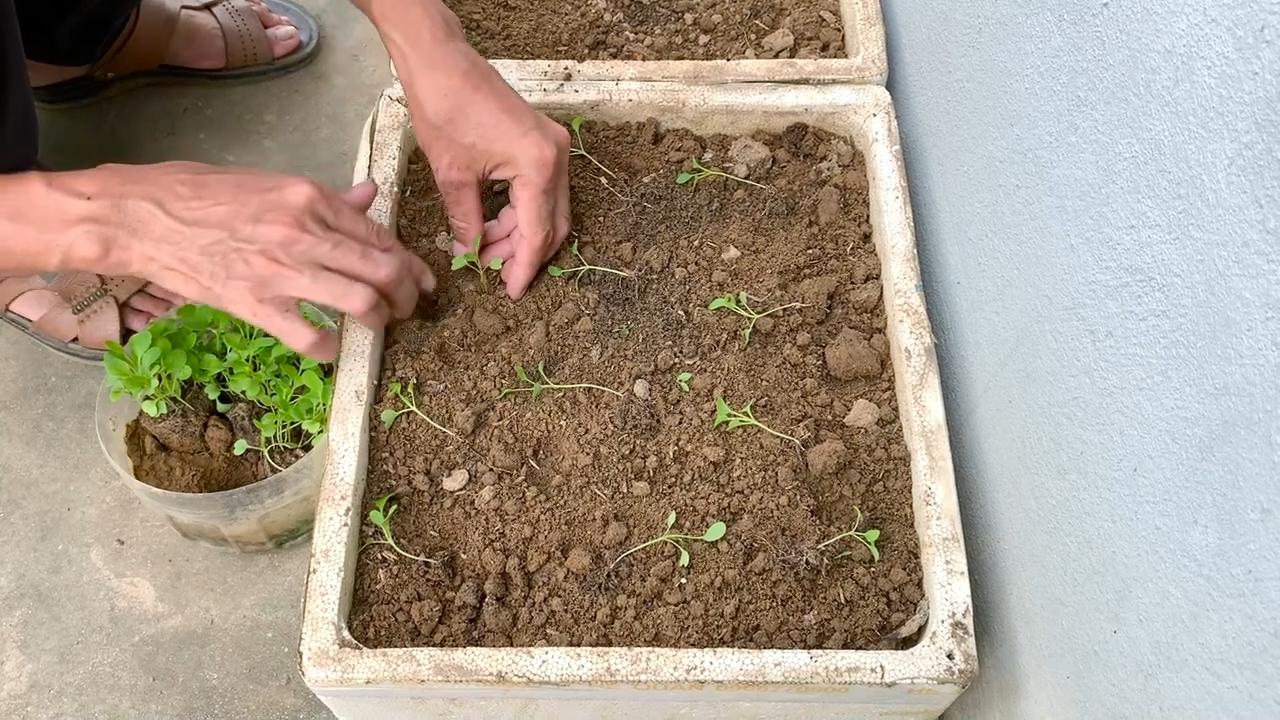
1. Fill the Box with Potting Soil: Fill the prepared styrofoam box with potting soil, leaving about an inch of space at the top. Gently pat down the soil to create a level surface.
2. Sow the Seeds: Sprinkle the bok choy seeds evenly over the surface of the soil. Don’t overcrowd them! A good rule of thumb is to space them about 1-2 inches apart.
3. Cover the Seeds: Lightly cover the seeds with a thin layer of potting soil (about ¼ inch).
4. Water Gently: Use a watering can with a gentle rose head to water the soil thoroughly. Be careful not to wash away the seeds. The soil should be moist but not soggy.
5. Place in a Sunny Location: Bok choy needs at least 4-6 hours of sunlight per day. Place the styrofoam box in a sunny spot in your garden or on your balcony.
6. Keep the Soil Moist: Check the soil moisture regularly and water as needed to keep it consistently moist.
Option 2: Starting Seeds Indoors
This method gives you a head start, especially if you live in a colder climate.
1. Prepare Seed Starting Trays or Pots: Fill seed starting trays or small pots with seed starting mix.
2. Sow the Seeds: Sow 2-3 bok choy seeds in each cell or pot.
3. Cover the Seeds: Lightly cover the seeds with a thin layer of seed starting mix.
4. Water Gently: Water the soil thoroughly, making sure it’s moist but not soggy.
5. Provide Light: Place the trays or pots in a warm, sunny location or under grow lights. If using grow lights, keep them on for about 14-16 hours per day.
6. Keep the Soil Moist: Check the soil moisture regularly and water as needed.
7. Transplant Seedlings: Once the seedlings have developed a few true leaves (usually after 2-3 weeks), they’re ready to be transplanted into the styrofoam box. Gently remove the seedlings from the trays or pots, being careful not to damage the roots. Space them about 6-8 inches apart in the box.
Caring for Your Bok Choy
Now that your bok choy is growing, here’s how to keep it happy and healthy.
1. Watering: Bok choy needs consistent moisture, especially during hot weather. Water deeply whenever the top inch of soil feels dry to the touch. Avoid overwatering, as this can lead to root rot. Water in the morning to allow the foliage to dry before nightfall, which can help prevent fungal diseases.
2. Sunlight: As mentioned earlier, bok choy needs at least 4-6 hours of sunlight per day. If you live in a very hot climate, provide some afternoon shade to prevent the leaves from scorching.
3. Fertilizing (Optional): If you want to give your bok choy a boost, you can fertilize it every 2-3 weeks with a balanced, water-soluble fertilizer. Follow the instructions on the fertilizer package. I like to use a fertilizer that’s specifically formulated for leafy greens.
4. Weeding: Keep the styrofoam box free of weeds. Weeds compete with your bok choy for nutrients and water. Gently pull out any weeds that appear.
5. Pest Control: Keep an eye out for pests like aphids, slugs, and cabbage worms. You can control aphids with a strong spray of water or by introducing beneficial insects like ladybugs. Slugs can be controlled with slug bait or by handpicking them off the plants. Cabbage worms can be controlled with Bacillus thuringiensis (Bt), a natural insecticide.
6. Bolting: Bolting is when the bok choy starts to produce a flower stalk. This usually happens when the weather gets too hot. Once bok choy bolts, the leaves become bitter. To prevent bolting, try to grow bok choy during cooler months (spring or fall). If your bok choy starts to bolt, harvest it immediately.
Harvesting Your Bok Choy
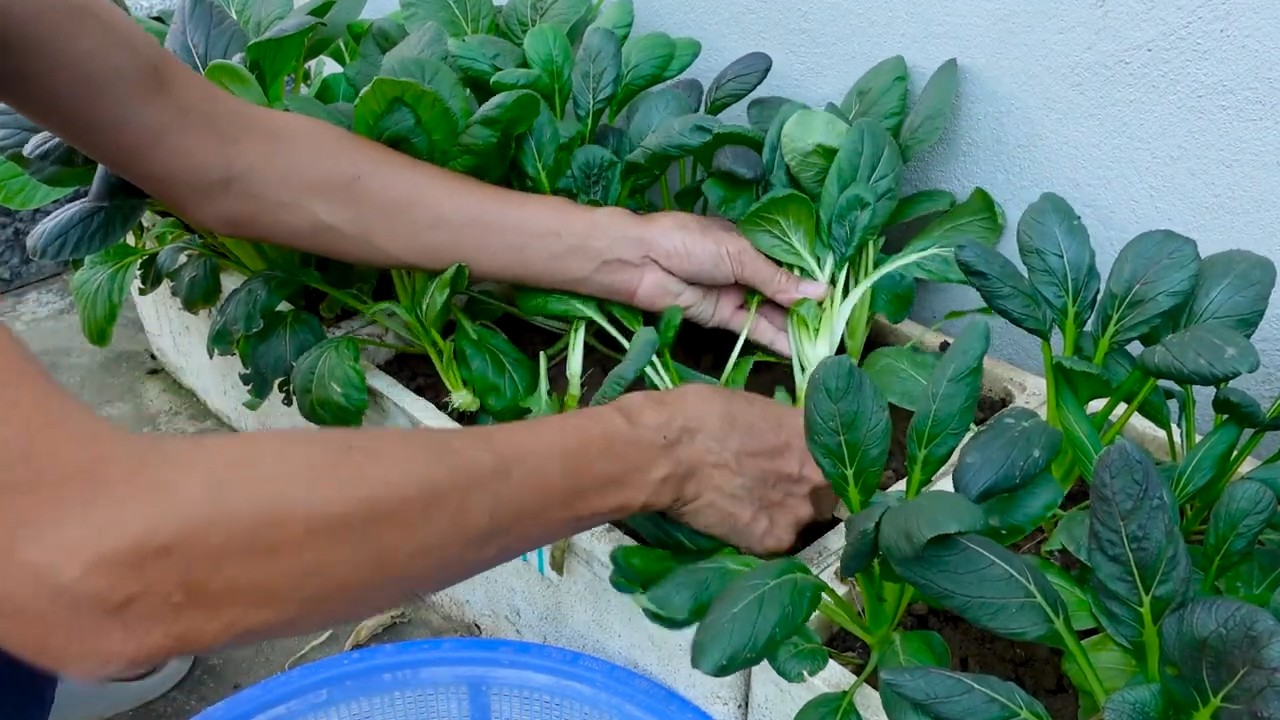
This is the best part! You can start harvesting your bok choy when the leaves are about 6-8 inches long.
1. Harvesting Individual Leaves: You can harvest individual leaves as needed, starting with the outer leaves. This will allow the inner leaves to continue to grow.
2. Harvesting the Whole Plant: You can also harvest the entire plant at once. Simply cut the plant off at the base with a sharp knife.
3. Cleaning and Storing: After harvesting, wash the bok choy thoroughly and store it in the refrigerator in a plastic bag. It will keep for about a week.
Troubleshooting
Even with the best care, you might encounter some problems. Here are a few common issues and how to deal with them.
* Yellowing Leaves: This could be a sign of overwatering, underwatering, or nutrient deficiency. Check the soil moisture and adjust your watering accordingly. If you suspect a nutrient deficiency, fertilize your bok choy.
* Holes in Leaves: This is usually caused by pests like cabbage worms or slugs. Inspect your plants regularly and take action to control pests.
* Root Rot: This is caused by overwatering and poor drainage. Make sure your styrofoam box has adequate drainage holes and avoid overwatering.
* Bolting: As mentioned earlier, bolting is caused by hot weather. Try to grow bok choy during cooler months.
Tips for Success
Here are a few extra tips to help you succeed with your bok choy growing adventure.
* Choose the Right Variety: Some bok choy varieties are more heat-tolerant than others. Choose a variety that’s well-suited to your climate.
* Use Good Quality Potting Soil: Don’t skimp on the potting soil! Good quality potting soil will provide your bok choy with the nutrients it needs to thrive.
* Water Regularly: Bok choy needs consistent moisture. Check the soil moisture regularly and water as needed.
Conclusion
So, there you have it! Transforming a simple styrofoam box into a thriving mini-garden for your Bok Choy is not just a fun project; it’s a sustainable and rewarding way to enjoy fresh, homegrown vegetables, even if you’re short on space or gardening experience. We’ve walked you through the process, highlighting the ease and affordability of this DIY trick. But why is this a must-try?
Firstly, consider the freshness factor. Imagine stepping outside your door and harvesting crisp, vibrant Bok Choy moments before adding it to your stir-fry. The flavor difference between store-bought and homegrown is undeniable. Secondly, think about the environmental impact. By repurposing a styrofoam box, you’re actively reducing waste and contributing to a more sustainable lifestyle. Plus, you’re minimizing your reliance on commercially grown produce, which often involves long-distance transportation and potentially harmful pesticides.
This method is also incredibly accessible. You don’t need a sprawling garden or expensive equipment. A simple styrofoam box, some soil, and a few Bok Choy seeds or seedlings are all you need to get started. It’s perfect for apartment dwellers, urban gardeners, or anyone looking to add a touch of green to their lives.
But the benefits don’t stop there. Growing your own Bok Choy allows you to control the growing environment and ensure that your vegetables are free from harmful chemicals. You can choose organic soil and fertilizers, knowing exactly what’s going into your food. This is particularly important for those with dietary restrictions or health concerns.
Now, let’s talk about variations. While we’ve focused on Bok Choy, this method can be adapted for other leafy greens like lettuce, spinach, or even herbs like basil and parsley. Experiment with different soil types and fertilizers to find what works best for your specific needs and climate. You can also add companion plants to your styrofoam garden to attract beneficial insects and deter pests. Marigolds, for example, are known to repel nematodes and other harmful insects.
Consider adding a simple drip irrigation system to your styrofoam box to ensure consistent watering. This is especially helpful during hot summer months when the soil can dry out quickly. You can easily create a DIY drip system using a plastic bottle and some tubing.
Another variation is to paint the exterior of your styrofoam box with a light-colored paint. This will help to reflect sunlight and keep the soil cooler, especially in warmer climates. You can also add drainage holes to the bottom of the box to prevent waterlogging.
We encourage you to embrace this DIY trick and experience the joy of growing your own Bok Choy. It’s a simple, affordable, and rewarding way to connect with nature and enjoy fresh, healthy food. Don’t be afraid to experiment and adapt the method to suit your specific needs and preferences.
And most importantly, we want to hear about your experience! Share your photos, tips, and challenges in the comments below. Let’s create a community of styrofoam box gardeners and inspire others to embrace this sustainable and rewarding practice. Your insights could help others overcome challenges and achieve success in their own gardening endeavors. So, grab a styrofoam box, some soil, and some Bok Choy seeds, and get growing! We can’t wait to see what you create. Remember, the best way to learn is by doing, so don’t be afraid to get your hands dirty and have some fun. Happy gardening!
Frequently Asked Questions (FAQ)
What kind of styrofoam box should I use?
Ideally, you should use a clean, food-grade styrofoam box. These are often used to transport fruits, vegetables, or seafood. Make sure the box is free from any harmful chemicals or contaminants. Avoid using boxes that have been used to store hazardous materials. The size of the box will depend on how much Bok Choy you want to grow. A larger box will allow you to grow more plants, but it will also require more soil and water.
How do I prepare the styrofoam box for planting?
First, thoroughly clean the box with soap and water to remove any dirt or debris. Then, drill drainage holes in the bottom of the box to prevent waterlogging. The number of drainage holes will depend on the size of the box. As a general rule, you should have at least four drainage holes per square foot. You can also line the inside of the box with a plastic bag to help retain moisture, but make sure to poke holes in the bag to allow for drainage.
What type of soil should I use for growing Bok Choy in a styrofoam box?
Use a well-draining potting mix that is rich in organic matter. Avoid using garden soil, as it can be too heavy and compact, which can hinder root growth. You can also amend the potting mix with compost or other organic materials to improve its fertility and drainage. A good potting mix should retain moisture but also allow excess water to drain away easily.
How often should I water my Bok Choy plants in a styrofoam box?
Water your Bok Choy plants regularly, especially during hot and dry weather. The frequency of watering will depend on the weather conditions and the type of soil you are using. As a general rule, you should water your plants when the top inch of soil feels dry to the touch. Avoid overwatering, as this can lead to root rot.
How much sunlight do Bok Choy plants need?
Bok Choy plants need at least 4-6 hours of sunlight per day. If you are growing your plants indoors, you may need to supplement with artificial light. Place your styrofoam box in a sunny location, such as a south-facing window or balcony. If you live in a hot climate, you may need to provide some shade during the hottest part of the day to prevent the leaves from scorching.
What are some common pests and diseases that affect Bok Choy plants?
Common pests that affect Bok Choy plants include aphids, cabbage worms, and flea beetles. You can control these pests by handpicking them off the plants, using insecticidal soap, or introducing beneficial insects like ladybugs. Common diseases that affect Bok Choy plants include downy mildew and clubroot. You can prevent these diseases by providing good air circulation, avoiding overwatering, and using disease-resistant varieties.
How do I harvest Bok Choy from my styrofoam box garden?
You can harvest Bok Choy when the leaves are about 6-8 inches long. Simply cut the leaves off at the base of the plant, leaving the central stem intact. This will allow the plant to continue producing new leaves. You can also harvest the entire plant at once by cutting it off at the base.
Can I grow other vegetables in a styrofoam box using this method?
Yes, you can grow other vegetables in a styrofoam box using this method. Some good options include lettuce, spinach, kale, radishes, and herbs. Just make sure to choose vegetables that are well-suited to growing in containers and that have similar growing requirements.
How long will my Bok Choy plants last in a styrofoam box?
Bok Choy is a cool-season crop that typically lasts for about 4-6 weeks. After that, the plants will start to bolt, which means they will produce flowers and become bitter. To extend the growing season, you can plant new seeds or seedlings every few weeks.
Is growing Bok Choy in a styrofoam box environmentally friendly?
Yes, growing Bok Choy in a styrofoam box is an environmentally friendly practice. By repurposing a styrofoam box, you are reducing waste and contributing to a more sustainable lifestyle. You are also minimizing your reliance on commercially grown produce, which often involves long-distance transportation and potentially harmful pesticides. Plus, you can control the growing environment and ensure that your vegetables are free from harmful chemicals. This DIY trick is a great way to reduce your carbon footprint and enjoy fresh, healthy food.

Leave a Comment