
Harvesting peanuts in small spaces might seem like an impossible dream, conjuring images of sprawling farms rather than cozy backyard gardens. But I’m here to tell you it’s absolutely achievable, and incredibly rewarding! Imagine the satisfaction of digging up your own homegrown peanuts, roasted to perfection and enjoyed with friends and family. It’s a taste of the South, right in your own backyard, no matter how petite your plot may be.
Peanuts, originally cultivated in South America thousands of years ago, have a rich history as a staple food and a symbol of resourcefulness. They’ve traveled the globe, becoming a beloved snack and a vital ingredient in cuisines worldwide. But you don’t need vast acres to participate in this agricultural legacy.
In today’s world, where space is often a premium, and the desire for fresh, homegrown food is growing, learning how to maximize your garden’s potential is essential. That’s why mastering the art of harvesting peanuts in small spaces is so valuable. This DIY guide will provide you with simple, effective tricks and hacks to successfully grow and harvest peanuts, even if you only have a balcony or a small raised bed. Get ready to enjoy the unique flavor and satisfaction of homegrown peanuts, proving that big flavor can come from small spaces!
Harvesting Peanuts in Small Spaces: A DIY Guide
Hey there, fellow gardeners! So, you’ve decided to grow peanuts in your small space garden? Awesome! It’s a rewarding experience, and trust me, nothing beats the taste of freshly harvested, homegrown peanuts. But when harvest time rolls around, it can feel a little daunting, especially if you’re working with limited space. Don’t worry, I’m here to guide you through the process. I’ve learned a few tricks over the years to make peanut harvesting manageable and even fun, even if you’re just growing them in containers or a small raised bed.
Knowing When to Harvest
Before we dive into the nitty-gritty, let’s talk about timing. Harvesting at the right time is crucial for getting the best flavor and yield.
* Check the Calendar: Peanut plants typically mature in 120-150 days from planting. Keep track of your planting date and start checking your plants around that time.
* Look at the Leaves: This is your biggest clue! When the leaves start to yellow and brown, it’s a good sign that the peanuts are maturing. Don’t panic if *some* leaves turn yellow; that’s normal. But when a significant portion of the plant looks like it’s fading, it’s time to investigate.
* Dig a Test Plant: This is the most reliable method. Gently dig up one plant and check the peanuts. The shells should be well-formed and the kernels inside should be plump and have a distinct peanut pattern. If the shells are thin and the kernels are small and pale, they’re not ready yet.
* Consider the Weather: If you’re expecting a hard frost, it’s best to harvest your peanuts, even if they’re not quite perfectly ripe. Frost can damage the peanuts and affect their flavor.
Tools You’ll Need
Gathering your tools beforehand will make the harvesting process much smoother. Here’s what I recommend:
* Garden Fork or Shovel: For loosening the soil and lifting the plants. A garden fork is often preferred as it’s less likely to damage the peanuts.
* Gloves: Protect your hands from dirt and potential irritants.
* Trowel: For digging around individual plants, especially if you’re harvesting from containers.
* Bucket or Tub: To collect the harvested plants.
* Hose with a Gentle Spray Nozzle: For washing the peanuts.
* Wire Mesh or Drying Rack: For curing the peanuts.
* Scissors or Pruning Shears: For trimming excess roots and stems (optional).
Harvesting Peanuts: Step-by-Step
Alright, let’s get our hands dirty! Here’s how I harvest my peanuts in my small garden:
1. Loosen the Soil: Using your garden fork or shovel, carefully loosen the soil around the peanut plants. Be gentle! You don’t want to damage the peanuts. Insert the fork a few inches away from the base of the plant and gently lift upwards. Repeat this around the entire plant.
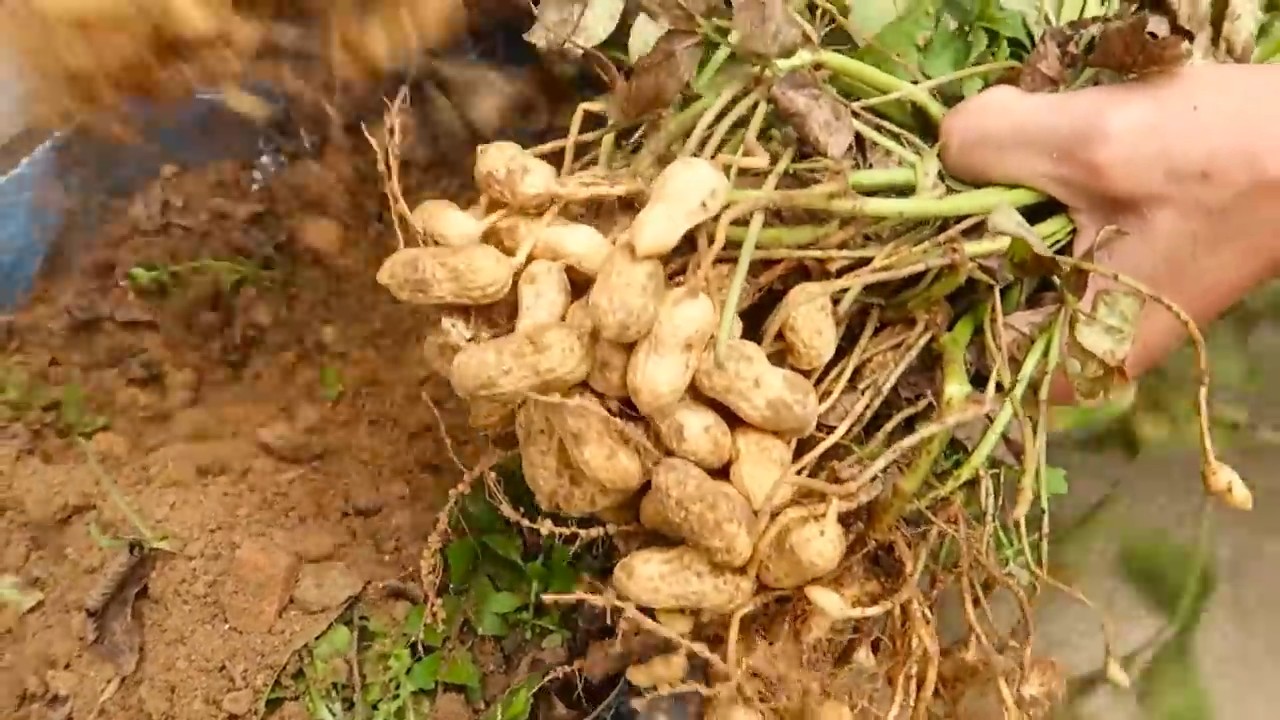
2. Lift the Plants: Once the soil is loosened, gently grasp the base of the plant and lift it out of the ground. You might need to wiggle it a bit to free the peanuts from the soil. Try to get as many peanuts as possible attached to the roots.
3. Shake Off Excess Soil: Give the plant a good shake to remove as much loose soil as possible. This will make washing them easier later.
4. Inspect Your Harvest: Take a look at your peanut bounty! Admire your hard work and check for any damaged or diseased peanuts. Discard any that look rotten or moldy.
5. Washing the Peanuts: This is a crucial step! You need to remove all the soil from the peanuts to prevent mold and ensure proper curing. Use your hose with a gentle spray nozzle to wash the peanuts thoroughly. I like to use a bucket of water and swish the plants around to loosen the dirt, then rinse them with the hose. Be patient and make sure you get all the nooks and crannies.
6. Drying the Plants: Now, it’s time to dry the peanut plants. There are a couple of ways to do this:
* Hanging Method: This is my preferred method, especially if you have limited space. Hang the entire plant upside down in a well-ventilated area, such as a garage, shed, or covered porch. You can use twine or wire to tie the plants together and hang them from a rafter or hook. Make sure the plants are not touching each other to allow for good air circulation.
* Rack Method: If you don’t have a place to hang the plants, you can spread them out on a wire mesh or drying rack. Again, make sure the plants are not overcrowded and that there’s good air circulation.
7. Curing the Peanuts: This is the most important step for developing the flavor of your peanuts. The curing process typically takes 2-4 weeks. The peanuts are properly cured when the shells are dry and brittle, and the kernels rattle inside. Check the peanuts regularly for mold or spoilage. If you find any, remove them immediately to prevent them from affecting the rest of your harvest.
8. Separating the Peanuts (Optional): Once the peanuts are cured, you can separate them from the plants. This is optional, but it makes them easier to store. Simply pull the peanuts off the roots. You can also leave them attached to the plants if you prefer.
9. Storing Your Peanuts: Store your cured peanuts in a cool, dry place in an airtight container. They can be stored in the shell for several months. You can also freeze them for longer storage.
Harvesting Peanuts from Containers
Growing peanuts in containers is a great option for small spaces. The harvesting process is similar to harvesting from the ground, but there are a few key differences:
1. Water Thoroughly: Before harvesting, water the container thoroughly. This will help loosen the soil and make it easier to remove the plants.
2. Gently Tip the Container: Carefully tip the container on its side and gently pull the plant out. You might need to use a trowel to loosen the soil around the edges of the container.
3. Follow the Remaining Steps: Once you’ve removed the plant from the container, follow the same steps as above for washing, drying, curing, and storing the peanuts.
Troubleshooting
Sometimes, things don’t go exactly as planned. Here are a few common issues you might encounter and how to deal with them:
* Peanuts are Small: This could be due to several factors, such as poor soil, insufficient watering, or harvesting too early. Make sure your soil is well-drained and rich in nutrients. Water regularly, especially during dry periods. And be patient! Wait until the plants are fully mature before harvesting.
* Peanuts are Moldy: Mold is usually caused by improper washing or curing. Make sure you wash the peanuts thoroughly to remove all the soil. Provide good air circulation during the curing process.
* Pests and Diseases: Keep an eye out for pests and diseases that can affect peanut plants. Common pests include aphids, spider mites, and leafhoppers. Common diseases include leaf spot and root rot. Treat any infestations or infections promptly to prevent them from damaging your harvest.
Enjoying Your Homegrown Peanuts
Congratulations! You’ve successfully harvested your own peanuts. Now, it’s time to enjoy the fruits (or rather, nuts) of your labor. Here are a few ways to enjoy your homegrown peanuts:
* Roasting: Roasting peanuts is a classic way to enjoy them. Simply spread them out on a baking sheet and roast them in a preheated oven at 350°F (175°C) for 15-20 minutes, or until they’re golden brown and fragrant.
* Boiling: Boiled peanuts are a Southern delicacy. Boil the peanuts in salted water for several hours, or until they’re soft and tender.
* Peanut Butter: Make your own homemade peanut butter! Simply grind roasted peanuts in a food processor until smooth. Add a pinch of salt and a drizzle of honey or maple syrup for extra flavor.
* Snacking: Of course, you can always just eat them straight out of the shell!
Growing and harvesting peanuts in a small space is totally doable, and it’s incredibly rewarding. With a little patience and effort, you can enjoy the delicious taste of homegrown peanuts all season long. Happy gardening!
Conclusion
So, there you have it! Harvesting peanuts in small spaces doesn’t have to be a daunting task. By following these simple steps and adapting them to your specific growing environment, you can enjoy the satisfaction of reaping the rewards of your peanut-growing efforts, even without acres of farmland. This DIY trick is a must-try for any urban gardener or small-space enthusiast looking to add a unique and rewarding crop to their repertoire.
Why is this method so compelling? It’s all about accessibility and control. You’re not relying on large machinery or extensive land. You’re directly involved in every stage, from planting to harvesting, fostering a deeper connection with your food and the natural world. Plus, the taste of freshly harvested, homegrown peanuts is simply unparalleled – a flavor experience you won’t find in any store-bought variety.
Don’t be afraid to experiment! Consider these variations to personalize your peanut harvesting experience:
* **Container Gardening Variations:** If you’re growing in containers, try using different types of containers to see which provides the best drainage and root development. Fabric pots, for example, can promote air pruning, leading to healthier root systems.
* **Timing Adjustments:** Monitor the weather closely. If you anticipate an early frost, you might need to harvest your peanuts a bit earlier than planned. Conversely, if you’re experiencing an unusually warm autumn, you might be able to extend the growing season slightly.
* **Soil Amendments:** While the guide emphasizes well-draining soil, consider adding specific amendments based on your soil’s composition. For example, if your soil is heavy clay, incorporate more organic matter like compost or aged manure to improve drainage and aeration.
* **Roasting Techniques:** Once you’ve harvested your peanuts, experiment with different roasting methods. Try oven roasting, pan roasting, or even air frying to find your preferred flavor and texture. Add spices like chili powder, smoked paprika, or sea salt for an extra kick.
This DIY peanut harvesting method empowers you to take control of your food source and enjoy the unique flavor of homegrown peanuts, regardless of your space constraints. It’s a rewarding project that connects you with nature and provides a delicious and nutritious snack.
We wholeheartedly encourage you to give this DIY trick a try. It’s easier than you might think, and the results are well worth the effort. And most importantly, we want to hear about your experience! Share your photos, tips, and challenges in the comments below. Let’s build a community of small-space peanut growers and learn from each other’s successes and failures. Your insights could help others discover the joy of harvesting peanuts in their own backyards or balconies. So, get planting, get harvesting, and get sharing! Let’s spread the peanut-growing love!
Frequently Asked Questions (FAQ)
What is the best time to harvest my peanuts?
The ideal time to harvest peanuts is typically in the late summer or early fall, about 120-150 days after planting. A key indicator is when the foliage begins to yellow and the plant starts to look a bit tired. You can also dig up a test plant to check the maturity of the peanuts. The shells should be well-formed and the kernels inside should be plump and have a distinct peanut flavor. Don’t wait too long, as the peanuts can start to sprout or rot in the ground if left unharvested.
How do I know if my peanuts are ready to harvest?
Besides the yellowing foliage, there are a few other telltale signs. The veins on the peanut shells should be prominent and dark. The inside of the shell should also be dark in color. If the shells are still white or light-colored, the peanuts are not yet mature. As mentioned before, digging up a test plant is the most reliable way to determine readiness.
What if I harvest my peanuts too early?
If you harvest your peanuts too early, the kernels will be small, underdeveloped, and lack the characteristic peanut flavor. They may also be difficult to roast properly. It’s always better to err on the side of waiting a bit longer to ensure optimal maturity.
What if I harvest my peanuts too late?
Harvesting too late can also be problematic. The peanuts can become susceptible to rot, especially in wet conditions. They may also start to sprout in the ground, which will affect their flavor and texture. Additionally, the shells can become brittle and break easily during harvesting.
How do I cure my peanuts after harvesting?
Curing is an essential step in preserving your harvested peanuts. To cure them, gently remove any excess soil from the peanuts and spread them out in a single layer on a wire mesh or screen in a well-ventilated area. Avoid direct sunlight, as this can cause the peanuts to dry out too quickly. Allow the peanuts to cure for 2-4 weeks, or until the shells are completely dry and brittle. You can test for dryness by shaking a handful of peanuts – if they rattle inside the shells, they are likely cured.
Can I eat peanuts straight from the ground?
While technically you *can* eat peanuts straight from the ground, it’s not recommended. Freshly harvested peanuts are very moist and don’t have the characteristic roasted peanut flavor. They also need to be cured to prevent mold growth and ensure proper storage. Curing and roasting significantly improve the flavor and texture of peanuts.
How do I store my cured peanuts?
Once your peanuts are fully cured, store them in an airtight container in a cool, dry, and dark place. Properly cured and stored peanuts can last for several months. You can also freeze peanuts for longer storage.
What if it rains while my peanuts are curing?
If it rains while your peanuts are curing, bring them indoors to a well-ventilated area to prevent them from getting too wet. Excess moisture can lead to mold growth and spoilage. Make sure the peanuts are spread out in a single layer to allow for proper air circulation.
Can I roast my peanuts in the oven?
Yes, oven roasting is a popular and easy way to roast peanuts. Preheat your oven to 350°F (175°C). Spread the cured peanuts in a single layer on a baking sheet and roast for 20-30 minutes, or until they are golden brown and have a roasted peanut aroma. Stir the peanuts occasionally to ensure even roasting. Let them cool completely before storing.
What are some other ways to roast peanuts?
Besides oven roasting, you can also roast peanuts in a skillet on the stovetop or in an air fryer. Skillet roasting involves heating the peanuts in a dry skillet over medium heat, stirring constantly until they are roasted to your liking. Air frying involves placing the peanuts in the air fryer basket and cooking them at 350°F (175°C) for 10-15 minutes, shaking the basket occasionally.
My peanut plants didn’t produce any peanuts. What could be the reason?
There are several reasons why your peanut plants might not have produced peanuts. These include:
* **Poor Soil:** Peanuts need well-draining soil that is rich in organic matter.
* **Insufficient Sunlight:** Peanuts require at least 6-8 hours of direct sunlight per day.
* **Lack of Water:** Peanuts need consistent moisture, especially during flowering and pod development.
* **Nutrient Deficiencies:** Peanuts need adequate levels of phosphorus and potassium.
* **Pests and Diseases:** Pests like aphids and diseases like leaf spot can affect peanut production.
* **Incorrect Planting Depth:** Planting peanuts too deep or too shallow can affect germination and growth.
* **Poor Pollination:** While peanuts are self-pollinating, strong winds or heavy rain can interfere with pollination.
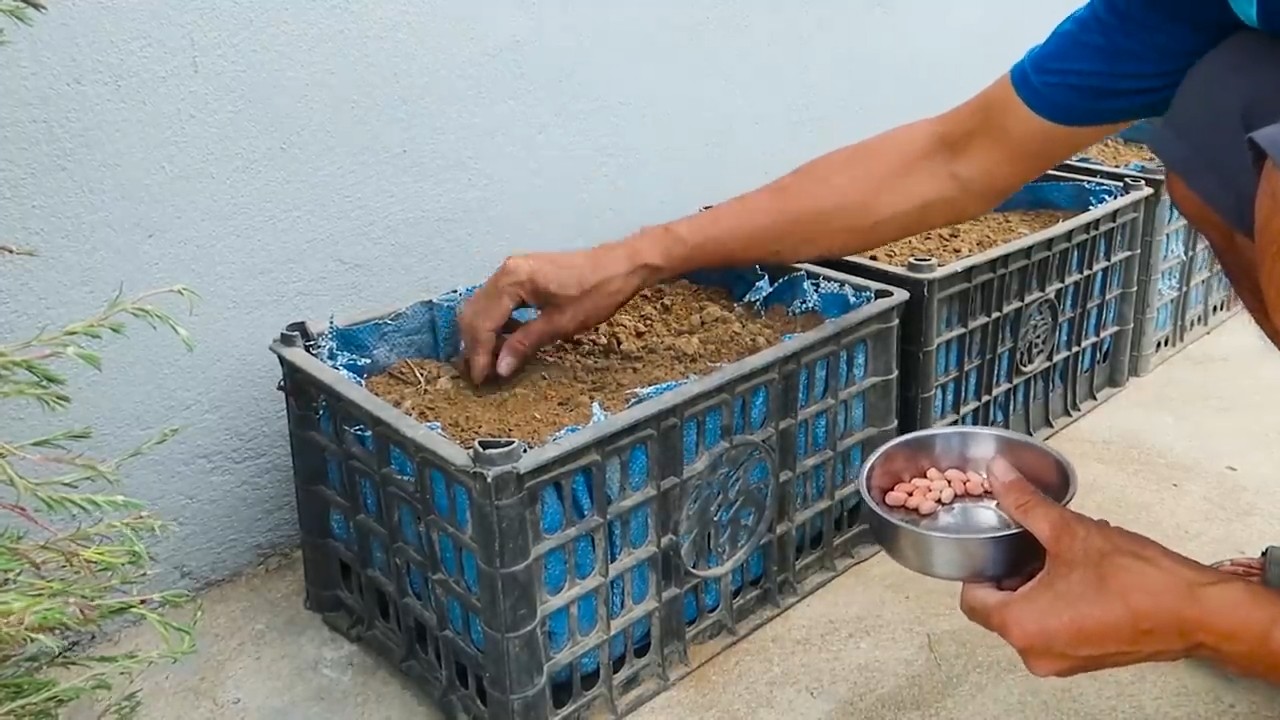
Can I grow peanuts in containers?
Yes, peanuts can be successfully grown in containers, making this DIY trick even more accessible. Choose a large container (at least 18 inches in diameter and 12 inches deep) with good drainage. Use a well-draining potting mix and provide adequate sunlight and water.
What type of peanuts are best for small spaces?
Virginia peanuts are a good choice for small spaces as they tend to be more compact than other varieties. Valencia peanuts are another option, known for their sweet flavor and multiple peanuts per pod.
How often should I water my peanut plants?
Water your peanut plants regularly, especially during dry periods. Aim to keep the soil consistently moist but not waterlogged. Water deeply whenever the top inch of soil feels dry to the touch.
Do peanut plants need fertilizer?
Peanut plants benefit from fertilization, especially with phosphorus and potassium. Avoid excessive nitrogen, as it can promote foliage growth at the expense of peanut production. Use a fertilizer specifically formulated for legumes or a balanced fertilizer with a lower nitrogen content.
Are peanut plants susceptible to pests and diseases?
Yes, peanut plants can be susceptible to pests and diseases. Common pests include aphids, spider mites, and leafhoppers. Common diseases include leaf spot, white mold, and root rot. Monitor your plants regularly and take appropriate measures to control pests and diseases.
How can I prevent pests and diseases on my peanut plants?
To prevent pests and diseases, practice good gardening hygiene. This includes removing weeds and debris from around your plants, providing adequate air circulation, and avoiding overwatering. You can also use organic pest control methods like insecticidal
Leave a Comment