
Grow bell peppers at home, even if you think you don’t have a green thumb! Have you ever dreamt of plucking a vibrant, juicy bell pepper straight from your own garden, ready to add a burst of flavor to your next meal? It’s more achievable than you think, and this DIY guide is your secret weapon to making that dream a reality.
Bell peppers have a rich history, originating in South America and spreading throughout the world thanks to their adaptability and delicious taste. For centuries, they’ve been a staple in countless cuisines, adding color and vital nutrients to our diets. But beyond their culinary appeal, there’s something deeply satisfying about nurturing a plant from seed to harvest, connecting us to the natural world in a tangible way.
Let’s face it, store-bought bell peppers can sometimes be bland and expensive. But when you grow bell peppers at home, you control the quality, ensuring they’re bursting with flavor and packed with vitamins. Plus, gardening is a fantastic stress reliever! This DIY article will provide you with simple, effective tricks and hacks to cultivate thriving bell pepper plants, even if you’re short on space or experience. I’m excited to share my favorite tips and tricks with you, so let’s get started!
Growing Bell Peppers at Home: A DIY Guide for Beginners
Hey there, fellow gardening enthusiasts! I’m so excited to share my tried-and-true method for growing vibrant, delicious bell peppers right in your own backyard (or even on your balcony!). Forget those bland, overpriced peppers from the grocery store – with a little patience and these simple steps, you’ll be harvesting your own colorful bounty in no time.
What You’ll Need: The Essential Supplies
Before we dive in, let’s gather our supplies. Having everything on hand will make the process smooth and enjoyable.
* **Bell Pepper Seeds or Seedlings:** You can start from seeds for more variety, or purchase seedlings for a quicker harvest. I personally love starting from seed, it’s so rewarding!
* **Seed Starting Trays or Small Pots (if starting from seed):** These are crucial for nurturing your seedlings before transplanting.
* **Seed Starting Mix (if starting from seed):** This is a light, sterile mix specifically designed for delicate seedlings.
* **Potting Soil:** A well-draining potting mix is essential for healthy pepper plants.
* **Gardening Gloves:** Protect your hands from dirt and potential irritants.
* **Watering Can or Hose:** For gentle and consistent watering.
* **Fertilizer:** A balanced fertilizer or one specifically formulated for vegetables.
* **Plant Markers:** To keep track of your different pepper varieties.
* **Trowel or Small Shovel:** For transplanting.
* **Stakes or Cages (optional):** To support your plants as they grow and prevent them from toppling over. I highly recommend these, especially for larger varieties.
* **Sunlight:** Bell peppers need at least 6-8 hours of direct sunlight per day.
* **Patience:** Growing anything takes time and care!
Starting from Seed: Nurturing Your Little Peppers
If you’re feeling adventurous (and I hope you are!), starting from seed is a fantastic way to grow a wider variety of bell peppers. Here’s how I do it:
1. **Sowing the Seeds:** Fill your seed starting trays or small pots with seed starting mix. Moisten the mix thoroughly, but don’t let it get soggy. Sow the seeds about ¼ inch deep, placing 2-3 seeds per cell or pot. Gently cover the seeds with more mix.
2. **Creating a Warm and Humid Environment:** Bell pepper seeds need warmth to germinate. I like to cover the trays with a clear plastic dome or plastic wrap to create a mini-greenhouse effect. This helps retain moisture and warmth. Place the trays in a warm location, ideally between 70-80°F (21-27°C). A heat mat can be helpful if your home is cooler.
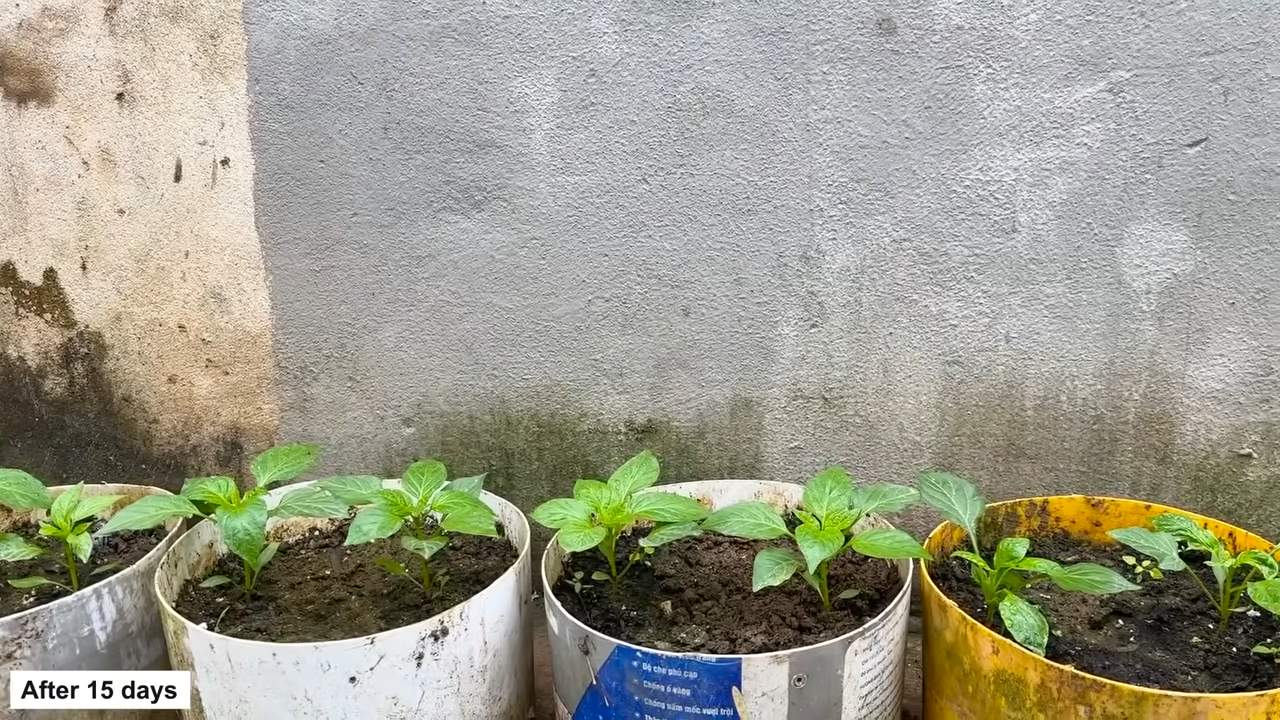
3. **Germination Time:** Be patient! Bell pepper seeds can take anywhere from 7-21 days to germinate. Keep the soil consistently moist, but not waterlogged. Remove the plastic cover once the seedlings emerge.
4. **Providing Light:** Once the seedlings sprout, they need plenty of light to grow strong and healthy. Place them under grow lights or in a very sunny window. If using a window, rotate the trays regularly to prevent the seedlings from leaning towards the light.
5. **Thinning the Seedlings:** Once the seedlings have their first true leaves (the second set of leaves that appear after the initial seed leaves), thin them out by snipping off the weaker seedlings at the soil line, leaving only the strongest seedling in each cell or pot. This gives the remaining seedling room to grow.
6. **Hardening Off:** Before transplanting your seedlings outdoors, you need to “harden them off.” This process gradually acclimates them to the outdoor environment. Start by placing the trays outdoors in a sheltered location for an hour or two each day, gradually increasing the amount of time they spend outside over the course of a week or two. This will help them adjust to the sun, wind, and temperature changes.
Transplanting Your Bell Pepper Plants: Giving Them a Home
Whether you started from seed or purchased seedlings, transplanting is a crucial step. Here’s how to do it right:
1. **Choosing the Right Location:** Bell peppers thrive in a sunny location with well-draining soil. Choose a spot that receives at least 6-8 hours of direct sunlight per day.
2. **Preparing the Soil:** Amend the soil with compost or other organic matter to improve drainage and fertility. Bell peppers prefer slightly acidic soil with a pH of 6.0-6.8.
3. **Spacing the Plants:** Space the plants about 18-24 inches apart. This allows them plenty of room to grow and prevents overcrowding.
4. **Digging the Holes:** Dig holes that are slightly larger than the root balls of your seedlings.
5. **Carefully Removing the Seedlings:** Gently remove the seedlings from their trays or pots, being careful not to damage the roots. If the roots are tightly bound, gently loosen them with your fingers.
6. **Planting the Seedlings:** Place the seedlings in the holes and backfill with soil. Gently firm the soil around the base of the plants.
7. **Watering Thoroughly:** Water the plants thoroughly after transplanting. This helps settle the soil and encourages root growth.
8. **Adding Support (Optional but Recommended):** Install stakes or cages around your plants to provide support as they grow. This will prevent them from toppling over, especially when they are laden with peppers.
Caring for Your Bell Pepper Plants: Ensuring a Bountiful Harvest
Once your bell pepper plants are in the ground, it’s time to provide them with the care they need to thrive.
1. **Watering:** Water your bell pepper plants regularly, especially during hot, dry weather. Aim to keep the soil consistently moist, but not waterlogged. Water deeply at the base of the plants, avoiding wetting the foliage, which can lead to fungal diseases. I usually water deeply 2-3 times a week, depending on the weather.
2. **Fertilizing:** Feed your bell pepper plants regularly with a balanced fertilizer or one specifically formulated for vegetables. Follow the instructions on the fertilizer package. I like to fertilize every 2-3 weeks during the growing season.
3. **Mulching:** Apply a layer of mulch around the base of the plants to help retain moisture, suppress weeds, and regulate soil temperature. Organic mulches like straw, wood chips, or shredded leaves are excellent choices.
4. **Pruning (Optional):** Pruning bell pepper plants can help improve air circulation and encourage fruit production. Remove any suckers (small shoots that grow from the base of the plant) and any yellowing or diseased leaves.
5. **Pest and Disease Control:** Keep an eye out for pests and diseases. Common pests that affect bell peppers include aphids, flea beetles, and tomato hornworms. Common diseases include blossom end rot, fungal leaf spots, and viral diseases. Treat any problems promptly with appropriate organic or chemical controls. I prefer to use organic methods whenever possible.
* Aphids: These tiny insects can suck the sap from your plants. You can control them with a strong spray of water or by introducing beneficial insects like ladybugs.
* Flea Beetles: These small, jumping beetles can chew holes in the leaves of your plants. You can control them with row covers or by using insecticidal soap.
* Tomato Hornworms: These large caterpillars can quickly defoliate your plants. Handpick them off the plants and dispose of them.
* Blossom End Rot: This condition is caused by a calcium deficiency and results in dark, sunken spots on the bottom of the peppers. Prevent it by ensuring that your soil is well-drained and by adding calcium to the soil.
* Fungal Leaf Spots: These diseases can cause spots on the leaves of your plants. Prevent them by providing good air circulation and by avoiding wetting the foliage when watering.
* Viral Diseases: These diseases can cause stunted growth and distorted leaves. Prevent them by controlling pests that can transmit the viruses.
Harvesting Your Bell Peppers: The Sweet Reward
The moment you’ve been waiting for! Harvesting your own homegrown bell peppers is incredibly satisfying.
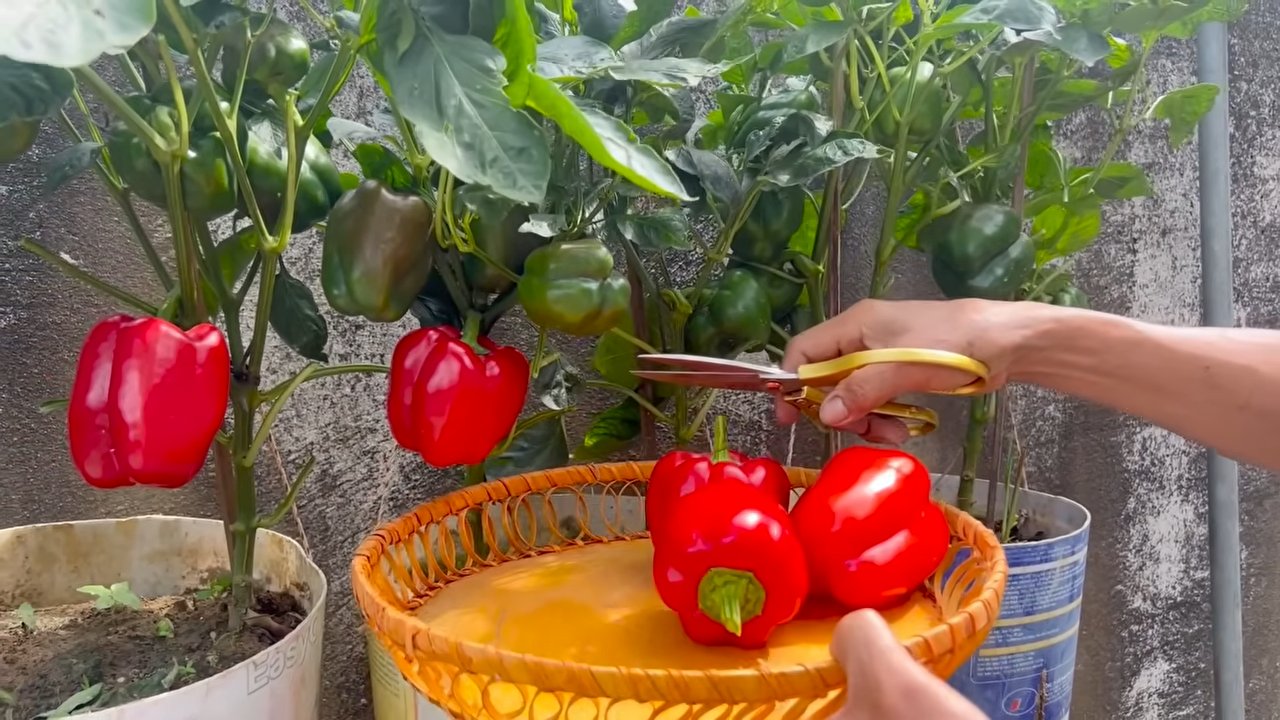
1. **When to Harvest:** Bell peppers are typically ready to harvest 60-90 days after transplanting, depending on the variety. They can be harvested at any stage of maturity, but they are sweetest and most flavorful when they are fully colored (green, red, yellow, orange, or purple, depending on the variety).
2. **How to Harvest:** Use a sharp knife or pruning shears to cut the peppers from the plant, leaving a short stem attached.
3. **Storing Your Harvest:** Store your bell peppers in the refrigerator for up to a week.
Troubleshooting: Common Problems and Solutions
Even with the best care, you might encounter some challenges along the way. Here are a few common problems and how to address them:
* **Lack of Fruit:** If your bell pepper plants are not producing fruit, it could be due to a lack of pollination, insufficient sunlight, or nutrient deficiencies. Hand-
Conclusion
So, there you have it! Growing bell peppers at home isn’t just a gardening project; it’s an investment in fresh, flavorful, and vibrant produce right at your fingertips. We’ve explored the simple yet effective methods to cultivate these colorful vegetables, from seed to harvest, ensuring you have a constant supply of garden-fresh goodness.
Why is this DIY trick a must-try? Because it empowers you to control the quality of your food, reduce your carbon footprint by minimizing transportation, and experience the sheer joy of nurturing life from a tiny seed. Store-bought bell peppers simply can’t compare to the taste and satisfaction of those you’ve grown yourself. Plus, it’s a fantastic way to get your hands dirty (literally!) and connect with nature.
But the adventure doesn’t stop here! Feel free to experiment with different varieties of bell peppers. Try growing the classic green bell peppers, or venture into the sweeter world of red, yellow, and orange varieties. For those who like a little heat, consider cultivating poblano peppers, which are technically a mild bell pepper. You can also explore different growing mediums, such as hydroponics, for a unique and space-saving approach.
Another variation to consider is companion planting. Basil, for example, is known to deter pests and improve the flavor of bell peppers. Marigolds are also excellent companions, attracting beneficial insects that prey on harmful ones. Experiment with different combinations to find what works best for your garden.
Don’t be afraid to get creative with your growing setup. If you have limited space, consider growing bell peppers in containers on your balcony or patio. Vertical gardening is another great option for maximizing space. Just ensure your plants receive adequate sunlight and are properly watered.
Growing bell peppers at home is a rewarding experience that offers numerous benefits. From the satisfaction of harvesting your own produce to the health benefits of eating fresh, homegrown vegetables, it’s a project that’s well worth the effort.
We encourage you to take the plunge and try this DIY trick for yourself. Start small, learn as you go, and don’t be discouraged by setbacks. Gardening is a journey, and every mistake is an opportunity to learn and improve.
Once you’ve harvested your first batch of homegrown bell peppers, we’d love to hear about your experience! Share your photos, tips, and challenges in the comments below. Let’s create a community of bell pepper enthusiasts and inspire others to embrace the joys of gardening. Happy growing!
Frequently Asked Questions (FAQ)
1. What is the best time to start growing bell peppers from seed?
The best time to start growing bell peppers from seed depends on your climate. In general, you should start seeds indoors 6-8 weeks before the last expected frost. This allows the seedlings to develop a strong root system before being transplanted outdoors. If you live in a warmer climate with a longer growing season, you can start seeds directly in the ground after the last frost. However, starting indoors provides a head start and ensures a higher success rate. Check your local weather forecasts and gardening resources to determine the optimal timing for your region.
2. How much sunlight do bell peppers need?
Bell peppers thrive in full sunlight, requiring at least 6-8 hours of direct sunlight per day. Insufficient sunlight can lead to leggy growth, reduced fruit production, and smaller, less flavorful peppers. Choose a location in your garden that receives ample sunlight throughout the day. If you’re growing bell peppers in containers, make sure to place them in a sunny spot. If you live in a particularly hot climate, providing some afternoon shade can help prevent the plants from overheating.
3. What type of soil is best for growing bell peppers?
Bell peppers prefer well-draining, fertile soil with a slightly acidic to neutral pH (6.0-7.0). Amend your soil with compost or other organic matter to improve drainage, fertility, and water retention. Avoid heavy clay soils, as they can become waterlogged and suffocate the roots. If you’re growing bell peppers in containers, use a high-quality potting mix specifically formulated for vegetables. Regular soil testing can help you determine the pH and nutrient levels of your soil, allowing you to make necessary adjustments.
4. How often should I water my bell pepper plants?
Water bell pepper plants deeply and regularly, especially during hot, dry weather. Aim to keep the soil consistently moist but not waterlogged. Water at the base of the plants to avoid wetting the foliage, which can increase the risk of fungal diseases. Mulching around the plants can help retain moisture and suppress weeds. Check the soil moisture regularly by sticking your finger into the soil. If the top inch feels dry, it’s time to water.
5. What are some common pests and diseases that affect bell peppers?
Bell peppers are susceptible to various pests and diseases, including aphids, spider mites, whiteflies, blossom-end rot, and fungal diseases. Regularly inspect your plants for signs of infestation or disease. Use organic pest control methods, such as insecticidal soap or neem oil, to control pests. Ensure good air circulation around the plants to prevent fungal diseases. Blossom-end rot is caused by calcium deficiency and can be prevented by ensuring adequate calcium levels in the soil and consistent watering.
6. How do I prevent blossom-end rot in bell peppers?
Blossom-end rot, a common problem in bell peppers, is caused by a calcium deficiency in the developing fruit. This can be due to insufficient calcium in the soil, inconsistent watering, or poor calcium uptake by the plant. To prevent blossom-end rot, amend your soil with calcium-rich amendments like bone meal or crushed eggshells before planting. Ensure consistent watering to help the plant absorb calcium effectively. Avoid over-fertilizing with nitrogen, as this can interfere with calcium uptake. Foliar sprays containing calcium can also be used to supplement calcium levels.
7. When are bell peppers ready to harvest?
Bell peppers are typically ready to harvest 60-90 days after transplanting, depending on the variety. The peppers should be firm, smooth, and have a vibrant color. You can harvest green bell peppers when they reach their mature size, or you can wait for them to ripen to red, yellow, or orange for a sweeter flavor. Use pruning shears or a sharp knife to cut the peppers from the plant, leaving a small stem attached. Regular harvesting encourages the plant to produce more peppers.
8. Can I grow bell peppers in containers?
Yes, bell peppers can be successfully grown in containers. Choose a container that is at least 12 inches in diameter and depth to provide adequate space for the roots. Use a high-quality potting mix specifically formulated for vegetables. Ensure the container has drainage holes to prevent waterlogging. Place the container in a sunny location that receives at least 6-8 hours of direct sunlight per day. Water regularly and fertilize with a balanced fertilizer every 2-3 weeks.
9. How do I fertilize my bell pepper plants?
Bell peppers benefit from regular fertilization to support healthy growth and abundant fruit production. Use a balanced fertilizer with equal amounts of nitrogen, phosphorus, and potassium (e.g., 10-10-10) at planting time. Once the plants start to flower, switch to a fertilizer with a higher phosphorus content to promote fruit development. Follow the instructions on the fertilizer label for application rates. Avoid over-fertilizing, as this can lead to excessive foliage growth and reduced fruit production.
10. What are some good companion plants for bell peppers?
Companion planting can benefit bell peppers by attracting beneficial insects, deterring pests, and improving soil health. Some good companion plants for bell peppers include basil, marigolds, carrots, onions, and garlic. Basil repels aphids and other pests, while marigolds attract beneficial insects that prey on harmful ones. Carrots and onions can help deter soil-borne pests. Avoid planting bell peppers near fennel, as it can inhibit their growth.

Leave a Comment