
Potato growing container gardening is taking the gardening world by storm, and for good reason! Imagine harvesting a bounty of fresh, homegrown potatoes right from your patio or balcony. No sprawling garden needed! But before you rush out to buy acres of land, let me tell you about a simple, space-saving solution that will have you enjoying delicious, homegrown spuds in no time.
The concept of container gardening, including using a potato growing container, has been around for centuries. From the hanging gardens of Babylon to the resourceful window boxes of Victorian England, people have always found ways to cultivate plants in limited spaces. Potatoes, in particular, have a rich history, originating in the Andes Mountains and becoming a staple food around the globe. Now, we’re bringing them home in a whole new way!
Why should you try this DIY trick? Well, for starters, it’s incredibly rewarding to nurture a plant from seed (or in this case, a seed potato) to harvest. Plus, growing your own potatoes means you know exactly what’s going into them – no harmful pesticides or mystery ingredients. And let’s be honest, store-bought potatoes just can’t compare to the taste of freshly dug, homegrown ones. So, if you’re short on space, eager to try a fun and easy gardening project, and crave the taste of truly fresh potatoes, then this DIY guide is for you. Let’s get growing!

DIY Potato Growing Container: From Spud to Spudtacular Harvest!
Hey there, fellow garden enthusiasts! I’m so excited to share this super easy and rewarding DIY project with you: building your own potato growing container. Forget digging up your whole garden – this method is perfect for small spaces, patios, or even balconies. Plus, it’s a fantastic way to get the kids involved in gardening! Get ready to enjoy fresh, homegrown potatoes with minimal effort.
What You’ll Need: The Potato Powerhouse Ingredients
Before we dive in, let’s gather our supplies. This is a pretty straightforward project, so you probably have a lot of these items lying around already.
* A Large Container: This is the heart of our potato-growing operation. I recommend a container that’s at least 2 feet in diameter and 2 feet tall. A plastic trash can (new, of course!), a large storage tote, or even a repurposed barrel will work perfectly. Just make sure it’s sturdy enough to hold a good amount of soil.
* Potting Soil: This is crucial! Don’t use garden soil directly from your yard; it’s often too dense and doesn’t drain well. Opt for a high-quality potting mix that’s light, airy, and well-draining. I usually go for a mix specifically formulated for vegetables.
* Seed Potatoes: These aren’t seeds in the traditional sense; they’re actually small potatoes that have “eyes” (those little bumps) from which new sprouts will grow. You can buy seed potatoes at your local garden center or online. Choose a variety you love to eat!
* Optional: Straw or Mulch: This helps retain moisture, suppress weeds, and keep the soil cool.
* Drill (with a large drill bit): For drainage holes.
* Watering Can or Hose: To keep your potatoes happy and hydrated.
* Fertilizer (Optional): A balanced, slow-release fertilizer can give your potatoes an extra boost.
Step-by-Step: Building Your Potato Paradise
Okay, let’s get our hands dirty! Here’s how to build your potato growing container:
1. Drill Drainage Holes: This is super important! Potatoes don’t like soggy feet. Drill several large drainage holes (about ½ inch in diameter) in the bottom of your container. I usually aim for at least 6-8 holes, evenly spaced.
2. Add the First Layer of Soil: Pour a layer of potting soil into the bottom of your container, about 4-6 inches deep. This will be the initial home for your seed potatoes.
3. Prepare Your Seed Potatoes: If your seed potatoes are large (bigger than an egg), you can cut them into smaller pieces, making sure each piece has at least one or two “eyes.” Let the cut pieces sit for a day or two to callous over before planting. This helps prevent rot. If they are small, you can plant them whole.
4. Plant the Seed Potatoes: Place your seed potatoes on top of the soil layer, spacing them about 8-10 inches apart. If you’re using cut pieces, make sure the “eyes” are facing upwards.
5. Cover with Soil: Cover the seed potatoes with another 4-6 inches of potting soil. Gently pat the soil down.
6. Water Thoroughly: Give your newly planted potatoes a good watering. Make sure the soil is evenly moist, but not waterlogged.
7. Place in a Sunny Location: Potatoes need plenty of sunlight to thrive. Choose a spot that gets at least 6-8 hours of direct sunlight per day.
The Waiting Game: Nurturing Your Potato Plants
Now comes the slightly less exciting part: waiting! But don’t worry, you’ll see sprouts emerging in a week or two. Here’s what to do in the meantime:
* Water Regularly: Keep the soil consistently moist, but avoid overwatering. Check the soil moisture by sticking your finger in a couple of inches. If it feels dry, it’s time to water.
* Watch for Sprouts: Once the sprouts emerge, they’ll start growing quickly. This is where the “hilling” process comes in.
Hilling: The Secret to a Bountiful Harvest
Hilling is the key to maximizing your potato yield. As the potato plants grow, you’ll gradually add more soil to the container, burying the stems. This encourages the plants to produce more potatoes along the buried stems.
1. Wait for the Sprouts to Grow: Let the sprouts grow to about 6-8 inches tall.
2. Add More Soil: Add another 4-6 inches of potting soil to the container, burying the stems up to their top leaves.
3. Repeat the Process: Continue adding soil every few weeks as the plants grow, until you reach the top of the container.
4. Optional: Add Straw or Mulch: Once you’ve finished hilling, you can add a layer of straw or mulch to the top of the container. This will help retain moisture, suppress weeds, and keep the soil cool.
Fertilizing (Optional): Giving Your Potatoes a Boost
While not strictly necessary, fertilizing can help your potatoes grow bigger and stronger.
* Choose a Balanced Fertilizer: Look for a fertilizer with a balanced NPK ratio (nitrogen, phosphorus, and potassium). A 10-10-10 or 14-14-14 fertilizer will work well.
* Follow the Instructions: Apply the fertilizer according to the instructions on the package.
* Fertilize Sparingly: Don’t over-fertilize, as this can lead to excessive foliage growth at the expense of potato production.
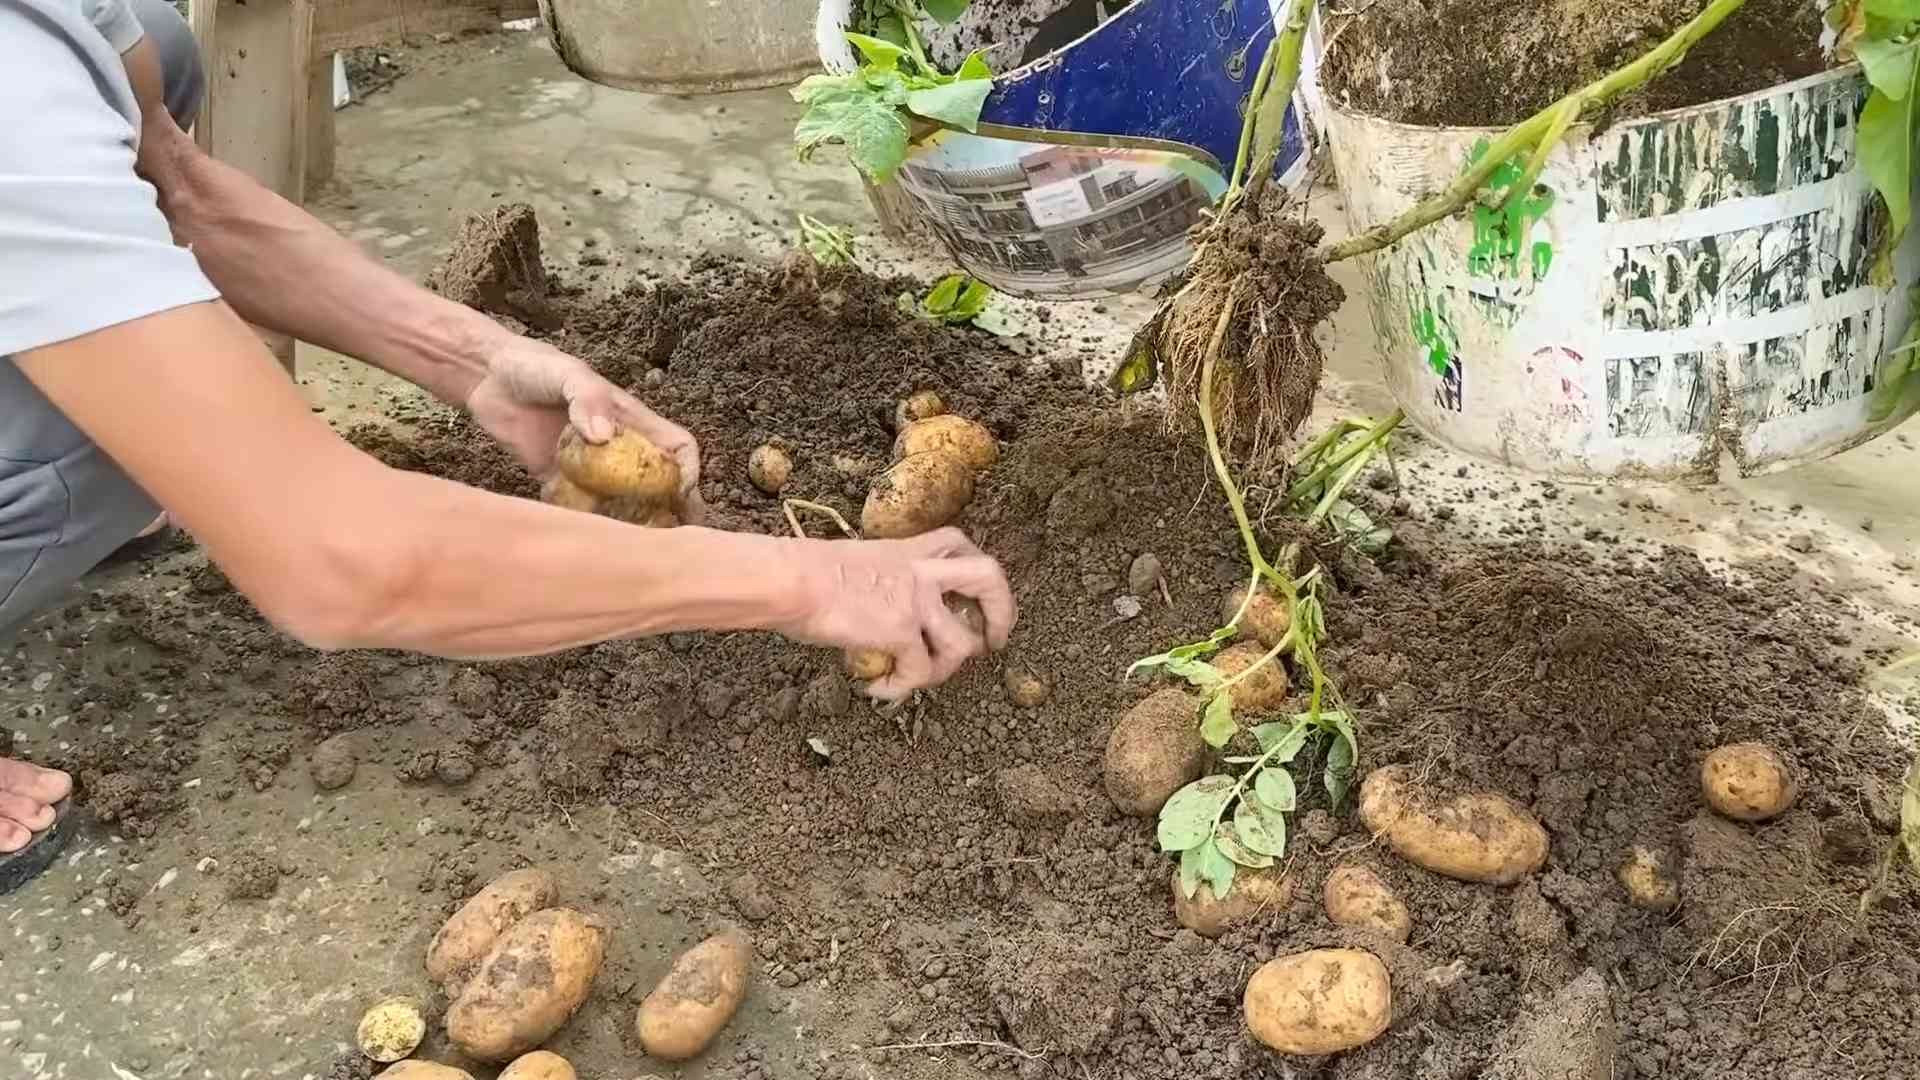
Harvest Time: The Grand Finale!
After all your hard work, it’s finally time to harvest your potatoes! This is the most rewarding part of the whole process.
1. When to Harvest: You can start harvesting “new potatoes” (small, tender potatoes) about 2-3 weeks after the plants flower. For larger, more mature potatoes, wait until the foliage starts to die back and turn yellow. This usually takes about 80-100 days from planting.
2. How to Harvest: The beauty of growing potatoes in a container is that harvesting is super easy! Simply tip the container over and gently sift through the soil to find your buried treasure. You can also reach into the container and carefully pull out the potatoes by hand.
3. Curing (Optional): If you want to store your potatoes for a longer period, you can cure them for a week or two. To cure potatoes, spread them out in a cool, dark, and well-ventilated place. This will help the skins toughen up and prevent rot.
Troubleshooting: Common Potato Problems and Solutions
Even with the best care, you might encounter a few problems along the way. Here are some common issues and how to deal with them:
* Potato Scab: This is a common fungal disease that causes rough, scabby patches on the potato skins. It’s usually not a serious problem, but it can make the potatoes look less appealing. To prevent potato scab, make sure your soil is well-drained and avoid overwatering.
* Colorado Potato Beetle: These pesky beetles can quickly defoliate your potato plants. Hand-picking the beetles and their larvae is the most effective way to control them. You can also use an organic insecticide like neem oil.
* Early Blight: This fungal disease causes dark, circular spots on the leaves. To prevent early blight, make sure your plants have good air circulation and avoid overhead watering. You can also use a fungicide if necessary.
* Poor Potato Production: If your plants are growing well but not producing many potatoes, it could be due to a lack of sunlight, over-fertilizing, or poor soil. Make sure your plants are getting enough sunlight, use a balanced fertilizer sparingly, and use a high-quality potting mix.
Enjoy Your Homegrown Harvest!
And there you have it! You’ve successfully grown your own potatoes in a container. Now it’s time to enjoy the fruits (or rather, vegetables) of your labor. Use your homegrown potatoes in your favorite recipes, share them with friends and family, or simply savor the satisfaction of knowing you grew them yourself. Happy gardening!
Conclusion
So, there you have it! Creating your own potato growing container is not just a fun weekend project; it’s a gateway to fresh, homegrown potatoes right at your fingertips. Forget those bland, store-bought spuds – imagine the taste of freshly dug, earthy potatoes, bursting with flavor, ready to be transformed into crispy fries, creamy mashed potatoes, or a hearty potato salad. This DIY project empowers you to control the entire growing process, ensuring your potatoes are free from unwanted chemicals and pesticides.
But the benefits extend beyond just taste. Building a potato growing container is incredibly space-efficient, making it perfect for urban gardeners, apartment dwellers with balconies, or anyone with limited yard space. You can customize the size and shape of your container to fit your specific needs and available space. Plus, the layered planting method maximizes yield, allowing you to harvest a surprising amount of potatoes from a relatively small area.
Why is this DIY potato growing container a must-try? Because it’s simple, cost-effective, and yields delicious results. It’s a fantastic way to connect with nature, learn about the growing process, and enjoy the satisfaction of harvesting your own food. It’s also a great project to involve kids in, teaching them about where their food comes from and fostering a love for gardening.
Looking for variations? Consider using different materials for your container. Instead of plastic bins, you could repurpose old tires (just be mindful of potential leaching), wooden pallets, or even large burlap sacks. Experiment with different soil mixes to find what works best for your climate and potato variety. You can also add companion plants like marigolds or basil to your container to deter pests and attract beneficial insects.
Don’t be afraid to get creative and personalize your potato growing container. Add drainage holes to the bottom of your container to prevent waterlogging. Use a dark-colored container to help warm the soil, especially in cooler climates. Label your container with the potato variety you’re growing so you don’t forget!
We wholeheartedly encourage you to give this DIY potato growing container a try. It’s a rewarding experience that will provide you with fresh, delicious potatoes for months to come. And most importantly, we want to hear about your experience! Share your photos, tips, and tricks in the comments below. Let us know what worked for you, what challenges you faced, and what delicious potato dishes you created with your homegrown harvest. Your feedback will help other gardeners succeed and inspire even more people to embrace the joy of growing their own food. So, grab your tools, gather your supplies, and get ready to embark on your potato-growing adventure! Happy gardening!
Frequently Asked Questions (FAQ)
What kind of potatoes should I plant in my container?
The best potatoes for container gardening are typically smaller varieties like fingerling potatoes, Yukon Gold, or red potatoes. These varieties tend to mature faster and produce a good yield in a limited space. However, you can experiment with other varieties as well. Just be sure to choose certified seed potatoes from a reputable source to ensure they are disease-free. Avoid using potatoes from the grocery store, as they may have been treated to prevent sprouting.
What kind of soil should I use in my potato growing container?
Potatoes need well-draining soil that is rich in organic matter. A good mix would be equal parts of compost, potting soil, and perlite or vermiculite. The compost provides nutrients, the potting soil provides structure, and the perlite or vermiculite improves drainage and aeration. Avoid using garden soil, as it can be too heavy and compacted for container gardening. You can also add a slow-release fertilizer to the soil mix to provide a steady supply of nutrients throughout the growing season.
How often should I water my potato growing container?
Potatoes need consistent moisture, especially during tuber formation. Water your container deeply whenever the top inch of soil feels dry to the touch. Avoid overwatering, as this can lead to root rot. The frequency of watering will depend on the weather conditions, the size of your container, and the type of soil you’re using. In hot, dry weather, you may need to water daily. In cooler, wetter weather, you may only need to water every few days.
How much sunlight do potatoes need?
Potatoes need at least six hours of sunlight per day to thrive. Choose a location for your container that receives plenty of direct sunlight. If you live in a very hot climate, you may want to provide some afternoon shade to prevent the soil from overheating.
How do I know when my potatoes are ready to harvest?
The timing of harvest depends on the potato variety and your personal preference. For “new potatoes,” which are small and tender, you can start harvesting when the plants begin to flower. Simply reach into the container and carefully dig around the base of the plant to harvest a few potatoes. For mature potatoes, wait until the foliage starts to die back and turn yellow or brown. This indicates that the potatoes have stopped growing and are ready to be harvested. To harvest, carefully dump the contents of the container onto a tarp or into a wheelbarrow and sort through the soil to find the potatoes.
Can I reuse the soil from my potato growing container?
Yes, you can reuse the soil from your potato growing container, but it’s important to amend it with fresh compost and fertilizer before planting again. Potatoes are heavy feeders and deplete the soil of nutrients. Adding compost and fertilizer will replenish the nutrients and improve the soil structure. You should also check the soil for any signs of disease or pests and treat it accordingly.
What are some common problems I might encounter when growing potatoes in a container?
Some common problems include potato blight, potato beetles, and aphids. Potato blight is a fungal disease that can cause the foliage to turn brown and rot. Potato beetles are insects that feed on the leaves of the potato plant. Aphids are small, sap-sucking insects that can weaken the plant. You can prevent these problems by choosing disease-resistant potato varieties, practicing good sanitation, and using organic pest control methods.
Can I grow potatoes in a container indoors?
While it’s possible to grow potatoes indoors, it’s more challenging than growing them outdoors. Potatoes need a lot of sunlight, which can be difficult to provide indoors. You’ll also need a very large container and a strong grow light. If you’re determined to grow potatoes indoors, choose a small variety and provide them with plenty of light, water, and nutrients.
How do I store my harvested potatoes?
Store your harvested potatoes in a cool, dark, and well-ventilated place. A root cellar is ideal, but a basement or garage will also work. Avoid storing potatoes in the refrigerator, as this can cause them to develop a sweet taste. Store potatoes away from apples and bananas, as these fruits release ethylene gas, which can cause potatoes to sprout. Properly stored potatoes can last for several months.

Leave a Comment