
Melon Growing Hack: Unlock a Bountiful Harvest with These Simple DIY Tricks!
Have you ever dreamed of biting into a juicy, homegrown melon, bursting with flavor that puts store-bought ones to shame? I know I have! But the reality of melon growing can sometimes be a little…disappointing. Maybe your vines produce beautiful flowers but no fruit, or perhaps your melons are small and bland. Don’t worry, you’re not alone! Many home gardeners struggle to achieve melon-growing success. That’s why I’m so excited to share these game-changing melon growing hack that will transform your garden and your taste buds.
Melons have a rich history, dating back thousands of years to Africa and Asia. They were prized by ancient civilizations for their sweetness and refreshing qualities. Today, the tradition of growing your own melons continues, offering a connection to the past and a delicious reward for your efforts.
But why do you need these specific melon growing hack? Because growing melons successfully requires a little more than just planting seeds and hoping for the best. These DIY tricks address common challenges like pollination issues, nutrient deficiencies, and pest control, giving you the upper hand in creating the perfect environment for your melons to thrive. I’m going to show you how to maximize your yield, improve the flavor, and protect your precious melons from common garden pests. Get ready to enjoy the sweetest, most satisfying melons you’ve ever tasted!
Grow the Biggest, Juiciest Melons: My Secret DIY Hack!
Okay, melon lovers, gather ’round! I’m about to share my absolute favorite DIY hack for growing melons that are not only HUGE but also bursting with flavor. I’ve been using this method for years, and trust me, it makes a world of difference. We’re talking county fair-worthy melons, people!
This hack focuses on providing your melon plants with the support and concentrated nutrients they need to thrive. It’s all about creating a little “melon cradle” and a targeted feeding system. Let’s get started!
What You’ll Need:
* Large Plastic Buckets (5-gallon or larger): One bucket per melon plant you want to support. Make sure they are sturdy!
* Drill with various sized drill bits: For drainage and creating access points.
* Landscape Fabric or Burlap: To line the buckets and prevent soil erosion.
* Potting Mix: A high-quality mix that drains well is crucial.
* Compost: The more, the merrier! This is the key to nutrient-rich soil.
* Slow-Release Fertilizer (specifically for fruits and vegetables): Follow the package instructions.
* Watering Can or Hose: For, well, watering!
* Scissors or Utility Knife: For cutting the landscape fabric.
* Stakes (bamboo or wooden): For extra support if needed.
* Twine or Plant Ties: To secure the melon vines to the stakes.
* Mulch (straw, wood chips, or shredded bark): To retain moisture and suppress weeds.
* Optional: Shade Cloth: If you live in a super hot climate, this can prevent sunburn.
Phase 1: Preparing the Melon Cradle Buckets
This is where we create the perfect environment for our melons to flourish. Think of it as a luxurious spa day, but for plants!
1. Drill Drainage Holes: Using a drill bit (around 1/2 inch), drill several drainage holes in the bottom of each bucket. I usually do about 6-8 holes, evenly spaced. This is super important to prevent waterlogging, which can lead to root rot. Nobody wants that!
2. Line the Buckets: Cut the landscape fabric or burlap into pieces large enough to line the inside of each bucket. This will help prevent the potting mix from washing out through the drainage holes. Make sure the fabric extends a few inches over the top edge of the bucket.
3. Create a “Feeding Tube” (Optional, but Recommended): This is my secret weapon! Using a smaller drill bit (around 1/4 inch), drill several holes along the sides of a smaller diameter PVC pipe (about 1-2 inches in diameter). The length of the pipe should be slightly shorter than the height of the bucket. This pipe will act as a direct feeding tube to the roots. Place the pipe vertically in the center of the bucket.
4. Fill with Potting Mix and Compost: Now, it’s time to create the perfect soil blend. Start by adding a layer of potting mix to the bottom of the bucket. Then, add a generous layer of compost. I usually aim for a 2:1 ratio of potting mix to compost. Mix the two together well. If you’re using the feeding tube, make sure it stays centered as you fill the bucket.
5. Incorporate Slow-Release Fertilizer: Follow the package instructions for your chosen fertilizer and mix it thoroughly into the top layer of the soil. This will provide a steady stream of nutrients to your melon plants as they grow.
Phase 2: Planting Your Melon Seedlings or Seeds
Now for the fun part – getting those melons started!
1. Choose Your Melon Variety: This is crucial! Consider your climate and personal preferences. Some popular choices include cantaloupe, watermelon, honeydew, and specialty varieties like Galia or Charentais.
2. Start Seeds Indoors (Optional): If you live in a cooler climate with a shorter growing season, starting your melon seeds indoors 4-6 weeks before the last expected frost is a great idea. This gives them a head start. Use seed starting trays and a good seed starting mix. Keep the soil moist and warm.
3. Direct Sow Seeds (If Climate Allows): If you have a longer growing season, you can direct sow your melon seeds directly into the prepared buckets. Plant the seeds according to the package instructions, usually about 1 inch deep.
4. Transplant Seedlings (If Starting Indoors): Once your seedlings have developed a few sets of true leaves and the weather has warmed up, it’s time to transplant them into the prepared buckets. Gently remove the seedlings from their trays and plant them in the center of the bucket, making sure the top of the root ball is level with the soil surface.
5. Water Thoroughly: After planting, water the seedlings or seeds thoroughly. This will help settle the soil and encourage root growth.
Phase 3: Supporting and Nurturing Your Melon Plants
This is where the magic happens! Consistent care and support are key to growing those prize-winning melons.
1. Water Regularly: Melons need consistent moisture, especially during fruit development. Water deeply and regularly, especially during hot, dry weather. Aim for about 1-2 inches of water per week. Check the soil moisture regularly by sticking your finger into the soil. If it feels dry an inch or two down, it’s time to water.
2. Fertilize Regularly: Even with the slow-release fertilizer, melons are heavy feeders. I like to supplement with a liquid fertilizer every 2-3 weeks, especially during fruit set. You can pour the liquid fertilizer directly into the “feeding tube” we created earlier for targeted root feeding!
3. Provide Support: As your melon vines grow, they will need support. This is where the stakes and twine come in. Gently tie the vines to the stakes to keep them off the ground. This will help prevent diseases and pests.
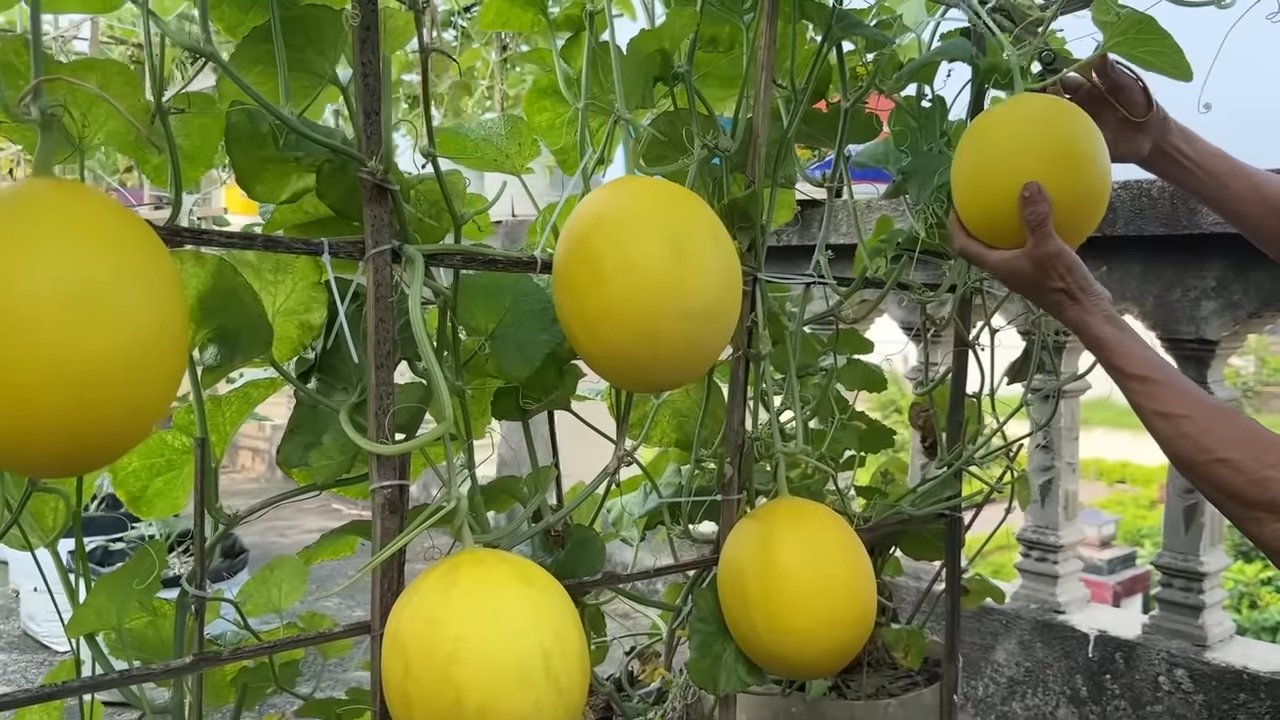
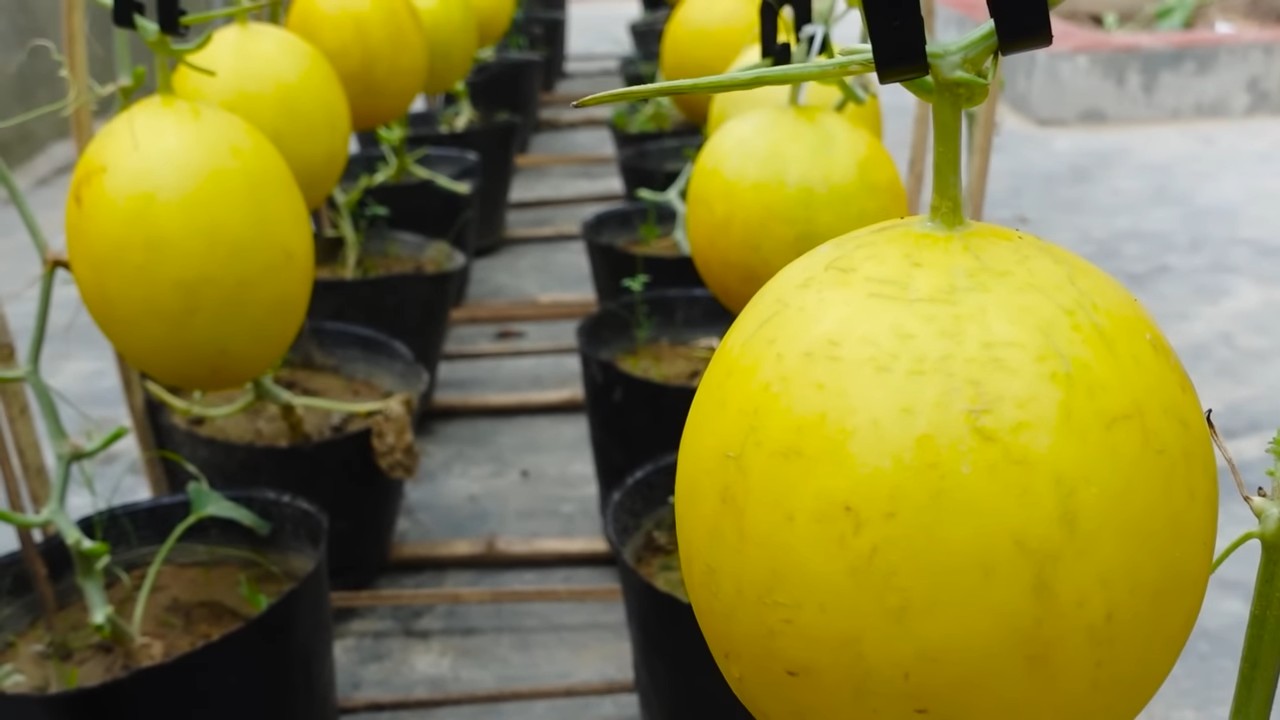
4. Create a Melon Cradle: As the melons start to develop, they will become heavy. This is where the bucket comes in handy! The bucket acts as a cradle, supporting the weight of the melon and preventing it from breaking off the vine prematurely.
5. Protect from Pests and Diseases: Keep an eye out for common melon pests like squash bugs, aphids, and cucumber beetles. Use organic pest control methods like insecticidal soap or neem oil to control infestations. Also, watch out for diseases like powdery mildew and downy mildew. Ensure good air circulation around the plants and avoid overhead watering to prevent these diseases.
6. Prune (Optional): Some gardeners like to prune their melon vines to encourage larger fruit. You can remove some of the side shoots and smaller melons to direct the plant’s energy towards the remaining fruit. I usually only do this if my plants are getting overcrowded.
7. Provide Shade (If Needed): If you live in a very hot climate, consider using shade cloth to protect your melons from sunburn. This is especially important for watermelons, which are prone to sunscald.
Phase 4: Harvesting Your Prize-Winning Melons
The moment we’ve all been waiting for! Knowing when to harvest your melons is crucial for getting that perfect flavor and texture.
1. Know Your Variety’s Harvest Indicators: Each melon variety has its own specific indicators of ripeness. For example, cantaloupes will develop a sweet aroma and the stem will easily slip from the vine. Watermelons will have a dull thud when thumped and the tendril closest to the melon will turn brown. Honeydew melons will turn a creamy yellow color. Do your research!
2. Check the Ground Spot: The ground spot is the area of the melon that rests on the ground. As the melon ripens, the ground spot will change color from white to yellow or cream.
3. Smell the Melon: Ripe melons will have a sweet, fruity aroma.
4. Gently Twist the Stem (Cantaloupe): For cantaloupes, gently twist the stem where it connects to the melon. If it easily separates, the melon is ripe.
5. Harvest Carefully: Once you’ve determined that your melon is ripe, carefully harvest it by cutting the stem with a sharp knife or pruning shears.
6. Enjoy Your Harvest! Now, the best part – savoring the fruits (or should I say, melons!) of your labor. Slice it up, share it with friends and family, and enjoy the delicious taste of homegrown goodness!
This DIY melon growing hack might seem like a lot of work, but trust me, the results are worth it. You’ll be amazed at the size and flavor of the melons you can grow using this method. Happy gardening!
Conclusion
So, there you have it! This simple yet effective melon growing hack can truly revolutionize your melon harvest. Forget about bland, undersized melons that disappoint. By implementing this easy technique, you’re setting the stage for sweeter, juicier, and significantly larger melons that will be the envy of your neighborhood.
Why is this a must-try? Because it addresses a fundamental need in melon cultivation: providing optimal support and preventing ground contact. Ground contact often leads to rot, pest infestations, and uneven ripening. By suspending your melons, you’re not only protecting them from these threats but also ensuring they receive consistent sunlight and air circulation, crucial for developing their full flavor potential.
Think of the possibilities! Imagine biting into a perfectly ripe watermelon, its sweetness intensified by the consistent sun exposure. Picture cantaloupes bursting with flavor, their delicate aroma filling your kitchen. Envision sharing your bountiful harvest with friends and family, knowing you achieved such impressive results with a simple, cost-effective method.
But don’t just take our word for it. We encourage you to experiment with variations of this melon growing hack. For smaller melons like cantaloupes or honeydews, consider using repurposed pantyhose or mesh produce bags for support. For larger watermelons, sturdy slings made from burlap or canvas might be more appropriate. You can even get creative with the suspension method, using trellises, stakes, or even hanging baskets. The key is to ensure the melon is adequately supported and protected from the ground.
This isn’t just about growing bigger melons; it’s about cultivating a more rewarding gardening experience. It’s about taking control of your harvest and enjoying the fruits (or rather, melons!) of your labor. It’s about connecting with nature and appreciating the simple joys of growing your own food.
We are confident that this **melon growing hack** will become an indispensable part of your gardening routine. It’s a game-changer that will transform your melon patch from a source of frustration to a source of pride.
So, what are you waiting for? Grab your supplies, head out to your garden, and give this technique a try. We’re eager to hear about your experiences! Share your photos, tips, and success stories in the comments below. Let’s create a community of melon enthusiasts who are passionate about growing the best possible melons. Together, we can unlock the secrets to a truly exceptional melon harvest. Happy gardening!
Frequently Asked Questions (FAQ)
What types of melons does this hack work best for?
This melon growing hack is beneficial for a wide variety of melons, including watermelons, cantaloupes, honeydews, and even smaller varieties like Galia melons. The principle of providing support and preventing ground contact applies to all melons, regardless of size. However, the specific support method may need to be adjusted based on the melon’s weight and size. For instance, a large watermelon will require a much sturdier support system than a small cantaloupe. Consider the mature size of the melon variety you’re growing when choosing your support materials.
What materials can I use to create the support sling?
The beauty of this hack is its versatility. You can use a variety of materials to create the support sling, depending on what you have readily available. Some popular options include:
* **Old T-shirts or fabric scraps:** These are soft, breathable, and readily available. Cut them into strips and braid them together for added strength.
* **Pantyhose or mesh produce bags:** These are ideal for smaller melons like cantaloupes or honeydews. The mesh allows for good air circulation.
* **Burlap or canvas:** These are durable and can support heavier watermelons.
* **Macrame plant hangers:** These offer a decorative and functional way to support your melons.
* **Commercial melon cradles:** These are specifically designed for supporting melons and can be found at garden centers.
The key is to choose a material that is strong enough to support the weight of the melon and that won’t damage the fruit.
How high off the ground should I suspend the melons?
The ideal height for suspending your melons is just enough to keep them from touching the ground. A few inches of clearance is usually sufficient. The goal is to prevent soil contact, which can lead to rot and pest infestations. Avoid suspending the melons too high, as this can make it difficult to monitor their progress and harvest them.
When should I start supporting the melons?
It’s best to start supporting the melons as soon as they begin to develop and reach a significant size. Waiting too long can make it difficult to lift and support the melons without damaging them. As a general rule, start supporting your melons when they are about the size of a softball.
Will this hack affect the taste of the melons?
Yes, in a positive way! By suspending the melons and preventing ground contact, you’re ensuring they receive consistent sunlight and air circulation. This promotes even ripening and enhances the flavor of the melons. You’ll likely notice a sweeter, juicier, and more flavorful melon compared to those grown directly on the ground.
Can I use this hack in a container garden?
Absolutely! This hack is particularly useful for container gardens, where space is often limited. By suspending the melons, you can maximize space and prevent the fruits from sprawling on the ground. Just make sure your container is large enough to support the weight of the mature melon and the support structure.
What if I don’t have a trellis or structure to hang the melons from?
If you don’t have a trellis or existing structure, you can easily create one. Use sturdy stakes or poles to build a simple frame around your melon plants. You can then attach the support slings to the frame. Alternatively, you can use hanging baskets or even repurpose old ladders to create a unique and functional support system.
How do I know when the melon is ripe and ready to harvest?
Determining when a melon is ripe can vary depending on the variety. However, some general indicators include:
* **Color change:** The skin of the melon will typically change color as it ripens. For example, watermelons will often develop a yellowish spot on the underside where they rest on the ground (even when suspended, check the underside).
* **Sound:** When you tap on a ripe watermelon, it should sound hollow.
* **Stem:** The stem connecting the melon to the vine will often start to dry out and crack when the melon is ripe.
* **Aroma:** Ripe cantaloupes and honeydews will have a sweet, fragrant aroma.
Research the specific ripening characteristics of the melon variety you’re growing for the most accurate assessment.
What are the benefits of using this melon growing hack?
The benefits are numerous! This **melon growing hack** offers:
* **Increased yield:** By preventing rot and pest infestations, you’ll likely harvest more melons.
* **Improved flavor:** Consistent sunlight and air circulation lead to sweeter, juicier melons.
* **Larger size:** Optimal growing conditions promote larger melon size.
* **Reduced pest and disease problems:** Preventing ground contact minimizes the risk of soilborne pests and diseases.
* **Space saving:** Ideal for container gardens or small spaces.
* **Aesthetics:** Suspended melons can add a unique and attractive element to your garden.
Is this hack suitable for all climates?
This hack is generally suitable for most climates where melons can be grown. However, in extremely hot climates, it’s important to provide some shade to the suspended melons to prevent sunburn. In cooler climates, suspending the melons can help them warm up faster and ripen more quickly.

Leave a Comment