
Grow Water Spinach Easily, even if you think you have a brown thumb! Have you ever dreamed of harvesting fresh, vibrant greens right from your own backyard, adding a delicious and nutritious boost to your meals? Well, dream no more! This DIY guide will unlock the secrets to cultivating this amazing vegetable with minimal effort and maximum yield.
Water spinach, also known as Ong Choy or Kangkong, isn’t just a tasty addition to stir-fries and salads; it boasts a rich history, deeply rooted in Southeast Asian cuisine. For centuries, it has been a staple in dishes across the region, prized for its versatility and nutritional value. Imagine bringing that culinary heritage to your own table, grown with your own hands!
But why should you bother with this DIY project? In today’s world, where access to fresh, affordable produce can be a challenge, learning to grow water spinach easily offers a fantastic solution. Not only will you save money on groceries, but you’ll also have the satisfaction of knowing exactly where your food comes from. Plus, it’s a fun and rewarding hobby that connects you with nature. I’m excited to share these simple yet effective tricks that will have you harvesting your own water spinach in no time. Let’s get started!

Grow Your Own Water Spinach: A Beginner’s Guide
Hey there, fellow gardening enthusiasts! Ever wanted to grow your own delicious and nutritious water spinach (also known as kangkong or ong choy)? It’s surprisingly easy, even if you don’t have a huge garden. I’m going to walk you through everything you need to know to cultivate this fantastic leafy green right at home. Get ready to enjoy fresh, homegrown water spinach in your stir-fries, soups, and salads!
What You’ll Need
Before we dive in, let’s gather our supplies. This is a pretty low-cost project, which is always a win!
* Water Spinach Seeds or Cuttings: You can find seeds online or at your local garden center. Cuttings from mature plants also work great – ask a friend who grows it if they can spare a few!
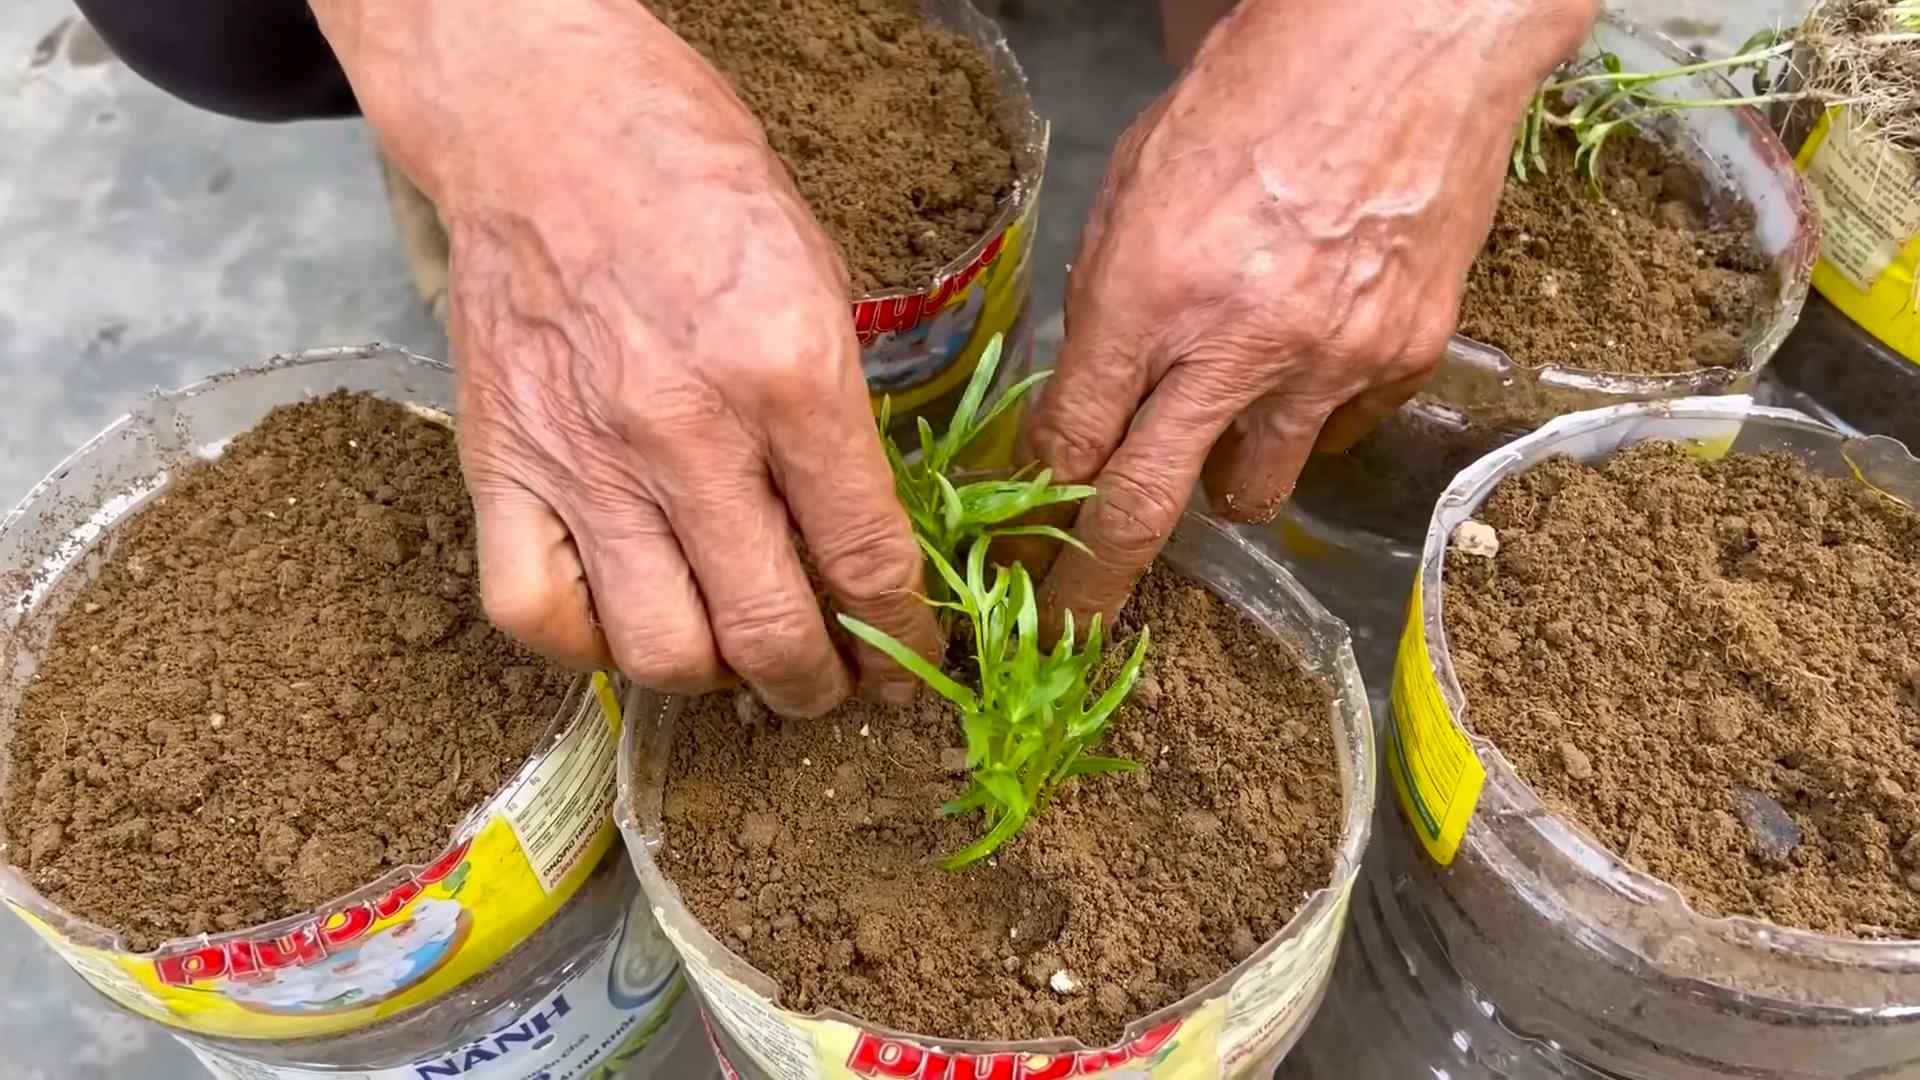
* A Container: A large bucket, tub, or even a repurposed plastic container will do. Make sure it’s at least 12 inches deep.
* Potting Mix: A good quality potting mix is essential for healthy growth.
* Water: Obviously! Use tap water that’s been sitting out for a day to dechlorinate, or rainwater if you have it.
* Fertilizer (Optional): A balanced liquid fertilizer can boost growth, but it’s not strictly necessary.
* Sunlight: Water spinach loves sunshine! Aim for at least 6 hours of direct sunlight per day.
* Gardening Gloves (Optional): To keep your hands clean.
Getting Started: Two Methods
There are two main ways to start your water spinach: from seeds or from cuttings. I’ll cover both methods so you can choose the one that works best for you.
Method 1: Growing from Seeds
This is probably the most common method, and it’s pretty straightforward.
1. Soaking the Seeds: Water spinach seeds have a hard outer shell, so soaking them helps them germinate faster. Place the seeds in a bowl of warm water and let them soak for 12-24 hours. This softens the shell and encourages sprouting.
2. Preparing the Container: Fill your container with potting mix, leaving about an inch or two of space at the top. Moisten the soil thoroughly with water. You want it damp, but not soggy.
3. Sowing the Seeds: Sprinkle the soaked seeds evenly over the surface of the soil. Don’t overcrowd them; give them some space to grow. Gently press the seeds into the soil, but don’t bury them too deep – about ¼ inch is perfect.
4. Covering the Seeds: Lightly cover the seeds with a thin layer of potting mix.
5. Watering: Gently water the soil again, being careful not to dislodge the seeds. A spray bottle works well for this.
6. Creating a Humid Environment: Cover the container with a clear plastic bag or plastic wrap to create a humid environment. This helps the seeds germinate. Make sure to poke a few holes in the plastic for ventilation.
7. Finding the Right Spot: Place the container in a warm, sunny location.
8. Monitoring and Watering: Check the soil moisture daily. Keep the soil consistently moist, but not waterlogged. Remove the plastic covering once the seedlings emerge, which should take about 7-14 days.
Method 2: Growing from Cuttings
This method is even easier and faster than starting from seeds! If you can get your hands on some cuttings, I highly recommend it.
1. Obtaining Cuttings: Ask a friend or neighbor who grows water spinach for cuttings. You want cuttings that are about 6-8 inches long and have several nodes (the points where leaves grow).
2. Preparing the Cuttings: Remove the leaves from the bottom 2-3 inches of the cuttings. This will encourage root growth.
3. Rooting the Cuttings in Water: Place the cuttings in a glass or jar of water, making sure that the nodes are submerged. Change the water every day or two to keep it fresh.
4. Waiting for Roots: In a few days to a week, you should see roots starting to emerge from the nodes.
5. Planting the Rooted Cuttings: Once the roots are about an inch long, you can plant the cuttings in your container.
6. Preparing the Container: Fill your container with potting mix, leaving about an inch or two of space at the top. Moisten the soil thoroughly with water.
7. Planting the Cuttings: Make small holes in the soil and gently plant the rooted cuttings, spacing them a few inches apart.
8. Watering: Water the soil thoroughly after planting.
Caring for Your Water Spinach
Now that your water spinach is planted, it’s time to provide the care it needs to thrive.
1. Sunlight: Water spinach needs at least 6 hours of direct sunlight per day. If you don’t have a sunny spot, you can supplement with a grow light.
2. Watering: Water spinach loves water! Keep the soil consistently moist, but not waterlogged. You can even grow it in a shallow pool of water, as it’s a semi-aquatic plant. If you’re growing it in soil, water deeply whenever the top inch of soil feels dry.
3. Fertilizing (Optional): If you want to boost growth, you can fertilize your water spinach every 2-3 weeks with a balanced liquid fertilizer. Follow the instructions on the fertilizer label. I like to use a diluted fish emulsion fertilizer.
4. Pest Control: Water spinach is generally pest-resistant, but occasionally aphids or spider mites may appear. If you notice any pests, you can spray the plants with insecticidal soap or neem oil.
5. Pruning: Pruning encourages bushier growth and prevents the plants from becoming leggy. Pinch off the tips of the stems regularly.
Harvesting Your Water Spinach
The best part! You can start harvesting your water spinach about 4-6 weeks after planting.
1. When to Harvest: Harvest when the stems are about 6-8 inches long.
2. How to Harvest: Use scissors or a sharp knife to cut the stems a few inches above the soil line. This will allow the plants to regrow and produce more leaves.
3. Harvesting Regularly: Harvest regularly to encourage continuous growth. The more you harvest, the more the plants will produce!
4. Storing Your Harvest: Water spinach is best used fresh, but you can store it in the refrigerator for a few days. Wrap it in a damp paper towel and place it in a plastic bag.
Troubleshooting
Even with the best care, you might encounter a few challenges. Here are some common problems and how to fix them:
* Yellowing Leaves: This could be a sign of overwatering, underwatering, or nutrient deficiency. Check the soil moisture and adjust your watering accordingly. If the soil is consistently moist, you might be overwatering. If the soil is dry, you need to water more often. If you suspect a nutrient deficiency, try fertilizing with a balanced liquid fertilizer.
* Slow Growth: This could be due to lack of sunlight, poor soil, or insufficient watering. Make sure your water spinach is getting enough sunlight and that the soil is well-draining and nutrient-rich.
* Pests: As mentioned earlier, aphids and spider mites can sometimes be a problem. Treat them with insecticidal soap or neem oil.
Enjoying Your Homegrown Water Spinach
Now that you’ve harvested your water spinach, it’s time to enjoy the fruits (or rather, leaves!) of your labor. Water spinach is incredibly versatile and can be used in a variety of dishes.
* Stir-fries: Water spinach is a classic ingredient in stir-fries. Simply add it to your favorite stir-fry recipe along with other vegetables and protein.
* Soups: Water spinach can be added to soups for extra flavor and nutrients.
* Salads: Young, tender water spinach leaves can be used in salads.
* Steamed: Steamed water spinach is a simple and healthy side dish.
* Garlic Water Spinach: A simple and delicious dish where water spinach is stir-fried with garlic and a little bit of oil.
Growing your own water spinach is a rewarding experience. It’s easy, inexpensive, and you get to enjoy fresh, homegrown vegetables. So, what are you waiting for? Get started today and enjoy the deliciousness of homegrown water spinach! Happy gardening!
Conclusion
So, there you have it! Growing your own water spinach, or kangkong, is not only surprisingly simple but also incredibly rewarding. Forget trekking to specialty Asian markets or relying on potentially wilted, overpriced bunches. With this straightforward DIY trick, you can have a constant supply of fresh, crisp, and vibrant water spinach right at your fingertips.
Why is this a must-try? Because it empowers you to control the quality and freshness of your produce. You know exactly where your food is coming from and how it’s been grown, free from harmful pesticides or long-distance transportation. Plus, the taste of freshly harvested water spinach is simply unparalleled – a world away from the store-bought variety. The subtle, slightly sweet flavor and satisfying crunch are a testament to the effort you put in.
Beyond the basic method, there’s plenty of room for experimentation. Try different containers – from repurposed plastic tubs to dedicated hydroponic setups. Explore various nutrient solutions to see which yields the best results in your specific environment. You can even experiment with growing different varieties of water spinach, each with its own unique flavor profile and texture. Consider adding companion plants like basil or mint to your water spinach container to naturally deter pests and enhance the overall ecosystem.
Don’t be intimidated if you’ve never grown anything before. This DIY water spinach project is incredibly forgiving and a fantastic starting point for anyone interested in urban gardening or simply wanting to add more fresh, healthy greens to their diet. The satisfaction of harvesting your own food is truly unmatched.
We wholeheartedly encourage you to give this DIY trick a try. It’s a fun, educational, and ultimately delicious experience. And once you’ve tasted the difference between homegrown and store-bought water spinach, you’ll never look back.
But the journey doesn’t end here! We’d love to hear about your experiences. Share your tips, tricks, and triumphs in the comments below. Did you try a different growing medium? Did you encounter any challenges? What are your favorite ways to prepare your homegrown water spinach? Your insights will not only help other readers but also contribute to a thriving community of water spinach enthusiasts. Let’s learn and grow together! Embrace the joy of cultivating your own fresh, delicious, and sustainable water spinach. This simple DIY project is a gateway to a healthier, more connected relationship with your food. So, grab your seeds, prepare your container, and get ready to experience the magic of homegrown water spinach!
Frequently Asked Questions (FAQ)
What exactly is water spinach, and why should I grow it?
Water spinach, also known as kangkong, ong choy, or swamp cabbage, is a leafy green vegetable popular in Southeast Asian cuisine. It’s known for its mild, slightly sweet flavor and crisp texture, making it a versatile ingredient in stir-fries, soups, salads, and more. Growing your own water spinach ensures a constant supply of fresh, pesticide-free greens, often at a fraction of the cost of buying it from the store. Plus, it’s a fast-growing plant, providing a quick return on your gardening efforts.
Is growing water spinach indoors possible?
Absolutely! In fact, growing water spinach indoors is often easier than growing it outdoors, especially if you live in a region with cooler climates. Indoor growing allows you to control the temperature, light, and humidity, creating an optimal environment for the plant to thrive. Just ensure you provide adequate light, either through a sunny window or with grow lights.
What kind of container should I use for growing water spinach?
You can use a variety of containers, as long as they are large enough to hold water and provide space for the roots to grow. Plastic tubs, buckets, large pots, or even repurposed containers like old storage bins work well. The container should be at least 6-8 inches deep to allow for sufficient root development. Make sure the container is food-grade if you’re using recycled materials.
What kind of soil or growing medium is best for water spinach?
Water spinach can be grown in soil, but it thrives in a semi-aquatic environment. A good option is to use a soilless mix like coco coir or perlite, which provides good drainage and aeration. You can also grow it hydroponically, with the roots submerged in a nutrient-rich water solution. If using soil, choose a well-draining potting mix amended with compost or other organic matter.
How often should I water my water spinach?
Water spinach loves water, so keep the growing medium consistently moist. If growing in soil, water daily or as needed to prevent the soil from drying out. If growing hydroponically, ensure the water level is maintained and the roots are always submerged. Regularly check the water level, especially during hot weather, as evaporation can be rapid.
What kind of light does water spinach need?
Water spinach needs at least 6 hours of sunlight per day to thrive. If growing indoors, place the container near a sunny window that receives direct sunlight. If natural light is insufficient, supplement with grow lights. LED grow lights are a good option as they are energy-efficient and provide the necessary spectrum of light for plant growth.
How do I fertilize my water spinach?
Water spinach is a heavy feeder, so regular fertilization is essential for optimal growth. Use a balanced liquid fertilizer diluted to half strength every 1-2 weeks. You can also use organic fertilizers like compost tea or fish emulsion. If growing hydroponically, use a hydroponic nutrient solution specifically formulated for leafy greens.
How long does it take for water spinach to grow?
Water spinach is a fast-growing plant. You can typically start harvesting leaves within 4-6 weeks of planting. Continue harvesting regularly to encourage new growth. The more you harvest, the more the plant will produce.
How do I harvest water spinach?
You can harvest water spinach by cutting the stems about 4-6 inches above the base of the plant. This will encourage new shoots to grow from the cut stems. You can also harvest individual leaves as needed. Harvest in the morning for the best flavor and texture.
Are there any pests or diseases that affect water spinach?
Water spinach is generally resistant to pests and diseases, but it can be susceptible to aphids, spider mites, and whiteflies. Regularly inspect your plants for signs of infestation and take action promptly. You can use insecticidal soap or neem oil to control pests. Ensure good air circulation to prevent fungal diseases.
Can I grow water spinach from cuttings?
Yes, you can easily propagate water spinach from cuttings. Simply take a stem cutting about 4-6 inches long and place it in water. Roots will typically develop within a few days. Once the roots are about an inch long, you can transplant the cutting into soil or a hydroponic system.
Is water spinach safe to eat?
Yes, water spinach is generally safe to eat. However, it’s important to source your seeds and growing medium from reputable suppliers to avoid contamination. Thoroughly wash the leaves before eating to remove any dirt or debris. If you are growing water spinach in a pond or other natural water source, be aware of potential contamination from pollutants or parasites.
How do I store harvested water spinach?
Store harvested water spinach in the refrigerator in a plastic bag or container. It will stay fresh for several days. You can also blanch and freeze water spinach for longer storage.
What are some ways to cook water spinach?
Water spinach is a versatile vegetable that can be used in a variety of dishes. It’s commonly stir-fried with garlic, chili, and soy sauce. It can also be added to soups, stews, and salads. Water spinach is also delicious steamed or blanched.
Can I grow water spinach in a small space?
Yes, water spinach is well-suited for small-space gardening. You can grow it in containers on a balcony, patio, or even indoors on a windowsill. Its rapid growth and adaptability make it an ideal choice for urban gardeners.


Leave a Comment