
Growing peanuts at home might seem like a whimsical dream reserved for sprawling farms, but I’m here to tell you it’s totally achievable, even in a small garden or on a sunny balcony! Forget trekking to the store for your peanut butter fix; imagine the satisfaction of harvesting your own homegrown peanuts, bursting with fresh, nutty flavor.
The humble peanut, despite its name, isn’t actually a nut! It’s a legume with a fascinating history, dating back thousands of years to South America. Evidence suggests peanuts were cultivated as early as 7,600 years ago in Peru! From ancient civilizations to modern-day snacks, the peanut has nourished and delighted people across the globe.
But why bother growing them yourself? Well, for starters, commercially grown peanuts are often heavily treated with pesticides. Growing peanuts at home allows you to control exactly what goes into your food, ensuring a healthier and more sustainable snack. Plus, it’s an incredibly rewarding experience to witness the entire life cycle of this unique plant, from planting the seed to digging up your buried treasure. In this DIY guide, I’ll share my tried-and-true tricks and hacks to help you successfully cultivate your own peanut patch, no matter your gardening experience. Get ready to unleash your inner farmer and enjoy the delicious fruits (or rather, legumes!) of your labor!
Growing Peanuts at Home: From Seed to Snack!
Hey there, fellow gardening enthusiasts! Ever thought about growing your own peanuts? It might seem a little daunting, but trust me, it’s a surprisingly rewarding experience. Imagine the satisfaction of harvesting your own homegrown peanuts, roasting them up, and enjoying a delicious, healthy snack. I’m going to walk you through the whole process, step-by-step, so you can enjoy the same joy I have. Let’s get started!
Choosing the Right Peanut Variety
Before we even think about planting, we need to pick the right peanut variety. Not all peanuts are created equal, and some are better suited for home gardens than others. Here’s what I recommend:
* Virginia Peanuts: These are the large, often roasted-in-the-shell peanuts you see at ballgames. They need a longer growing season, so they’re best for warmer climates.
* Spanish Peanuts: These are smaller, with reddish-brown skins, and have a higher oil content. They mature faster than Virginia peanuts.
* Runner Peanuts: These are the most commonly grown peanuts in the US, often used for peanut butter. They are also a good choice for home gardens.
* Valencia Peanuts: These have three or four small kernels per shell and are known for their sweet flavor. They’re a good option for boiling.
I personally prefer Spanish peanuts because they mature relatively quickly and are delicious roasted. But feel free to experiment and see which variety works best for you and your climate!
Preparing the Soil
Peanuts are pretty particular about their soil. They need well-drained, sandy loam soil with a slightly acidic pH (around 6.0 to 6.5). Here’s how I prepare my soil:
* Soil Testing: First, I always recommend getting your soil tested. You can buy a soil testing kit at most garden centers or send a sample to your local agricultural extension office. This will tell you the pH and nutrient levels of your soil.
* Amending the Soil: Based on the soil test results, you might need to amend your soil. If your soil is too heavy (clay-like), add plenty of organic matter like compost, aged manure, or peat moss to improve drainage. If your soil is too acidic, add lime to raise the pH.
* Loosening the Soil: Peanuts need loose soil to develop properly. Use a garden fork or tiller to loosen the soil to a depth of at least 12 inches.
* Fertilizing: Peanuts don’t need a lot of nitrogen, but they do need phosphorus and potassium. I like to add a balanced fertilizer (like 10-10-10) at planting time, following the instructions on the package. Be careful not to over-fertilize with nitrogen, as this can lead to excessive foliage growth and fewer peanuts.
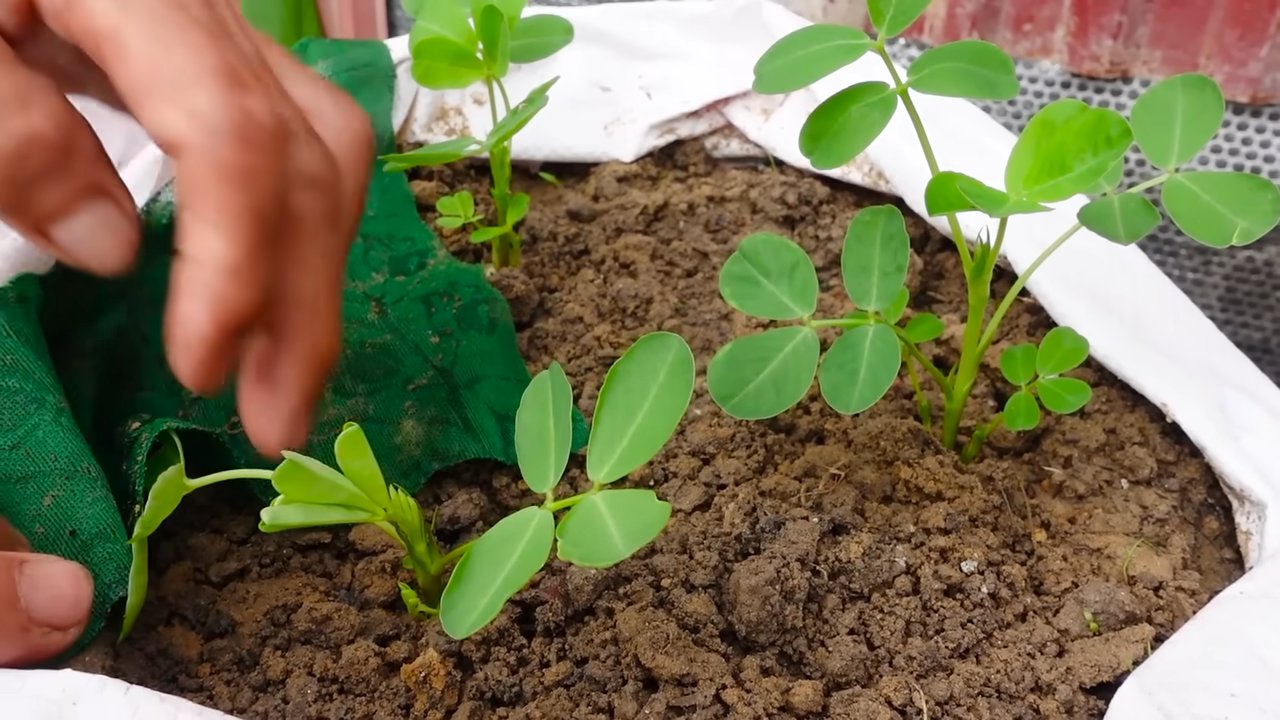
Planting the Peanuts
Now for the fun part – planting! Here’s my planting process:
1. Timing: Peanuts need warm soil to germinate, so wait until after the last frost and the soil temperature is consistently above 65°F (18°C). I usually plant in late spring or early summer.
2. Soaking the Seeds: I like to soak my peanut seeds (or raw peanuts in the shell) in water for a few hours before planting. This helps to soften the shell and speed up germination.
3. Planting Depth and Spacing: Plant the peanuts about 1-2 inches deep and 6-8 inches apart in rows that are 2-3 feet apart.
4. Watering: After planting, water the soil thoroughly. Keep the soil consistently moist but not waterlogged until the seedlings emerge.
Caring for Your Peanut Plants
Peanuts are relatively low-maintenance plants, but they do need some care to thrive.
* Watering: Water regularly, especially during dry spells. Peanuts need about 1 inch of water per week. Avoid overhead watering, as this can promote fungal diseases. Drip irrigation is ideal.
* Weeding: Keep the area around your peanut plants free of weeds. Weeds compete with the peanuts for nutrients and water. Hand-pulling weeds is the best option, as herbicides can damage the peanut plants.
* Hilling: This is a crucial step! As the peanut plants grow, they will produce “pegs” that grow downwards from the base of the plant into the soil. These pegs are what develop into peanuts. To encourage peanut production, hill the soil around the base of the plants every few weeks. This means gently mounding soil around the base of the plants to cover the pegs.
* Fertilizing (Again): About a month after planting, I like to give my peanut plants another dose of fertilizer. Again, use a balanced fertilizer and follow the instructions on the package.
* Pest and Disease Control: Peanuts can be susceptible to pests like aphids, spider mites, and leafhoppers. Check your plants regularly for signs of infestation and treat accordingly. Fungal diseases can also be a problem, especially in humid climates. To prevent fungal diseases, avoid overhead watering and ensure good air circulation around the plants.
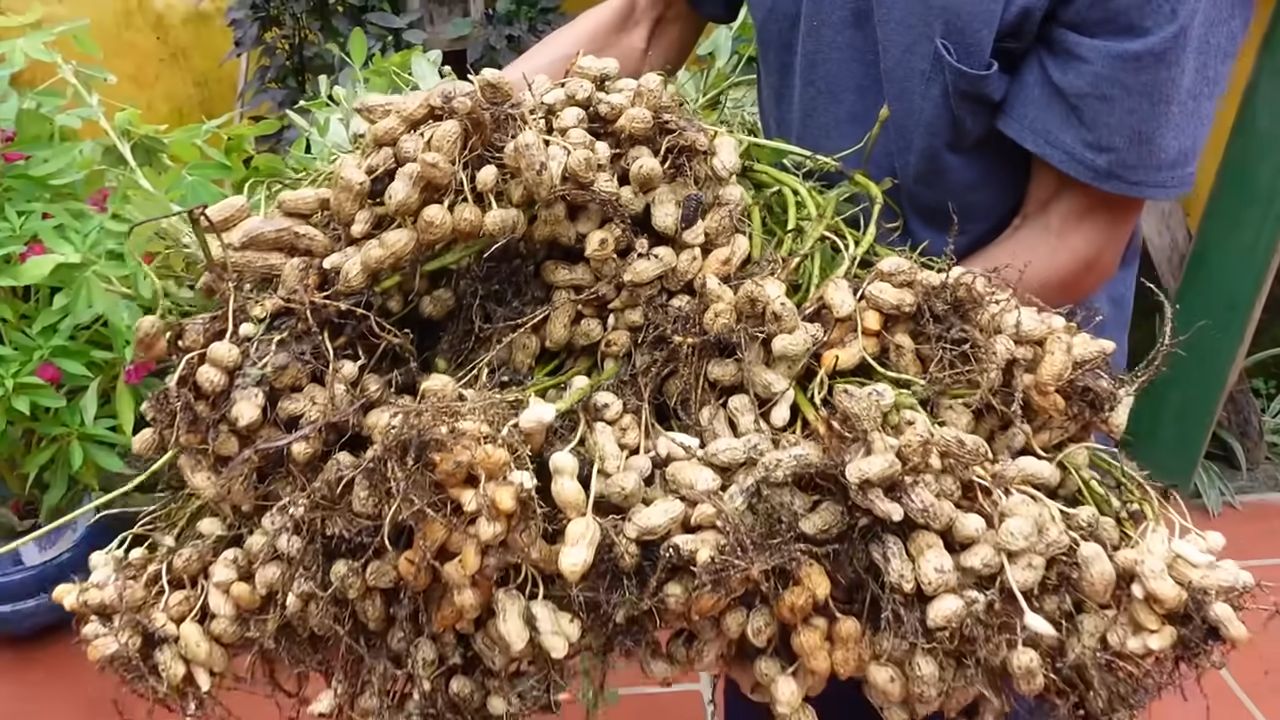
Harvesting Your Peanuts
This is the moment we’ve been waiting for! Knowing when to harvest your peanuts is key.
1. Timing: Peanuts are typically ready to harvest about 120-150 days after planting, depending on the variety. A good indicator is when the foliage starts to turn yellow and the lower leaves begin to die back.
2. Testing: To be sure, dig up a few plants and check the peanuts. The shells should be well-formed and the kernels should be plump and mature.
3. Digging: Once you’re ready to harvest, use a garden fork or shovel to carefully dig up the entire plant, being careful not to damage the peanuts.
4. Shaking: Gently shake off any excess soil from the plants.
5. Drying: Hang the plants upside down in a well-ventilated area for 2-4 weeks to dry. This allows the peanuts to cure and develop their flavor. I usually hang them in my garage or shed.
Curing and Storing Your Peanuts
Proper curing and storage are essential for preserving the quality of your peanuts.
* Curing: As mentioned above, curing involves drying the peanuts on the plant for several weeks. This reduces the moisture content and prevents mold growth.
* Shelling: Once the peanuts are cured, you can shell them. This can be done by hand or with a peanut sheller.
* Storing: Store the shelled peanuts in an airtight container in a cool, dry place. They can also be frozen for longer storage.
Roasting Your Homegrown Peanuts
Now for the best part – roasting and enjoying your homegrown peanuts!
1. Preheating: Preheat your oven to 350°F (175°C).
2. Preparing: Spread the shelled peanuts in a single layer on a baking sheet.
3. Roasting: Roast the peanuts for 15-20 minutes, or until they are golden brown and fragrant. Stir them occasionally to ensure even roasting.
4. Cooling: Remove the peanuts from the oven and let them cool completely on the baking sheet.
5. Salting (Optional): If desired, sprinkle the peanuts with salt while they are still warm.
And there you have it! Delicious, homegrown roasted peanuts. Enjoy!
Troubleshooting Common Peanut Growing Problems
Even with the best care, you might encounter some problems while growing peanuts. Here are a few common issues and how to address them:
* Poor Germination: If your peanut seeds aren’t germinating, it could be due to cold soil, poor quality seeds, or overwatering. Make sure the soil is warm enough before planting, use fresh seeds, and avoid overwatering.
* Yellowing Leaves: Yellowing leaves can be a sign of nutrient deficiency, especially nitrogen. Try fertilizing with a balanced fertilizer.
* Small Peanuts: Small peanuts can be caused by poor soil, insufficient watering, or lack of hilling. Make sure your soil is well-drained and fertile, water regularly, and hill the soil around the plants.
* Pest Infestations: Keep an eye out for pests like aphids, spider mites, and leafhoppers. Treat infestations promptly with insecticidal soap or other appropriate pesticides.
* Fungal Diseases: Prevent fungal diseases by avoiding overhead watering, ensuring good air circulation, and using disease-resistant varieties.
Extra Tips for Peanut Growing Success
Here are a few extra tips that I’ve learned over the years:
* Rotate Crops: Don’t plant peanuts in the same spot year after year. Crop rotation helps to prevent soilborne diseases and pests.
* Use Inoculant: Peanut plants benefit from inoculation with nitrogen-fixing bacteria. You can purchase peanut inoculant at most garden centers.
*
Conclusion
So, there you have it! Growing peanuts at home is not only achievable but also a deeply rewarding experience. Forget the store-bought peanuts that may have traveled thousands of miles and sat on shelves for who knows how long. Imagine the satisfaction of harvesting your own fresh, flavorful peanuts, knowing exactly where they came from and how they were grown. This DIY trick transforms your garden into a source of delicious and nutritious snacks, offering a connection to nature that’s hard to beat.
Why is this a must-try? Because it’s more than just growing peanuts; it’s about embracing sustainability, reducing your carbon footprint, and enjoying the unparalleled taste of homegrown goodness. It’s about teaching children where their food comes from and fostering a love for gardening. It’s about creating a unique and engaging project that the whole family can enjoy. And let’s be honest, who can resist the allure of freshly roasted peanuts straight from their own backyard?
But the fun doesn’t stop there! Feel free to experiment with different peanut varieties to discover your favorite flavor profile. Try Valencia peanuts for their sweetness, Virginia peanuts for their large size, or Spanish peanuts for their intense nutty flavor. You can also explore different roasting methods, from oven roasting to pan roasting, to achieve your perfect level of crispness and flavor. Consider adding spices like chili powder, smoked paprika, or garlic powder for a savory twist. Or, for a sweet treat, try coating your roasted peanuts in honey or maple syrup.
Growing peanuts at home also opens up a world of culinary possibilities. Use your homegrown peanuts to make homemade peanut butter, add them to stir-fries and salads for a crunchy texture, or incorporate them into your favorite baking recipes. The possibilities are endless!
We wholeheartedly encourage you to give this DIY trick a try. It’s easier than you might think, and the rewards are well worth the effort. Don’t be afraid to get your hands dirty, embrace the learning process, and enjoy the journey from seed to snack.
Once you’ve harvested your first batch of homegrown peanuts, we’d love to hear about your experience! Share your tips, tricks, and photos with us in the comments below. Let’s create a community of peanut-growing enthusiasts and inspire others to embark on this exciting gardening adventure. What variety did you grow? What challenges did you face, and how did you overcome them? What’s your favorite way to enjoy your homegrown peanuts? Your insights will be invaluable to other aspiring peanut growers. So, get planting, get growing, and get ready to enjoy the delicious taste of homegrown peanuts!
Frequently Asked Questions (FAQ)
1. What is the best time of year to plant peanuts?
The ideal time to plant peanuts is in the spring, after the last frost when the soil temperature has consistently reached at least 65 degrees Fahrenheit (around 18 degrees Celsius). Peanuts need a long, warm growing season of at least 120-150 days to mature properly. In most regions, this means planting in late April or early May. However, this can vary depending on your specific climate and the length of your growing season. Check your local weather forecasts and planting guides to determine the best planting time for your area. Planting too early in cold soil can lead to poor germination and stunted growth.
2. What kind of soil is best for growing peanuts?
Peanuts thrive in well-drained, sandy loam soil that is rich in organic matter. The soil should be loose and friable to allow the developing peanut pods to easily penetrate the ground. Avoid heavy clay soils, as they can become compacted and restrict pod development. The ideal soil pH for peanuts is between 6.0 and 6.5. Before planting, amend your soil with compost or other organic matter to improve drainage and fertility. You can also add gypsum to provide calcium, which is essential for peanut pod development. If your soil is particularly heavy, consider growing peanuts in raised beds or containers to improve drainage.
3. How much sunlight do peanuts need?
Peanuts require at least 6-8 hours of direct sunlight per day to thrive. Choose a planting location that receives full sun throughout the day. Insufficient sunlight can lead to weak, leggy plants and reduced peanut production. If you are growing peanuts in containers, make sure to place them in a sunny spot. You may need to rotate the containers periodically to ensure that all sides of the plants receive adequate sunlight.
4. How often should I water my peanut plants?
Peanuts need consistent moisture, especially during flowering and pod development. Water deeply and regularly, aiming to keep the soil consistently moist but not waterlogged. Avoid overhead watering, as this can promote fungal diseases. Instead, water at the base of the plants using a soaker hose or drip irrigation system. The frequency of watering will depend on your climate, soil type, and the age of the plants. Check the soil moisture regularly and water when the top inch of soil feels dry to the touch. During periods of drought or extreme heat, you may need to water more frequently.
5. How do I know when my peanuts are ready to harvest?
The timing of peanut harvest is crucial for optimal flavor and yield. Peanuts are typically ready to harvest in the fall, about 120-150 days after planting. A good indicator of maturity is when the foliage begins to yellow and the lower leaves start to drop. You can also dig up a few plants to check the peanut pods. The pods should be plump and well-filled, with a distinct veining pattern on the shells. The inside of the shells should be dark in color. If the pods are still small and immature, wait a few more weeks before harvesting. Harvesting too early can result in underdeveloped peanuts with poor flavor. Harvesting too late can lead to the pods rotting in the ground.
6. What are some common pests and diseases that affect peanut plants, and how can I control them?
Peanut plants can be susceptible to various pests and diseases, including aphids, spider mites, leaf spot, and root rot. To prevent pest and disease problems, choose disease-resistant peanut varieties, practice good sanitation, and provide adequate air circulation. Regularly inspect your plants for signs of pests or diseases. If you detect any problems, take action promptly. For aphids and spider mites, you can try spraying the plants with insecticidal soap or neem oil. For leaf spot, remove and destroy infected leaves and apply a fungicide if necessary. To prevent root rot, ensure that your soil is well-drained and avoid overwatering. Crop rotation can also help to reduce the incidence of soilborne diseases.
7. Can I grow peanuts in containers?
Yes, you can successfully grow peanuts in containers, especially if you have limited garden space or heavy clay soil. Choose a large container that is at least 18 inches deep and wide to accommodate the developing peanut pods. Fill the container with a well-draining potting mix that is rich in organic matter. Make sure the container has drainage holes to prevent waterlogging. Plant 3-4 peanut seeds per container and water regularly. Place the container in a sunny location that receives at least 6-8 hours of direct sunlight per day. Container-grown peanuts may require more frequent watering and fertilization than peanuts grown in the ground.
8. How do I cure and store my harvested peanuts?
After harvesting your peanuts, it’s important to cure them properly to improve their flavor and shelf life. To cure peanuts, gently shake off any excess soil and spread them out in a single layer on a wire mesh screen or clean surface. Place the peanuts in a well-ventilated area, such as a garage or shed, away from direct sunlight. Allow the peanuts to dry for 2-3 weeks, or until the shells are completely dry and brittle. Once the peanuts are cured, you can store them in airtight containers in a cool, dry place. Properly cured and stored peanuts can last for several months. You can also freeze peanuts for longer storage.
Leave a Comment