
Growing Cabbage in Bottles might sound like something out of a science fiction movie, but trust me, it’s a surprisingly effective and space-saving gardening technique! Have you ever dreamed of harvesting fresh, crisp cabbage right from your balcony or even your kitchen windowsill? Well, dream no more! This DIY guide will unlock the secrets to cultivating these leafy greens in a way you never thought possible.
While container gardening itself has ancient roots, with evidence suggesting its practice in ancient Egypt and Rome, the modern twist of using recycled bottles adds a sustainable and innovative edge. It’s a fantastic way to reduce waste while simultaneously enjoying the fruits (or rather, vegetables!) of your labor.
Let’s face it, traditional gardening can be intimidating. Large plots, tilling soil, and battling pests can feel overwhelming. But growing cabbage in bottles offers a simplified, manageable approach, especially for those with limited space or time. This method minimizes soil-borne diseases, controls pests more easily, and allows you to move your cabbage plants to the best sunlight conditions. Plus, it’s a conversation starter! Imagine the look on your friends’ faces when they see your thriving cabbage patch in repurposed bottles. I’m excited to share this simple yet effective method with you, so let’s get started and transform those empty bottles into a miniature cabbage farm!
Growing Cabbage in Bottles: A Fun and Space-Saving DIY Project
Hey there, fellow gardening enthusiasts! Are you short on space but still dreaming of fresh, homegrown cabbage? Well, I’ve got a fantastic solution for you: growing cabbage in bottles! It’s a surprisingly effective and visually appealing way to cultivate these leafy greens, even if you only have a balcony or a small patio. Let’s dive into this exciting DIY project!
What You’ll Need
Before we get our hands dirty, let’s gather all the necessary supplies. Here’s a comprehensive list:
* Plastic Bottles: The star of the show! I recommend using 2-liter soda bottles or larger water bottles. The bigger, the better, as it gives the cabbage roots more room to grow. You’ll need one bottle per cabbage plant.
* Potting Mix: A good quality potting mix is crucial for healthy cabbage growth. Avoid using garden soil directly, as it can be too dense and may contain pests or diseases.
* Cabbage Seeds or Seedlings: You can start from seeds or purchase seedlings from your local nursery. Starting from seeds gives you more control over the variety, but seedlings offer a head start.
* Scissors or a Utility Knife: For cutting the plastic bottles. Be careful!
* Drill or Screwdriver: To create drainage holes in the bottles.
* Watering Can or Hose: For watering your cabbage plants.
* Fertilizer: A balanced fertilizer will provide the necessary nutrients for optimal growth. I prefer a slow-release granular fertilizer, but liquid fertilizer works too.
* Optional:
* Gloves: To protect your hands.
* Measuring cup: For accurate fertilizer application.
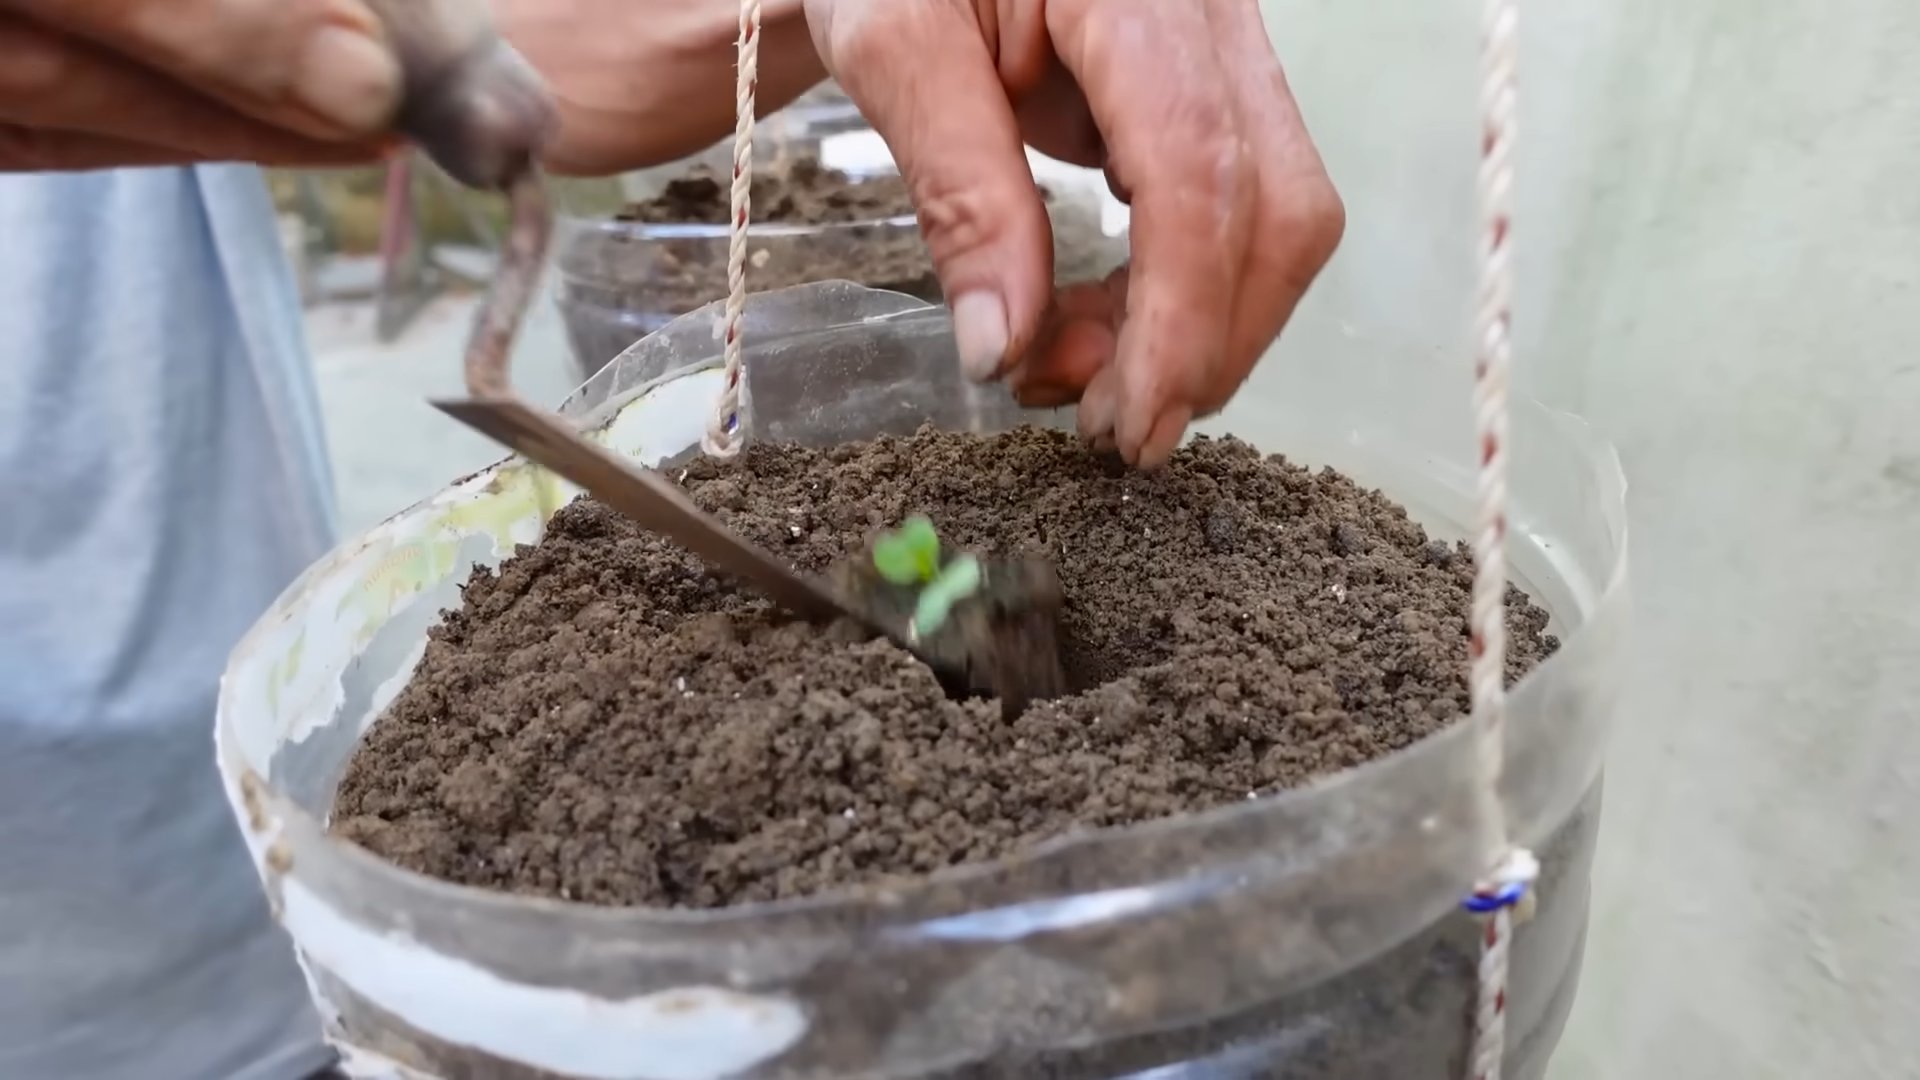
* Small trowel or spoon: For transplanting seedlings.
* Labels: To identify different cabbage varieties.
Preparing the Bottles
This is where we transform those ordinary plastic bottles into mini cabbage gardens!
1. Clean the Bottles: Thoroughly wash the plastic bottles with soap and water to remove any residue. Rinse them well and let them dry completely. This step is important to prevent any contamination that could harm your plants.
2. Cut the Bottles: There are a couple of ways to cut the bottles, depending on your preference and the size of the bottle.
* Method 1 (Horizontal Cut): Cut the bottle horizontally, about one-third of the way down from the top. You’ll essentially be creating two separate pieces: a larger bottom section and a smaller top section. The bottom section will hold the potting mix and the cabbage plant, while the top section can be inverted and used as a mini-greenhouse initially.
* Method 2 (Vertical Cut): Cut the bottle vertically, starting from the top and going down about two-thirds of the way. This creates a flap that you can open and close. This method is useful for larger bottles and allows for easier access to the plant.
3. Create Drainage Holes: This is absolutely essential! Cabbage plants need well-draining soil to prevent root rot. Use a drill or screwdriver to create several drainage holes in the bottom of the bottle. I usually make about 5-6 holes, evenly spaced.
4. Optional: Paint or Decorate: If you want to add a personal touch, you can paint or decorate the bottles. Use non-toxic paint that is safe for plants. This is a fun way to make your bottle garden more visually appealing.
Planting the Cabbage
Now for the exciting part – planting our cabbage!
1. Fill the Bottles with Potting Mix: Fill the prepared bottles with high-quality potting mix, leaving about an inch of space at the top. Gently press down the soil to remove any air pockets.
2. Sowing Seeds (if starting from seeds): If you’re starting from seeds, sow 2-3 seeds per bottle, about half an inch deep. Cover the seeds with potting mix and gently water them. Keep the soil consistently moist but not waterlogged.
3. Transplanting Seedlings (if using seedlings): If you’re using seedlings, carefully remove them from their containers. Gently loosen the roots and place the seedling in the center of the bottle. Fill the remaining space with potting mix, ensuring that the top of the root ball is level with the soil surface. Gently press down the soil around the seedling.
4. Water Thoroughly: After planting, water the cabbage plants thoroughly. This will help settle the soil and ensure that the roots are properly hydrated.
5. Optional: Mini-Greenhouse Effect: If you used the horizontal cut method, you can invert the top section of the bottle and place it over the bottom section to create a mini-greenhouse. This will help retain moisture and warmth, promoting faster germination and growth, especially in cooler climates. Remove the top section once the seedlings have emerged or the seedling has established itself.
Caring for Your Cabbage Plants
Proper care is essential for healthy and productive cabbage plants.
1. Sunlight: Cabbage plants need at least 6 hours of direct sunlight per day. Place your bottle garden in a sunny location, such as a balcony, patio, or windowsill. If you don’t have enough natural sunlight, you can supplement with grow lights.
2. Watering: Water your cabbage plants regularly, especially during hot and dry weather. The soil should be consistently moist but not waterlogged. Check the soil moisture by sticking your finger into the soil. If the top inch feels dry, it’s time to water.
3. Fertilizing: Cabbage plants are heavy feeders and require regular fertilization. Apply a balanced fertilizer every 2-3 weeks, following the instructions on the fertilizer packaging. I like to use a slow-release granular fertilizer, as it provides a steady supply of nutrients over time.
4. Pest and Disease Control: Keep an eye out for pests and diseases. Common cabbage pests include aphids, cabbage worms, and slugs. You can control these pests with insecticidal soap, neem oil, or by handpicking them off the plants. Common cabbage diseases include black rot and clubroot. Prevent these diseases by providing good air circulation, avoiding overwatering, and using disease-resistant varieties.
5. Support: As the cabbage head grows larger, it may become top-heavy and require support. You can use stakes or cages to support the plant and prevent it from falling over.
6. Crop Rotation: If you plan to grow cabbage in bottles year after year, it’s important to practice crop rotation. This means planting different types of plants in the same bottles each year to prevent the buildup of soilborne diseases.
Harvesting Your Cabbage
The moment we’ve all been waiting for – harvesting our homegrown cabbage!
1. Timing: Cabbage is typically ready to harvest 60-100 days after planting, depending on the variety. The head should be firm and compact.
2. Harvesting: To harvest, use a sharp knife to cut the cabbage head from the stem, close to the base of the plant.
3. Enjoy! Now you can enjoy your fresh, homegrown cabbage in salads, soups, stews, or any other dish you like.
Tips and Tricks for Success
Here are a few extra tips and tricks to help you succeed with your bottle cabbage garden:
* Choose the Right Variety: Select cabbage varieties that are well-suited for container gardening. Smaller varieties, such as ‘Dwarf Morden’ or ‘Golden Acre,’ are ideal.
* Provide Adequate Drainage: Make sure the bottles have plenty of drainage holes to prevent root rot.
* Use High-Quality Potting Mix: Don’t skimp on the potting mix. A good quality potting mix will provide the necessary nutrients and drainage for healthy cabbage growth.
* Water Regularly: Cabbage plants need consistent moisture, especially during hot weather.
* Fertilize Regularly: Cabbage plants are heavy feeders and require regular fertilization.
* Protect from Pests and Diseases: Keep an eye out for pests and diseases and take action promptly.
* Rotate Crops: If you plan to grow cabbage in bottles year after year, practice crop rotation.
* Experiment: Don’t be afraid to experiment with different varieties, fertilizers, and growing techniques.
Troubleshooting
Even with the best care, you may encounter some problems along the way. Here are some common issues and how to address them:
* Yellowing Leaves: This could be a sign of nutrient deficiency, overwatering, or underwatering. Check the soil moisture and fertilize if necessary.
* Stunted Growth: This could be due to poor soil, lack of sunlight, or pest infestation. Ensure the plants are getting enough sunlight, fertilize regularly, and check for pests.
* Root Rot: This is caused by overwatering and poor drainage. Make sure the bottles have adequate drainage holes and avoid overwatering.
* Pest Infestation: Common cabbage pests include aphids, cabbage worms, and slugs. Control
Conclusion
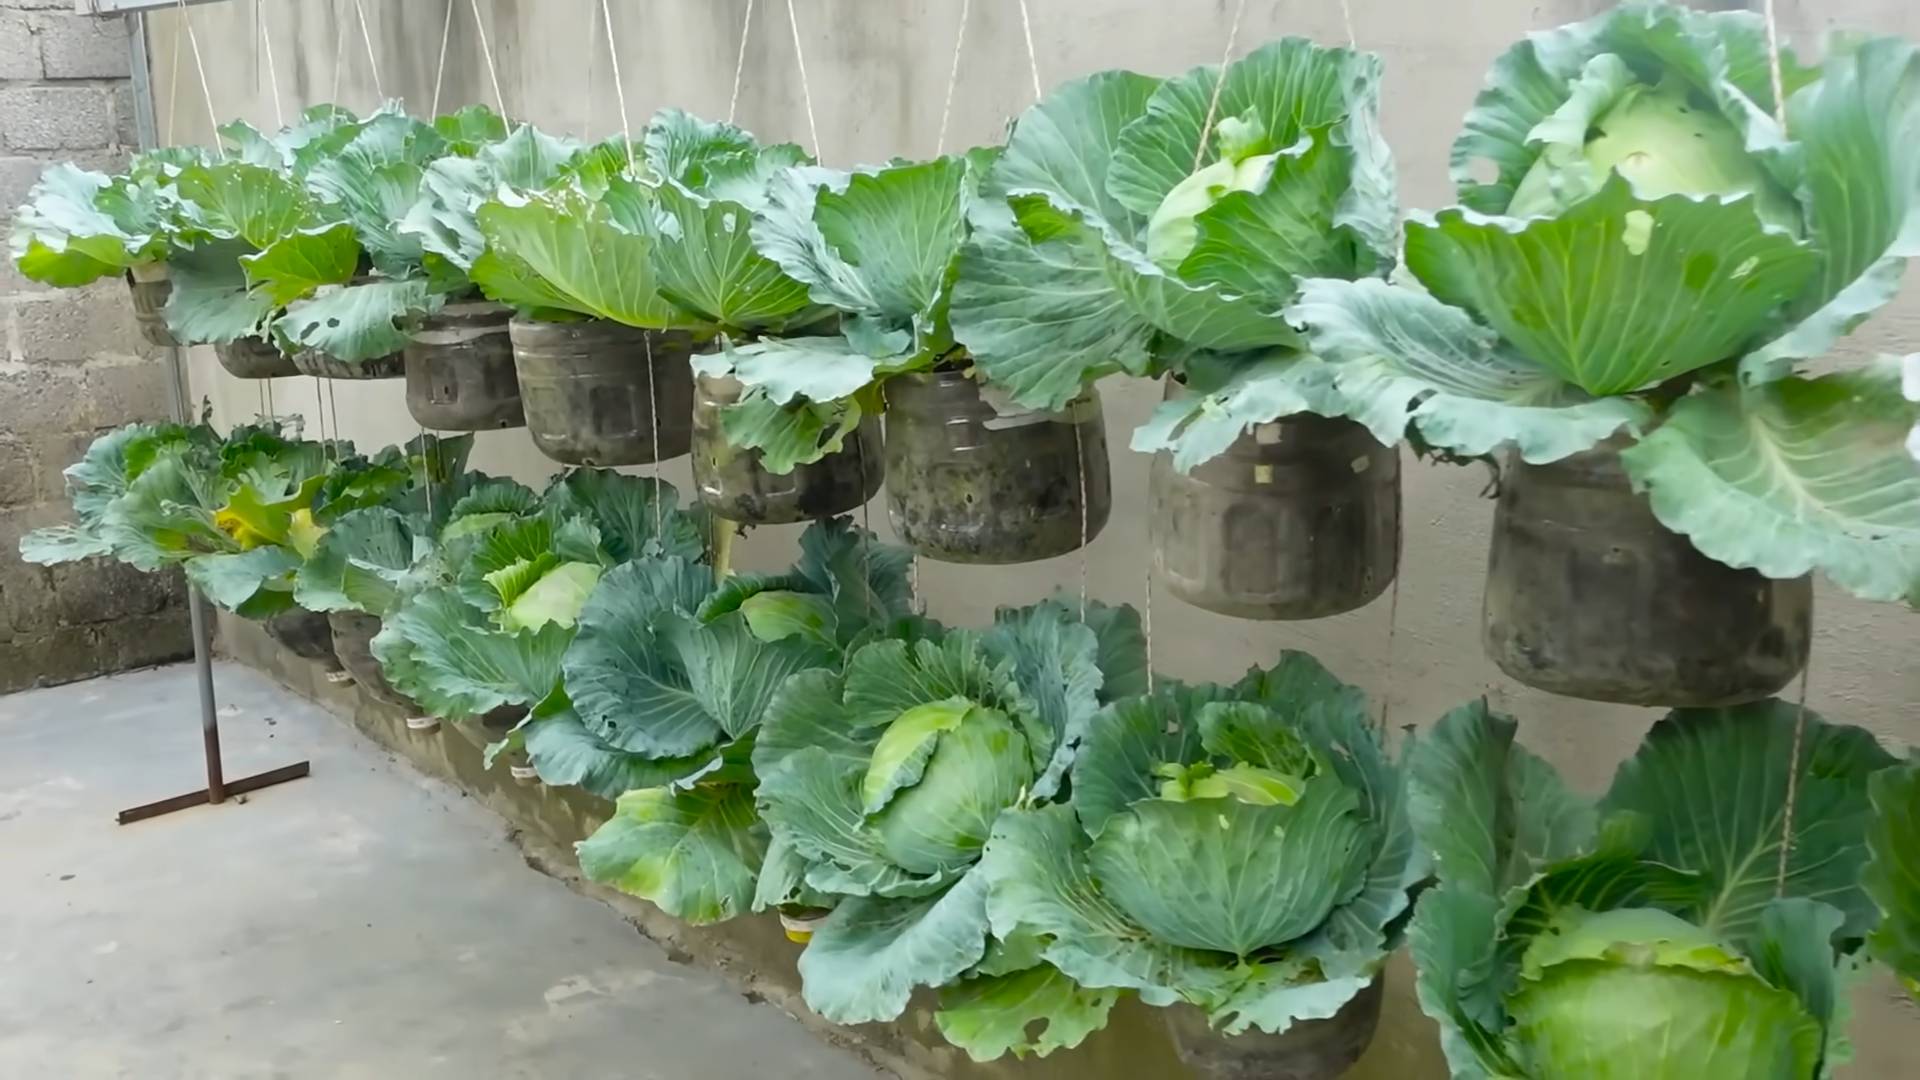
So, there you have it! Growing cabbage in bottles might sound unconventional, but it’s a surprisingly effective and rewarding method, especially for urban gardeners or those with limited space. This DIY trick transforms discarded plastic bottles into miniature cabbage patches, offering a sustainable and space-saving solution for cultivating fresh, homegrown vegetables.
Why is this a must-try? Firstly, it’s incredibly space-efficient. Forget sprawling garden beds; a few bottles hanging on a balcony or lining a sunny windowsill can yield a surprising amount of delicious cabbage. Secondly, it’s a fantastic way to recycle and reduce plastic waste, turning potential landfill fodder into a productive resource. Thirdly, it offers better control over the growing environment. You can easily move the bottles to optimize sunlight exposure, protect them from harsh weather, and monitor soil moisture levels more closely. Finally, it’s a fun and engaging project, perfect for getting kids involved in gardening and teaching them about sustainability.
But the benefits don’t stop there. Growing cabbage in bottles can also help to minimize pest problems. The elevated position of the bottles makes it harder for ground-dwelling pests like slugs and snails to reach your precious cabbages. Plus, the confined space allows for easier monitoring and treatment of any infestations that do occur.
Ready to take your bottle gardening to the next level? Consider these variations:
* Experiment with different cabbage varieties: While smaller varieties like ‘Golden Acre’ are ideal, you can also try growing other compact cabbage types.
* Add companion plants: Plant herbs like dill or rosemary alongside your cabbage to deter pests and enhance flavor.
* Create a vertical garden: Hang multiple bottles at different heights to maximize space and create a visually appealing display.
* Use different bottle sizes: Larger bottles can accommodate larger cabbage varieties or multiple smaller plants.
* Try hydroponics: Instead of soil, use a nutrient-rich water solution for even faster growth.
We’re confident that once you experience the joy of harvesting your own homegrown cabbage from recycled bottles, you’ll be hooked! It’s a simple, sustainable, and satisfying way to enjoy fresh, healthy vegetables, even in the smallest of spaces.
Don’t just take our word for it – give it a try! We encourage you to embark on your own bottle cabbage growing adventure. Share your experiences, tips, and photos with us in the comments below. We’d love to see your creative setups and hear about your successes (and any challenges you encounter along the way). Let’s build a community of bottle cabbage enthusiasts and inspire others to embrace this innovative and eco-friendly gardening method. Remember, even small actions can make a big difference in creating a more sustainable future. So, grab some bottles, some soil, and some cabbage seeds, and get growing! This DIY trick is a game changer for small space gardening.
Frequently Asked Questions (FAQ)
What type of cabbage is best for growing in bottles?
Smaller, compact cabbage varieties are generally the best choice for bottle gardening. ‘Golden Acre’ is a popular option due to its relatively small size and quick maturity. Other suitable varieties include ‘Dwarf Morden’, ‘Early Jersey Wakefield’, and ‘Savoy Ace’. These varieties tend to produce smaller heads that are well-suited to the limited space within a bottle. Avoid larger varieties like ‘Brunswick’ or ‘January King’, as they may outgrow the available space and struggle to thrive.
What size bottle should I use?
The ideal bottle size depends on the cabbage variety you choose. For smaller varieties like ‘Golden Acre’, a 2-liter bottle can be sufficient. However, for slightly larger varieties, a 3-liter or even a 5-liter bottle may be necessary to provide adequate space for root development and head growth. Ensure the bottle is sturdy enough to support the weight of the soil and the growing plant. Clear or translucent bottles are preferable, as they allow you to monitor soil moisture levels more easily.
What type of soil should I use?
A well-draining potting mix is essential for growing cabbage in bottles. Avoid using garden soil, as it can be too heavy and compact, leading to poor drainage and root rot. A good potting mix should contain a blend of peat moss, perlite, and vermiculite. You can also add compost or other organic matter to enrich the soil and provide essential nutrients. Ensure the soil is slightly acidic, with a pH between 6.0 and 6.8, which is ideal for cabbage growth.
How often should I water my cabbage plants in bottles?
Watering frequency depends on several factors, including the weather, the size of the bottle, and the type of soil you’re using. Generally, you should water your cabbage plants whenever the top inch of soil feels dry to the touch. Avoid overwatering, as this can lead to root rot. Ensure the bottle has drainage holes to allow excess water to escape. During hot, dry weather, you may need to water your plants daily, while during cooler, wetter weather, you may only need to water them every few days.
How much sunlight do cabbage plants need?
Cabbage plants require at least 6 hours of direct sunlight per day to thrive. Choose a location that receives plenty of sunlight, such as a south-facing balcony or windowsill. If you’re growing your cabbage plants indoors, you may need to supplement with artificial lighting, such as grow lights. Rotate the bottles regularly to ensure all sides of the plant receive adequate sunlight.
How do I fertilize my cabbage plants in bottles?
Cabbage plants are heavy feeders and require regular fertilization to produce healthy heads. Use a balanced fertilizer, such as a 10-10-10 or 20-20-20, diluted to half strength. Fertilize your plants every two to three weeks, following the instructions on the fertilizer label. You can also use organic fertilizers, such as compost tea or fish emulsion. Avoid over-fertilizing, as this can lead to excessive foliage growth and reduced head formation.
How do I protect my cabbage plants from pests and diseases?
Growing cabbage in bottles can help to minimize pest problems, but it’s still important to monitor your plants regularly for signs of infestation. Common cabbage pests include aphids, cabbage worms, and flea beetles. You can control these pests by handpicking them off the plants, spraying them with insecticidal soap, or using organic pesticides like Bacillus thuringiensis (Bt). To prevent diseases, ensure good air circulation around your plants and avoid overwatering. If you notice any signs of disease, such as yellowing leaves or spots, remove the affected leaves immediately and treat the plant with a fungicide.
How long does it take to grow cabbage in bottles?
The time it takes to grow cabbage in bottles depends on the variety you’re growing and the growing conditions. Generally, it takes between 60 and 90 days from planting to harvest. Smaller, faster-maturing varieties like ‘Golden Acre’ may be ready to harvest in as little as 60 days, while larger varieties may take longer. You’ll know your cabbage is ready to harvest when the head is firm and compact.
Can I reuse the bottles for growing cabbage again?
Yes, you can reuse the bottles for growing cabbage again, provided they are cleaned and disinfected properly. After harvesting your cabbage, remove the old soil and wash the bottles thoroughly with soap and water. Disinfect the bottles with a solution of bleach and water (1 part bleach to 9 parts water) to kill any remaining pathogens. Rinse the bottles thoroughly with clean water before reusing them.
What if my cabbage plant outgrows the bottle?
If your cabbage plant outgrows the bottle, you have a few options. You can transplant it to a larger container, such as a pot or a raised bed. Alternatively, you can harvest the cabbage head early, even if it’s not fully mature. While the head may be smaller, it will still be edible and delicious. Finally, you can try pruning the roots to slow down the plant’s growth. However, this can be stressful for the plant and may reduce its yield.
Leave a Comment