
Growing Potatoes in a Bag: Imagine harvesting a bounty of fresh, homegrown potatoes right from your patio or balcony! No sprawling garden needed. Sounds too good to be true? It’s not! This simple, space-saving DIY project is perfect for urban gardeners, apartment dwellers, or anyone looking to add a touch of homegrown goodness to their lives.
For centuries, potatoes have been a staple food around the world, originating in the Andes Mountains of South America. From humble peasant fare to gourmet delights, the potato’s versatility is undeniable. But did you know you don’t need acres of farmland to enjoy the taste of freshly dug potatoes?
I know what you’re thinking: “I don’t have a garden!” That’s perfectly okay! This DIY trick eliminates the need for traditional gardening. Growing Potatoes in a Bag is a fantastic solution for those with limited space. Plus, it’s a fun and rewarding project that even kids can get involved in. Forget back-breaking digging and weeding; this method is clean, easy, and yields surprisingly impressive results. Ready to ditch the store-bought spuds and grow your own delicious potatoes? Let’s get started!
Growing Potatoes in a Bag: A Bountiful Harvest on Your Patio!
Okay, potato lovers, gather ’round! I’m going to show you how to grow a mountain of potatoes right on your patio, balcony, or even in a small garden space. Forget digging up huge plots of land; this bag method is super easy, surprisingly productive, and a whole lot of fun. Trust me, once you taste homegrown potatoes, you’ll never go back to store-bought!
What You’ll Need: The Potato Power Starter Pack
Before we dive in, let’s make sure you have everything you need. This is our potato-growing arsenal:
* A Large Grow Bag: Look for a fabric grow bag (or a sturdy plastic bag) that’s at least 20 gallons in size. The bigger, the better, as it gives the potatoes plenty of room to grow. I personally prefer fabric bags because they allow for better drainage and aeration.
* Seed Potatoes: These aren’t just any potatoes! Seed potatoes are specifically grown for planting and are certified disease-free. You can find them at your local garden center or online. Choose a variety you love to eat! I’m partial to Yukon Golds for their creamy texture and all-purpose use.
* Potting Mix: Don’t use garden soil directly in the bag. It’s too heavy and compacts easily. Instead, opt for a high-quality potting mix that’s light, airy, and well-draining.
* Compost: Compost is like a superfood for your potatoes! It provides essential nutrients and helps retain moisture.
* Water: Obvious, right? But consistent watering is key to a successful potato harvest.
* Fertilizer (Optional): A balanced, slow-release fertilizer can give your potatoes an extra boost, but it’s not strictly necessary if you’re using good compost.
* Scissors or a Knife: For cutting the seed potatoes (if needed).
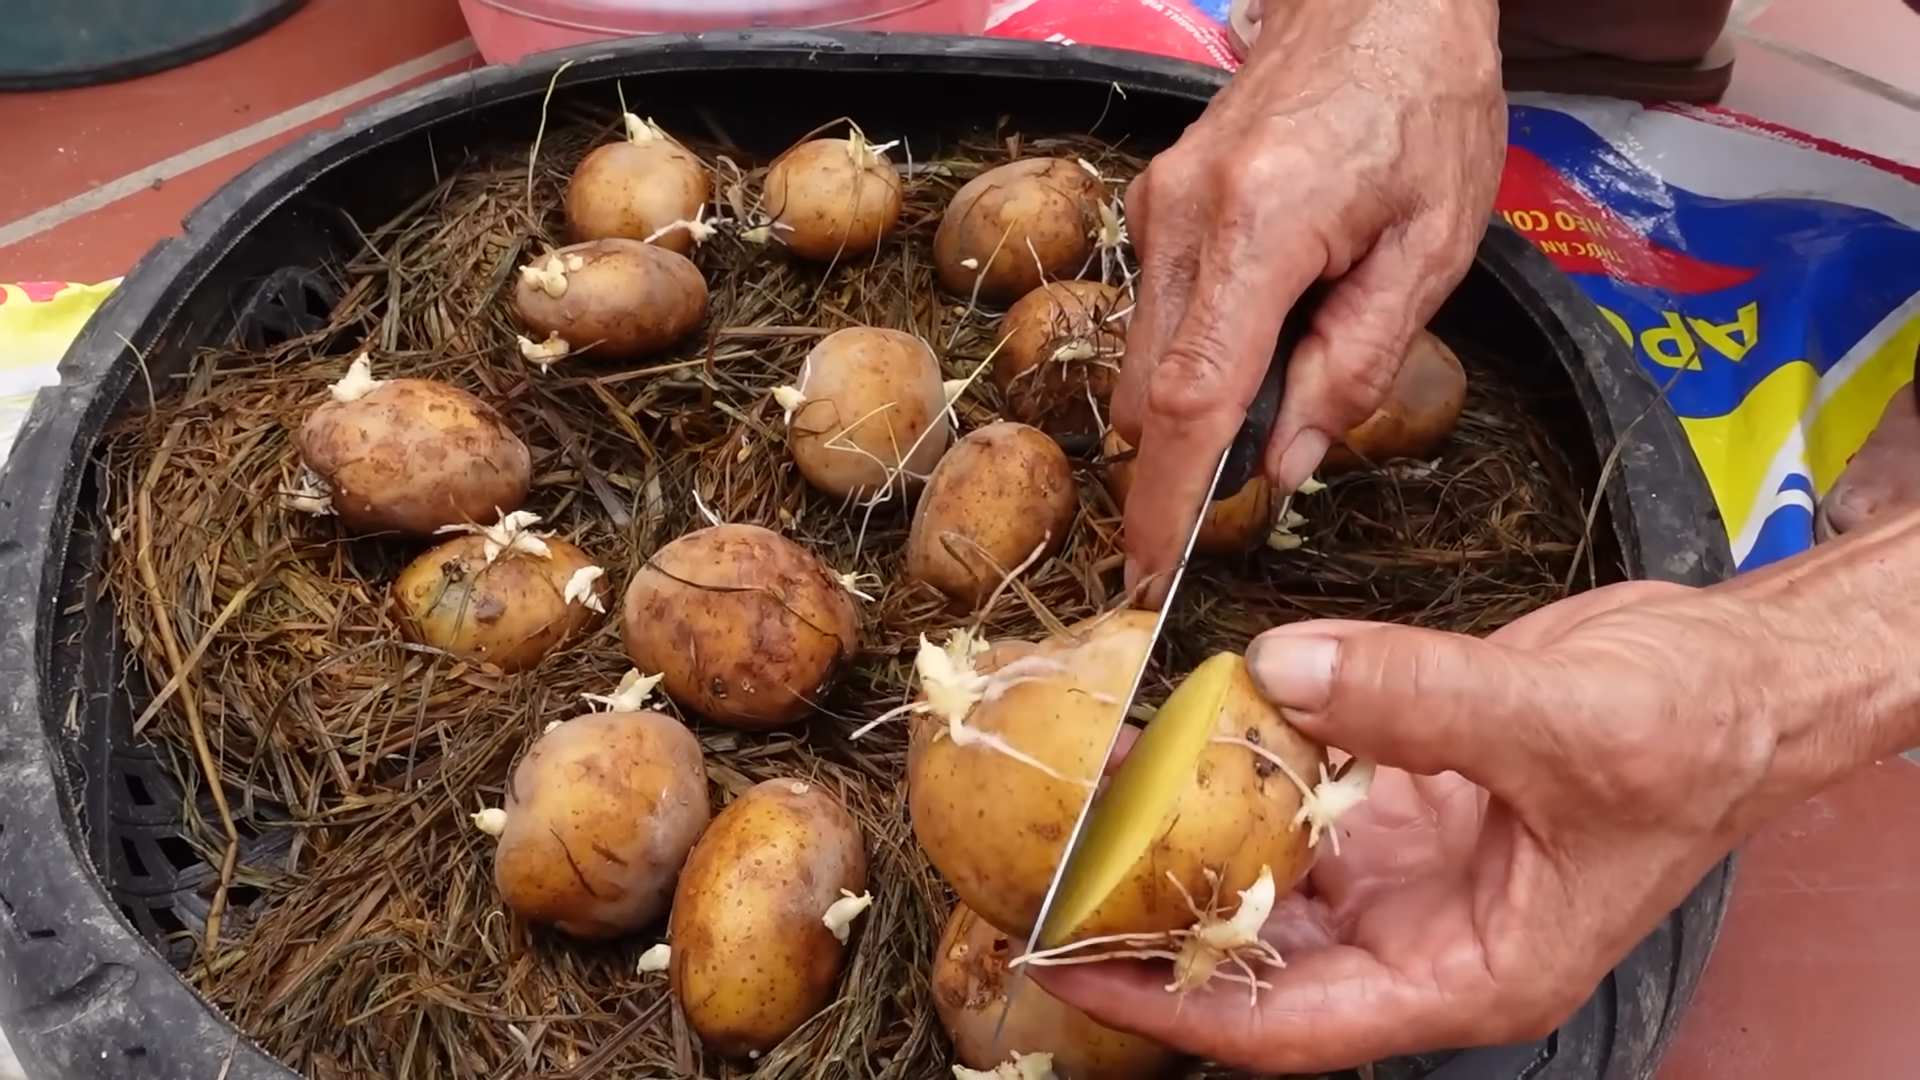
Preparing Your Seed Potatoes: The Spud Spa Treatment
This step is crucial for getting your potatoes off to a strong start.
1. Chitting (Optional but Recommended): Chitting is the process of encouraging your seed potatoes to sprout before planting. This gives them a head start and can result in an earlier harvest. To chit your potatoes, place them in a cool, bright location (but not direct sunlight) for a few weeks. You’ll see small, green sprouts (called “eyes”) emerge from the potatoes.
2. Cutting (If Necessary): If your seed potatoes are large (bigger than an egg), you can cut them into smaller pieces. Each piece should have at least one or two “eyes.” Let the cut pieces dry for a day or two to allow the cut surfaces to callous over. This helps prevent rot. I usually cut mine into pieces about the size of a golf ball.
Planting Your Potatoes: The Bag-Building Bonanza
Now for the fun part! We’re going to layer our bag like a potato lasagna.
1. The First Layer: Pour about 4-6 inches of potting mix into the bottom of your grow bag. Mix in a generous amount of compost. This will be the foundation for your potato plants.
2. Planting the Seed Potatoes: Place your seed potato pieces (or whole small seed potatoes) on top of the soil, with the “eyes” facing upwards. Space them about 8-12 inches apart. If you’re using a very large bag, you can plant more than one potato.
3. Covering the Potatoes: Cover the seed potatoes with another 4-6 inches of potting mix and compost. Gently water the soil until it’s moist but not soggy.
4. Waiting Game: Now, we wait! Place the bag in a sunny location. Potatoes need at least 6-8 hours of sunlight per day. Keep the soil consistently moist, but don’t overwater.
Hilling Your Potatoes: The Soil-Stacking Strategy
This is where the magic happens! Hilling encourages the potato plants to produce more potatoes along their stems.
1. When to Hill: As your potato plants grow, you’ll notice the stems emerging from the soil. When the stems are about 6-8 inches tall, it’s time to hill.
2. The Hilling Process: Add another 4-6 inches of potting mix and compost to the bag, covering the stems of the potato plants, leaving only the top few leaves exposed.
3. Repeat: Continue hilling every few weeks as the plants grow taller. The goal is to fill the bag almost to the top with soil. This encourages the plants to produce potatoes all along the buried stems. I usually hill about 3-4 times during the growing season.
Caring for Your Potato Plants: The TLC Treatment
Okay, potato lovers, gather ’round! I’m going to show you how to grow a mountain of potatoes right on your patio, balcony, or even in a small garden space. Forget digging up huge plots of land; this bag method is super easy, surprisingly productive, and a whole lot of fun. Trust me, once you taste homegrown potatoes, you’ll never go back to store-bought!
What You’ll Need: The Potato Power Starter Pack
Before we dive in, let’s make sure you have everything you need. This is our potato-growing arsenal:
* A Large Grow Bag: Look for a fabric grow bag (or a sturdy plastic bag) that’s at least 20 gallons in size. The bigger, the better, as it gives the potatoes plenty of room to grow. I personally prefer fabric bags because they allow for better drainage and aeration.
* Seed Potatoes: These aren’t just any potatoes! Seed potatoes are specifically grown for planting and are certified disease-free. You can find them at your local garden center or online. Choose a variety you love to eat! I’m partial to Yukon Golds for their creamy texture and all-purpose use.
* Potting Mix: Don’t use garden soil directly in the bag. It’s too heavy and compacts easily. Instead, opt for a high-quality potting mix that’s light, airy, and well-draining.
* Compost: Compost is like a superfood for your potatoes! It provides essential nutrients and helps retain moisture.
* Water: Obvious, right? But consistent watering is key to a successful potato harvest.
* Fertilizer (Optional): A balanced, slow-release fertilizer can give your potatoes an extra boost, but it’s not strictly necessary if you’re using good compost.
* Scissors or a Knife: For cutting the seed potatoes (if needed).
Preparing Your Seed Potatoes: The Spud Spa Treatment
This step is crucial for getting your potatoes off to a strong start.
1. Chitting (Optional but Recommended): Chitting is the process of encouraging your seed potatoes to sprout before planting. This gives them a head start and can result in an earlier harvest. To chit your potatoes, place them in a cool, bright location (but not direct sunlight) for a few weeks. You’ll see small, green sprouts (called “eyes”) emerge from the potatoes.
2. Cutting (If Necessary): If your seed potatoes are large (bigger than an egg), you can cut them into smaller pieces. Each piece should have at least one or two “eyes.” Let the cut pieces dry for a day or two to allow the cut surfaces to callous over. This helps prevent rot. I usually cut mine into pieces about the size of a golf ball.
Planting Your Potatoes: The Bag-Building Bonanza
Now for the fun part! We’re going to layer our bag like a potato lasagna.
1. The First Layer: Pour about 4-6 inches of potting mix into the bottom of your grow bag. Mix in a generous amount of compost. This will be the foundation for your potato plants.
2. Planting the Seed Potatoes: Place your seed potato pieces (or whole small seed potatoes) on top of the soil, with the “eyes” facing upwards. Space them about 8-12 inches apart. If you’re using a very large bag, you can plant more than one potato.
3. Covering the Potatoes: Cover the seed potatoes with another 4-6 inches of potting mix and compost. Gently water the soil until it’s moist but not soggy.
4. Waiting Game: Now, we wait! Place the bag in a sunny location. Potatoes need at least 6-8 hours of sunlight per day. Keep the soil consistently moist, but don’t overwater.
Hilling Your Potatoes: The Soil-Stacking Strategy
This is where the magic happens! Hilling encourages the potato plants to produce more potatoes along their stems.
1. When to Hill: As your potato plants grow, you’ll notice the stems emerging from the soil. When the stems are about 6-8 inches tall, it’s time to hill.
2. The Hilling Process: Add another 4-6 inches of potting mix and compost to the bag, covering the stems of the potato plants, leaving only the top few leaves exposed.
3. Repeat: Continue hilling every few weeks as the plants grow taller. The goal is to fill the bag almost to the top with soil. This encourages the plants to produce potatoes all along the buried stems. I usually hill about 3-4 times during the growing season.
Caring for Your Potato Plants: The TLC Treatment
Happy plants mean happy potatoes!
1. Watering: Keep the soil consistently moist, especially during hot weather. Check the soil moisture regularly by sticking your finger into the soil. If it feels dry an inch or two below the surface, it’s time to water.
2. Fertilizing (Optional): If you’re using fertilizer, follow the instructions on the package. I usually fertilize every few weeks with a balanced, slow-release fertilizer.
3. Pest Control: Keep an eye out for pests like aphids, potato beetles, and flea beetles. If you spot any pests, you can try hand-picking them off the plants or using an organic insecticide.
4. Sunlight: Ensure your potato plants receive at least 6-8 hours of sunlight per day. If you live in a very hot climate, you may need to provide some afternoon shade to prevent the plants from scorching.
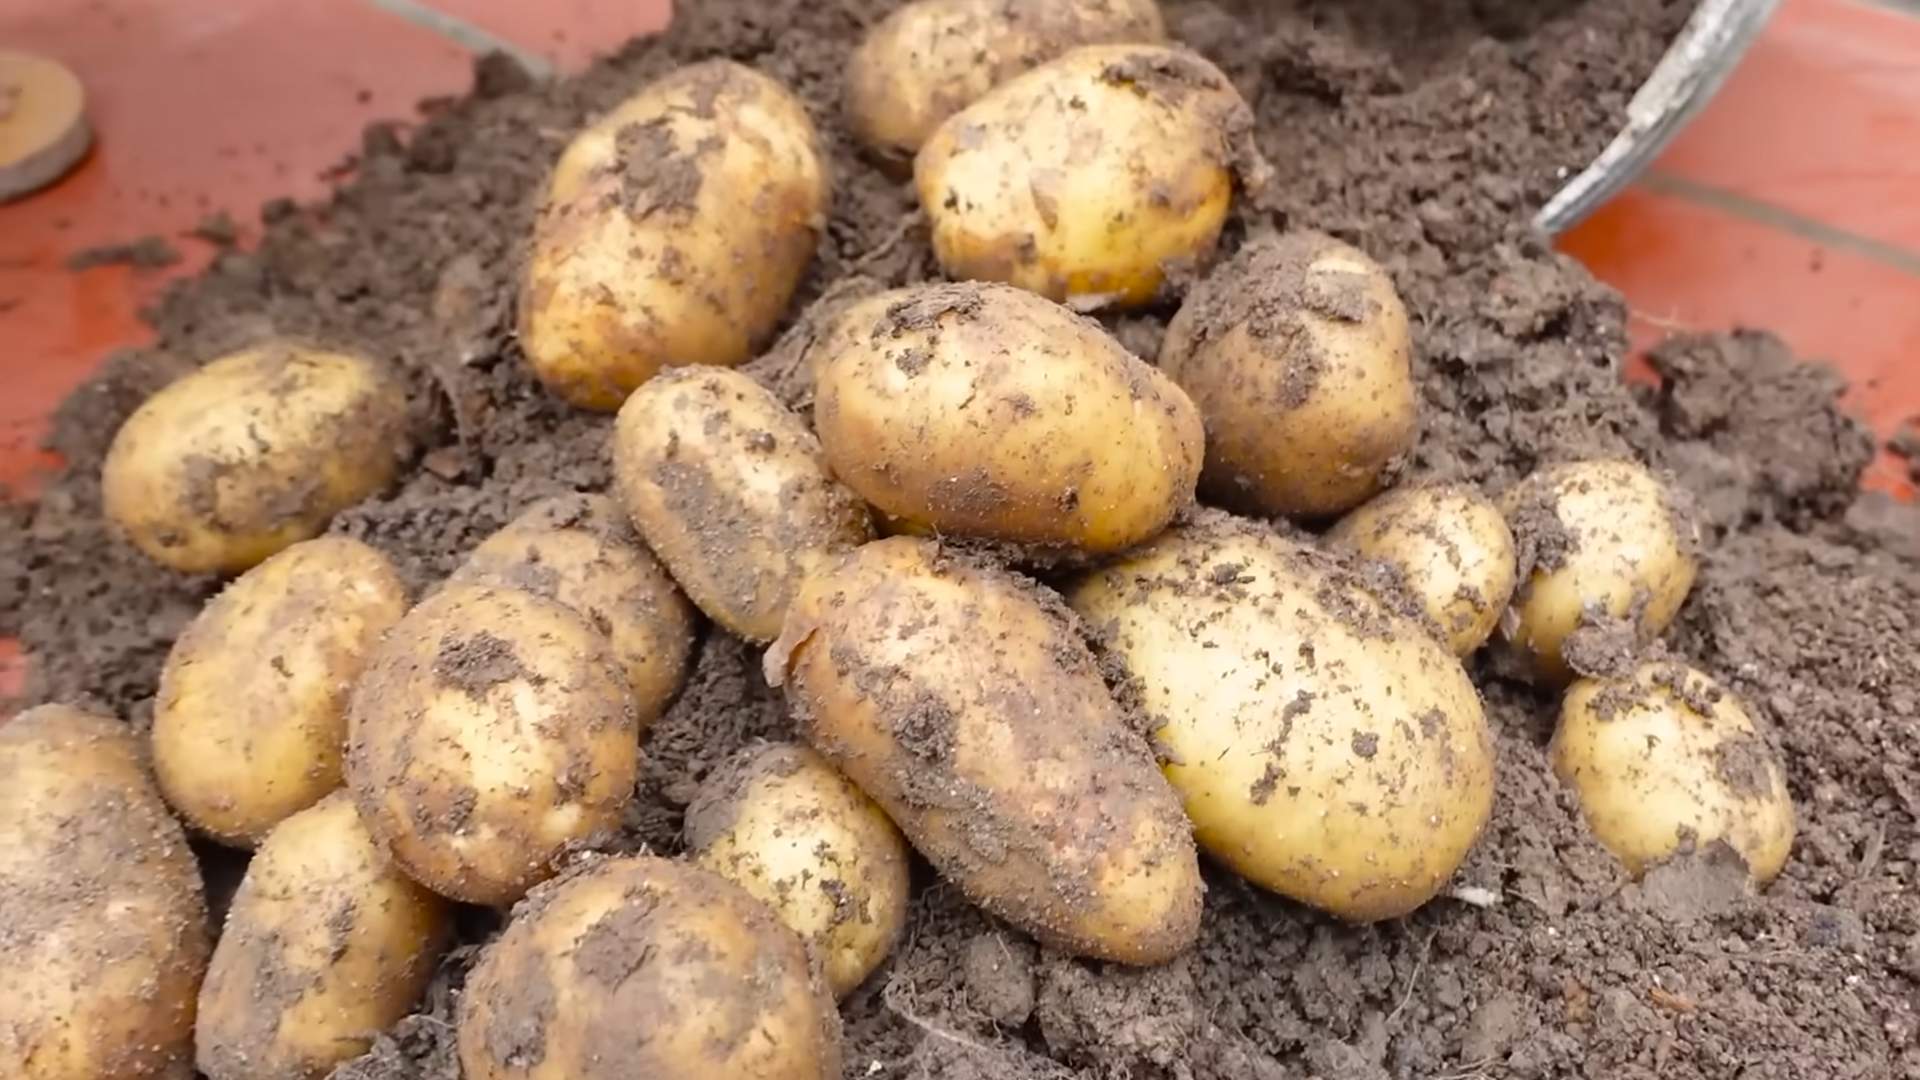
Harvesting Your Potatoes: The Golden Spud Celebration
The moment we’ve all been waiting for!
1. When to Harvest: You can start harvesting “new potatoes” (small, tender potatoes) about 2-3 weeks after the plants flower. To harvest new potatoes, carefully reach into the bag and pull out a few potatoes. Be careful not to disturb the rest of the plant. For a full harvest of mature potatoes, wait until the plants start to die back and the foliage turns yellow or brown. This usually happens about 80-100 days after planting.
2. The Harvesting Process: The easiest way to harvest potatoes from a bag is to simply dump the bag out onto a tarp or other surface. Then, you can sort through the soil and collect your potatoes. It’s like a treasure hunt!
3. Curing (Optional): If you plan to store your potatoes for a long time, you’ll need to cure them. To cure potatoes, spread them out in a cool, dark, and well-ventilated place for about a week. This allows the skins to harden and helps prevent rot.
Troubleshooting: Potato Problems and Solutions
Even with the best care, you might encounter a few challenges along the way. Here are some common potato problems and how to fix them:
* Yellowing Leaves: This could be a sign of overwatering, underwatering, nutrient deficiency, or disease. Check the soil moisture and adjust your watering accordingly. If the soil is dry, water deeply. If the soil is soggy, allow it to dry out before watering again. You can also try fertilizing with a balanced fertilizer.
* Potato Blight: This is a fungal disease that can cause brown spots on the leaves and stems. To prevent potato blight, choose disease-resistant varieties and avoid overhead watering. If you see signs of blight, remove the affected leaves and stems immediately. You can also try spraying with a fungicide.
* Pests: As mentioned earlier, keep an eye out for pests like aphids, potato beetles, and flea beetles. Hand-pick them off the plants or use an organic insecticide.
Potato Varieties: A World of Spud Possibilities
Choosing the right potato variety is key to a successful and delicious harvest. Here are a few popular varieties to consider:
* Yukon Gold: A classic all-purpose potato with a creamy texture and buttery flavor.
* Red Pontiac: A red-skinned potato with a waxy texture, perfect for boiling and salads.
* Russet Burbank: The classic baking potato, with a fluffy texture and earthy flavor.
* Fingerling Potatoes: Small, elongated potatoes with a unique flavor and texture. They come in a variety of colors, including red, yellow, and purple.
* Purple Potatoes: These potatoes are packed with antioxidants and have a slightly nutty flavor.
Tips and Tricks for Potato-Growing Success: The Potato Pro Playbook
Here are a few extra tips to help you grow the best potatoes ever:
* Rotate Your Crops: Don’t plant potatoes in the same spot every year. Rotate your crops to prevent soilborne diseases.
* Use a Soil Thermometer: Potatoes grow best when the soil temperature is between 60 and 70 degrees Fahrenheit. Use a soil thermometer to monitor the soil temperature and plant your potatoes when the soil is
Conclusion
So, there you have it! Growing potatoes in a bag is not just a gardening trend; it’s a game-changer for anyone, regardless of space or experience. It’s a simple, efficient, and incredibly rewarding way to cultivate your own fresh, delicious potatoes right at home. Forget the sprawling garden plots and back-breaking digging. This method brings the farm to your patio, balcony, or even your doorstep.
Why is this DIY trick a must-try? Because it offers a level of control and convenience that traditional gardening simply can’t match. You dictate the soil quality, the watering schedule, and even the sun exposure. Plus, the “harvesting” process is a breeze – no more blindly digging and hoping to unearth hidden treasures. Simply tip the bag and collect your bounty! The satisfaction of harvesting your own homegrown potatoes, knowing exactly where they came from and how they were grown, is unparalleled. It’s a connection to your food that’s both grounding and empowering.
But the beauty of growing potatoes in a bag lies not only in its simplicity but also in its adaptability. Feel free to experiment with different potato varieties. Russets, Yukon Golds, fingerlings – each will bring its unique flavor and texture to your table. Consider adding companion plants like marigolds or basil to your bag to deter pests and enhance the flavor of your potatoes. You can also adjust the size of your bag to suit your space and desired yield. Smaller bags are perfect for beginners or those with limited space, while larger bags can accommodate more seed potatoes and produce a larger harvest.
Don’t be afraid to get creative with your soil mix. While a standard potting mix works well, you can also incorporate compost, peat moss, or even aged manure to enrich the soil and provide your potatoes with the nutrients they need to thrive. Remember to monitor the moisture levels in your bag and adjust your watering schedule accordingly. Potatoes need consistent moisture, but they don’t like to be waterlogged.
The key to success with this method is observation. Pay attention to your potato plants. Watch for signs of pests or diseases, and address them promptly. Observe how your plants respond to different watering schedules and adjust accordingly. The more you observe, the more you’ll learn, and the better your harvests will become.
We wholeheartedly encourage you to give this DIY trick a try. It’s an investment of time and effort that yields a delicious and rewarding return. Imagine the satisfaction of serving your family a meal made with potatoes you grew yourself. Picture the look on their faces as they savor the fresh, earthy flavor of homegrown goodness.
And once you’ve experienced the joy of growing potatoes in a bag, we want to hear about it! Share your experiences, your tips, and your triumphs with us. Post photos of your potato plants, your harvests, and the delicious meals you create. Let’s build a community of bag-growing enthusiasts and inspire others to discover the magic of homegrown potatoes. So, grab a bag, some seed potatoes, and get ready to embark on a gardening adventure that’s both fun and fulfilling. Happy growing! This method is a great way to ensure you have access to fresh, organic potatoes.
Frequently Asked Questions (FAQ)
What kind of bag should I use for growing potatoes?
The ideal bag for growing potatoes is a durable, breathable container that allows for good drainage. Fabric grow bags, often made from felt or other porous materials, are excellent choices because they allow air to circulate around the roots, preventing them from becoming waterlogged. These bags also promote “air pruning,” where the roots stop growing when they reach the edge of the bag, encouraging the plant to develop a more robust root system. You can also use sturdy plastic bags, but be sure to poke plenty of drainage holes in the bottom to prevent water from pooling. The size of the bag will depend on how many seed potatoes you plan to plant. A 10-20 gallon bag is generally a good starting point. Avoid using thin, flimsy bags that are likely to tear under the weight of the soil and potatoes.
How many seed potatoes can I plant in one bag?
The number of seed potatoes you can plant in one bag depends on the size of the bag and the variety of potato you’re growing. As a general guideline, you can plant 3-5 seed potatoes in a 10-20 gallon bag. Space the seed potatoes evenly around the bag, ensuring they have enough room to grow. If you’re using a smaller bag, you may only want to plant 1-2 seed potatoes. Overcrowding can lead to smaller potatoes and reduced yields. It’s better to err on the side of caution and give your potatoes plenty of room to develop.
What kind of soil should I use?
Potatoes need well-draining, nutrient-rich soil to thrive. A good potting mix is a great starting point. You can also create your own soil mix by combining equal parts potting soil, compost, and peat moss or coco coir. Compost provides essential nutrients and improves soil structure, while peat moss or coco coir helps retain moisture. Avoid using heavy clay soil, as it can become waterlogged and suffocate the roots. You can also amend your soil with slow-release fertilizer to provide your potatoes with a steady supply of nutrients throughout the growing season.
How often should I water my potato plants in a bag?
Watering frequency will depend on the weather, the size of your bag, and the type of soil you’re using. As a general rule, water your potato plants when the top inch of soil feels dry to the touch. Potatoes need consistent moisture, especially during tuber formation. Avoid overwatering, as this can lead to root rot. Check the drainage holes in your bag to ensure that water is draining properly. During hot, dry weather, you may need to water your plants daily. During cooler, wetter weather, you may only need to water them every few days.
How much sunlight do potato plants need?
Potato plants need at least 6-8 hours of sunlight per day to thrive. Choose a location for your bag that receives plenty of direct sunlight. If you live in a hot climate, you may want to provide some afternoon shade to prevent the plants from overheating. If you don’t have a sunny spot, you can supplement with grow lights.
How do I “hill” the potatoes in a bag?
“Hilling” is the process of adding more soil to the bag as the potato plants grow. This encourages the plants to produce more tubers along the buried stem. When the potato shoots emerge from the soil, add more soil to the bag, covering the stems up to the bottom set of leaves. Repeat this process every few weeks as the plants grow, until the bag is almost full. This technique maximizes potato production within the bag.
When are the potatoes ready to harvest?
Potatoes are typically ready to harvest 70-100 days after planting, depending on the variety. You can start harvesting “new potatoes” (small, immature potatoes) a few weeks after the plants flower. To harvest new potatoes, carefully reach into the bag and remove a few tubers, leaving the rest of the plant to continue growing. For a full harvest, wait until the plants have flowered and the foliage begins to die back. At this point, the potatoes will have reached their full size and maturity. To harvest, simply tip the bag over and collect the potatoes.
Can I reuse the soil from my potato bag?
You can reuse the soil from your potato bag, but it’s important to amend it with fresh compost and fertilizer to replenish the nutrients that were used by the potato plants. You should also check the soil for any signs of pests or diseases and treat accordingly. If you had any problems with pests or diseases, it’s best to discard the soil and start with fresh soil.
What are some common problems when growing potatoes in a bag?
Some common problems when growing potatoes in a bag include pests, diseases, and nutrient deficiencies. Pests like aphids, potato beetles, and flea beetles can damage the foliage of your potato plants. Diseases like early blight and late blight can also affect potato plants. Nutrient deficiencies can lead to stunted growth and reduced yields. To prevent these problems, choose disease-resistant potato varieties, monitor your plants regularly for pests and diseases, and provide them with adequate nutrients.
Can I grow potatoes in a bag indoors?
Yes, you can grow potatoes in a bag indoors, but you’ll need to provide them with adequate light. A sunny windowsill may not be enough, so you’ll likely need to supplement with grow lights. Choose a location that is well-ventilated and has a consistent temperature. Indoor potato plants may be more susceptible to pests and diseases, so monitor them closely.

Leave a Comment