
Growing Celery Indoors might seem like a challenge reserved for seasoned gardeners, but trust me, it’s a surprisingly achievable and rewarding DIY project for anyone, even if you’re just starting out! Have you ever found yourself tossing out the base of a celery stalk, thinking it’s useless? Well, what if I told you that you could transform that very scrap into a thriving, homegrown celery plant, right on your windowsill?
Celery, with its crisp stalks and refreshing flavor, has been cultivated for centuries. Originating in the Mediterranean, it was initially valued for its medicinal properties before becoming a culinary staple. Now, you can bring a piece of that history into your own home! This DIY guide will walk you through the simple steps of regrowing celery from scraps, saving you money and reducing food waste – a win-win!
In today’s world, where sustainability and self-sufficiency are becoming increasingly important, learning how to regrow vegetables like celery is a fantastic way to connect with nature and take control of your food source. Plus, fresh, homegrown celery tastes so much better than store-bought! So, let’s dive in and discover the secrets to successfully growing celery indoors and enjoying the fruits (or rather, vegetables) of your labor.
Growing Celery Indoors: From Kitchen Scrap to Fresh Stalks!
Hey there, fellow plant enthusiasts! Ever find yourself tossing out the base of your celery after using the stalks? Well, stop right there! I’m going to show you how to turn that kitchen scrap into a thriving celery plant, right in your own home. It’s easier than you think, and it’s a fantastic way to reduce waste and enjoy fresh celery whenever you need it.
What You’ll Need
Before we dive in, let’s gather our supplies. This is a pretty low-key project, so you probably have most of this stuff already:
* The base of a celery stalk (about 2 inches from the bottom, with the root end intact)
* A shallow dish or bowl
* Water (tap water is fine)
* A sunny windowsill or grow light
* Potting soil
* A pot with drainage holes (at least 6 inches in diameter)
* Optional: Liquid fertilizer
Phase 1: Rooting Your Celery Base
This is where the magic begins! We’re going to coax those dormant roots back to life.
1. Prepare the Celery Base: Carefully trim the top of the celery base, leaving about 2 inches of the stalks intact. This will help the plant focus its energy on root growth. Don’t worry about making it perfectly even; just remove any wilted or browning parts.
2. Place in Water: Fill your shallow dish with about an inch of water. Place the celery base, cut-side up, in the water. Make sure the bottom of the base is submerged, but the top part remains dry. This prevents rotting.
3. Find a Sunny Spot: Place the dish on a sunny windowsill or under a grow light. Celery needs plenty of light to thrive, so aim for at least 6 hours of direct sunlight per day. If you’re using a grow light, position it about 6-12 inches above the celery base.
4. Change the Water Regularly: This is crucial! Change the water every 1-2 days to prevent bacteria growth and keep the water fresh. You’ll start to see small roots emerging from the bottom of the celery base within a few days to a week.
5. Be Patient: Root growth can vary depending on the celery variety and environmental conditions. Don’t get discouraged if you don’t see roots immediately. Just keep the water fresh and the celery base in a sunny spot.
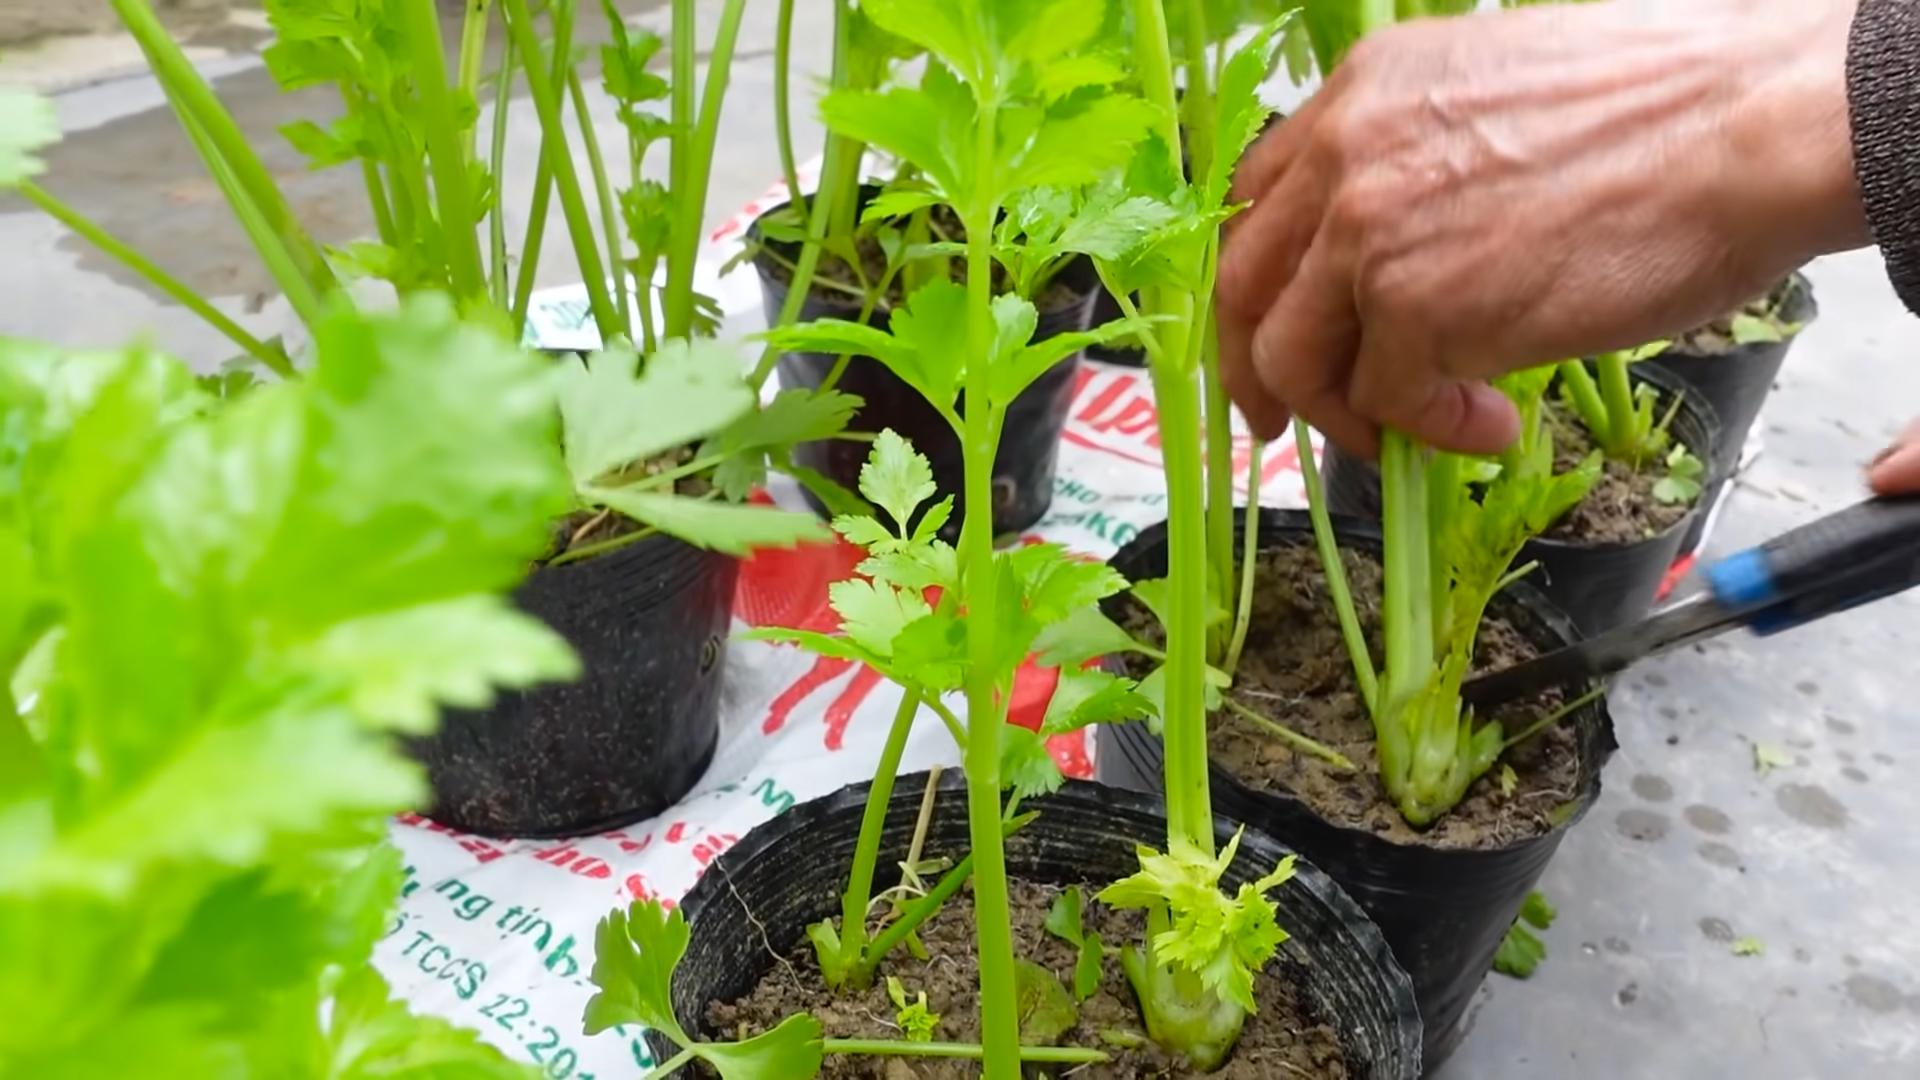
Phase 2: Planting Your Celery
Once your celery base has developed a good network of roots (about an inch or two long), it’s time to move it to a pot.
1. Prepare the Pot: Fill your pot with high-quality potting soil. Make sure the soil is loose and well-draining. Celery doesn’t like to sit in soggy soil.
2. Create a Hole: Dig a hole in the center of the pot that’s large enough to accommodate the celery base and its roots.
3. Carefully Transplant: Gently remove the celery base from the water and carefully place it in the hole. Make sure the top of the celery base is level with the soil surface.
4. Fill and Water: Fill the hole with potting soil, gently pressing down around the celery base to secure it. Water thoroughly until the water drains out of the bottom of the pot.
5. Back to the Sun: Place the pot back on the sunny windowsill or under the grow light.
Phase 3: Caring for Your Indoor Celery
Now that your celery is planted, it’s time to provide it with the care it needs to grow into a healthy plant.
1. Watering: Keep the soil consistently moist, but not soggy. Water when the top inch of soil feels dry to the touch. Overwatering can lead to root rot, so be careful not to overdo it.
2. Fertilizing: Celery is a heavy feeder, so it benefits from regular fertilization. Use a liquid fertilizer diluted to half strength every 2-3 weeks. Follow the instructions on the fertilizer label.
3. Light: As mentioned before, celery needs plenty of light. Aim for at least 6 hours of direct sunlight per day. If you’re using a grow light, keep it on for 12-14 hours per day.
4. Temperature: Celery prefers temperatures between 60-70°F (15-21°C). Avoid placing it near drafts or extreme temperature fluctuations.
5. Humidity: Celery likes humidity, so if your home is dry, you can increase the humidity around the plant by misting it with water regularly or placing a tray of water near the pot.
6. Pest Control: Keep an eye out for common pests like aphids and spider mites. If you notice any pests, treat them with insecticidal soap or neem oil.
7. Harvesting: You can start harvesting celery stalks when they are about 6-8 inches long. Cut the outer stalks first, leaving the inner stalks to continue growing. You can harvest celery stalks as needed, allowing the plant to continue producing new growth.
Troubleshooting
Even with the best care, you might encounter some challenges along the way. Here are a few common problems and how to fix them:
* Yellowing Leaves: This could be a sign of overwatering, underwatering, or nutrient deficiency. Check the soil moisture and adjust your watering accordingly. If the soil is consistently moist, reduce your watering frequency. If the soil is dry, water more often. You can also try fertilizing the plant to provide it with the nutrients it needs.
* Leggy Growth: This is usually caused by insufficient light. Move the plant to a sunnier location or provide it with supplemental light using a grow light.
* Slow Growth: This could be due to a variety of factors, including insufficient light, poor soil, or nutrient deficiency. Make sure the plant is getting enough light, and consider repotting it with fresh potting soil. You can also try fertilizing the plant to provide it with the nutrients it needs.
* Root Rot: This is caused by overwatering and poor drainage. Make sure the pot has drainage holes and that the soil is well-draining. Avoid overwatering the plant. If you suspect root rot, you can try repotting the plant with fresh potting soil and removing any affected roots.
Tips for Success
Here are a few extra tips to help you grow healthy and delicious celery indoors:
* Choose the Right Celery: Some celery varieties are easier to grow indoors than others. Look for varieties that are compact and disease-resistant.
* Use High-Quality Potting Soil: Celery needs well-draining soil that is rich in nutrients. Use a high-quality potting soil that is specifically formulated for vegetables.
* Provide Adequate Drainage: Make sure the pot has drainage holes to prevent water from accumulating in the soil.
* Rotate the Plant Regularly: Rotate the plant regularly to ensure that all sides receive equal amounts of light.
* Be Patient: Growing celery from a base takes time and patience. Don’t get discouraged if you don’t see results immediately. Just keep providing the plant with the care it needs, and you’ll eventually be rewarded with fresh, delicious celery.
Enjoy Your Homegrown Celery!
That’s it! You’ve successfully grown celery indoors from a kitchen scrap. Now you can enjoy fresh, homegrown celery in your soups, salads, and snacks. It’s a rewarding experience, and it’s a great way to reduce waste and connect with nature. Happy growing!

Conclusion
So, there you have it! Growing celery indoors might seem like a challenge, but with a little patience and the right approach, you can enjoy fresh, crisp celery right from your own home. This DIY trick isn’t just about saving money; it’s about connecting with your food, reducing your carbon footprint, and experiencing the satisfaction of nurturing something from start to finish.
Why is this a must-try? Because store-bought celery, while convenient, often lacks the vibrant flavor and freshness of homegrown. Plus, you control the growing environment, ensuring your celery is free from unwanted pesticides and chemicals. Imagine adding freshly harvested celery to your soups, salads, or enjoying it as a healthy snack with your favorite dip. The possibilities are endless!
But don’t stop there! Feel free to experiment with different celery varieties. Try growing ‘Utah Tall’ for its classic flavor or ‘Golden Self-Blanching’ for a sweeter, milder taste. You can also adjust the nutrient solution to see how it affects the growth and flavor of your celery. Consider adding a small amount of Epsom salts to the water to provide magnesium, which can help with chlorophyll production and overall plant health.
Another variation to consider is companion planting. While you’re growing your celery indoors, try placing it near other herbs like parsley or basil. These herbs can help deter pests and even enhance the flavor of your celery.
Growing celery indoors is a rewarding experience that brings a touch of nature into your home. It’s a fantastic way to teach children about gardening and where their food comes from. It’s also a great option for those with limited outdoor space or those who live in climates where celery can’t be grown year-round.
We encourage you to give this DIY trick a try. Don’t be afraid to experiment and find what works best for you and your growing environment. And most importantly, share your experience with us! Let us know how your indoor celery garden is thriving. Share your tips, tricks, and any challenges you encounter along the way. We’re all in this together, learning and growing (pun intended!) as a community.
So, grab some celery stalks, prepare your growing medium, and get ready to embark on a rewarding journey of growing your own fresh, delicious celery indoors. You won’t regret it!
Frequently Asked Questions (FAQ)
Q: What kind of celery can I grow indoors?
A: You can grow most celery varieties indoors, but some are better suited than others. ‘Utah Tall’ is a popular choice for its classic celery flavor and relatively easy growth. ‘Golden Self-Blanching’ is another good option, known for its sweeter and milder taste. Experiment with different varieties to see which one thrives best in your indoor environment. Consider the size of your growing space when choosing a variety, as some celery plants can grow quite large.
Q: How much light does indoor celery need?
A: Celery requires a significant amount of light to thrive. Aim for at least 6-8 hours of direct sunlight per day. If you don’t have access to enough natural light, supplement with grow lights. Fluorescent or LED grow lights are excellent options. Position the lights about 6-12 inches above the plants and adjust as they grow. Insufficient light can lead to leggy growth and weak stalks.
Q: What kind of soil or growing medium should I use?
A: Celery prefers a rich, well-draining soil. A good mix would be equal parts potting soil, compost, and perlite or vermiculite. The compost provides nutrients, while the perlite or vermiculite improves drainage and aeration. You can also grow celery hydroponically using a nutrient-rich water solution. Ensure the growing medium is slightly acidic, with a pH between 6.0 and 6.8.
Q: How often should I water my indoor celery?
A: Celery needs consistent moisture to thrive. Water regularly, keeping the soil consistently moist but not waterlogged. Check the soil moisture level daily and water when the top inch feels dry to the touch. Avoid letting the soil dry out completely, as this can stress the plants. Overwatering can lead to root rot, so ensure your containers have adequate drainage.
Q: What kind of fertilizer should I use for indoor celery?
A: Celery is a heavy feeder and requires regular fertilization. Use a balanced liquid fertilizer, such as a 20-20-20, diluted to half strength. Fertilize every 2-3 weeks during the growing season. You can also supplement with compost tea or worm castings to provide additional nutrients. Avoid over-fertilizing, as this can lead to salt buildup in the soil.
Q: How long does it take to grow celery indoors?
A: Growing celery indoors from seed can take 3-4 months to reach maturity. However, if you’re regrowing celery from a stalk base, you can harvest new stalks in as little as 2-3 weeks. The exact time will depend on the variety, growing conditions, and your level of care. Be patient and consistent with your watering and fertilizing, and you’ll be rewarded with fresh, homegrown celery.
Q: What are some common problems when growing celery indoors?
A: Some common problems include pests like aphids and spider mites, as well as diseases like celery blight. Inspect your plants regularly for signs of pests or diseases. Treat infestations with insecticidal soap or neem oil. Ensure good air circulation to prevent fungal diseases. Overwatering can also lead to root rot, so be mindful of your watering habits.
Q: Can I grow celery indoors year-round?
A: Yes, you can grow celery indoors year-round, provided you have adequate light and temperature control. Celery prefers temperatures between 60-70°F (15-21°C). If your home gets too cold in the winter, consider using a heat mat to warm the soil. Supplement with grow lights to ensure your plants receive enough light during the shorter days of winter.
Q: How do I harvest celery grown indoors?
A: You can harvest celery stalks as needed once they reach a desirable size. Simply cut the outer stalks near the base of the plant, leaving the inner stalks to continue growing. You can also harvest the entire plant at once if you prefer. Wash the stalks thoroughly before using them in your recipes.
Q: Is it better to start celery from seed or from a stalk base?
A: Both methods have their advantages. Starting from seed allows you to choose from a wider variety of celery types. However, it takes longer to reach maturity. Regrowing from a stalk base is a quicker and easier option, but you’re limited to the variety you purchased. Experiment with both methods to see which one you prefer.


Leave a Comment