
Grow Ginger at Home? Absolutely! Imagine stepping into your kitchen and harvesting fresh, zesty ginger straight from your own little garden. No more trips to the store or settling for less-than-perfect roots. This isn’t just a gardening project; it’s a culinary adventure waiting to happen!
Ginger, with its fiery flavor and incredible health benefits, has been cherished for centuries. Originating in South Asia, it’s been used in traditional medicine and cuisine for thousands of years. From ancient remedies to modern-day stir-fries, ginger’s versatility is undeniable. I think it’s time we bring this amazing plant a little closer to home.
But why should you bother learning how to grow ginger at home? Well, for starters, homegrown ginger tastes significantly better than store-bought. It’s fresher, more vibrant, and packed with flavor. Plus, you’ll know exactly where it came from and how it was grown – no pesticides or questionable practices here! More importantly, growing ginger at home is surprisingly easy and rewarding. It’s a fantastic way to connect with nature, learn new skills, and enjoy the fruits (or, in this case, the rhizomes) of your labor. This DIY guide will give you all the tips and tricks you need to successfully cultivate your own ginger patch, even if you have limited space or gardening experience. Let’s get started!
Grow Your Own Ginger: A Simple DIY Guide
Hey there, fellow plant enthusiasts! Ever thought about growing your own ginger? It’s surprisingly easy and incredibly rewarding. Imagine fresh, homegrown ginger ready whenever you need it for cooking, teas, or even just to enjoy its invigorating aroma. I’m going to walk you through the whole process, step-by-step, so you can have your own little ginger patch right at home.
Choosing Your Ginger Rhizome
First things first, you need a ginger rhizome. This is basically the “root” of the ginger plant, and it’s what you’ll be planting.
* Look for plump, healthy rhizomes: When selecting your ginger, head to your local grocery store or Asian market. Look for rhizomes that are plump, firm, and have a healthy, almost shiny skin. Avoid any that are shriveled, dry, or have signs of mold.
* Eyes are key: The rhizome should have visible “eyes” or buds. These are the little bumps that will eventually sprout into new shoots. The more eyes, the better!
* Organic is best: If possible, opt for organic ginger. Non-organic ginger is often treated with growth inhibitors to prevent sprouting, which can make it harder to grow. If you can only find non-organic, don’t worry, we can still make it work!
* Soaking for success: If you’re using non-organic ginger, soaking it in water overnight can help wash away some of those inhibitors and encourage sprouting.
Preparing Your Ginger for Planting
Okay, you’ve got your ginger. Now it’s time to get it ready for its new home.
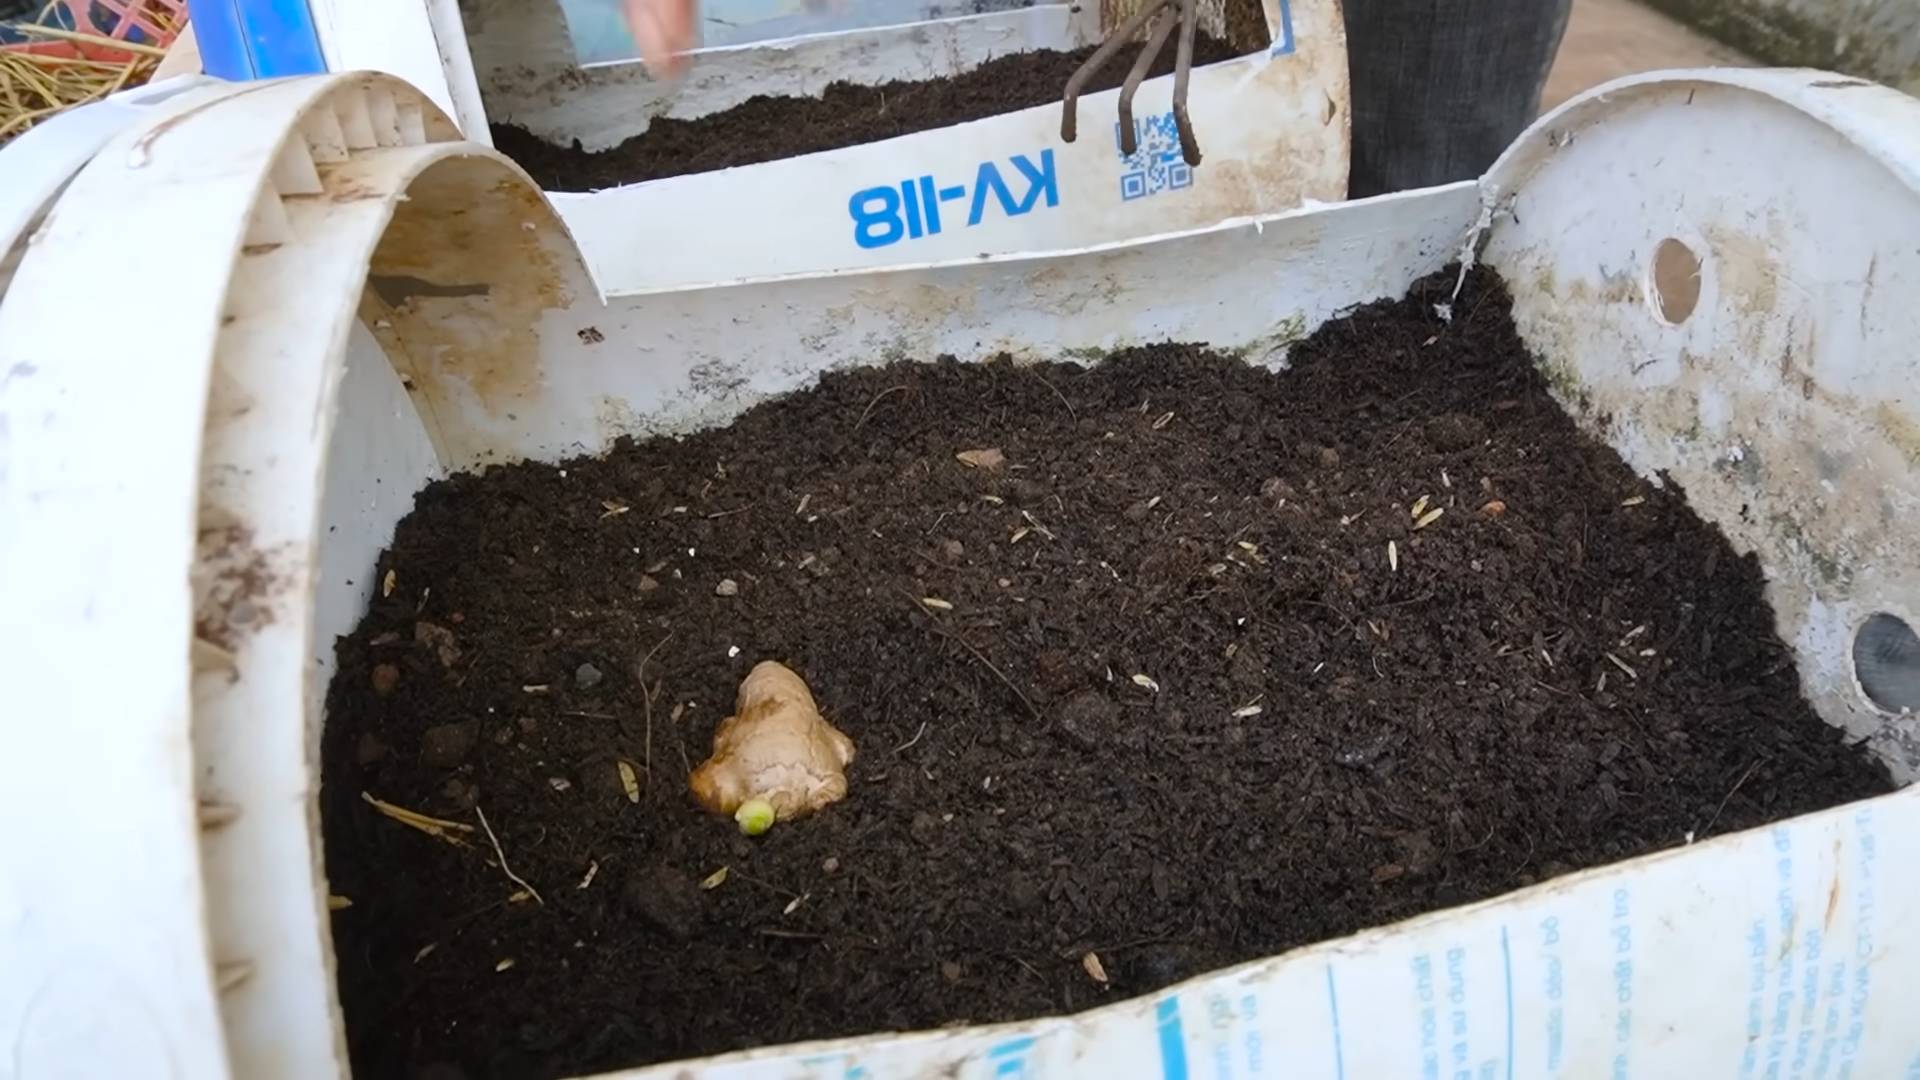
1. Cut it up (if needed): If your ginger rhizome is large, you can cut it into smaller pieces. Each piece should have at least one or two “eyes.” This is a great way to get multiple plants from a single rhizome!
2. Let it heal: After cutting, let the pieces sit out in a dry place for a day or two. This allows the cut surfaces to callous over, which helps prevent rot when you plant them.
3. Pre-sprouting (optional but recommended): This step isn’t strictly necessary, but it can give your ginger a head start. Place the ginger pieces in a shallow container lined with damp paper towels. Cover them loosely with another layer of damp paper towels. Keep the paper towels moist and place the container in a warm, dark place. You should see sprouts emerging in a week or two.
Planting Your Ginger
Now for the fun part – getting your ginger in the soil!
1. Choose the right pot: Ginger needs room to spread, so select a wide, shallow pot. A pot that’s at least 12 inches in diameter and 6-8 inches deep is a good starting point. Make sure the pot has drainage holes!
2. Prepare the soil: Ginger loves rich, well-draining soil. A good mix is equal parts potting soil, compost, and perlite or vermiculite. This will provide the nutrients your ginger needs and ensure good drainage.
3. Planting depth: Fill the pot with your soil mixture, leaving a couple of inches of space at the top. Place the ginger pieces on top of the soil, with the “eyes” facing upwards. Cover them with about 1-2 inches of soil.
4. Water gently: Water the soil gently until it’s moist but not soggy. You don’t want to drown your ginger!
Caring for Your Ginger Plant
Once your ginger is planted, it’s all about providing the right environment for it to thrive.
1. Location, location, location: Ginger loves warmth and humidity. Place your pot in a spot that gets bright, indirect sunlight. Direct sunlight can scorch the leaves. A windowsill facing east or west is usually ideal.
2. Watering: Keep the soil consistently moist, but not waterlogged. Water when the top inch of soil feels dry to the touch. During the growing season (spring and summer), you may need to water more frequently. Reduce watering in the fall and winter when the plant is dormant.
3. Humidity: Ginger thrives in humid environments. If you live in a dry climate, you can increase humidity by misting the plant regularly, placing the pot on a tray filled with pebbles and water (making sure the bottom of the pot isn’t sitting in the water), or using a humidifier.
4. Fertilizing: Feed your ginger plant every few weeks during the growing season with a balanced liquid fertilizer diluted to half strength.
5. Temperature: Ginger prefers temperatures between 65°F and 85°F (18°C and 29°C). Protect it from frost and cold drafts.
6. Pest control: Keep an eye out for pests like aphids or spider mites. If you spot any, treat them with insecticidal soap or neem oil.
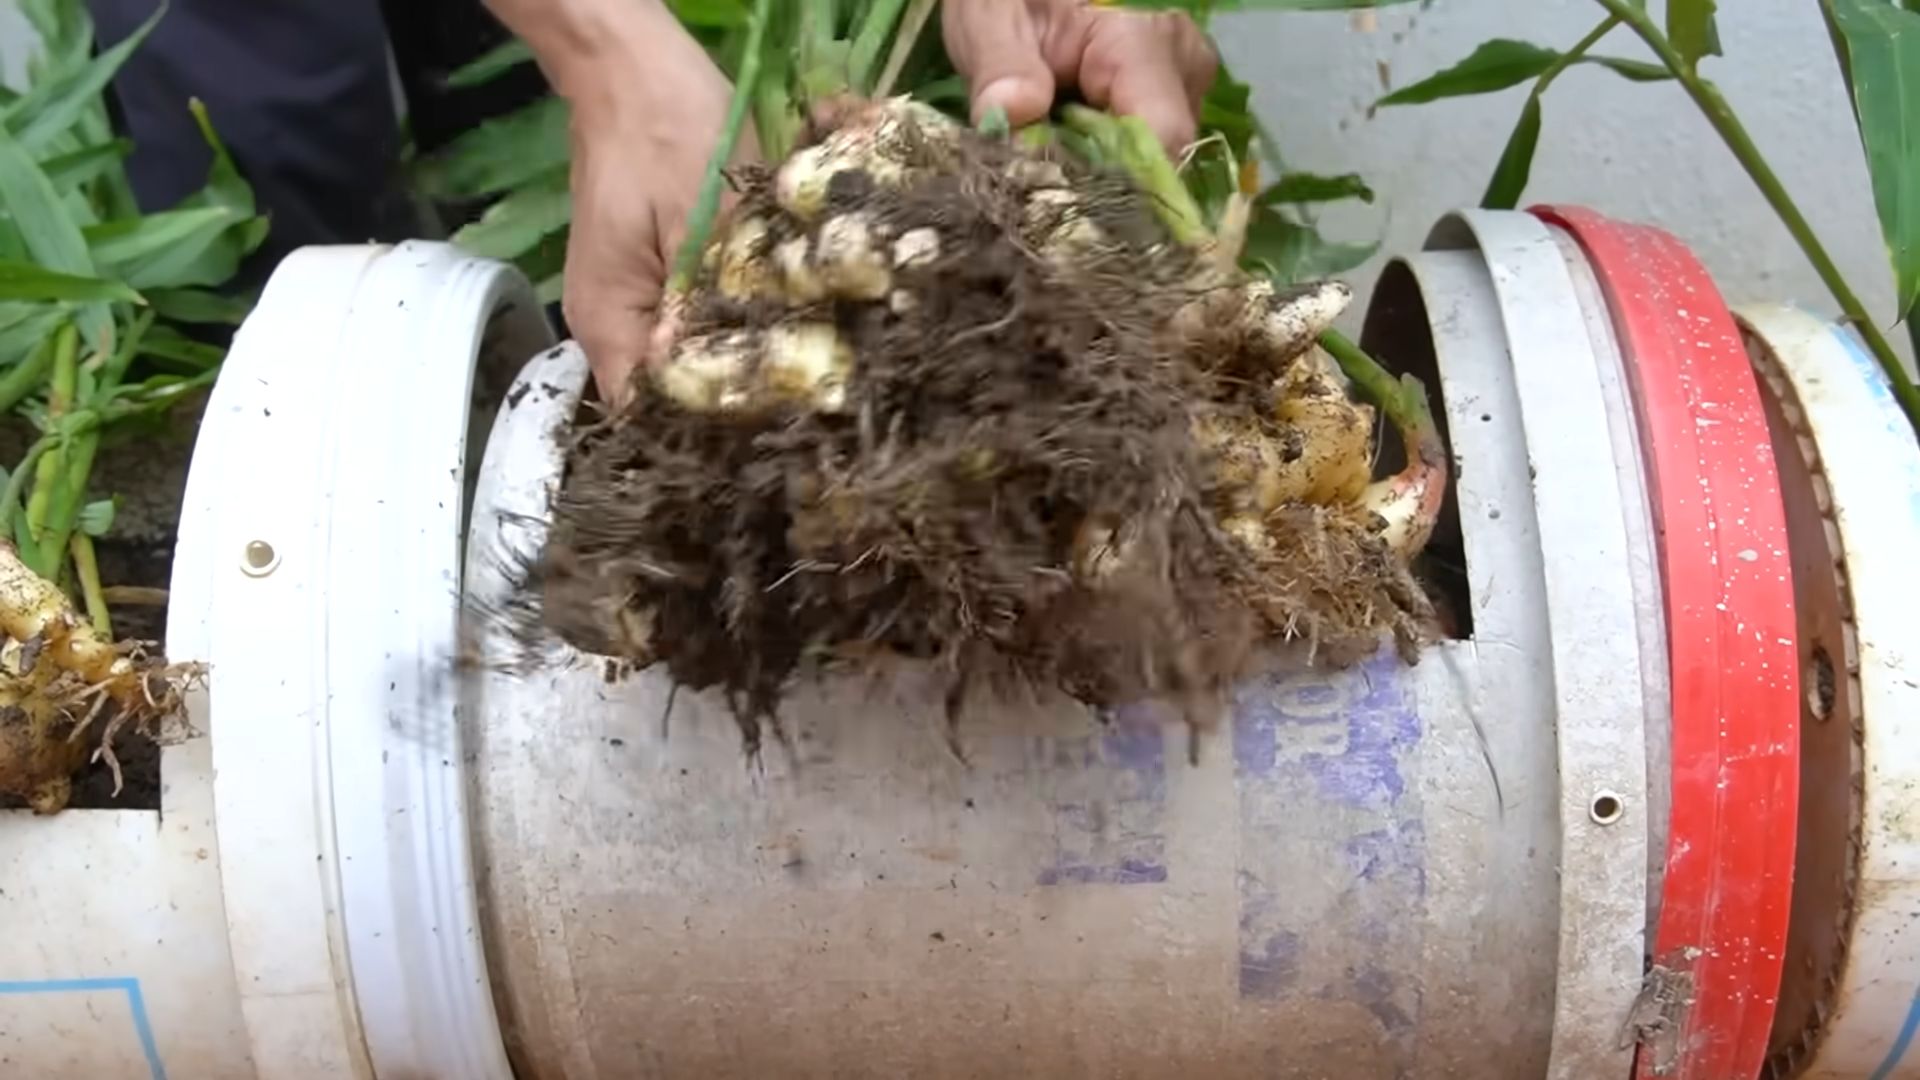
Harvesting Your Ginger
The best part! Harvesting your own ginger is so satisfying.
1. When to harvest: You can start harvesting ginger about 8-10 months after planting. The leaves will start to turn yellow and die back, which is a sign that the rhizomes are mature.
2. Gentle digging: Carefully dig around the edges of the pot to loosen the soil. Gently lift the ginger rhizomes out of the soil.
3. Harvesting a little at a time: If you don’t need to harvest the entire plant at once, you can carefully dig around the edges and cut off a piece of the rhizome as needed. The plant will continue to grow.
4. Replanting: Save a few pieces of the rhizome to replant and start the process all over again!
5. Cleaning and storing: Wash the harvested ginger rhizomes thoroughly and let them dry. You can store them in the refrigerator for a few weeks or freeze them for longer storage. To freeze, peel and chop the ginger, then spread it out on a baking sheet and freeze until solid. Transfer the frozen ginger to a freezer bag or container.
Troubleshooting
Sometimes things don’t go exactly as planned. Here are a few common problems you might encounter and how to fix them.
* No sprouting: If your ginger isn’t sprouting, make sure it’s getting enough warmth and moisture. Try moving it to a warmer location or increasing the humidity. Also, double-check that the rhizome is still firm and healthy. If it’s soft or mushy, it may have rotted.
* Yellowing leaves: Yellowing leaves can be a sign of overwatering, underwatering, or nutrient deficiency. Check the soil moisture and adjust your watering accordingly. If the soil is consistently moist, you may be overwatering. If the soil is dry, you may need to water more frequently. You can also try fertilizing the plant to provide it with the nutrients it needs.
* Rotting rhizomes: Rotting rhizomes are usually caused by overwatering or poor drainage. Make sure your pot has drainage holes and that the soil is well-draining. If you suspect rot, carefully remove the affected rhizomes and replant the healthy ones in fresh soil.
* Pests: As mentioned earlier, keep an eye out for pests like aphids or spider mites. Treat them with insecticidal soap or neem oil.
Extra Tips for Ginger Growing Success
Here are a few extra tips I’ve learned along the way that can help you grow even more amazing ginger:
* Use rainwater: If possible, use rainwater to water your ginger plant. Rainwater is naturally soft and free of chemicals that can harm plants.
* Rotate your crops: If you’re growing ginger in the same pot year after year, it’s a good idea to rotate the soil to prevent nutrient depletion.
* Mulch: Adding a layer of mulch to the top of the soil can help retain moisture and suppress weeds.
* Experiment with different varieties: There are many different varieties of ginger, each with its own unique flavor and aroma. Experiment with different varieties to find your favorite.
* Be patient: Growing ginger takes time and patience. Don’t get discouraged if you don’t see results right away. Just keep providing the right environment and your ginger will eventually thrive.
Growing your own ginger is a fun and rewarding experience. With a little bit of care and attention, you can enjoy fresh, homegrown ginger all year round. Happy growing!
Conclusion
So, there you have it! Growing ginger at home is not only achievable but also incredibly rewarding. Imagine the satisfaction of harvesting your own fresh, vibrant ginger root whenever a recipe calls for it, knowing exactly where it came from and how it was grown. Forget those bland, store-bought rhizomes that have been sitting on shelves for who knows how long. With a little patience and the simple steps outlined above, you can cultivate a thriving ginger patch right in your own kitchen or garden.
This DIY trick is a must-try for several compelling reasons. First and foremost, the flavor of homegrown ginger is simply unparalleled. It’s more intense, more aromatic, and has a delightful zing that store-bought ginger often lacks. Secondly, you’ll be saving money in the long run. Think about how often you buy ginger, even if it’s just a small piece here and there. Over time, those costs add up. Growing your own eliminates that expense and provides you with a continuous supply. Thirdly, it’s a fantastic way to connect with nature and learn about the growing process. There’s something truly special about nurturing a plant from a small rhizome to a mature, productive specimen. Finally, and perhaps most importantly, you’ll have the peace of mind knowing that your ginger is free from harmful pesticides and chemicals. You control the growing environment and can ensure that it’s cultivated using organic and sustainable practices.
But the fun doesn’t stop there! Feel free to experiment with different varieties of ginger. There’s common ginger, of course, but also blue ginger, galangal, and turmeric, all of which can be grown using similar methods. You can also try different growing mediums, such as coco coir or a soilless mix, to see what works best for you. Consider adding companion plants like marigolds or basil to deter pests and attract beneficial insects. And don’t be afraid to get creative with your containers! Upcycle old buckets, pots, or even grow bags to create a unique and personalized ginger garden.
Once you’ve mastered the basics, you can even explore advanced techniques like propagating ginger from cuttings or forcing it to flower. The possibilities are endless!
We wholeheartedly encourage you to give this DIY trick a try. It’s a simple, affordable, and incredibly satisfying way to add fresh, flavorful ginger to your life. And once you’ve harvested your first batch of homegrown ginger, we’d love to hear about your experience! Share your photos, tips, and tricks in the comments below. Let’s create a community of ginger-growing enthusiasts and inspire others to embark on this rewarding journey. Don’t forget to tell us what you think about this method of how to grow ginger at home. Happy growing!
Frequently Asked Questions (FAQ)
1. What kind of ginger should I use to start growing?
The best ginger to use for starting your own patch is fresh, plump ginger root from the grocery store or a local farmer’s market. Look for rhizomes that are firm, have visible “eyes” (small buds), and are free from wrinkles or signs of decay. Organic ginger is preferable, as it’s less likely to have been treated with growth inhibitors. Avoid using powdered ginger or ginger that has been processed in any way. The goal is to find a healthy, viable rhizome that’s ready to sprout.
2. How long does it take for ginger to sprout?
Sprouting time can vary depending on several factors, including temperature, humidity, and the quality of the ginger rhizome. Generally, you can expect to see sprouts emerge within 2 to 3 weeks. However, it could take longer, especially if the conditions aren’t ideal. Be patient and continue to provide consistent moisture and warmth. Soaking the ginger in water overnight before planting can sometimes speed up the sprouting process.
3. What kind of soil is best for growing ginger?
Ginger thrives in well-draining, nutrient-rich soil. A good potting mix specifically formulated for vegetables or herbs is a great option. You can also create your own mix by combining equal parts of potting soil, compost, and perlite or vermiculite. The compost provides essential nutrients, while the perlite or vermiculite improves drainage and aeration. Avoid using heavy clay soil, as it can retain too much moisture and lead to root rot.
4. How much sunlight does ginger need?
Ginger prefers partial shade, especially in hot climates. Direct sunlight can scorch the leaves and damage the plant. A location that receives morning sun and afternoon shade is ideal. If you’re growing ginger indoors, place it near a bright window but away from direct sunlight. You can also use sheer curtains to filter the light. If the leaves start to turn yellow or brown, it’s a sign that the plant is getting too much sun.
5. How often should I water ginger?
Ginger needs consistent moisture, but it’s important to avoid overwatering. Water the plant thoroughly when the top inch of soil feels dry to the touch. Allow the excess water to drain out of the pot. During the growing season (spring and summer), you may need to water more frequently. In the fall and winter, when the plant is dormant, reduce watering. Overwatering can lead to root rot, so it’s always better to err on the side of caution.
6. When is the best time to harvest ginger?
You can start harvesting ginger about 8 to 10 months after planting. The leaves will start to turn yellow and die back, indicating that the rhizomes are mature. You can harvest the entire plant or just dig up a portion of the rhizome as needed. To harvest, gently loosen the soil around the plant and carefully lift the rhizomes out of the ground. Wash off any excess soil and store the ginger in a cool, dry place.
7. Can I grow ginger indoors year-round?
Yes, you can absolutely grow ginger indoors year-round. In fact, it’s often easier to control the growing environment indoors, especially in regions with cold winters. Provide the plant with adequate light, warmth, and humidity, and it will thrive. You may need to supplement with artificial light during the winter months.
8. What are some common problems when growing ginger, and how can I fix them?
Some common problems include root rot (caused by overwatering), pests (such as aphids or spider mites), and nutrient deficiencies. To prevent root rot, ensure that the soil is well-draining and avoid overwatering. If you notice pests, treat the plant with insecticidal soap or neem oil. For nutrient deficiencies, fertilize the plant with a balanced liquid fertilizer every few weeks during the growing season.
9. Can I grow ginger in a container? What size container is best?
Yes, ginger grows very well in containers. Choose a pot that is at least 12 inches in diameter and 12 inches deep to allow the rhizomes plenty of room to spread. Make sure the container has drainage holes to prevent waterlogging.
10. How do I store harvested ginger?
Freshly harvested ginger can be stored in the refrigerator for several weeks. Wrap it in a paper towel and place it in a plastic bag to prevent it from drying out. You can also freeze ginger for longer storage. Peel and chop the ginger into small pieces, then freeze it in a single layer on a baking sheet. Once frozen, transfer the ginger to a freezer bag or container. Frozen ginger can be grated directly into recipes without thawing. Another option is to pickle the ginger.

Leave a Comment