
Vinegar and Baking Soda Cleaning: Unlock the power of your pantry! Are you tired of harsh chemicals and expensive cleaning products cluttering your cabinets? I know I was! For generations, our grandmothers relied on simple, natural ingredients to keep their homes sparkling. Think about it – before the age of mass-produced cleaners, vinegar and baking soda were the go-to solutions for everything from scrubbing grime to freshening fabrics.
This DIY guide is your ticket to a cleaner, greener home using the dynamic duo of vinegar and baking soda cleaning. We’ll delve into a treasure trove of easy-to-follow recipes and techniques that will banish dirt, eliminate odors, and leave your home smelling fresh – all without breaking the bank or exposing your family to harmful toxins.
Why is this so important now? In a world increasingly aware of environmental impact and the potential dangers of chemical exposure, returning to these time-tested methods is not just nostalgic; it’s a smart and responsible choice. Plus, let’s be honest, who doesn’t love the satisfaction of creating something effective and eco-friendly with their own two hands? Get ready to discover the magic of vinegar and baking soda – your home (and your wallet) will thank you!

DIY Power Cleaning: Unleash the Magic of Vinegar and Baking Soda!
Hey there, fellow cleaning enthusiasts! Are you tired of harsh chemicals and expensive cleaning products? Well, you’re in the right place! Today, I’m going to share my favorite DIY cleaning hack: the incredible power of vinegar and baking soda. This dynamic duo is not only eco-friendly and budget-friendly, but it’s also surprisingly effective at tackling a wide range of cleaning challenges around your home. Get ready to ditch those store-bought cleaners and embrace the natural cleaning power of vinegar and baking soda!
Why Vinegar and Baking Soda?
Before we dive into the nitty-gritty, let’s talk about why this combination works so well.
* Vinegar: This acidic powerhouse is a natural disinfectant and deodorizer. It’s great for cutting through grease, dissolving mineral deposits, and killing mold and mildew. I always keep a big bottle of white distilled vinegar on hand – it’s my go-to for so many cleaning tasks!
* Baking Soda: This mild alkali is a gentle abrasive and deodorizer. It’s perfect for scrubbing surfaces without scratching them, absorbing odors, and neutralizing acids. Plus, it’s super cheap and readily available!
* The Fizzing Action: When vinegar and baking soda combine, they create a chemical reaction that produces carbon dioxide gas. This fizzing action helps to loosen dirt and grime, making it easier to wipe away. It’s like a mini cleaning party happening right before your eyes!
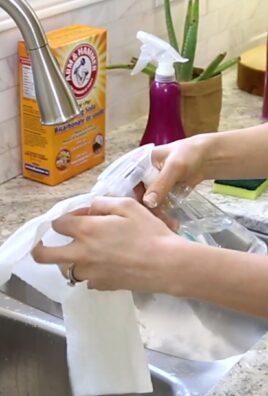
Cleaning Your Kitchen Sink
My kitchen sink is constantly battling food residue, grease, and hard water stains. Here’s how I use vinegar and baking soda to keep it sparkling:
1. Rinse the Sink: Start by rinsing your sink with warm water to remove any loose debris.
2. Sprinkle Baking Soda: Generously sprinkle baking soda all over the bottom and sides of the sink. Don’t be shy – the more, the merrier!
3. Pour Vinegar: Slowly pour vinegar over the baking soda. You’ll see it start to fizz and bubble. Let the mixture sit for about 15-20 minutes. This gives the vinegar and baking soda time to work their magic, loosening grime and breaking down stains.
4. Scrub: After the fizzing subsides, use a sponge or scrub brush to scrub the sink thoroughly. Pay extra attention to any stubborn stains or areas with built-up grime. I like to use a non-scratch scrub brush to avoid damaging the sink’s surface.
5. Rinse Again: Rinse the sink with warm water until all traces of baking soda and vinegar are gone.
6. Dry: Dry the sink with a clean cloth to prevent water spots.
7. Bonus Tip: For extra shine, you can rub a lemon half over the sink’s surface after rinsing. The citric acid in the lemon will help to remove any remaining hard water stains and leave your sink smelling fresh and clean.
Unclogging a Drain
A clogged drain is a common household problem, but you don’t always need harsh chemicals to fix it. Vinegar and baking soda can often do the trick!
1. Remove Standing Water: If there’s standing water in the sink, bail it out with a cup or container.
2. Pour Baking Soda: Pour about 1 cup of baking soda down the drain.
3. Pour Vinegar: Follow the baking soda with 1 cup of vinegar.
4. Let it Fizz: Let the mixture fizz for about 30 minutes. This will help to break down the clog. I usually put a stopper or rag over the drain opening to contain the fizzing action and prevent it from escaping.
5. Flush with Hot Water: After 30 minutes, flush the drain with hot water for several minutes. This will help to clear away the loosened debris.
6. Repeat if Necessary: If the drain is still clogged, repeat the process. For stubborn clogs, you may need to repeat the process several times.
7. Prevention: To prevent future clogs, avoid pouring grease down the drain and regularly flush the drain with hot water. I also like to use a drain strainer to catch hair and other debris.
Cleaning Your Microwave
Microwaves can get pretty gross with splattered food and lingering odors. Here’s how to clean yours with vinegar and baking soda:
1. Vinegar Solution: In a microwave-safe bowl, mix 1 cup of water with 1/4 cup of vinegar.
2. Microwave: Place the bowl in the microwave and heat on high for 3-5 minutes, or until the solution is boiling and the microwave is filled with steam.
3. Let it Sit: Leave the bowl in the microwave for another 5-10 minutes. The steam will help to loosen the food splatters.
4. Wipe Clean: Carefully remove the bowl (it will be hot!) and wipe down the inside of the microwave with a damp cloth or sponge. The food splatters should wipe away easily.
5. Baking Soda Paste (Optional): For stubborn stains, make a paste of baking soda and water. Apply the paste to the stains and let it sit for a few minutes before wiping clean.
Hey there, fellow cleaning enthusiasts! Are you tired of harsh chemicals and expensive cleaning products? Well, you’re in the right place! Today, I’m going to share my favorite DIY cleaning hack: the incredible power of vinegar and baking soda. This dynamic duo is not only eco-friendly and budget-friendly, but it’s also surprisingly effective at tackling a wide range of cleaning challenges around your home. Get ready to ditch those store-bought cleaners and embrace the natural cleaning power of vinegar and baking soda!
Why Vinegar and Baking Soda?
Before we dive into the nitty-gritty, let’s talk about why this combination works so well.
* Vinegar: This acidic powerhouse is a natural disinfectant and deodorizer. It’s great for cutting through grease, dissolving mineral deposits, and killing mold and mildew. I always keep a big bottle of white distilled vinegar on hand – it’s my go-to for so many cleaning tasks!
* Baking Soda: This mild alkali is a gentle abrasive and deodorizer. It’s perfect for scrubbing surfaces without scratching them, absorbing odors, and neutralizing acids. Plus, it’s super cheap and readily available!
* The Fizzing Action: When vinegar and baking soda combine, they create a chemical reaction that produces carbon dioxide gas. This fizzing action helps to loosen dirt and grime, making it easier to wipe away. It’s like a mini cleaning party happening right before your eyes!
Cleaning Your Kitchen Sink
My kitchen sink is constantly battling food residue, grease, and hard water stains. Here’s how I use vinegar and baking soda to keep it sparkling:
1. Rinse the Sink: Start by rinsing your sink with warm water to remove any loose debris.
2. Sprinkle Baking Soda: Generously sprinkle baking soda all over the bottom and sides of the sink. Don’t be shy – the more, the merrier!
3. Pour Vinegar: Slowly pour vinegar over the baking soda. You’ll see it start to fizz and bubble. Let the mixture sit for about 15-20 minutes. This gives the vinegar and baking soda time to work their magic, loosening grime and breaking down stains.
4. Scrub: After the fizzing subsides, use a sponge or scrub brush to scrub the sink thoroughly. Pay extra attention to any stubborn stains or areas with built-up grime. I like to use a non-scratch scrub brush to avoid damaging the sink’s surface.
5. Rinse Again: Rinse the sink with warm water until all traces of baking soda and vinegar are gone.
6. Dry: Dry the sink with a clean cloth to prevent water spots.
7. Bonus Tip: For extra shine, you can rub a lemon half over the sink’s surface after rinsing. The citric acid in the lemon will help to remove any remaining hard water stains and leave your sink smelling fresh and clean.
Unclogging a Drain
A clogged drain is a common household problem, but you don’t always need harsh chemicals to fix it. Vinegar and baking soda can often do the trick!
1. Remove Standing Water: If there’s standing water in the sink, bail it out with a cup or container.
2. Pour Baking Soda: Pour about 1 cup of baking soda down the drain.
3. Pour Vinegar: Follow the baking soda with 1 cup of vinegar.
4. Let it Fizz: Let the mixture fizz for about 30 minutes. This will help to break down the clog. I usually put a stopper or rag over the drain opening to contain the fizzing action and prevent it from escaping.
5. Flush with Hot Water: After 30 minutes, flush the drain with hot water for several minutes. This will help to clear away the loosened debris.
6. Repeat if Necessary: If the drain is still clogged, repeat the process. For stubborn clogs, you may need to repeat the process several times.
7. Prevention: To prevent future clogs, avoid pouring grease down the drain and regularly flush the drain with hot water. I also like to use a drain strainer to catch hair and other debris.
Cleaning Your Microwave
Microwaves can get pretty gross with splattered food and lingering odors. Here’s how to clean yours with vinegar and baking soda:
1. Vinegar Solution: In a microwave-safe bowl, mix 1 cup of water with 1/4 cup of vinegar.
2. Microwave: Place the bowl in the microwave and heat on high for 3-5 minutes, or until the solution is boiling and the microwave is filled with steam.
3. Let it Sit: Leave the bowl in the microwave for another 5-10 minutes. The steam will help to loosen the food splatters.
4. Wipe Clean: Carefully remove the bowl (it will be hot!) and wipe down the inside of the microwave with a damp cloth or sponge. The food splatters should wipe away easily.
5. Baking Soda Paste (Optional): For stubborn stains, make a paste of baking soda and water. Apply the paste to the stains and let it sit for a few minutes before wiping clean.
6. Ventilate: Leave the microwave door open for a few minutes to air it out.
Cleaning Grout
Grout can be a breeding ground for mold and mildew, and it can be tough to clean. But with vinegar and baking soda, you can get your grout looking like new!
1. Make a Paste: Mix baking soda with enough water to form a thick paste.
2. Apply to Grout: Apply the paste to the grout lines.
3. Spray with Vinegar: Spray the grout lines with vinegar. The baking soda and vinegar will fizz.
4. Scrub: Let the mixture sit for a few minutes, then scrub the grout lines with a grout brush or old toothbrush.
5. Rinse: Rinse the grout lines with water.
6. Repeat if Necessary: For stubborn stains, repeat the process.
Deodorizing Your Refrigerator
A smelly refrigerator is never a good thing. Here’s how to use baking soda to absorb odors:
1. Remove Food: Remove all food from the refrigerator.
2. Baking Soda Box: Place an open box of baking soda in the refrigerator.
3. Wait: Let the baking soda sit in the refrigerator for at least 24 hours, or longer for stronger odors.
4. Replace Regularly: Replace the baking soda box every month or two to keep your refrigerator smelling fresh.
5. Vinegar Wipe Down (Optional): For extra deodorizing power, you can wipe down the inside of the refrigerator with a solution of equal parts vinegar and water before placing the baking soda box inside.
Cleaning Coffee Stains from Mugs
Coffee stains can be tough to remove from mugs, but baking soda can help!
1. Sprinkle Baking Soda: Sprinkle baking soda into the mug.
2. Add Water: Add a small amount of water to form a paste.
3. Scrub: Scrub the inside of the mug with the paste.
4. Rinse: Rinse the mug with water.
5. Repeat if Necessary: For stubborn stains, repeat the process.
Cleaning Your Showerhead
Mineral deposits can build up on your showerhead, reducing water pressure. Here’s how to clean it with vinegar:
1. Remove Showerhead (Optional): If possible, remove the showerhead from the shower arm. This will make it easier to clean.
2. Vinegar Soak: Fill a plastic bag with vinegar and submerge the showerhead in the vinegar. Secure the bag with a rubber band or twist tie. If you can’t remove the showerhead, you can still fill a bag with vinegar and attach it to the showerhead using a rubber band.
3. Soak Overnight: Let the showerhead soak in the vinegar overnight.
4. Rinse: Remove the showerhead from the bag and rinse it thoroughly with water.
5. Scrub (Optional): If there are any remaining mineral deposits, scrub them with a toothbrush.
6. Reattach Showerhead: Reattach the showerhead to the shower arm.
Cleaning Your Toilet Bowl
Vinegar and baking soda can also be used to clean your toilet bowl.
1. Pour Baking Soda: Pour 1 cup of baking soda into the toilet bowl.
2. Pour Vinegar: Follow the baking soda with 2 cups of vinegar.
3. Let it Fizz: Let the mixture fizz for about 30 minutes.
4. Scrub: Scrub the toilet bowl with a toilet brush.
5. Flush: Flush the toilet.
Important Considerations
* Test First:

Conclusion
So, there you have it! This simple yet powerful DIY cleaning trick using vinegar and baking soda is more than just a cleaning hack; it’s a game-changer for your home. It’s a testament to the fact that you don’t need harsh chemicals or expensive products to achieve a sparkling clean. The combination of vinegar and baking soda creates a fizzing action that effectively loosens grime, deodorizes surfaces, and tackles stubborn stains, all while being gentle on the environment and your wallet.
Why is this a must-try? Because it’s effective, affordable, and eco-friendly. It’s a trifecta of benefits that makes it a superior choice compared to many commercial cleaners. You’re not just cleaning; you’re making a conscious decision to reduce your exposure to harmful chemicals and minimize your environmental impact. Plus, the satisfaction of creating your own cleaning solution and witnessing its effectiveness firsthand is incredibly rewarding.
But the beauty of this DIY trick lies in its versatility. Feel free to experiment with variations to suit your specific needs. For instance, add a few drops of your favorite essential oil, like lemon or lavender, to the vinegar solution for a refreshing scent. For tougher stains, create a paste of baking soda and water and let it sit on the affected area for a longer period before scrubbing. You can also use different types of vinegar, such as apple cider vinegar, for its added antibacterial properties. Remember to always test any cleaning solution on a small, inconspicuous area first to ensure it doesn’t damage the surface.
This vinegar and baking soda cleaning method is particularly effective in bathrooms and kitchens. Use it to clean your sinks, toilets, showers, ovens, and stovetops. It’s also great for unclogging drains and removing mildew. The possibilities are endless!
We wholeheartedly encourage you to try this DIY cleaning trick and experience the difference for yourself. It’s a simple, effective, and sustainable way to keep your home clean and healthy. Don’t just take our word for it; put it to the test and see the amazing results firsthand.
And most importantly, we want to hear about your experience! Share your tips, variations, and success stories in the comments below. Let us know how this DIY cleaning trick has worked for you and any creative ways you’ve adapted it to your specific needs. Your feedback will not only help us improve this guide but also inspire others to embrace the power of natural cleaning. Together, we can create a cleaner, healthier, and more sustainable world, one vinegar and baking soda cleaning session at a time. So, grab your vinegar, baking soda, and a little elbow grease, and let’s get cleaning! We can’t wait to hear about your sparkling clean results!
Frequently Asked Questions (FAQs)
Is vinegar and baking soda safe to use on all surfaces?
While vinegar and baking soda are generally safe for most surfaces, it’s crucial to exercise caution and test the solution on a small, inconspicuous area first. Avoid using vinegar on natural stone surfaces like marble, granite, and limestone, as the acidity can etch and damage them. Baking soda can be mildly abrasive, so avoid using it on delicate or easily scratched surfaces. Always dilute the vinegar with water to reduce its acidity, and use a soft cloth or sponge for cleaning. When in doubt, consult the manufacturer’s instructions for the specific surface you’re cleaning.
What is the best ratio of vinegar and baking soda to use?
The ideal ratio of vinegar and baking soda depends on the cleaning task. For general cleaning, a 1:1 ratio is a good starting point. For example, you can mix 1/2 cup of vinegar with 1/2 cup of baking soda. For tougher stains or clogs, you can increase the amount of baking soda. When unclogging drains, start by pouring 1 cup of baking soda down the drain, followed by 1 cup of vinegar. Let it fizz for 30 minutes, then flush with hot water. Remember that the fizzing action is what helps to loosen dirt and grime, so adjust the ratio accordingly.
Can I store a pre-mixed solution of vinegar and baking soda?
It’s not recommended to store a pre-mixed solution of vinegar and baking soda. When combined, they react and neutralize each other, producing carbon dioxide and water. This reaction diminishes the cleaning power of both ingredients. It’s best to mix them fresh each time you need them. This ensures that you’re getting the full benefit of their cleaning properties.
What are some other uses for vinegar and baking soda besides cleaning?
Vinegar and baking soda have a wide range of uses beyond cleaning. Baking soda can be used as a natural deodorant, a teeth whitener, and a remedy for heartburn. Vinegar can be used as a fabric softener, a weed killer, and a natural hair rinse. Both ingredients can be used in baking and cooking. Their versatility makes them valuable additions to any household.
Is it safe to mix vinegar and baking soda with other cleaning products?
It’s generally not recommended to mix vinegar and baking soda with other cleaning products, especially those containing bleach. Mixing vinegar with bleach can create toxic chlorine gas, which can be harmful to your health. Similarly, mixing baking soda with certain cleaning products can create unwanted chemical reactions. It’s best to use vinegar and baking soda on their own or in combination with each other. If you’re unsure about mixing them with other products, consult the manufacturer’s instructions or err on the side of caution.
How can I make the vinegar smell less strong?
The strong smell of vinegar can be off-putting to some people. To reduce the odor, you can add a few drops of your favorite essential oil to the vinegar solution. Lemon, lavender, and tea tree oil are popular choices. You can also infuse the vinegar with citrus peels or herbs for a more natural scent. Another option is to use distilled white vinegar, which has a milder odor than other types of vinegar. After cleaning with vinegar, be sure to ventilate the area well to allow the smell to dissipate.
Can I use this method to clean my oven?
Yes, the vinegar and baking soda cleaning method is excellent for cleaning ovens. First, remove any loose debris from the oven. Then, make a paste of baking soda and water and spread it evenly over the interior surfaces of the oven, avoiding the heating elements. Let the paste sit overnight. The next day, spray the paste with vinegar and let it fizz for a few minutes. Finally, scrub the oven clean with a sponge or cloth. This method is a natural and effective way to remove baked-on grease and grime without using harsh chemicals.
How often should I use this cleaning method?
The frequency of using this cleaning method depends on your cleaning needs and habits. For general cleaning, you can use it once a week or as needed. For tougher stains or clogs, you may need to use it more frequently. It’s a good idea to incorporate this method into your regular cleaning routine to keep your home clean and fresh. Remember to always test the solution on a small area first and adjust the frequency accordingly.
What type of vinegar is best for cleaning?
Distilled white vinegar is generally considered the best type of vinegar for cleaning due to its high acidity and lack of color. It’s effective at killing bacteria, removing stains, and deodorizing surfaces. Apple cider vinegar can also be used for cleaning, but it has a lower acidity and may leave a slight residue. Avoid using colored vinegars, such as balsamic vinegar, as they can stain surfaces.
How does this method compare to commercial cleaners?
This DIY cleaning method offers several advantages over commercial cleaners. It’s more affordable, eco-friendly, and less likely to contain harsh chemicals that can be harmful to your health. While some commercial cleaners may be more powerful for certain tasks, the vinegar and baking soda method is effective for a wide range of cleaning needs. It’s a great option for those who are looking for a natural and sustainable way to clean their homes. Plus, you have complete control over the ingredients and can customize the solution to your specific needs.
Leave a Comment