
Grow Basil Indoors? Absolutely! Imagine having fresh, fragrant basil right at your fingertips, no matter the season. Forget those sad, wilted bunches from the grocery store – we’re talking vibrant, flavorful basil ready to elevate your pasta dishes, pizzas, and pesto to a whole new level.
Basil, with its roots tracing back to ancient India, has been cherished for centuries, not just for its culinary uses but also for its medicinal properties and symbolic significance. In some cultures, it represents love and good fortune. Now, you can bring a little bit of that history and good fortune into your own home!
Let’s face it, buying fresh herbs can be expensive, and they often go bad before you even get a chance to use them. That’s where the magic of DIY comes in. Learning how to grow basil indoors is not only a cost-effective solution but also incredibly rewarding. I’m going to show you some simple, yet effective tricks and hacks that will have you harvesting your own basil in no time. Whether you’re a seasoned gardener or a complete beginner, these tips will help you create a thriving indoor basil garden. Get ready to unleash your inner green thumb and enjoy the delicious rewards!
Growing Tomatoes at Home: A Beginner’s Guide to a Bountiful Harvest
Hey there, fellow gardening enthusiasts! I’m so excited to share my tried-and-true method for growing delicious, juicy tomatoes right in your own backyard (or even on your balcony!). Trust me, there’s nothing quite like the taste of a homegrown tomato, and with a little patience and these simple steps, you’ll be enjoying them all summer long.
Choosing the Right Tomato Variety
Before we get our hands dirty, let’s talk about tomato varieties. This is crucial because different types thrive in different climates and have varying growth habits.
* Determinate vs. Indeterminate: This is the big one! Determinate tomatoes grow to a certain size and produce all their fruit at once, making them great for canning. Indeterminate tomatoes, on the other hand, keep growing and producing fruit throughout the season. I personally prefer indeterminate varieties because I love having a continuous supply of fresh tomatoes.
* Cherry Tomatoes: These are small, sweet, and perfect for snacking. They’re also generally easier to grow, making them a great choice for beginners.
* Roma Tomatoes: These are meaty and have fewer seeds, making them ideal for sauces and pastes.
* Beefsteak Tomatoes: These are the giants of the tomato world, perfect for slicing and putting on sandwiches.
* Heirloom Tomatoes: These are older varieties that have been passed down through generations. They often have unique flavors and colors, but can be a bit more challenging to grow.
Consider your climate, space, and what you plan to do with your tomatoes when choosing your varieties. I usually grow a mix of cherry, Roma, and beefsteak tomatoes to have all my bases covered!
Starting Your Tomato Plants
You have two options here: starting from seed or buying seedlings from a nursery. I’ve done both, and honestly, starting from seed is incredibly rewarding, but it requires a bit more time and effort.
Starting from Seed (Indoor)
This is how I usually get my tomato plants going. It gives me a head start on the growing season.
1. Gather Your Supplies: You’ll need tomato seeds, seed starting trays or small pots, seed starting mix (not regular potting soil!), a spray bottle, and a grow light (optional, but highly recommended).
2. Sow the Seeds: Fill your seed starting trays or pots with seed starting mix. Moisten the mix with the spray bottle. Plant 2-3 seeds per cell or pot, about ¼ inch deep.
3. Provide Warmth and Light: Cover the trays or pots with a clear plastic dome or plastic wrap to create a humid environment. Place them in a warm location (around 70-75°F). If you’re using a grow light, position it a few inches above the trays.
4. Water Regularly: Keep the seed starting mix consistently moist, but not soggy. Use the spray bottle to gently water the seedlings.
5. Thin the Seedlings: Once the seedlings have their first true leaves (the second set of leaves that appear after the initial seed leaves), thin them to one seedling per cell or pot. Choose the strongest, healthiest-looking seedling and snip off the others at the soil line.
6. Harden Off the Seedlings: About a week before you plan to transplant your seedlings outdoors, you’ll need to “harden them off.” This means gradually exposing them to outdoor conditions. Start by placing them outside for an hour or two each day, gradually increasing the time over the course of a week. This will help them adjust to the sun, wind, and temperature changes.
Buying Seedlings
If you’re short on time or space, buying seedlings is a perfectly fine option.
1. Choose Healthy Seedlings: Look for seedlings that are about 6-8 inches tall, have thick stems, and are a healthy green color. Avoid seedlings that are leggy (tall and spindly), have yellowing leaves, or show signs of disease or pests.
2. Harden Off the Seedlings: Even if you buy seedlings, it’s still a good idea to harden them off for a few days before transplanting them.
Transplanting Your Tomato Plants
Now for the fun part – getting those little plants into the ground!
1. Choose a Sunny Location: Tomatoes need at least 6-8 hours of sunlight per day. Choose a location in your garden that gets plenty of sun.
2. Prepare the Soil: Tomatoes prefer well-drained soil that is rich in organic matter. Amend your soil with compost or aged manure before planting. I also like to add a handful of bone meal to each planting hole to provide phosphorus, which promotes strong root growth.
3. Dig the Holes: Dig holes that are deep enough to bury the bottom third of the tomato plant’s stem. This might seem strange, but tomatoes can actually grow roots from their stems, which will result in a stronger, healthier plant.
4. Plant the Seedlings: Gently remove the seedlings from their pots. If the roots are tightly bound, gently loosen them with your fingers. Place the seedlings in the holes and backfill with soil.
5. Water Thoroughly: Water the newly planted seedlings thoroughly.
6. Add Support: Tomatoes, especially indeterminate varieties, need support to keep them from sprawling on the ground. You can use stakes, cages, or trellises. I prefer cages because they provide all-around support and are easy to install.
Caring for Your Tomato Plants
Once your tomato plants are in the ground, it’s important to provide them with the care they need to thrive.
1. Watering: Water your tomato plants deeply and regularly, especially during hot, dry weather. Aim to water at the base of the plant to avoid wetting the foliage, which can lead to disease. I usually water my tomatoes every 2-3 days, depending on the weather.
2. Fertilizing: Tomatoes are heavy feeders, so they need regular fertilization. Use a balanced fertilizer (such as 10-10-10) every 2-3 weeks. You can also use organic fertilizers, such as compost tea or fish emulsion.
3. Pruning: Pruning is important for indeterminate tomato varieties. Remove the “suckers” that grow between the main stem and the branches. These suckers will steal energy from the plant and reduce fruit production. I usually prune my tomatoes every week or two.
4. Mulching: Mulching helps to retain moisture in the soil, suppress weeds, and regulate soil temperature. Use organic mulches, such as straw, wood chips, or shredded leaves.
5. Pest and Disease Control: Keep an eye out for pests and diseases. Common tomato pests include aphids, tomato hornworms, and whiteflies. Common tomato diseases include early blight, late blight, and blossom end rot. Treat pests and diseases promptly with appropriate organic or chemical controls. I prefer to use organic methods whenever possible, such as insecticidal soap or neem oil.
Dealing with Common Tomato Problems
Even with the best care, you might encounter some problems along the way. Here are a few common issues and how to address them:
* Blossom End Rot: This is caused by a calcium deficiency in the soil. The bottom of the tomato will turn black and leathery. To prevent blossom end rot, add calcium to the soil before planting and water regularly. You can also use a calcium spray.
* Early Blight: This is a fungal disease that causes brown spots on the leaves. To prevent early blight, avoid wetting the foliage when watering and provide good air circulation. Treat with a fungicide if necessary.
* Tomato Hornworms: These are large, green caterpillars that can quickly defoliate your tomato plants. Handpick them off the plants or use Bacillus thuringiensis (Bt), a natural insecticide.
* Cracking: This is caused by uneven watering. The tomatoes will crack, especially after a heavy rain. To prevent cracking, water regularly and consistently.
Harvesting Your Tomatoes
The moment you’ve been waiting for!
1. Look for Color: Tomatoes are ripe when they are fully colored and slightly soft to the touch. The color will depend on the variety you’re growing.
2. Gently Twist: Gently twist the tomato off the vine. If it doesn’t come off easily, it’s probably not quite ripe yet.
3. Enjoy! There’s nothing quite like the taste of a homegrown tomato. Enjoy them fresh, in salads, sauces, or however you like!
Extending the Tomato Season
Want to keep enjoying fresh tomatoes even after the weather starts to cool down? Here are a few tips:
* Plant Early-Maturing Varieties: Choose varieties that mature quickly, so you can harvest them before the first frost.
* Use Row Covers: Row covers can protect your plants from frost and extend the growing season.
* Harvest Green Tomatoes: If frost is imminent, harvest any green tomatoes and bring them indoors to ripen. You can ripen
Conclusion
So, there you have it! Mastering the art of growing basil indoors is not only achievable, but it’s also incredibly rewarding. Imagine having a constant supply of fresh, fragrant basil right at your fingertips, ready to elevate your culinary creations at a moment’s notice. No more last-minute trips to the grocery store or settling for wilted, lackluster herbs. This DIY trick is a game-changer for anyone who loves to cook with fresh ingredients and appreciates the vibrant flavor that only homegrown basil can provide.
But why is this a must-try? Beyond the convenience and superior taste, growing your own basil indoors offers a connection to nature, even within the confines of your home. It’s a therapeutic activity that can reduce stress and bring a sense of accomplishment as you watch your tiny seedlings transform into lush, leafy plants. Plus, you have complete control over the growing process, ensuring that your basil is free from harmful pesticides and chemicals.
Ready to take your indoor basil garden to the next level? Consider experimenting with different varieties of basil. Sweet basil is a classic choice, but you might also enjoy the spicy notes of Thai basil, the lemony aroma of lemon basil, or the vibrant purple hue of opal basil. Each variety offers a unique flavor profile that can add depth and complexity to your dishes.
Another variation to explore is hydroponic basil growing. This method involves growing basil in nutrient-rich water without soil. It can be a fun and efficient way to grow basil indoors, especially if you have limited space. There are many hydroponic kits available online, or you can even build your own DIY system.
Don’t be afraid to get creative with your containers, too. While standard pots work perfectly well, you can also use repurposed items like mason jars, teacups, or even old watering cans to add a touch of personality to your indoor garden. Just make sure that your chosen container has adequate drainage to prevent root rot.
The key to successful indoor basil growing is providing your plants with the right conditions. This means plenty of sunlight (or a good grow light), well-draining soil, and regular watering. Don’t overwater your basil, as this can lead to root rot. Allow the soil to dry out slightly between waterings.
We are confident that you’ll find growing basil indoors to be a simple and satisfying experience. We encourage you to give this DIY trick a try and discover the joy of harvesting your own fresh herbs. And most importantly, we want to hear about your experience! Share your tips, tricks, and photos with us in the comments below. Let’s build a community of indoor basil enthusiasts and inspire others to embrace the joys of homegrown herbs. Happy growing!
Frequently Asked Questions (FAQ)
What is the best location for growing basil indoors?
The ideal location for growing basil indoors is a spot that receives at least 6-8 hours of direct sunlight per day. A south-facing window is often the best choice. If you don’t have access to enough natural light, you can supplement with a grow light. Position the grow light a few inches above the basil plants and keep it on for 12-14 hours per day.
What type of soil should I use for growing basil indoors?
Basil prefers well-draining soil that is rich in organic matter. A good potting mix specifically formulated for herbs is a great option. You can also create your own potting mix by combining equal parts of potting soil, perlite, and compost. Avoid using garden soil, as it can be too heavy and may not drain well.
How often should I water my indoor basil plants?
Water your basil plants when the top inch of soil feels dry to the touch. Water thoroughly until water drains out of the bottom of the pot. Be careful not to overwater, as this can lead to root rot. Allow the soil to dry out slightly between waterings. The frequency of watering will depend on factors such as the size of the pot, the temperature, and the humidity.
How do I fertilize my indoor basil plants?
Basil is a relatively light feeder, so you don’t need to fertilize it too often. A balanced liquid fertilizer diluted to half strength can be applied every 2-4 weeks during the growing season (spring and summer). Avoid over-fertilizing, as this can lead to leggy growth and a less flavorful herb.
How do I harvest basil leaves from my indoor plants?
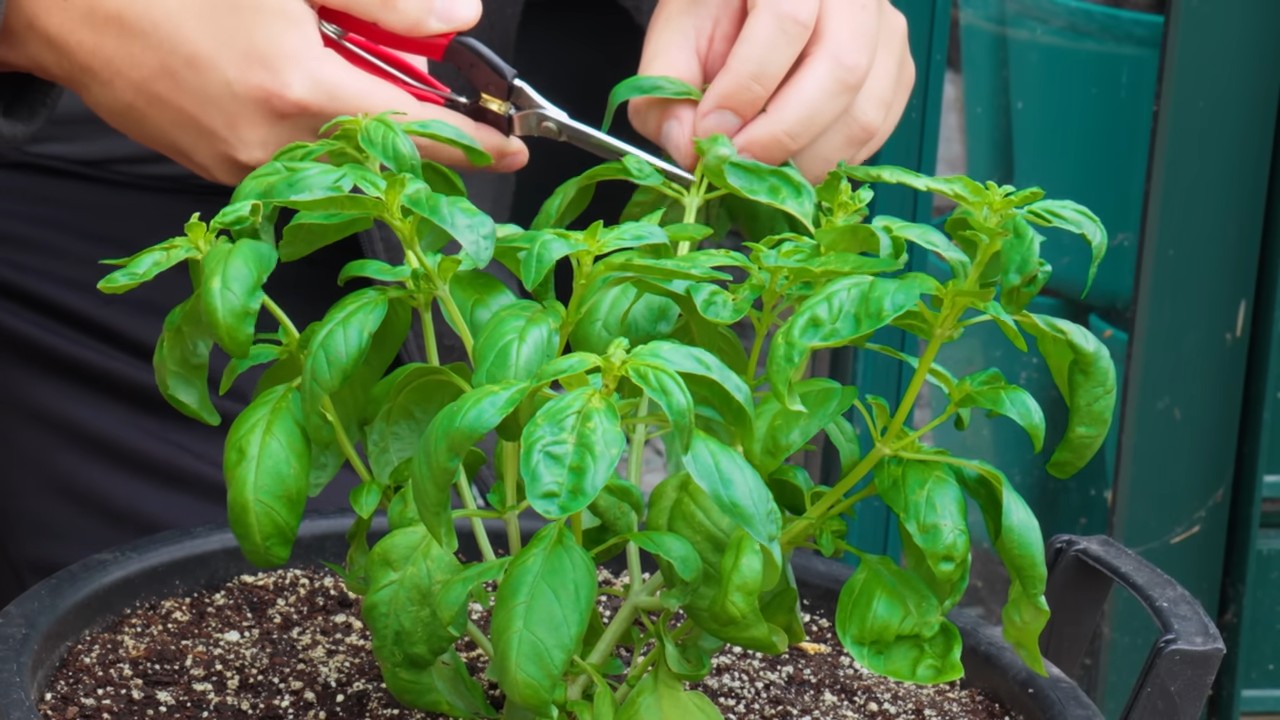
The best time to harvest basil leaves is in the morning, after the dew has dried. Pinch off the leaves from the top of the plant, just above a set of leaves. This will encourage the plant to branch out and produce more leaves. Avoid removing more than one-third of the plant’s leaves at a time.
Why are my basil leaves turning yellow?
Yellowing basil leaves can be caused by several factors, including overwatering, underwatering, nutrient deficiencies, or pests. Check the soil moisture to ensure that you are watering correctly. If the soil is consistently wet, reduce the frequency of watering. If the soil is dry, water more often. You may also need to fertilize your basil plants if they are lacking nutrients. Inspect the leaves for signs of pests, such as aphids or spider mites.
How do I prevent pests from attacking my indoor basil plants?
To prevent pests from attacking your indoor basil plants, inspect them regularly for signs of infestation. If you spot any pests, you can try washing them off with a strong stream of water or using insecticidal soap. You can also introduce beneficial insects, such as ladybugs, to control pests naturally.
Can I grow basil from seed indoors?
Yes, you can easily grow basil from seed indoors. Start the seeds in a seed-starting tray or small pots filled with seed-starting mix. Keep the soil moist and warm (around 70-75°F). The seeds should germinate in about 5-10 days. Once the seedlings have developed a few sets of true leaves, you can transplant them into larger pots.
How long does it take for basil to grow indoors?
Basil can grow relatively quickly indoors, especially if provided with the right conditions. You can typically start harvesting leaves about 4-6 weeks after planting seeds or transplanting seedlings.
My basil plant is flowering. Should I remove the flowers?
Yes, you should remove the flowers from your basil plant. When basil flowers, it stops producing leaves and focuses its energy on seed production. Removing the flowers will encourage the plant to continue producing leaves. You can pinch off the flower buds as soon as you see them.
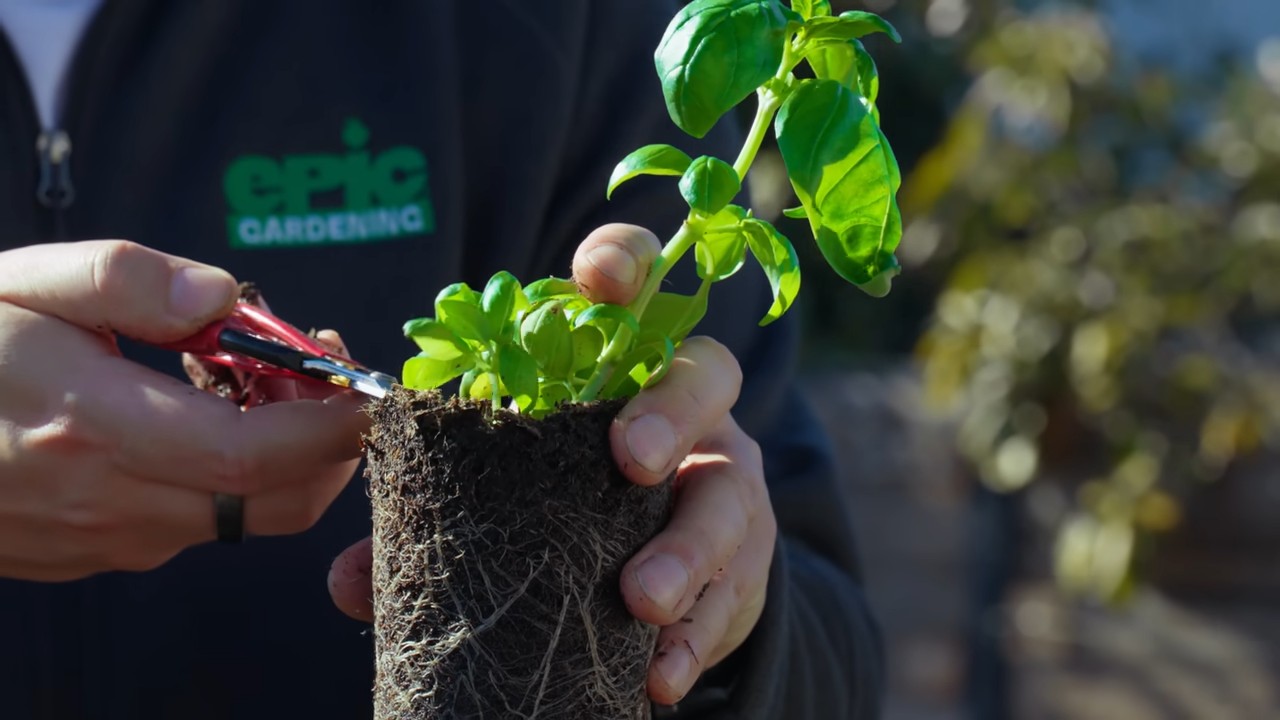
Can I propagate basil from cuttings?
Yes, basil can be easily propagated from cuttings. Take a 4-6 inch cutting from a healthy basil plant, removing the lower leaves. Place the cutting in a glass of water, making sure that the leaves are not submerged. Roots should start to develop in about a week or two. Once the roots are about an inch long, you can transplant the cutting into a pot filled with potting mix. This is a great way to expand your indoor basil garden without having to start from seed.
Leave a Comment