
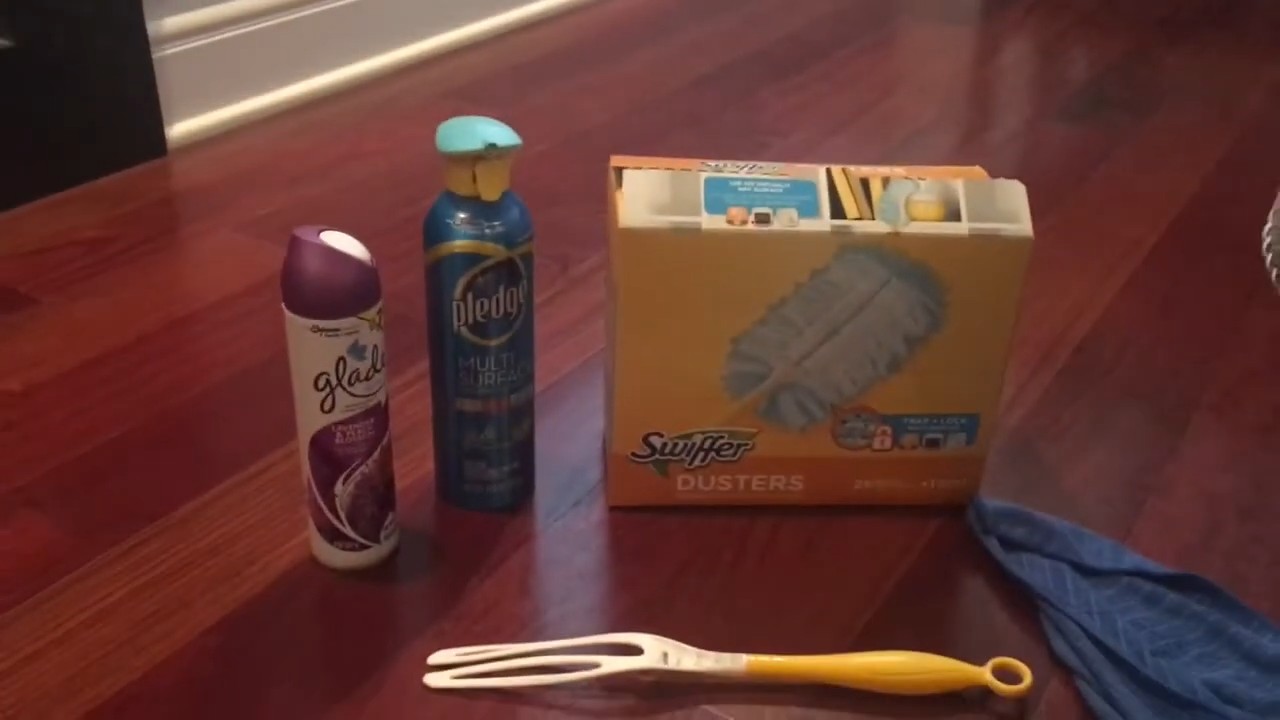
Pledge Multi-Surface Furniture Cleaning: Are you tired of staring at dusty surfaces and fingerprints on your beloved furniture? I know I am! It’s a constant battle, isn’t it? But what if I told you there’s a way to keep your furniture sparkling without breaking the bank or spending hours scrubbing? This DIY guide is your secret weapon to achieving a showroom shine with simple, effective techniques.
The desire to care for our homes and furniture is deeply rooted in human history. From ancient civilizations using natural oils to protect their wooden treasures to modern-day innovations, we’ve always sought ways to preserve and beautify our living spaces. Think about it – furniture isn’t just functional; it’s often a reflection of our personal style and a repository of cherished memories.
That’s why mastering the art of Pledge Multi-Surface Furniture Cleaning is so essential. Store-bought cleaners can be expensive and sometimes contain harsh chemicals. But with a few clever DIY tricks, you can create your own effective solutions using ingredients you probably already have at home. Not only will you save money, but you’ll also have the peace of mind knowing exactly what’s going onto your furniture. So, let’s dive in and discover how to achieve a dazzling clean with these easy and affordable DIY hacks for Pledge Multi-Surface Furniture Cleaning!
DIY Pledge Multi-Surface Cleaner: Save Money and Shine!
Hey there, fellow DIY enthusiasts! Are you tired of constantly buying expensive multi-surface cleaners? I know I was! That’s why I decided to experiment and create my own version of Pledge Multi-Surface Cleaner. Not only is it incredibly cost-effective, but you also have complete control over the ingredients, making it a safer and potentially more eco-friendly option for your home. Plus, it’s super satisfying to whip up your own cleaning solutions!
This recipe is designed to mimic the cleaning power and shine of Pledge, and I’ve tweaked it over time to get it just right. Get ready to say goodbye to store-bought cleaners and hello to a sparkling clean home, all thanks to your own ingenuity!
What You’ll Need: The Ingredients and Equipment
Before we dive into the mixing, let’s gather all the necessary supplies. This will make the process smooth and efficient.
Ingredients:
* 1 cup Distilled Water: This is crucial! Tap water can contain minerals that can leave streaks on surfaces.
* 1/4 cup White Vinegar: A natural disinfectant and degreaser. Don’t worry, the scent dissipates quickly!
* 2 tablespoons Olive Oil: This is the secret ingredient for that Pledge-like shine! It nourishes wood and leaves a beautiful luster.
* 1 teaspoon Liquid Dish Soap (Gentle, like Dawn or similar): Cuts through grease and grime. Avoid anything with bleach.
* 10-15 drops Essential Oil (Optional): For fragrance. Lemon, orange, lavender, or cedarwood are great choices. I personally love lemon for its fresh, clean scent.
Equipment:
* Spray Bottle (Clean and empty): A standard spray bottle will do the trick. Make sure it’s clean to avoid contaminating your cleaner.
* Measuring Cups and Spoons: Accuracy is key for the best results.
* Funnel (Optional but Recommended): Makes pouring liquids into the spray bottle much easier and less messy.
* Mixing Bowl: For combining the ingredients before transferring them to the spray bottle.
* Soft Cloths or Microfiber Towels: For wiping and polishing surfaces.
Mixing Your Homemade Pledge: Step-by-Step Instructions
Now for the fun part! Follow these steps carefully to create your own amazing multi-surface cleaner.
1. Prepare Your Workspace: Clear a space on your counter and gather all your ingredients and equipment. This will help you stay organized and prevent spills.
2. Combine the Water and Vinegar: In your mixing bowl, pour in the 1 cup of distilled water and the 1/4 cup of white vinegar. Give it a gentle stir to combine.
3. Add the Olive Oil: Now, carefully measure out 2 tablespoons of olive oil and add it to the water and vinegar mixture. The olive oil might seem like it won’t mix well, but don’t worry, it will emulsify as we continue.
4. Incorporate the Dish Soap: Add 1 teaspoon of gentle liquid dish soap to the bowl. Be careful not to add too much, as it can create excessive suds.
5. Add Essential Oils (Optional): If you’re using essential oils for fragrance, now’s the time to add them. I recommend starting with 10 drops and adding more if you prefer a stronger scent. Remember, a little goes a long way!
6. Mix Thoroughly: Gently stir all the ingredients together until they are well combined. You’ll notice the mixture becoming slightly cloudy as the olive oil emulsifies.
7. Transfer to Spray Bottle: Using your funnel (if you have one), carefully pour the mixture into your clean spray bottle. Be careful not to overfill the bottle. Leave a little space at the top.
8. Shake Well: Secure the spray bottle lid tightly and shake the bottle vigorously to ensure all the ingredients are fully mixed. This is especially important to distribute the olive oil evenly.
Using Your Homemade Pledge: Tips and Tricks for Sparkling Results
Okay, you’ve made your cleaner! Now let’s talk about how to use it effectively to get that Pledge-like shine.
1. Test in an Inconspicuous Area: Before using your homemade cleaner on a large surface, it’s always a good idea to test it in a small, hidden area first. This will ensure that it doesn’t damage or discolor the surface.
2. Spray Lightly: When cleaning, spray a light mist of the cleaner onto the surface you want to clean. Avoid spraying too much, as this can leave a residue.
3. Wipe with a Soft Cloth: Immediately after spraying, wipe the surface with a soft cloth or microfiber towel. Use a circular motion to distribute the cleaner evenly and remove dirt and grime.
4. Buff to a Shine: After wiping, use a clean, dry cloth to buff the surface to a beautiful shine. This will help remove any remaining residue and enhance the luster.
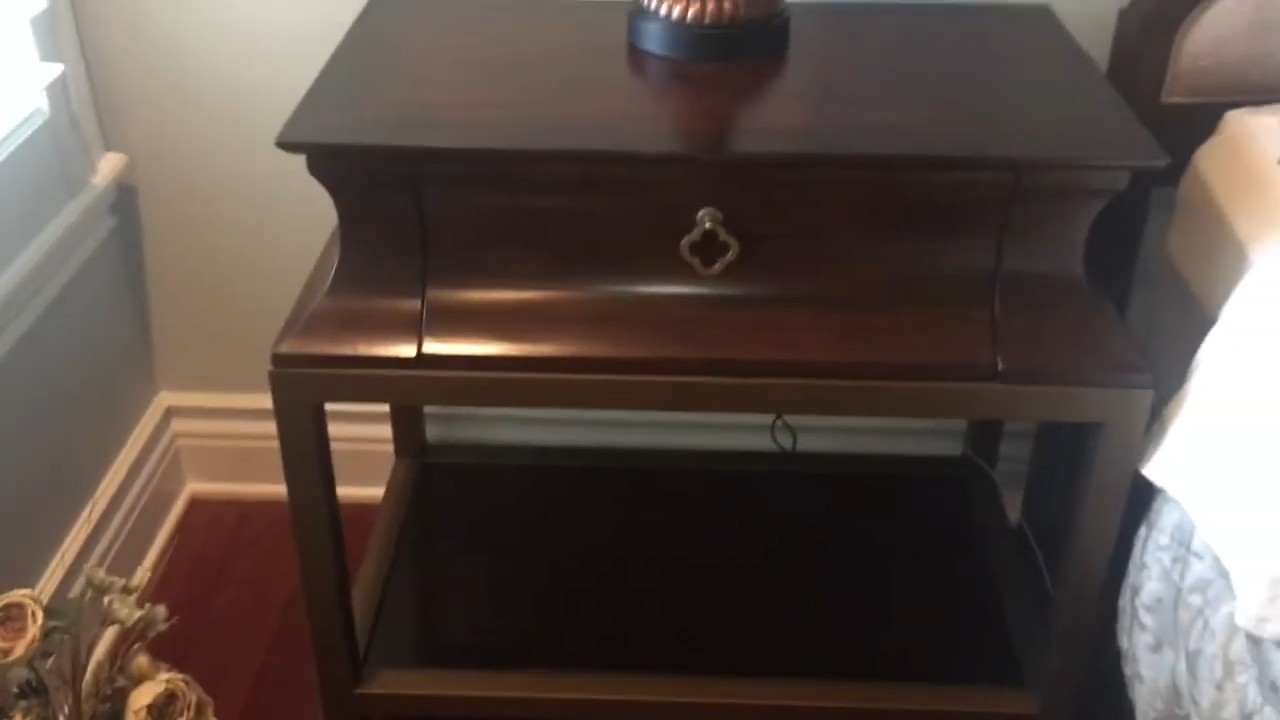
5. Suitable Surfaces: This homemade Pledge is great for wood furniture, cabinets, countertops (except for porous surfaces like granite), stainless steel appliances, and even leather.
6. Surfaces to Avoid: Avoid using this cleaner on porous surfaces like granite, marble, or unsealed wood, as the olive oil can penetrate and stain these materials. Also, avoid using it on electronics screens, as the moisture can damage them.
7. Frequency of Use: You can use this cleaner as often as needed to keep your surfaces clean and shiny. I typically use it once or twice a week to maintain a clean and polished look.
Troubleshooting and Customization: Making it Your Own
Sometimes, things don’t go exactly as planned. Here are some common issues you might encounter and how to fix them, plus some ideas for customizing your cleaner.
Problem: Streaking
* Cause: Too much olive oil or dish soap.
* Solution: Reduce the amount of olive oil or dish soap in your next batch. Also, make sure you’re buffing the surface thoroughly with a clean, dry cloth.
Problem: Dull Finish
* Cause: Not enough olive oil.
* Solution: Increase the amount of olive oil slightly in your next batch.
Problem: Strong Vinegar Smell
* Cause: Too much vinegar.
* Solution: Reduce the amount of vinegar in your next batch. The essential oils will also help to mask the vinegar smell.
Problem: Excessive Suds
* Cause: Too much dish soap.
* Solution: Reduce the amount of dish soap in your next batch.
Customization Ideas:
* Different Essential Oils: Experiment with different essential oils to create your own unique scent. Lavender, tea tree, and eucalyptus are all great options.
* Lemon Juice: Add a tablespoon of lemon juice for extra cleaning power and a fresh scent.
* Tea Tree Oil: Add a few drops of tea tree oil for its antibacterial properties.
* Vinegar Infusion: Infuse your vinegar with citrus peels or herbs for a more fragrant and potent cleaner. Simply place the peels or herbs in a jar of vinegar and let it sit for a few weeks before using.
Storage and Shelf Life: Keeping Your Cleaner Fresh
Proper storage is essential to maintain the quality and effectiveness of your homemade Pledge.
* Storage: Store your homemade Pledge in a cool, dark place away from direct sunlight and heat. This will help prevent the ingredients from breaking down.
* Shelf Life: This homemade cleaner typically has a shelf life of about 2-3 months. Over time, the ingredients may separate or the scent may fade. If you notice any changes in the appearance or smell of the cleaner, it’s best to discard it and make a fresh batch.
* Labeling: Be sure to label your spray bottle clearly with the name of the cleaner and the date it was made. This will help you keep track of its age and prevent accidental misuse.
Safety Precautions: A Few Words of Caution
While this homemade cleaner is generally safe, it’s important to take a few precautions to ensure your safety.
* Keep Out of Reach of Children and Pets: As with all cleaning products, keep this homemade cleaner out of reach of children and pets.
* Avoid Contact with Eyes: Avoid contact with eyes. If contact occurs, rinse thoroughly with water.
* Do Not Ingest: Do not ingest this cleaner. If ingested, seek medical attention immediately.
* Ventilation: When using this cleaner, ensure adequate ventilation.
* Allergy Awareness: If you have any allergies to the ingredients used in this recipe, avoid using this cleaner.
I hope you enjoy making and using your own homemade Pledge Multi-Surface Cleaner! It’s a fantastic way to save money, reduce waste, and create a cleaner, healthier home. Happy cleaning!
Conclusion
So, there you have it! Ditching the store-bought sprays and embracing this DIY Pledge Multi-Surface Furniture Cleaning solution is more than just a cost-effective alternative; it’s a conscious choice for a healthier home and a happier planet. We’ve walked you through a simple, effective recipe that utilizes ingredients you likely already have in your pantry. The results? A gleaming, dust-free surface that smells fantastic, without the harsh chemicals and overwhelming artificial fragrances often found in commercial products.
But the benefits extend beyond just clean furniture. Think about the reduced plastic waste from empty spray bottles piling up in landfills. Consider the peace of mind knowing exactly what you’re spraying around your family and pets. And let’s not forget the satisfaction of creating something yourself, a small act of self-sufficiency that empowers you to take control of your home environment.
This DIY Pledge Multi-Surface Furniture Cleaning solution isn’t just about saving money; it’s about investing in a healthier, more sustainable lifestyle. It’s about making informed choices that benefit both your home and the world around you.
Why is this DIY trick a must-try? Because it’s simple, affordable, eco-friendly, and incredibly effective. You’re getting a powerful cleaning solution without the harsh chemicals, artificial fragrances, and plastic waste associated with store-bought alternatives. Plus, you can customize the scent to your liking!
Ready to take it to the next level? Here are a few suggestions and variations to personalize your DIY Pledge Multi-Surface Furniture Cleaning experience:
* **Essential Oil Blends:** Experiment with different essential oil combinations to create your signature scent. Lavender and lemon offer a calming and refreshing aroma, while tea tree and eucalyptus provide antibacterial properties. For a woodsy scent, try cedarwood and pine. Remember to use pure essential oils for the best results.
* **Vinegar Infusion:** For extra cleaning power, infuse your vinegar with citrus peels (lemon, orange, grapefruit) for a few weeks before using it in the recipe. This adds a natural degreasing agent and a pleasant citrus scent.
* **Wood Type Considerations:** While this recipe is generally safe for most sealed wood surfaces, always test it on an inconspicuous area first, especially on antique or delicate furniture. For particularly sensitive wood, consider reducing the amount of vinegar or substituting it with distilled water.
* **Dusting Cloth Choice:** The type of cloth you use can also impact the effectiveness of your cleaning. Microfiber cloths are excellent for trapping dust and dirt, while soft cotton cloths are ideal for polishing.
* **For Leather Furniture:** While this recipe is primarily designed for wood and other hard surfaces, a very diluted version (mostly water with a tiny amount of oil) can be used on leather. However, always test in an inconspicuous area first and use sparingly. Follow up with a dedicated leather conditioner.
* Adding a touch of Castile Soap: For extra cleaning power, add a teaspoon of unscented Castile soap to the mixture. This is especially helpful for removing stubborn grime.
We’re confident that once you try this DIY Pledge Multi-Surface Furniture Cleaning solution, you’ll never go back to store-bought sprays. It’s a game-changer for your home and your well-being.
So, what are you waiting for? Gather your ingredients, mix up a batch, and experience the difference for yourself. We’re eager to hear about your results! Share your experiences, variations, and tips in the comments below. Let’s build a community of DIY cleaning enthusiasts who are passionate about creating healthier, more sustainable homes. Don’t forget to tag us in your social media posts using #DIYFurnitureCleaning and #EcoFriendlyHome. We can’t wait to see your sparkling clean furniture!
FAQ
Here are some frequently asked questions to help you get the most out of your DIY Pledge Multi-Surface Furniture Cleaning solution:
Is this DIY cleaner safe for all types of furniture?
Generally, yes, this DIY cleaner is safe for most sealed wood, laminate, and other hard surfaces. However, it’s crucial to test it on an inconspicuous area first, especially if you have antique or delicate furniture. Different wood types react differently to cleaning solutions. For instance, some finishes might be more sensitive to vinegar. If you notice any discoloration or damage, discontinue use immediately and consult a professional furniture restorer. For unsealed wood, avoid using this cleaner as it can cause water damage. Always err on the side of caution and test before applying to the entire surface.
How long does the DIY cleaner last?
This DIY cleaner doesn’t contain any harsh preservatives, so it’s best to use it within a few weeks. Store it in a cool, dark place in a tightly sealed spray bottle to prevent bacterial growth and maintain its effectiveness. If you notice any changes in color, odor, or consistency, discard the solution and make a fresh batch. Making smaller batches more frequently is generally recommended to ensure optimal freshness and cleaning power.
Can I use different types of vinegar?
White distilled vinegar is the recommended type for this DIY cleaner due to its acidity and lack of color, which minimizes the risk of staining. However, you can experiment with other types of vinegar, such as apple cider vinegar, but be aware that they may have a slight color that could potentially affect lighter-colored furniture. If you choose to use a different type of vinegar, test it on an inconspicuous area first to ensure it doesn’t cause any discoloration. Avoid using balsamic vinegar, as its dark color and sugar content can leave a sticky residue.
What if I don’t have essential oils?
Essential oils are primarily added for fragrance and antibacterial properties, but they’re not strictly necessary for the cleaning power of the solution. If you don’t have essential oils, you can simply omit them from the recipe. The vinegar and oil will still effectively clean and polish your furniture. Alternatively, you can infuse your vinegar with citrus peels for a natural fragrance boost.
How often should I use this DIY cleaner?
The frequency of cleaning depends on how often your furniture gets dusty or dirty. For general dusting and maintenance, you can use this DIY cleaner once or twice a week. For heavily soiled furniture, you may need to clean it more frequently. Avoid over-cleaning, as excessive moisture can damage wood furniture. Always wipe up any excess cleaner with a dry cloth after application.
Can I use this cleaner on electronics?
No, this DIY cleaner is not recommended for use on electronics. The moisture can damage sensitive electronic components. Use a dry microfiber cloth specifically designed for cleaning electronics.
What if the cleaner leaves a residue?
If the cleaner leaves a residue, it’s likely due to using too much oil in the mixture. Try reducing the amount of oil in your next batch. You can also wipe the furniture down with a clean, damp cloth after applying the cleaner to remove any excess residue. Ensure you are using a clean microfiber cloth to avoid re-depositing dirt.
Is this cleaner safe for pets and children?
This DIY cleaner is generally safer for pets and children than commercial cleaners, as it doesn’t contain harsh chemicals. However, it’s still important to keep the cleaner out of reach of children and pets. Essential oils can be toxic to pets if ingested, so choose pet-safe essential oils or omit them altogether. Always supervise children when they are helping with cleaning.
Can I use this cleaner on painted furniture?
This cleaner can be used on painted furniture, but it’s essential to test it on an inconspicuous area first to ensure it doesn’t damage the paint. Some paints are more sensitive to vinegar than others. If you notice any discoloration or damage, discontinue use immediately. For painted furniture, consider using a more diluted solution with less vinegar.
What are the benefits of using a DIY furniture cleaner over store-bought cleaners?
The benefits are numerous! DIY furniture cleaner is cost-effective, eco-friendly, and allows you to control the ingredients. You avoid harsh chemicals, artificial fragrances, and plastic waste. It’s a healthier and more sustainable option for your home and the environment. Plus, you get the satisfaction of creating something yourself! You know exactly what you are using to clean your home, and that peace of mind is priceless.


Leave a Comment