
Grow Kitchen Sage, right in your own home! Imagine stepping into your kitchen, not to a barren countertop, but to a vibrant, fragrant herb garden, ready to elevate your culinary creations. Forget those sad, wilted bunches from the grocery store – we’re talking about fresh, potent sage, bursting with flavor and ready at your fingertips.
For centuries, sage has been more than just a culinary herb. Ancient Romans revered it for its medicinal properties, believing it could grant immortality. Native American cultures have long used sage in smudging ceremonies for purification and healing. Now, you can tap into that rich history and bring the magic of sage into your everyday life.
Why should you embark on this DIY adventure? Because growing your own herbs is incredibly rewarding! Not only will you have access to the freshest ingredients, but you’ll also save money, reduce waste, and connect with nature in a meaningful way. Plus, learning how to grow kitchen sage is surprisingly easy, even if you don’t have a green thumb. I’m going to share some simple, effective tricks and hacks that will have you harvesting your own sage in no time. Let’s get started and transform your kitchen into a thriving herb haven!
Propagating Sage from Cuttings: A Beginner’s Guide
Hey there, fellow plant enthusiasts! I’m so excited to share my tried-and-true method for propagating sage from cuttings. It’s a fantastic way to expand your herb garden without spending a fortune, and honestly, it’s incredibly rewarding to watch those little cuttings transform into thriving sage plants. So, grab your gardening gloves, and let’s get started!
What You’ll Need
Before we dive in, let’s gather all the necessary supplies. Having everything on hand will make the process smooth and enjoyable.
* Healthy Sage Plant: Obviously! Choose a mature sage plant that looks vibrant and disease-free.
* Sharp, Clean Pruning Shears or Knife: This is crucial for making clean cuts that promote rooting. I always sterilize mine with rubbing alcohol to prevent any fungal infections.
* Rooting Hormone (Optional but Recommended): This powder or liquid helps stimulate root growth and increases your success rate. I personally swear by it!
* Small Pots or Containers: You’ll need pots to house your cuttings while they root. I prefer using small plastic pots (around 3-4 inches in diameter) with drainage holes.
* Potting Mix: A well-draining potting mix is essential. I like to use a mix specifically formulated for seed starting or cuttings, as it’s usually lighter and less likely to retain too much moisture. You can also make your own by combining equal parts peat moss (or coco coir), perlite, and vermiculite.
* Watering Can or Spray Bottle: For gentle watering.
* Clear Plastic Bag or Humidity Dome (Optional): This helps create a humid environment, which is beneficial for rooting.
* Labels and a Pen: To keep track of your cuttings. Trust me, you’ll want to label them!
Taking the Cuttings
This is the most important part! The quality of your cuttings will directly impact your success.
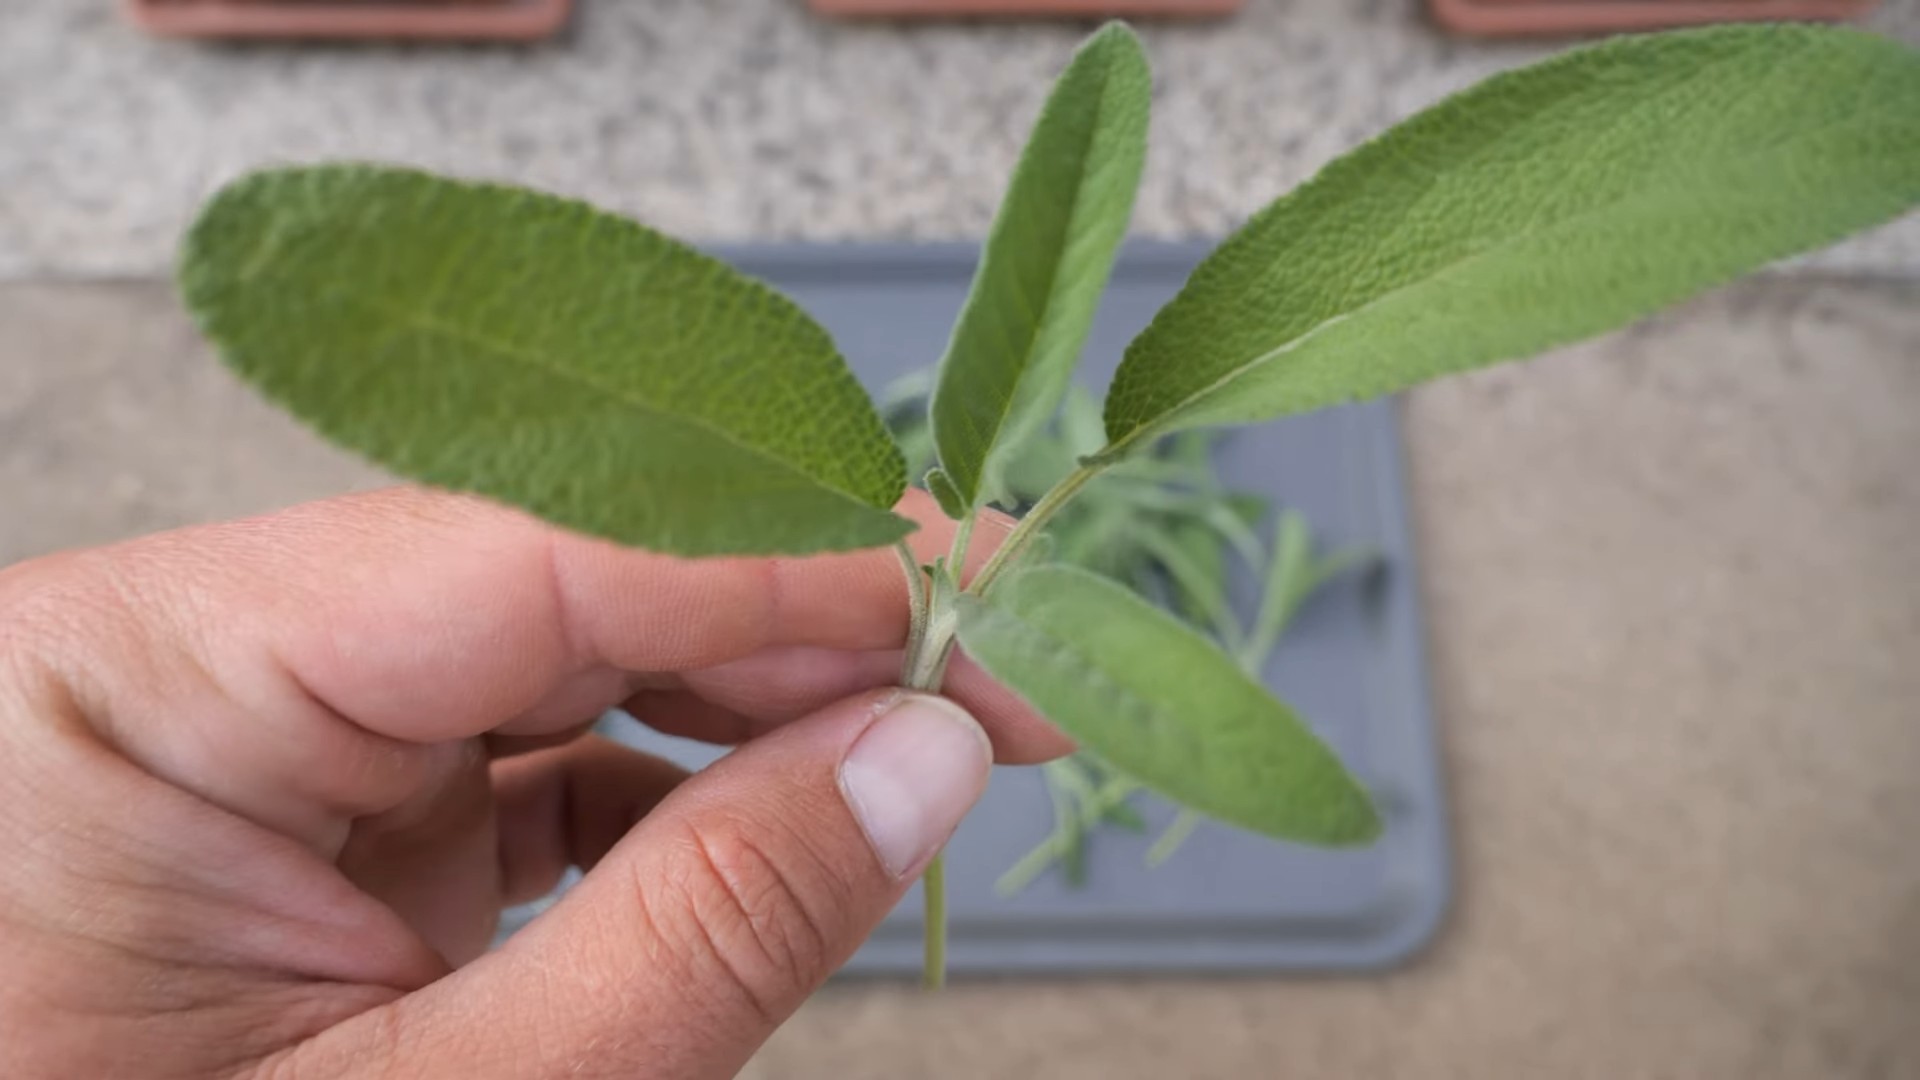
1. Choose the Right Stems: Look for healthy, non-flowering stems that are about 4-6 inches long. Avoid stems that are woody or too soft and flimsy. The ideal stems are semi-hardwood – meaning they’re not brand new growth, but not old and woody either.
2. Make the Cut: Using your sterilized pruning shears or knife, make a clean cut just below a node (the point where leaves grow from the stem). A node is where the plant will produce roots. Cutting just below the node encourages root development.
3. Remove Lower Leaves: Carefully remove the leaves from the bottom 1-2 inches of the cutting. This prevents the leaves from rotting when they’re buried in the potting mix and also encourages the plant to focus its energy on root production.
4. Prepare the Cutting (Optional but Recommended): If you’re using rooting hormone, now’s the time! Moisten the cut end of the stem slightly and dip it into the rooting hormone powder. Tap off any excess powder. This step isn’t absolutely necessary, but it definitely increases your chances of success, especially if you’re new to propagating.
Planting the Cuttings
Now that we have our cuttings, it’s time to get them planted!
1. Prepare the Pots: Fill your small pots with the well-draining potting mix. Gently tap the pots to settle the soil.
2. Make a Hole: Use a pencil or your finger to create a small hole in the center of the potting mix, deep enough to accommodate the bottom 1-2 inches of the cutting.
3. Insert the Cutting: Carefully insert the cutting into the hole, making sure the node where you removed the leaves is buried in the soil.
4. Gently Firm the Soil: Gently press the soil around the cutting to secure it in place.
5. Water Thoroughly: Water the cuttings gently but thoroughly, until the soil is moist but not soggy. I like to use a spray bottle to avoid disturbing the cuttings.
Creating a Humid Environment
Sage cuttings thrive in a humid environment, especially in the early stages of rooting.
1. Cover with Plastic Bag or Humidity Dome: Place a clear plastic bag over the pot, making sure the bag doesn’t touch the leaves. You can use skewers or chopsticks to prop up the bag if needed. Alternatively, you can use a humidity dome if you have one.
2. Ventilation: Open the bag or dome for a few minutes every day to allow for air circulation and prevent mold growth.
Caring for Your Cuttings
Patience is key! It takes time for the cuttings to develop roots.
1. Location: Place the pots in a warm, bright location, but out of direct sunlight. Direct sunlight can scorch the cuttings. An east-facing window is ideal.
2. Watering: Keep the soil consistently moist, but not soggy. Check the soil moisture regularly by sticking your finger into the soil. If the top inch feels dry, it’s time to water.
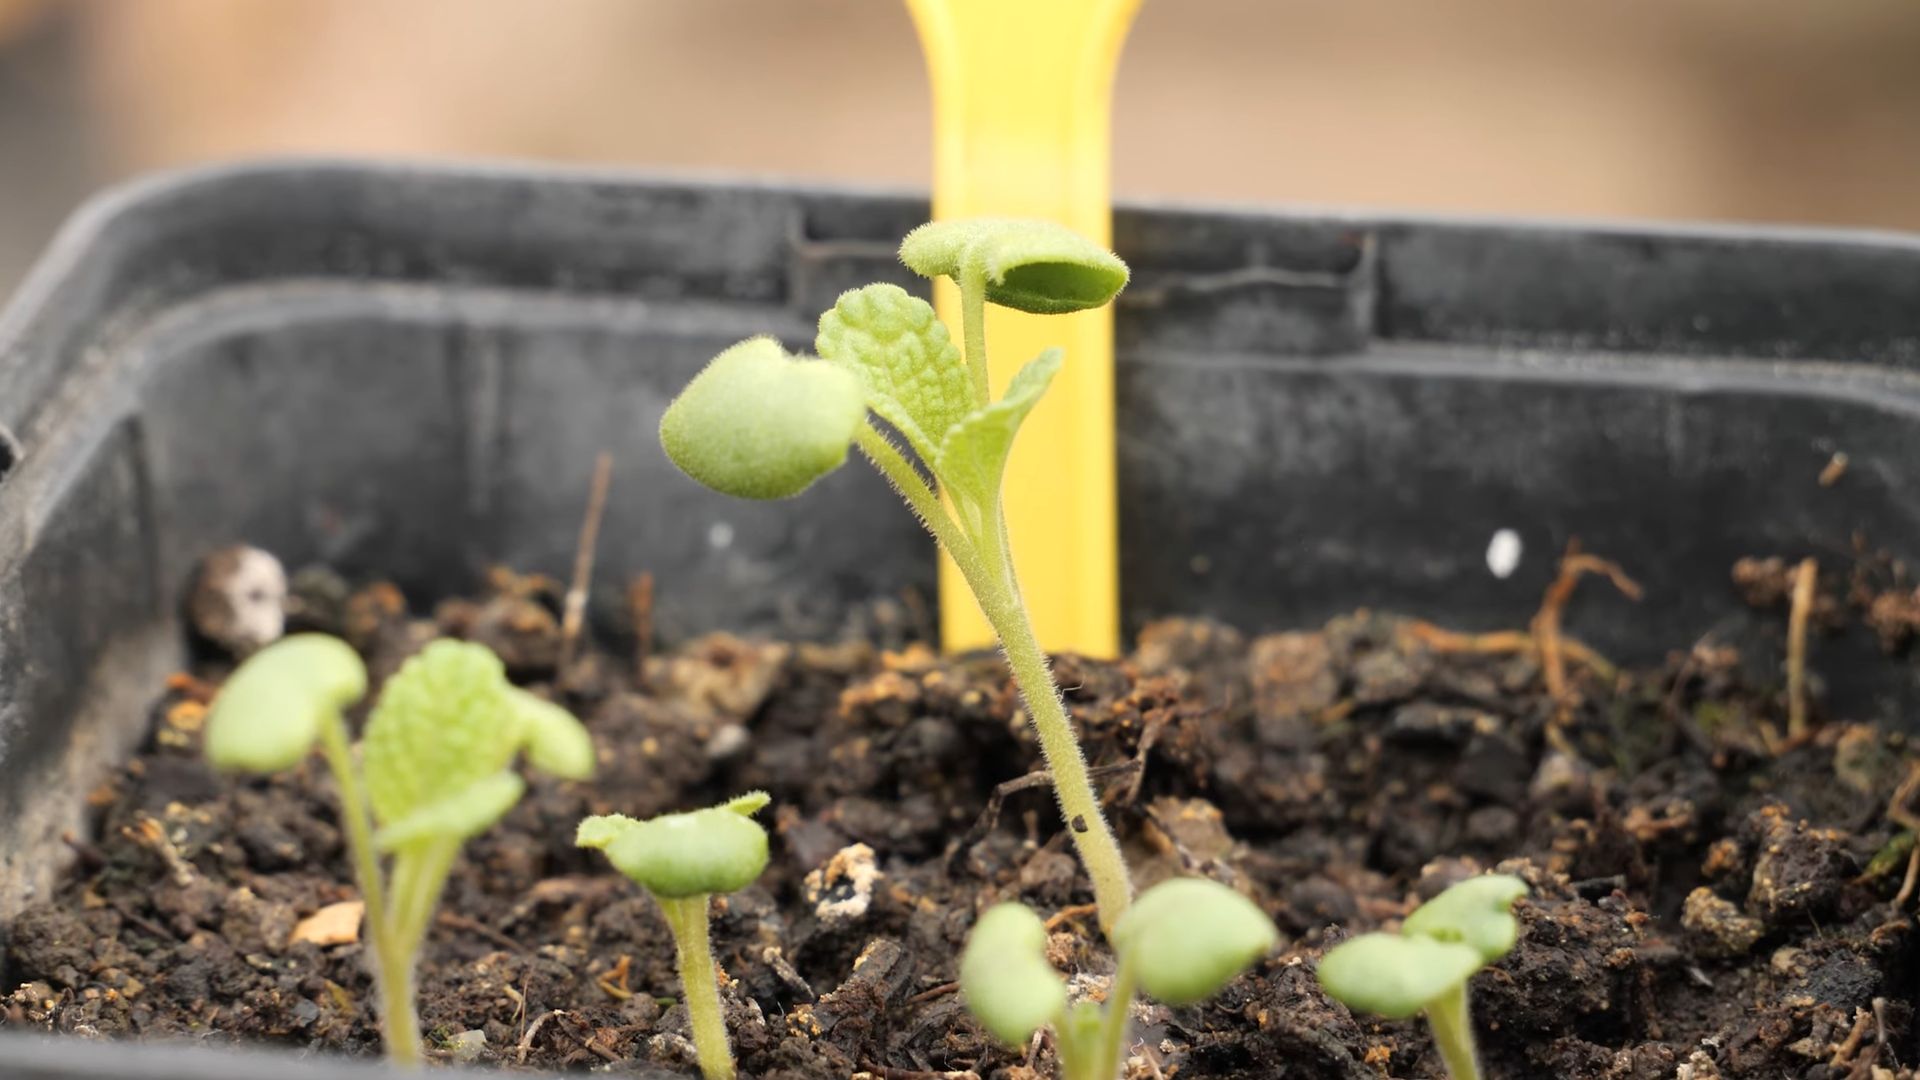
3. Monitoring: Check your cuttings regularly for signs of rooting. After a few weeks (usually 2-4 weeks), you should start to see new growth. You can also gently tug on the cuttings to see if they’ve rooted. If they resist, they’ve likely developed roots.
4. Fertilizing: Once the cuttings have rooted and started to grow, you can start fertilizing them with a diluted liquid fertilizer. Follow the instructions on the fertilizer label.
Transplanting Your Sage Plants
Once your sage plants have developed a strong root system, it’s time to transplant them into larger pots or into your garden.
1. Choose a Location: Sage prefers full sun and well-drained soil. Choose a location in your garden that meets these requirements.
2. Prepare the Soil: Amend the soil with compost or other organic matter to improve drainage and fertility.
3. Dig a Hole: Dig a hole that’s slightly larger than the root ball of your sage plant.
4. Remove the Plant from the Pot: Gently remove the sage plant from its pot, being careful not to damage the roots.
5. Place the Plant in the Hole: Place the plant in the hole and backfill with soil. Gently firm the soil around the plant.
6. Water Thoroughly: Water the plant thoroughly after transplanting.
Troubleshooting
Even with the best intentions, sometimes things don’t go as planned. Here are some common problems and how to fix them:
* Cuttings Rotting: This is usually caused by overwatering or poor drainage. Make sure your potting mix is well-draining and avoid overwatering. Also, ensure there’s adequate ventilation.
* Cuttings Not Rooting: This could be due to a number of factors, including poor quality cuttings, lack of humidity, or insufficient light. Make sure you’re using healthy cuttings, providing adequate humidity, and placing the cuttings in a bright location. Using rooting hormone can also help.
* Leaves Turning Yellow: This could be a sign of overwatering or underwatering. Check the soil moisture and adjust your watering accordingly.
Tips for Success
Here are a few extra tips to help you succeed in propagating sage from cuttings:
* Take Cuttings in the Spring or Early Summer: This is the best time to take cuttings, as the plants are actively growing.
* Use a Heat Mat: A heat mat can help speed up the rooting process, especially in cooler climates.
* Be Patient: Rooting cuttings takes time, so don’t get discouraged if you don’t see results immediately.
* Experiment: Don’t be afraid to experiment with different techniques and methods. What works for one person may not work for another.
Enjoy Your New Sage Plants!
That’s it! You’ve successfully propagated sage from cuttings. Now you can enjoy fresh sage in your cooking, teas, and even as a beautiful addition to your garden. Happy gardening! I hope this guide has been helpful, and I wish you the best of luck with your sage propagation journey. Remember, even if you don’t succeed the first time, don’t give up! Keep practicing, and you’ll be a pro in no time.
Conclusion
So, there you have it! Growing your own kitchen sage isn’t just a charming addition to your garden; it’s a gateway to fresher, more flavorful meals and a deeper connection with the food you prepare. We’ve walked through the simple steps, from choosing the right variety to harvesting your fragrant leaves. The benefits extend far beyond the culinary realm. Imagine the satisfaction of snipping fresh sage for a last-minute stuffing recipe, or brewing a soothing tea with leaves you nurtured yourself. It’s a small act of self-sufficiency that brings a surprising amount of joy.
But why is this DIY trick a must-try? Because store-bought dried sage simply can’t compare to the vibrant aroma and potent flavor of freshly grown sage. The difference is truly remarkable. Plus, you control the growing conditions, ensuring your sage is free from unwanted pesticides and chemicals. You’re not just adding an herb to your dish; you’re adding a touch of your own care and dedication.
Ready to take your culinary creations to the next level?
Don’t be afraid to experiment! Consider these variations to personalize your sage-growing experience:
* **Container Gardening:** If you’re short on space, sage thrives in pots. Choose a well-draining container and enjoy fresh sage on your balcony or patio.
* **Sage Infused Oil:** Harvest a large batch of sage and infuse it into olive oil for a flavorful cooking oil that adds a unique depth to your dishes.
* **Sage Butter:** Combine softened butter with finely chopped sage and a pinch of salt for a delicious spread on bread or a flavorful topping for grilled meats.
* **Companion Planting:** Plant sage near rosemary, cabbage, and carrots to deter pests and improve their growth.
Growing your own kitchen sage is an incredibly rewarding experience. It’s easy, cost-effective, and adds a touch of magic to your cooking. We encourage you to give it a try! Start small, be patient, and enjoy the process.
We’re confident that once you taste the difference, you’ll never go back to store-bought sage again. So, grab some seeds or a starter plant, find a sunny spot, and get ready to embark on your sage-growing adventure.
Don’t forget to share your experiences with us! We’d love to hear about your successes, challenges, and creative ways you’re using your homegrown sage. Post pictures of your thriving sage plants and delicious sage-infused recipes on social media using #HomegrownSage and tag us! Let’s build a community of sage enthusiasts and inspire others to discover the joys of growing their own herbs. Happy gardening!
Frequently Asked Questions (FAQ)
What is the best time of year to plant sage?
The best time to plant sage depends on your climate. In warmer climates, you can plant sage in early spring or fall. In colder climates, it’s best to wait until after the last frost in spring. Starting sage indoors from seeds 6-8 weeks before the last frost is also a great option for colder regions. This gives the seedlings a head start before transplanting them outdoors.
How much sunlight does sage need?
Sage thrives in full sun, requiring at least 6-8 hours of direct sunlight per day. Insufficient sunlight can lead to leggy growth and reduced flavor intensity. If you’re growing sage indoors, place it near a sunny window or use a grow light to supplement natural light.
What kind of soil is best for growing sage?
Sage prefers well-draining soil with a slightly alkaline pH (around 6.5-7.0). Heavy clay soil can lead to root rot, so it’s essential to amend the soil with compost or other organic matter to improve drainage. A mixture of potting soil, perlite, and vermiculite is ideal for container-grown sage.
How often should I water my sage plant?
Water sage deeply but infrequently, allowing the soil to dry out slightly between waterings. Overwatering can lead to root rot, so it’s crucial to avoid soggy soil. Check the soil moisture by sticking your finger about an inch deep. If the soil feels dry, it’s time to water. During hot, dry weather, you may need to water more frequently.
How do I harvest sage?
You can begin harvesting sage leaves once the plant is established, usually after a few months. Simply snip off the leaves as needed, using sharp scissors or pruning shears. Avoid removing more than one-third of the plant at a time, as this can stress the plant and hinder its growth. For drying sage, harvest stems in the morning after the dew has dried.
How do I dry sage?
There are several ways to dry sage. One method is to tie the stems together and hang them upside down in a cool, dry, and well-ventilated place. Another method is to spread the leaves on a screen or baking sheet and let them air dry. You can also use a dehydrator to dry sage quickly. Once the leaves are completely dry and brittle, store them in an airtight container in a cool, dark place.
How do I propagate sage?
Sage can be propagated from seeds, cuttings, or layering. Cuttings are the easiest and most common method. Take 4-6 inch cuttings from new growth in spring or summer. Remove the lower leaves and dip the cut end in rooting hormone. Plant the cuttings in a well-draining potting mix and keep them moist until they root, which usually takes a few weeks.
What are some common pests and diseases that affect sage?
Sage is generally resistant to pests and diseases, but it can be susceptible to aphids, spider mites, and powdery mildew. Aphids and spider mites can be controlled with insecticidal soap or neem oil. Powdery mildew can be prevented by ensuring good air circulation and avoiding overwatering.
Can I grow sage indoors?
Yes, sage can be grown indoors, provided it receives enough sunlight or artificial light. Choose a well-draining pot and use a potting mix specifically formulated for herbs. Place the pot near a sunny window or use a grow light to supplement natural light. Water regularly, allowing the soil to dry out slightly between waterings.
How long does a sage plant live?
Sage is a perennial plant, meaning it can live for several years. However, its lifespan is typically around 5-7 years. Over time, the plant may become woody and less productive. To prolong its life, prune it regularly and divide it every few years.


Leave a Comment