
Grow Oregano Indoors? Absolutely! Imagine having fresh, fragrant oregano right at your fingertips, ready to spice up your favorite dishes, no matter the season. Forget those sad, dried-up flakes in the spice rack – we’re talking vibrant, flavorful oregano bursting with life, grown right in your own home!
For centuries, oregano has been cherished not only for its culinary prowess but also for its medicinal properties. From ancient Greece, where it symbolized joy and happiness, to traditional Italian kitchens, oregano has been a staple herb, adding a distinctive zest to countless recipes. But what if you don’t have a sprawling garden or live in a climate that supports year-round outdoor growth? That’s where the magic of indoor gardening comes in!
Let’s be honest, buying fresh herbs from the grocery store can be expensive and often wasteful. They wilt quickly, and you’re left tossing out half the bunch. That’s why learning how to grow oregano indoors is such a game-changer. It’s a simple, cost-effective, and incredibly rewarding way to elevate your cooking and connect with nature, even within the confines of your home. I’m excited to share some easy DIY tricks and hacks that will have you harvesting your own homegrown oregano in no time. Get ready to unleash your inner gardener!
DIY Tomato Plant Support System: From Seedling to Harvest!
Hey there, fellow gardeners! I’m so excited to share my tried-and-true method for creating a super effective and budget-friendly tomato plant support system. Forget those flimsy cages you find at the store – we’re building something sturdy that will keep your precious tomato plants happy and productive all season long. This DIY project is perfect for beginners and experienced gardeners alike, and it’s a great way to recycle materials and save some money. Let’s get started!
Why Build Your Own Tomato Support?
Store-bought tomato cages often fall short when it comes to supporting mature, heavily laden tomato plants. They’re usually too short, too narrow, and not strong enough to handle the weight of all those delicious tomatoes. My DIY system addresses these issues by providing:
* Superior Support: Keeps your plants upright, preventing stems from breaking and fruits from touching the ground.
* Improved Air Circulation: Reduces the risk of fungal diseases by allowing air to circulate freely around the plant.
* Easier Harvesting: Makes it easier to access and harvest your ripe tomatoes.
* Cost-Effectiveness: Significantly cheaper than buying multiple high-quality cages.
* Customization: You can tailor the size and shape of the support to fit your specific tomato varieties and garden space.
Materials You’ll Need
Before we dive into the construction, let’s gather our supplies. I’ve tried to keep this list as accessible as possible, using materials you might already have on hand.
* Concrete Reinforcement Mesh (Remesh): This is the backbone of our support system. You can usually find it at home improvement stores. A single sheet is often enough for several supports. Look for sheets that are at least 5 feet wide.
* Bolt Cutters: Essential for cutting the remesh to size. Safety glasses are a must when using these!
* Gloves: Protect your hands from sharp edges.
* Measuring Tape: For accurate cuts and consistent sizing.
* Zip Ties (Heavy-Duty): To secure the overlapping edges of the cylinder. I prefer the black UV-resistant ones for outdoor use.
* Optional: Metal Stakes or Rebar: For extra support, especially in windy areas or for very heavy tomato varieties.
* Optional: Bright Colored Spray Paint: To paint the finished cages.
Step-by-Step Construction Guide
Okay, let’s get our hands dirty! Follow these steps to build your own super-strong tomato supports.
1. Planning and Measuring
This is a crucial step to ensure your supports are the right size for your tomato plants. Consider the mature size of your chosen varieties. Indeterminate tomatoes (those that keep growing all season) will need taller supports than determinate varieties (those that grow to a certain size and then stop).
1. Determine the Height: I usually aim for a height of at least 4-5 feet for indeterminate varieties. For determinate varieties, 3-4 feet might suffice.
2. Determine the Diameter: A diameter of 18-24 inches is generally a good starting point. This gives the plant plenty of room to grow and allows for good air circulation.
3. Calculate the Mesh Size: To calculate the length of remesh you need, use the formula: Circumference = πd (where d is the diameter and π is approximately 3.14). Add a few extra inches for overlap. For example, for a 20-inch diameter, you’ll need approximately 63 + a few inches for overlap.
4. Mark the Mesh: Use a permanent marker to mark the cutting lines on the remesh. Double-check your measurements before cutting!
2. Cutting the Remesh
Safety first! Always wear gloves and safety glasses when working with bolt cutters.
1. Position the Mesh: Place the remesh on a flat, stable surface.
2. Cut Along the Marked Lines: Use the bolt cutters to carefully cut along the marked lines. It’s better to make multiple small cuts than to try to cut through the entire wire at once.
3. Smooth the Edges: After cutting, check for any sharp edges and use the bolt cutters to trim them down. You can also use a file to smooth them out.
3. Forming the Cylinder
Now we’ll shape the cut remesh into a cylinder.
1. Roll the Mesh: Carefully roll the cut piece of remesh into a cylinder shape. This can be a bit tricky, so take your time and be careful not to bend the mesh too much.
2. Overlap the Edges: Overlap the edges of the mesh by at least 4-6 inches. This will provide a strong and secure connection.
3. Secure with Zip Ties: Use heavy-duty zip ties to secure the overlapping edges. Start at the top and bottom, and then add zip ties every 6-8 inches along the seam. Make sure the zip ties are tight!
4. Trim the Zip Ties: Use wire cutters or scissors to trim the excess length of the zip ties.
4. Adding Extra Support (Optional)
For extra stability, especially in windy areas or for heavy tomato varieties, you can add metal stakes or rebar.
1. Position the Stakes: Place the stakes around the outside of the cylinder, spacing them evenly.
2. Secure the Stakes: Use zip ties or wire to attach the stakes to the remesh.
5. Painting (Optional)
Painting your tomato supports can help them blend in with your garden and protect them from rust.
1. Choose Your Paint: Use a rust-resistant spray paint designed for metal. I like to use a dark green or brown color to help the supports blend in with the foliage.
2. Prepare the Surface: Clean the supports with a wire brush to remove any dirt or rust.
3. Apply the Paint: Apply several thin coats of paint, allowing each coat to dry completely before applying the next.
Using Your Tomato Supports
Now that you’ve built your awesome tomato supports, it’s time to put them to use!
1. Install Early: Place the supports around your tomato plants as soon as you transplant them into the garden. This will prevent you from damaging the plants later on.
2. Secure the Plant: As your tomato plants grow, gently guide the stems through the openings in the mesh. You can use plant clips or soft twine to secure the stems to the support if needed.
3. Monitor and Adjust: Keep an eye on your tomato plants and adjust the supports as needed. If the plants are getting too heavy, you may need to add extra stakes or supports.
Tips and Tricks for Success
Here are a few extra tips to help you get the most out of your DIY tomato supports:
* Choose the Right Mesh: Remesh is the best option for this project because it’s strong, durable, and relatively inexpensive. However, you can also use other types of wire mesh if you prefer.
* Consider the Spacing: When spacing your tomato plants, make sure to leave enough room for them to grow and for you to move around them.
* Water and Fertilize Regularly: Tomato plants need plenty of water and nutrients to thrive. Water deeply and regularly, especially during hot weather. Fertilize every few weeks with a balanced fertilizer.
* Prune Your Plants: Pruning your tomato plants can help improve air circulation and prevent diseases. Remove any suckers (the small shoots that grow between the main stem and the branches) to encourage the plant to focus its energy on producing fruit.
* Rotate Your Crops: To prevent soilborne diseases, rotate your tomato plants to a different location in your garden each year.
* Recycle and Reuse: At the end of the season, clean your tomato supports and store them in a dry place. You can reuse them year after year!
Troubleshooting
Even with the best planning, things don’t always go perfectly. Here are a few common problems and how to fix them:
* Support is Tipping: If your support is tipping over, it’s likely because the plant is too heavy or the ground is too soft. Add extra stakes or rebar to provide more stability. You can also try burying the bottom of the support a few inches into the ground.
* Plant is Breaking Through the Support: If your tomato plant is growing too vigorously and breaking through the support, you may need to prune it more aggressively. You can also try adding a second layer of mesh to the support.
* Zip Ties are Breaking: If your zip ties are breaking, it’s likely because they’re not strong enough or they’re being exposed to too much sunlight. Use heavy-duty, UV-resistant zip ties and replace them as needed.
Adapting the Design
This design is very adaptable! Feel free to modify it to suit your specific needs and preferences.
* Square Supports: Instead of a
Conclusion
So, there you have it! Growing oregano indoors is not only achievable, but it’s also a rewarding experience that brings the fresh, vibrant flavors of the Mediterranean right into your kitchen. Forget those sad, dried-up herbs from the grocery store – imagine snipping fresh, fragrant oregano leaves whenever you need them, adding a burst of authentic flavor to your pasta sauces, pizzas, grilled meats, and countless other dishes.
This DIY trick is a must-try for several compelling reasons. First and foremost, it guarantees a constant supply of fresh oregano, regardless of the season. No more last-minute trips to the store or settling for subpar dried herbs. Second, it’s incredibly cost-effective. A single oregano plant can provide you with months, even years, of fresh herbs, far outweighing the cost of repeatedly buying them. Third, it’s a sustainable and eco-friendly way to enjoy fresh herbs. You’re reducing your reliance on commercially grown and transported produce, minimizing your carbon footprint. Finally, it’s simply a fun and fulfilling project that connects you with nature and allows you to nurture something beautiful and useful.
But the beauty of growing oregano indoors lies in its versatility. Feel free to experiment with different varieties of oregano, such as Greek oregano (known for its strong, pungent flavor), Italian oregano (slightly milder and sweeter), or even golden oregano (prized for its ornamental value and subtle flavor). You can also try different potting mixes to see which one works best for your growing conditions. Consider adding companion plants like basil or thyme to your indoor herb garden for a diverse and fragrant collection.
Don’t be afraid to get creative with your setup! If you don’t have a sunny windowsill, consider using a grow light to provide your oregano with the light it needs. You can also use self-watering pots to simplify watering and prevent overwatering. And if you’re short on space, try growing oregano in hanging baskets or vertical planters.
We wholeheartedly encourage you to give this DIY trick a try. It’s easier than you might think, and the rewards are well worth the effort. Imagine the satisfaction of harvesting your own fresh oregano and using it to create delicious meals for yourself and your loved ones.
Once you’ve successfully grown your own oregano indoors, we’d love to hear about your experience! Share your tips, tricks, and photos with us in the comments section below. Let us know what varieties you’ve tried, what challenges you’ve faced, and what successes you’ve achieved. Your feedback will not only help other readers but also inspire us to continue sharing valuable gardening tips and tricks. So, grab a pot, some soil, and an oregano seedling, and get ready to embark on a flavorful and rewarding journey! Let’s all enjoy the benefits of fresh, homegrown oregano!
FAQ
What kind of oregano should I grow indoors?
The best type of oregano to grow indoors depends on your personal preference and the flavors you enjoy most. Greek oregano (Origanum vulgare hirtum) is a popular choice due to its strong, pungent flavor, which is ideal for Mediterranean dishes. Italian oregano (Origanum x majoricum) offers a milder, sweeter flavor that works well in a variety of cuisines. Golden oregano (Origanum vulgare ‘Aureum’) is a visually appealing option with a more subtle flavor, making it a great addition to salads and garnishes. Consider trying a few different varieties to see which one you like best. Each type offers a unique flavor profile that can enhance your culinary creations.
How much sunlight does indoor oregano need?
Oregano thrives in bright, direct sunlight. Ideally, it needs at least 6-8 hours of sunlight per day. A south-facing window is usually the best option. If you don’t have a sunny windowsill, you can supplement with a grow light. Place the grow light about 6-12 inches above the plant and keep it on for 12-14 hours per day. Insufficient light can lead to leggy growth and a less intense flavor. Rotate the plant regularly to ensure all sides receive adequate light.
What kind of soil is best for growing oregano indoors?
Oregano prefers well-draining soil. A good potting mix for oregano is a combination of equal parts potting soil, perlite, and compost. This mixture provides the necessary nutrients while ensuring proper drainage. Avoid using heavy garden soil, as it can retain too much moisture and lead to root rot. You can also add a small amount of sand to improve drainage further. Ensure the pot you use has drainage holes to prevent water from accumulating at the bottom.
How often should I water my indoor oregano plant?
Water your oregano plant when the top inch of soil feels dry to the touch. Avoid overwatering, as this can lead to root rot. Water thoroughly until water drains out of the drainage holes. During the winter months, when the plant is not actively growing, you can reduce watering frequency. Check the soil moisture regularly and adjust your watering schedule accordingly. Remember that indoor environments can vary, so it’s essential to monitor your plant’s needs.
How do I harvest oregano from my indoor plant?
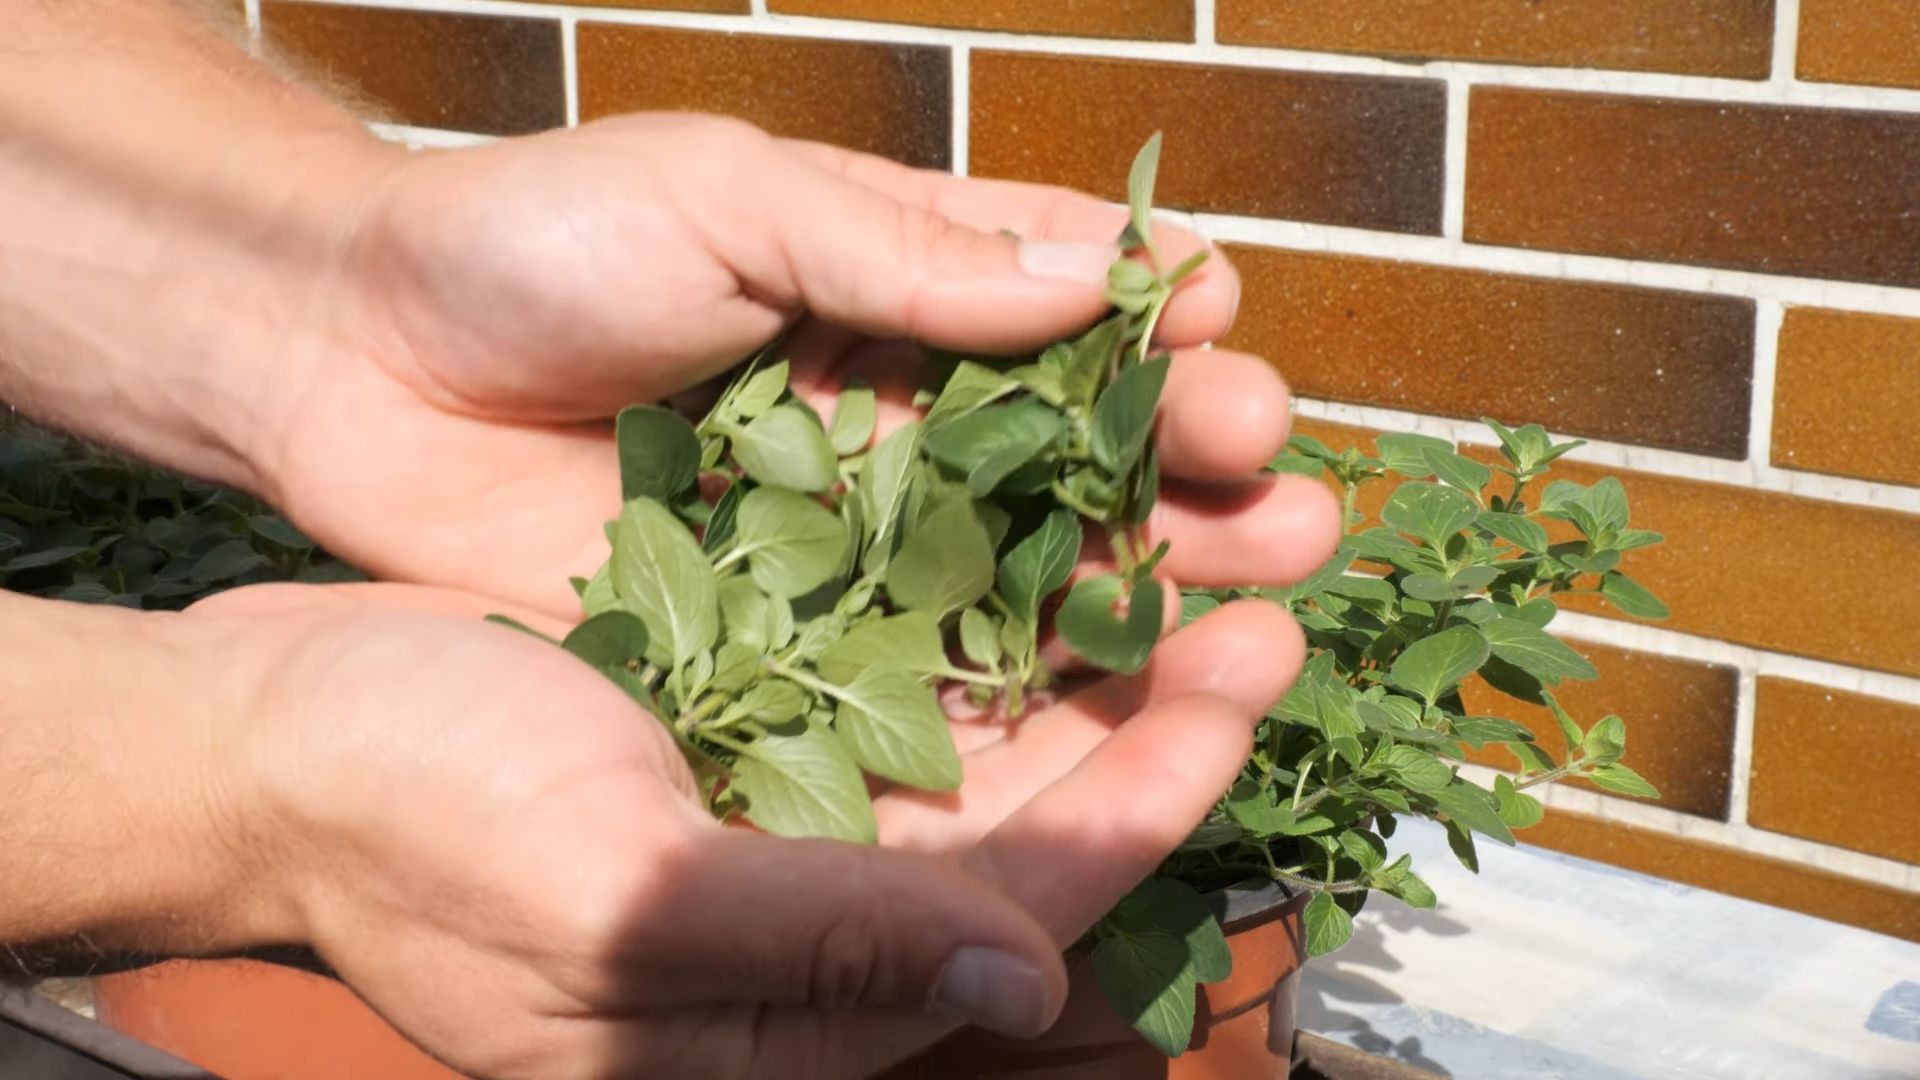
You can start harvesting oregano leaves once the plant is about 4-6 inches tall. To harvest, simply snip off stems just above a leaf node (the point where leaves grow from the stem). This encourages the plant to branch out and produce more leaves. Harvest regularly to keep the plant bushy and productive. You can use the fresh oregano leaves immediately or dry them for later use. To dry oregano, hang the stems upside down in a cool, dry place or use a dehydrator.
How do I propagate oregano from cuttings?
Propagating oregano from cuttings is a simple and effective way to create new plants. Take a 4-6 inch cutting from a healthy stem, removing the lower leaves. Dip the cut end in rooting hormone (optional) and plant it in a small pot filled with well-draining potting mix. Keep the soil moist but not soggy, and place the pot in a warm, bright location. Roots should develop within a few weeks. Once the cutting has established roots, you can transplant it into a larger pot.
What are some common problems when growing oregano indoors?
Some common problems when growing oregano indoors include overwatering, underwatering, pests, and diseases. Overwatering can lead to root rot, while underwatering can cause the leaves to wilt and dry out. Pests such as aphids and spider mites can infest oregano plants. To prevent these problems, ensure proper watering, provide adequate sunlight, and inspect your plants regularly for pests. If you notice any pests, treat them with insecticidal soap or neem oil. Good air circulation can also help prevent fungal diseases.
Can I grow oregano indoors year-round?
Yes, you can grow oregano indoors year-round with proper care. Providing adequate sunlight, well-draining soil, and regular watering will help your oregano plant thrive throughout the year. During the winter months, you may need to supplement with a grow light to ensure the plant receives enough light. Also, reduce watering frequency during the dormant period. With a little attention, you can enjoy fresh oregano from your indoor garden all year long.
How do I encourage my oregano plant to be bushier?
To encourage your oregano plant to be bushier, prune it regularly. Pinching back the tips of the stems encourages the plant to branch out and produce more leaves. You can also harvest the leaves frequently, which will have the same effect. Avoid letting the plant flower, as this can reduce leaf production. By pruning and harvesting regularly, you can keep your oregano plant compact and bushy.
Is it better to grow oregano from seed or from a cutting?
Growing oregano from cuttings is generally faster and easier than growing it from seed. Cuttings will produce a mature plant more quickly, and you’ll know exactly what variety you’re getting. Growing from seed can be more challenging, as the germination rate can be variable, and it may take longer for the plant to mature. However, growing from seed can be a more economical option if you want to grow a large number of plants. If you’re a beginner, starting with a cutting is recommended.
Leave a Comment