
Easy Melon Gardening – sounds like a dream, right? Imagine biting into a juicy, homegrown melon, bursting with flavor and sweetness, knowing you nurtured it from a tiny seed. It’s not as far-fetched as you might think! For centuries, cultures around the globe have cultivated melons, from the watermelons of ancient Africa, depicted in Egyptian tombs, to the cantaloupes enjoyed by Roman emperors. The allure of these sweet, refreshing fruits has always been strong.
But let’s be honest, the thought of growing melons can be intimidating. They seem to need so much space and attention! That’s where this DIY guide comes in. I’m going to share some simple, effective tricks and hacks that will make easy melon gardening a reality, even if you have limited space or gardening experience.
In today’s world, where we’re increasingly conscious of where our food comes from, growing your own melons is not just a fun hobby; it’s a way to connect with nature, enjoy healthier, pesticide-free produce, and impress your friends and family with your green thumb. Plus, store-bought melons simply can’t compare to the taste of a vine-ripened, homegrown beauty. So, are you ready to ditch the grocery store melons and embark on your own melon-growing adventure? Let’s get started!
Grow Your Own Delicious Melons: A Beginner’s Guide
Okay, melon lovers, let’s get down to business! I’m going to walk you through everything you need to know to grow your own juicy, sweet melons right in your backyard. It might seem intimidating at first, but trust me, with a little planning and effort, you’ll be enjoying homegrown melons in no time.
Choosing Your Melon Variety
Before we even think about planting, we need to decide what kind of melon we want to grow. There are so many delicious options! Here are a few popular choices:
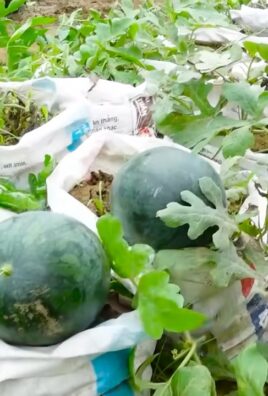
* **Watermelon:** The classic summer treat! Watermelons need a lot of space, so keep that in mind. There are different varieties, from the large, seeded ones to smaller, seedless options.
* **Cantaloupe:** Sweet and fragrant, cantaloupes are relatively easy to grow. They prefer warm weather and well-drained soil.
* **Honeydew:** Similar to cantaloupe, honeydews have a smooth, pale green rind and a sweet, refreshing flavor.
* **Galia Melon:** A cross between a cantaloupe and a honeydew, Galia melons have a distinctive netted rind and a sweet, aromatic flesh.
* **Casaba Melon:** These melons have a smooth, yellow rind and a mild, slightly tangy flavor.
Think about your climate, the space you have available, and your personal preferences when choosing your melon variety.
Preparing Your Melon Patch
Melons are sun-loving plants, so finding the right spot is crucial.
* **Sunlight:** Melons need at least 6-8 hours of direct sunlight per day. Choose a location in your yard that gets plenty of sunshine.
* **Soil:** Melons thrive in well-drained, fertile soil. Before planting, amend your soil with compost or well-rotted manure to improve its fertility and drainage.
* **Space:** Melons need plenty of space to spread out. Watermelons, in particular, can take up a lot of room. Make sure you have enough space for your chosen variety.
* **Soil pH:** Melons prefer a soil pH between 6.0 and 6.8. You can test your soil pH with a soil testing kit and amend it accordingly.
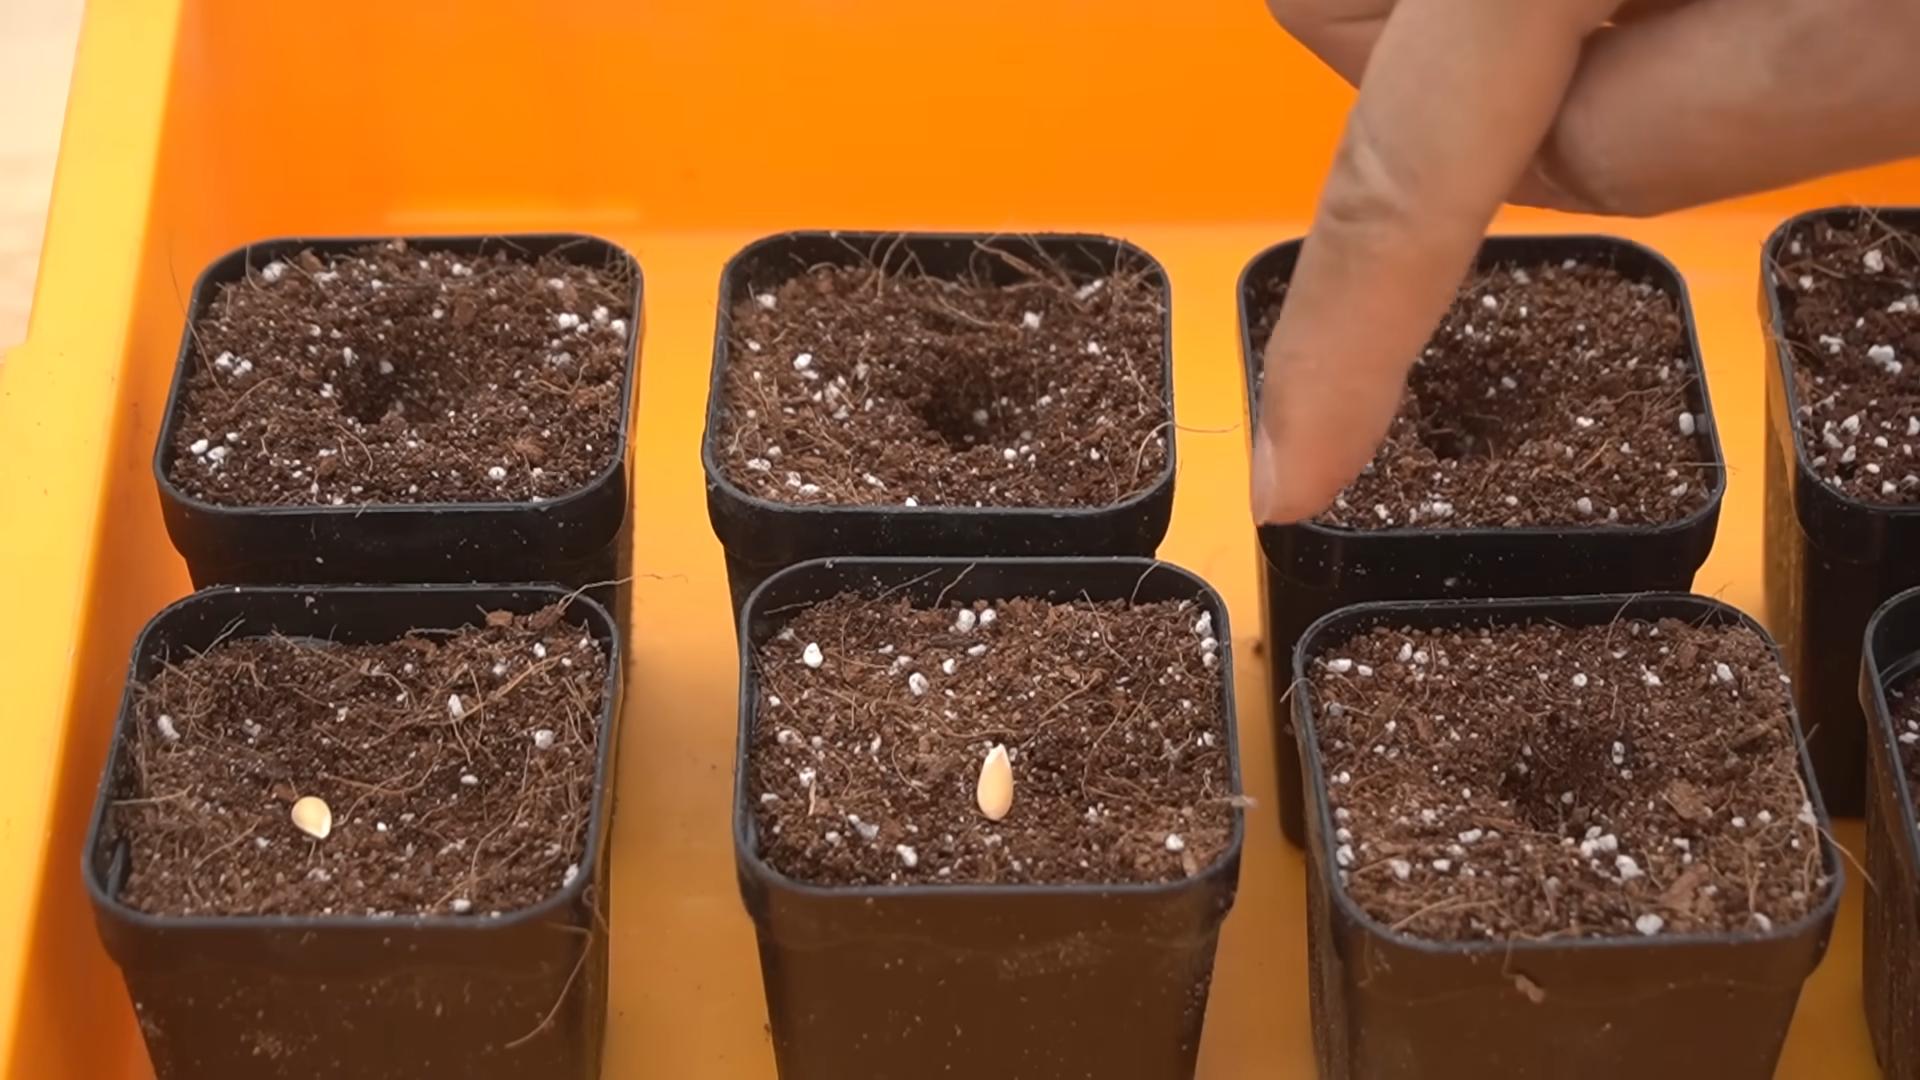
Starting Your Melon Seeds
You can either start your melon seeds indoors or direct sow them in your garden. Starting them indoors gives you a head start, especially in cooler climates.
* **Starting Indoors (4-6 weeks before the last frost):**
1. **Gather Your Supplies:** You’ll need seed starting trays or small pots, seed starting mix, melon seeds, and a heat mat (optional).
2. **Sow the Seeds:** Fill your seed starting trays or pots with seed starting mix. Sow the melon seeds about 1 inch deep.
3. **Water Gently:** Water the soil gently to moisten it.
4. **Provide Warmth:** Place the seed starting trays or pots on a heat mat (if using) and keep them in a warm location (around 70-80°F).
5. **Provide Light:** Once the seeds germinate, provide them with plenty of light. You can use a grow light or place them in a sunny window.
6. **Harden Off:** Before transplanting the seedlings outdoors, you’ll need to harden them off. This means gradually exposing them to outdoor conditions over a period of 7-10 days. Start by placing them outdoors for a few hours each day, gradually increasing the amount of time they spend outside.
* **Direct Sowing (after the last frost):**
1. **Prepare the Soil:** Prepare your garden bed by amending it with compost or well-rotted manure.
2. **Sow the Seeds:** Sow the melon seeds about 1 inch deep, spacing them according to the instructions on the seed packet.
3. **Water Gently:** Water the soil gently to moisten it.
4. **Keep the Soil Moist:** Keep the soil moist until the seeds germinate.
Transplanting Your Melon Seedlings
Once your melon seedlings have developed a few sets of true leaves and the danger of frost has passed, it’s time to transplant them into your garden.
1. **Choose a Cloudy Day:** Transplanting on a cloudy day will help prevent the seedlings from getting stressed.
2. **Dig Holes:** Dig holes that are slightly larger than the root balls of the seedlings. Space the holes according to the instructions on the seed packet.
3. **Gently Remove Seedlings:** Carefully remove the seedlings from their pots or seed starting trays.
4. **Place Seedlings in Holes:** Place the seedlings in the holes and gently backfill with soil.
5. **Water Thoroughly:** Water the seedlings thoroughly after transplanting.
6. **Mulch:** Apply a layer of mulch around the plants to help retain moisture and suppress weeds. I like to use straw or wood chips.
Caring for Your Melon Plants
Once your melon plants are established, there are a few things you can do to help them thrive.
* **Watering:** Melons need consistent watering, especially during hot, dry weather. Water deeply and regularly, but avoid overwatering, which can lead to root rot. Aim for about 1-2 inches of water per week.
* **Fertilizing:** Melons are heavy feeders, so they benefit from regular fertilization. Use a balanced fertilizer or a fertilizer specifically formulated for melons. Follow the instructions on the fertilizer package. I like to use a liquid fertilizer every few weeks.
* **Weeding:** Keep your melon patch free of weeds. Weeds compete with melon plants for water and nutrients.
* **Pest Control:** Keep an eye out for pests, such as aphids, squash bugs, and cucumber beetles. You can use insecticidal soap or other organic pest control methods to control these pests.
* **Pollination:** Melons need to be pollinated in order to produce fruit. If you’re not seeing any fruit developing, you may need to hand-pollinate the flowers. To hand-pollinate, use a small paintbrush to transfer pollen from the male flowers to the female flowers. You can identify female flowers by the small fruit that is already present at the base of the flower.
* **Pruning (Optional):** Some gardeners prune their melon plants to encourage fruit production. You can prune off any suckers (small shoots that grow from the base of the plant) or any excessive foliage.
Supporting Your Melons
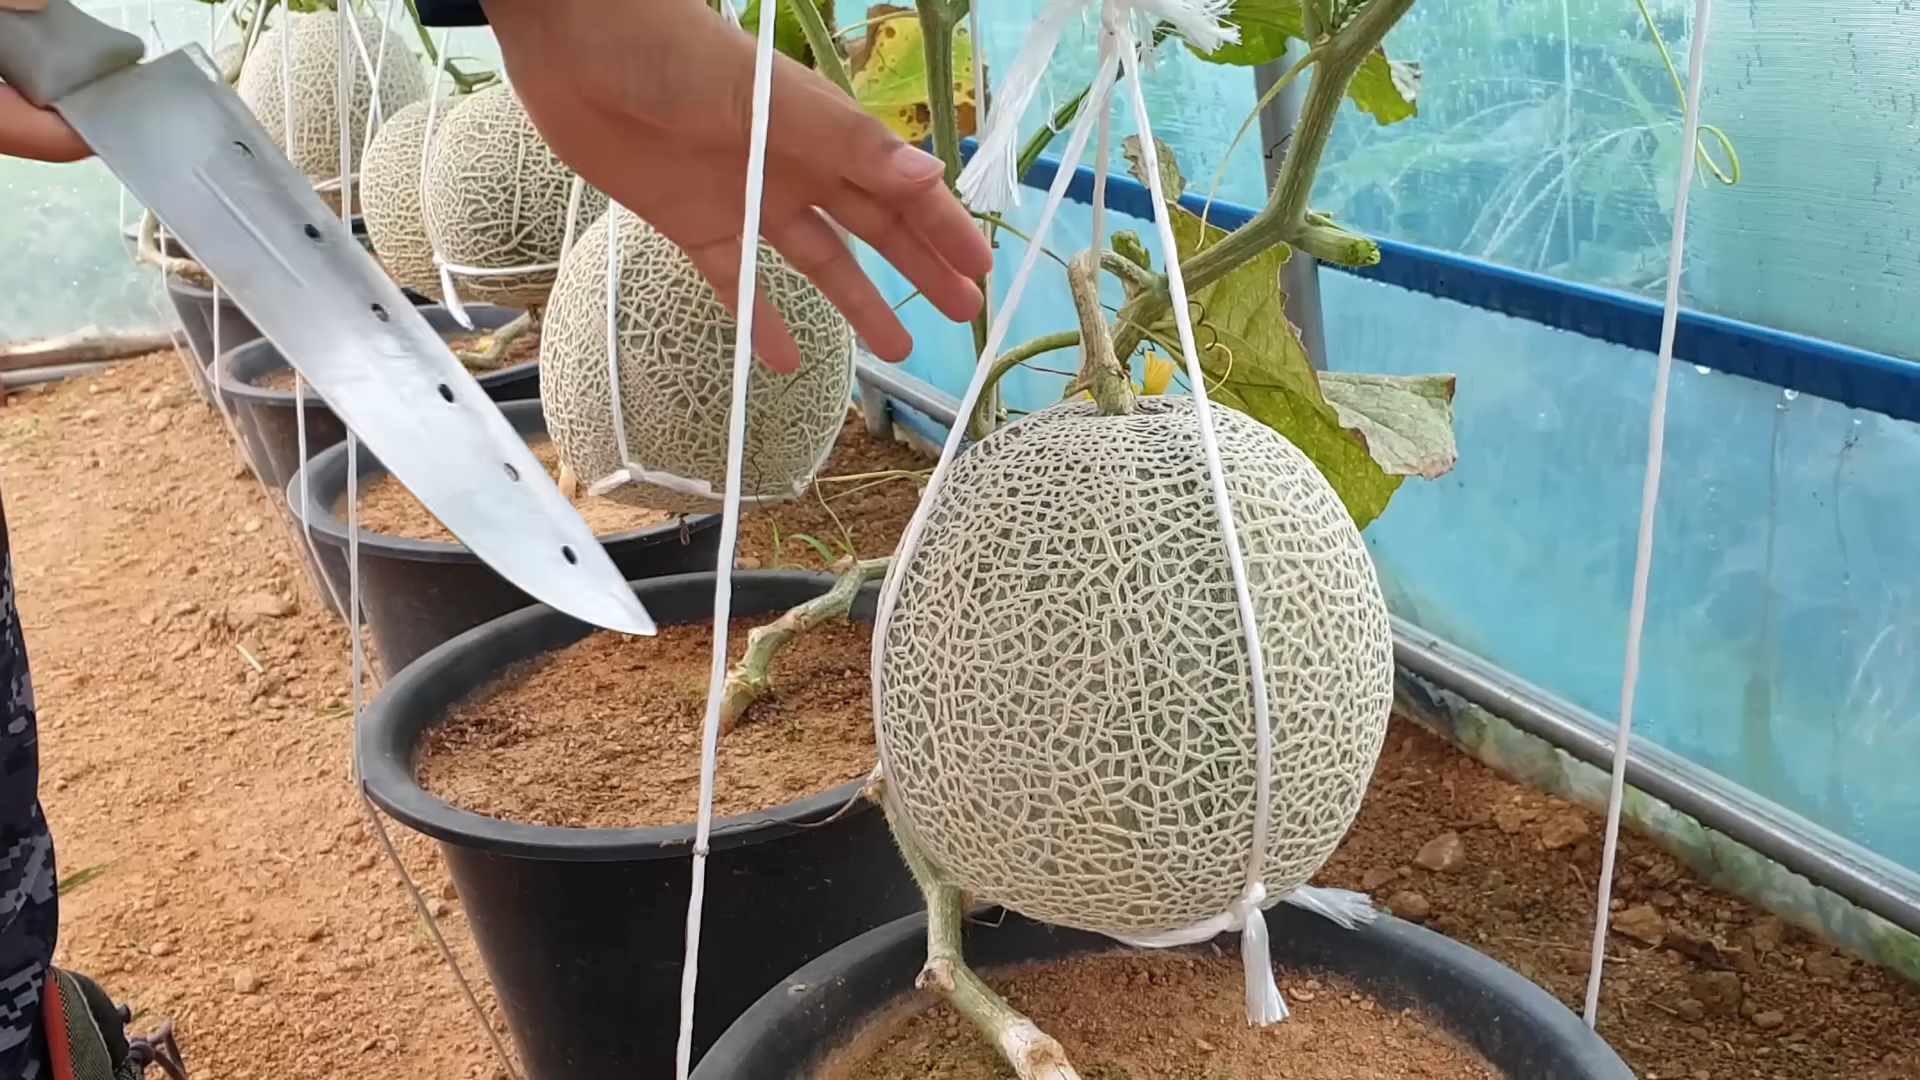
As your melons grow, they may need some support to keep them off the ground. This is especially important for larger varieties like watermelons.
* **Trellising:** You can train your melon plants to grow on a trellis. This is a good option for smaller melon varieties like cantaloupes and honeydews.
* **Slings:** For larger melons like watermelons, you can use slings to support the fruit. You can make slings out of old t-shirts or pantyhose. Tie the slings to the trellis or a sturdy stake.
* **Straw or Cardboard:** You can also place straw or cardboard under the melons to keep them off the ground. This will help prevent them from rotting.
Harvesting Your Melons
Knowing when to harvest your melons is key to enjoying their full flavor. Here are some tips for determining when your melons are ripe:
* **Watermelons:** Look for a dull, rather than shiny, rind. The underside of the melon (where it rests on the ground) should be yellow or cream-colored. When you thump the melon, it should sound hollow. The tendril closest to the melon should be brown and dry.
* **Cantaloupes:** The melon should have a sweet, musky aroma. The stem should slip easily from the melon when you gently pull on it. The rind should be a golden color.
* **Honeydews:** The melon should have a slightly waxy feel. The blossom end (the end opposite the stem) should be slightly soft. The rind should be a creamy yellow color.
* **Galia Melons:** The rind should turn from green to yellow. The melon should have a sweet, aromatic fragrance.
* **Casaba Melons:** The rind should turn a deep yellow color. The melon should feel heavy for its size.
Once your melons are ripe, cut them from the vine with a sharp knife.
Enjoying Your Homegrown Melons
Congratulations! You’ve successfully grown your own delicious melons. Now it’s time to enjoy the fruits (or rather, melons) of your labor.
* **Eat Them Fresh:** There’s nothing quite like biting into a juicy, homegrown melon on a hot summer day.
* **Make Melon Salads:** Melon salads are a refreshing and healthy way to enjoy your melons.
* **Blend Them into Smoothies:** Melon smoothies are a delicious and nutritious treat.
* **Grill Them:** Grilled melon is a surprisingly delicious and unique dish.
* **Freeze Them:** You can freeze melon chunks for later use in smoothies or other recipes.
Troubleshooting Common Melon Problems
Even with the best care
Conclusion
So, there you have it! Mastering the art of easy melon gardening is not only achievable but also incredibly rewarding. We’ve walked you through a simple yet effective DIY trick that can significantly boost your melon yield and overall gardening success. This isn’t just about growing melons; it’s about connecting with nature, understanding the nuances of plant life, and enjoying the fruits (literally!) of your labor.
Why is this DIY trick a must-try? Because it addresses some of the most common challenges faced by melon growers, such as poor pollination, soil nutrient deficiencies, and pest infestations. By implementing this technique, you’re proactively creating a more favorable environment for your melon plants to thrive. You’re essentially giving them a head start and maximizing their potential to produce delicious, juicy melons.
But don’t just take our word for it. The real magic happens when you put this knowledge into practice. Experiment with different melon varieties to discover your personal favorites. Consider variations on the DIY trick itself. For example, if you’re dealing with particularly acidic soil, you might incorporate lime into your soil amendment mixture. If you’re in a region with high humidity, ensure adequate spacing between plants to promote air circulation and prevent fungal diseases. You could even try companion planting, pairing your melons with beneficial herbs or flowers that deter pests or attract pollinators.
The possibilities are endless!
We encourage you to embrace the spirit of experimentation and tailor this DIY trick to your specific gardening conditions and preferences. Remember, gardening is a journey, not a destination. There will be successes and setbacks along the way, but each experience is an opportunity to learn and grow.
Now, it’s your turn to get your hands dirty and experience the joy of easy melon gardening firsthand. We’re confident that you’ll be amazed by the results. And once you’ve harvested your bountiful crop of homegrown melons, we’d love to hear about your experience. Share your tips, tricks, and triumphs in the comments section below. Let’s create a community of melon enthusiasts who are passionate about sharing their knowledge and inspiring others to embark on their own gardening adventures.
Don’t delay! Start planning your melon garden today and get ready to savor the sweet taste of success. Happy gardening!
Frequently Asked Questions (FAQ)
What exactly is the DIY trick you’re referring to?
The DIY trick we’ve been discussing involves creating a customized soil amendment and pollination aid to enhance melon growth. This typically includes a blend of compost, aged manure, bone meal, and Epsom salts to provide essential nutrients. The pollination aid can be a simple paintbrush used to manually transfer pollen from male to female flowers, especially in areas with limited bee activity. This combination addresses both nutritional needs and pollination challenges, leading to healthier plants and increased fruit production.
What types of melons does this DIY trick work best for?
This DIY trick is beneficial for a wide range of melon varieties, including watermelon, cantaloupe, honeydew, and muskmelon. However, some varieties may have specific needs. For example, watermelon tends to be a heavy feeder, so you might want to increase the amount of compost and manure in your soil amendment. Cantaloupe, on the other hand, prefers slightly drier conditions, so ensure good drainage. Experimentation is key to finding what works best for your chosen melon variety.
How often should I apply the soil amendment?
Ideally, you should incorporate the soil amendment into the soil before planting your melon seedlings or seeds. This gives the nutrients time to break down and become available to the plants. You can also side-dress your plants with additional compost or manure every few weeks during the growing season to provide a continuous supply of nutrients. Monitor your plants for signs of nutrient deficiencies, such as yellowing leaves, and adjust your feeding schedule accordingly.
Is manual pollination really necessary?
While melons are typically pollinated by bees and other insects, manual pollination can be beneficial, especially in areas with low pollinator populations or during periods of inclement weather. It ensures that female flowers are adequately pollinated, leading to higher fruit set and larger, more uniform melons. To manually pollinate, use a small paintbrush to gently transfer pollen from the male flowers (which have a long, thin stem) to the female flowers (which have a small, immature melon at the base). Do this in the morning when the pollen is most viable.
What if I don’t have access to all the ingredients for the soil amendment?
Don’t worry if you can’t find all the ingredients listed in the soil amendment recipe. The key is to provide a balanced blend of nutrients. Compost and aged manure are excellent sources of organic matter and essential nutrients. Bone meal provides phosphorus, which is important for root development and flowering. Epsom salts provide magnesium, which helps with chlorophyll production. If you’re missing an ingredient, you can substitute it with another similar amendment. For example, if you don’t have bone meal, you can use rock phosphate.
How do I know when my melons are ripe?
Determining when a melon is ripe can be tricky, but there are a few telltale signs to look for. For watermelons, check the underside where it rests on the ground. It should be a creamy yellow color. Also, thump the melon; a ripe watermelon will sound hollow. For cantaloupes, the stem should slip easily from the fruit when it’s ripe. Honeydew melons will develop a slightly waxy feel and a sweet aroma. Trust your senses and don’t be afraid to sample a small piece to ensure it’s ripe.
What are some common pests and diseases that affect melons, and how can I prevent them?
Common pests that affect melons include aphids, squash bugs, and vine borers. Diseases include powdery mildew, fusarium wilt, and anthracnose. To prevent these problems, practice good garden hygiene, such as removing weeds and debris. Use insecticidal soap or neem oil to control pests. Choose disease-resistant melon varieties and provide adequate air circulation to prevent fungal diseases. Crop rotation can also help to reduce the buildup of pests and diseases in the soil.
Can I grow melons in containers?
Yes, you can grow melons in containers, but you’ll need to choose a large container (at least 20 gallons) and provide adequate support for the vines. Dwarf or bush varieties of melons are best suited for container gardening. Use a high-quality potting mix and water regularly. You’ll also need to fertilize your plants more frequently than if they were grown in the ground.
How much sunlight do melons need?
Melons need at least 6-8 hours of direct sunlight per day to thrive. Choose a sunny location for your melon garden and ensure that your plants are not shaded by trees or buildings.
What if my melon plants are producing flowers but not fruit?
This could be due to a number of factors, including poor pollination, nutrient deficiencies, or stress from heat or drought. Ensure that your plants are adequately pollinated, either by bees or by hand. Fertilize your plants with a balanced fertilizer and water them regularly. Protect your plants from extreme heat by providing shade during the hottest part of the day.

Leave a Comment