
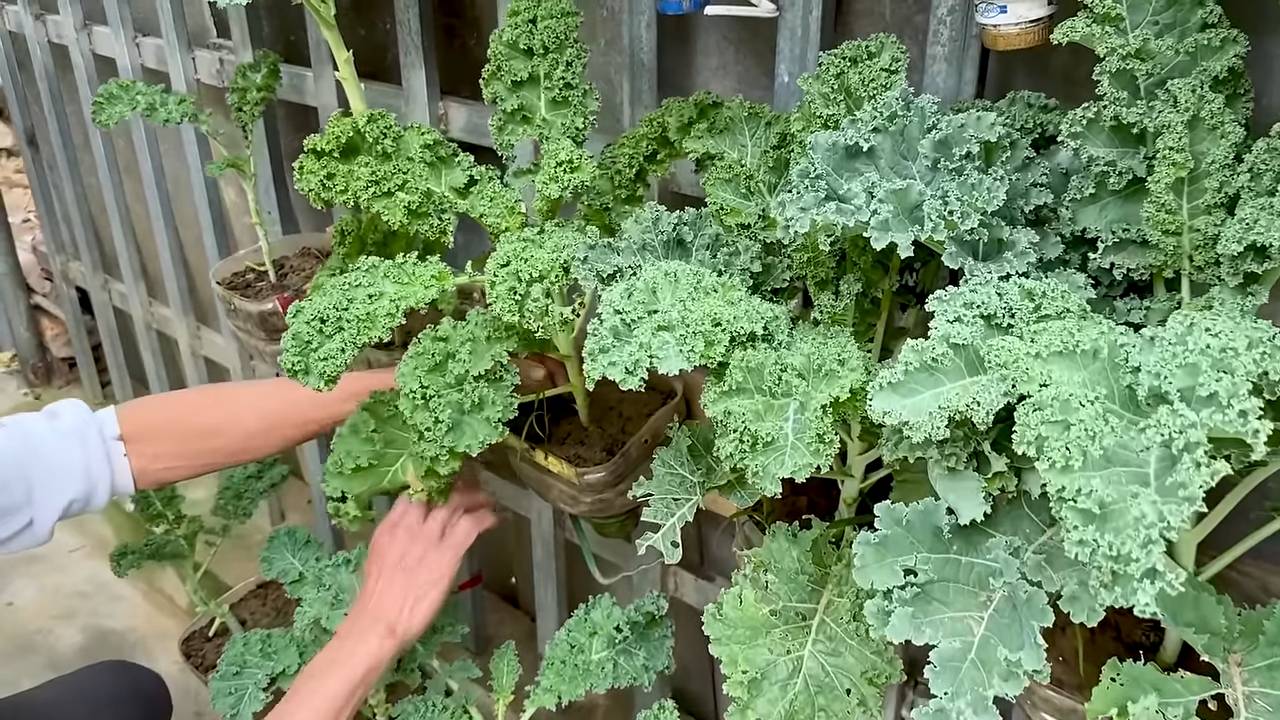
Grow Kale in Bottles? Absolutely! I know it sounds a little unconventional, but trust me, this DIY gardening trick is a game-changer, especially if you’re short on space or looking for a fun, eco-friendly project. Imagine fresh, vibrant kale readily available right outside your door, or even on your balcony, all thanks to repurposed plastic bottles.
While container gardening itself has been around for centuries, with evidence dating back to ancient Egypt and Rome, the modern twist of using recycled materials like plastic bottles adds a sustainable and resourceful element. It’s a beautiful way to connect with nature while minimizing our environmental footprint. Think of it as a modern take on the hanging gardens of Babylon, but instead of royalty, you’re the ruler of your own leafy green kingdom!
Why should you try this? Well, for starters, it’s incredibly space-saving, making it perfect for apartment dwellers or anyone with limited garden space. Plus, it’s a fantastic way to recycle those plastic bottles that often end up in landfills. But more importantly, growing your own kale ensures you have access to fresh, healthy greens free from harmful pesticides. Who wouldn’t want that? This simple DIY project allows you to grow kale in bottles, offering a sustainable and accessible way to enjoy this nutritional powerhouse. Let’s dive in and discover how easy it is to get started!
Grow Kale in Bottles: A Fun and Space-Saving DIY Project!
Hey there, fellow gardening enthusiasts! Are you short on space but still craving fresh, homegrown kale? Well, I’ve got the perfect solution for you: growing kale in bottles! It’s a fantastic way to recycle, save space, and enjoy delicious, nutritious greens right at your fingertips. I’ve been doing this for a while now, and trust me, it’s easier than you think. Let’s dive in!
What You’ll Need
Before we get started, let’s gather all the necessary materials. This will make the whole process smoother and more enjoyable.
* Plastic Bottles: The star of the show! I usually use 2-liter soda bottles or larger water bottles. Make sure they’re clean and free of any residue. You can even experiment with different sizes and shapes.
* Potting Mix: Good quality potting mix is crucial for healthy kale growth. Avoid using garden soil, as it can be too dense and may contain pests or diseases.
* Kale Seeds: Choose your favorite kale variety! There are so many options, from curly kale to dinosaur kale (lacinato) to Russian kale. I personally love the ‘Red Russian’ variety for its beautiful color and mild flavor.
* Scissors or Utility Knife: For cutting the bottles. Be careful!
* Drill or Nail and Hammer: To create drainage holes.
* Watering Can or Spray Bottle: For watering your kale seedlings.
* Optional:
* Gloves: To keep your hands clean.
* Small Pebbles or Gravel: For drainage at the bottom of the bottles.
* Plant Labels: To keep track of your kale varieties.
* Liquid Fertilizer: To give your kale a boost.
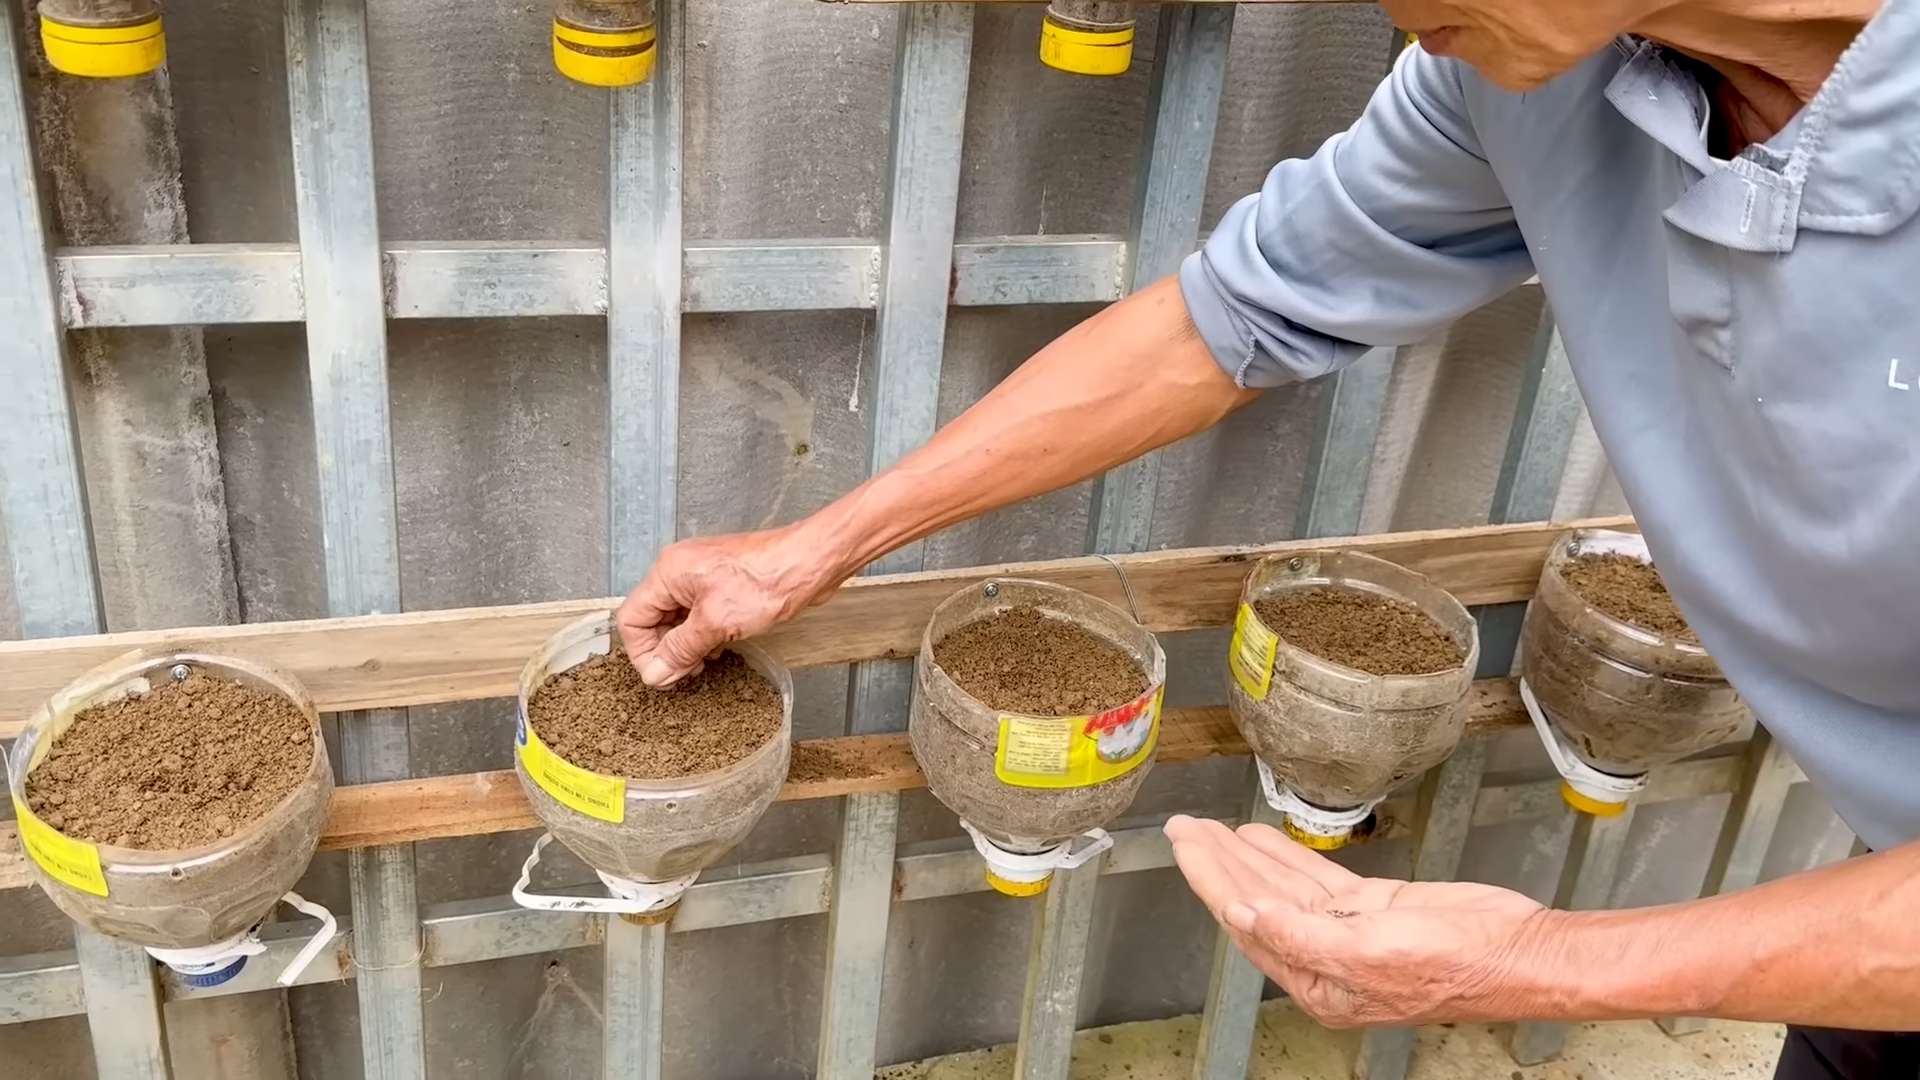
Preparing the Bottles
This is where we transform those empty bottles into mini kale gardens!
1. Clean the Bottles: Thoroughly wash the bottles with soap and water to remove any leftover residue. Rinse them well and let them dry completely. This is important to prevent any contamination that could harm your kale.
2. Cut the Bottles: There are a couple of ways you can cut the bottles, depending on how you want to hang or place them.
* Option 1: Horizontal Planting: Cut a rectangular opening along the side of the bottle, leaving the top and bottom intact. This creates a trough-like planter. The size of the opening depends on how much space you want for your kale to grow. I usually make it about 4-6 inches wide and long.
* Option 2: Vertical Planting: Cut the bottle in half horizontally. You’ll use the bottom half as the planter. You can discard the top half or use it as a mini-greenhouse to cover the seedlings initially.
3. Create Drainage Holes: This is essential to prevent waterlogging, which can lead to root rot. Use a drill or a nail and hammer to create several drainage holes in the bottom of the bottle. I usually make about 4-5 holes, evenly spaced.
4. Optional: Add Drainage Layer: Place a layer of small pebbles or gravel at the bottom of the bottle. This will further improve drainage and prevent the potting mix from clogging the drainage holes.
Planting the Kale Seeds
Now for the fun part – planting the seeds!
1. Fill the Bottles with Potting Mix: Fill the prepared bottles with potting mix, leaving about an inch of space at the top. Gently pat down the soil to remove any air pockets.
2. Sow the Seeds: Sprinkle the kale seeds evenly over the surface of the potting mix. I usually sow a few extra seeds to ensure good germination.
3. Cover the Seeds: Lightly cover the seeds with a thin layer of potting mix. About ¼ inch is sufficient.
4. Water Gently: Use a watering can or spray bottle to gently water the potting mix. Be careful not to wash away the seeds. The soil should be moist but not soggy.
5. Label the Bottles (Optional): If you’re planting different varieties of kale, label the bottles so you can keep track of them.
Caring for Your Kale Seedlings
Proper care is crucial for healthy kale growth.
1. Provide Sunlight: Kale needs at least 6 hours of sunlight per day. Place the bottles in a sunny location, such as a windowsill, balcony, or patio. If you don’t have enough natural light, you can supplement with grow lights.
2. Water Regularly: Keep the potting mix consistently moist, but not soggy. Water when the top inch of soil feels dry to the touch. The frequency of watering will depend on the weather and the type of potting mix you’re using.
3. Thin the Seedlings: Once the seedlings have emerged and have a few true leaves, thin them out, leaving only the strongest seedlings. This will give them enough space to grow and prevent overcrowding. I usually aim for about 2-3 inches between plants.
4. Fertilize (Optional): To give your kale a boost, you can fertilize them with a liquid fertilizer every 2-3 weeks. Follow the instructions on the fertilizer label. I prefer using organic fertilizers, such as fish emulsion or seaweed extract.
5. Pest Control: Keep an eye out for pests, such as aphids, cabbage worms, and slugs. If you spot any pests, you can try removing them by hand or using an organic insecticide, such as neem oil.
Harvesting Your Kale
The best part – enjoying the fruits (or rather, leaves) of your labor!
1. Harvesting Time: You can start harvesting kale leaves when they are about 4-6 inches long.
2. Harvesting Method: Harvest the outer leaves first, leaving the inner leaves to continue growing. This will allow you to harvest kale continuously throughout the growing season.
3. Enjoy Your Kale: Wash the kale leaves thoroughly before eating. You can use them in salads, smoothies, soups, stews, or sauté them as a side dish. The possibilities are endless!
Tips and Tricks for Success
Here are a few extra tips to help you succeed with growing kale in bottles:
* Choose the Right Potting Mix: A well-draining potting mix is essential for healthy kale growth. Avoid using garden soil, as it can be too dense and may contain pests or diseases.
* Provide Adequate Drainage: Make sure the bottles have adequate drainage holes to prevent waterlogging.
* Don’t Overwater: Overwatering can lead to root rot. Water only when the top inch of soil feels dry to the touch.
* Provide Enough Sunlight: Kale needs at least 6 hours of sunlight per day.
* Protect from Extreme Weather: If you live in an area with extreme weather conditions, such as frost or heat waves, protect your kale plants accordingly. You can move the bottles indoors or cover them with a protective cloth.
* Rotate Your Crops: To prevent soil depletion and the buildup of pests and diseases, rotate your crops every year. Don’t plant kale in the same bottles year after year.
* Experiment with Different Varieties: Try growing different varieties of kale to find your favorites.
* Have Fun! Gardening should be enjoyable. Don’t be afraid to experiment and learn from your mistakes.
Troubleshooting
Even with the best care, you might encounter some problems. Here’s how to troubleshoot common issues:
* Yellowing Leaves: This could be a sign of overwatering, underwatering, or nutrient deficiency. Check the soil moisture and adjust your watering accordingly. If the soil is dry, water more frequently. If the soil is soggy, water less frequently. You can also try fertilizing your kale with a liquid fertilizer.
* Leggy Seedlings: This is usually caused by insufficient sunlight. Move the bottles to a sunnier location or supplement with grow lights.
* Pests: Keep an eye out for pests, such as aphids, cabbage worms, and slugs. Remove them by hand or use an organic insecticide.
* Slow Growth: This could be due to a variety of factors, such as poor soil, insufficient sunlight, or nutrient deficiency. Make sure you’re using a good quality potting mix, providing enough sunlight, and fertilizing your kale regularly.
I hope this guide has inspired you to try growing kale in bottles! It’s a rewarding and sustainable way to enjoy fresh, homegrown greens, even if you’re short on space. Happy gardening!
Conclusion
So, there you have it! Growing kale in bottles isn’t just a quirky gardening experiment; it’s a genuinely effective and rewarding way to cultivate fresh, nutritious greens, even with limited space or resources. We’ve walked you through the simple steps, highlighting the benefits of this innovative method, and addressed potential challenges along the way.
Why is this DIY trick a must-try? Because it democratizes gardening. It empowers anyone, regardless of their living situation or gardening expertise, to enjoy the satisfaction of harvesting their own food. Imagine stepping outside your apartment, balcony, or even kitchen window and snipping off a handful of vibrant, healthy kale leaves for your salad, smoothie, or stir-fry. That’s the power of bottle gardening.
Beyond the practicality, growing kale in bottles is also incredibly sustainable. You’re repurposing plastic waste, reducing your carbon footprint, and minimizing your reliance on commercially grown produce, which often travels long distances and contributes to environmental pollution. It’s a small act with a big impact.
But the beauty of this method lies in its adaptability. Feel free to experiment with different types of bottles. Larger bottles will naturally accommodate larger kale varieties, while smaller bottles are perfect for baby kale or other leafy greens. You can also explore different growing mediums. While we recommended a standard potting mix, you could try coco coir, perlite, or even a hydroponic solution for a soilless approach.
Consider the placement of your bottle garden. South-facing locations will provide the most sunlight, but if you live in a particularly hot climate, you might want to provide some afternoon shade to prevent the kale from bolting (going to seed prematurely). You can also get creative with the aesthetics. Paint the bottles, decorate them with stencils, or arrange them in visually appealing patterns to create a unique and eye-catching display.
And don’t limit yourself to just kale! This method can be adapted for other leafy greens like spinach, lettuce, and arugula, as well as herbs like basil, mint, and parsley. The possibilities are endless.
Ultimately, growing kale in bottles is about more than just growing food; it’s about connecting with nature, fostering creativity, and embracing a more sustainable lifestyle. It’s a fun, educational, and rewarding experience that we wholeheartedly encourage you to try.
So, grab some bottles, gather your supplies, and get ready to embark on your own bottle gardening adventure. We’re confident that you’ll be amazed by the results. And once you’ve harvested your first batch of homegrown kale, we’d love to hear about your experience! Share your photos, tips, and challenges in the comments below. Let’s build a community of bottle gardeners and inspire others to embrace this innovative and sustainable way of growing food. Let us know what kind of kale you grew!
Frequently Asked Questions (FAQ)
What kind of bottles are best for growing kale?
The best bottles for growing kale are generally those made from PET plastic (polyethylene terephthalate), which is commonly used for water and soda bottles. These bottles are lightweight, durable, and readily available. Look for bottles that are at least 2 liters in size to provide enough space for the kale roots to develop. Avoid using bottles that have contained harsh chemicals or pesticides, as these could contaminate your plants. Thoroughly clean and rinse any used bottles before planting. Clear or translucent bottles are preferable, as they allow you to monitor the moisture level of the soil. However, if you’re concerned about algae growth, you can paint the outside of the bottles (except for a small viewing strip) with a non-toxic paint.
How often should I water my kale plants in bottles?
The watering frequency will depend on several factors, including the size of the bottle, the type of soil, the climate, and the stage of growth of the kale plants. As a general rule, you should water your kale plants when the top inch of soil feels dry to the touch. During hot and dry weather, you may need to water them daily, while during cooler or wetter weather, you may only need to water them every few days. Avoid overwatering, as this can lead to root rot. Ensure that the bottles have adequate drainage holes to allow excess water to escape. A good way to check if your kale plants need watering is to lift the bottle. If it feels light, it’s likely time to water.
What kind of soil should I use for growing kale in bottles?
A well-draining potting mix is ideal for growing kale in bottles. Look for a mix that contains a blend of peat moss, perlite, and vermiculite. This type of mix will provide good aeration and drainage, which are essential for healthy root growth. Avoid using garden soil, as it can be too heavy and compact, which can lead to drainage problems. You can also amend your potting mix with compost or other organic matter to provide additional nutrients. If you’re using a soilless growing medium like coco coir, be sure to supplement it with a liquid fertilizer to provide the necessary nutrients for the kale plants.
How much sunlight do kale plants need when grown in bottles?
Kale plants need at least 6 hours of direct sunlight per day to thrive. Place your bottle garden in a sunny location, such as a south-facing balcony or windowsill. If you don’t have access to enough natural sunlight, you can supplement with grow lights. LED grow lights are a good option, as they are energy-efficient and don’t produce excessive heat. If you live in a particularly hot climate, you may need to provide some afternoon shade to prevent the kale from bolting.
How do I fertilize kale plants grown in bottles?
Kale plants are heavy feeders and require regular fertilization to produce healthy growth. You can use a balanced liquid fertilizer, such as a 10-10-10 or 20-20-20 formula, diluted to half strength. Fertilize your kale plants every 2-3 weeks, or as needed. You can also use organic fertilizers, such as compost tea or fish emulsion. Be sure to follow the instructions on the fertilizer label. Avoid over-fertilizing, as this can burn the roots of the plants.
How do I prevent pests and diseases when growing kale in bottles?
To prevent pests and diseases, start with healthy seedlings and use a clean potting mix. Regularly inspect your kale plants for signs of pests, such as aphids, cabbage worms, or flea beetles. If you find any pests, you can remove them by hand or spray the plants with insecticidal soap or neem oil. To prevent diseases, ensure that the plants have good air circulation and avoid overwatering. If you notice any signs of disease, such as yellowing leaves or fungal spots, remove the affected leaves and treat the plants with a fungicide.
When is the best time to harvest kale from my bottle garden?
You can start harvesting kale leaves when they are about 4-6 inches long. Harvest the outer leaves first, leaving the inner leaves to continue growing. You can harvest kale leaves continuously throughout the growing season. Avoid harvesting more than one-third of the plant at a time, as this can stress the plant. The best time to harvest kale is in the morning, after the dew has dried.
Can I grow kale in bottles indoors?
Yes, you can grow kale in bottles indoors, but you will need to provide adequate light. Place the bottles near a sunny window or use grow lights to supplement the natural light. Indoor kale plants may require more frequent watering and fertilization than outdoor plants. Be sure to monitor the plants closely and adjust your care accordingly.
What varieties of kale are best suited for growing in bottles?
Dwarf varieties of kale, such as Dwarf Blue Curled Vates or Red Russian, are well-suited for growing in bottles, as they don’t get too large. You can also grow other kale varieties, such as Lacinato (Dinosaur) kale or Curly kale, but you may need to provide more support for the plants as they grow. Experiment with different varieties to see which ones thrive best in your bottle garden.
How do I overwinter kale plants grown in bottles?
Kale is a cold-hardy plant and can tolerate light frosts. In mild climates, you can leave your kale plants in bottles outdoors throughout the winter. In colder climates, you may need to protect the plants from freezing temperatures. You can move the bottles indoors or cover them with a frost blanket. Reduce watering during the winter months, as the plants will not be growing as actively.

Leave a Comment