
Maximize Storage Space in your home garden and unlock its full potential! Are you tired of tripping over tools, struggling to find your seeds, or feeling like your green oasis is more chaotic than calming? I know I have been there! It’s frustrating when a lack of organization hinders your gardening passion.
For centuries, gardeners have sought clever ways to optimize their limited spaces. From the hanging gardens of Babylon to the compact kitchen gardens of medieval Europe, resourcefulness has always been key. Today, with smaller living spaces becoming increasingly common, the need to maximize storage space in our gardens is more crucial than ever.
This DIY guide is your answer to a clutter-free and efficient gardening experience. We’ll explore simple yet effective hacks to transform your garden from a disorganized mess into a haven of tranquility and productivity. Imagine having every tool within easy reach, seeds neatly organized, and your precious plants thriving in a well-maintained environment. I’m going to show you how to achieve this without breaking the bank. Let’s dive in and discover how to make the most of every inch of your garden!
DIY: Supercharge Your Storage Space!
Okay, let’s face it. We all crave more storage. Whether you’re battling overflowing closets, a cramped kitchen, or a garage that’s more “stuff-age” than storage, I’m here to help! This guide is packed with DIY projects and clever hacks to maximize every nook and cranny of your home. Get ready to declutter and organize like a pro!
Vertical Thinking: Taking Storage to New Heights
The first rule of storage maximization? Look up! Walls are your best friend.
* **Goal:** Utilize vertical space to free up floor space.
* **Materials:** Shelves, brackets, paint (optional), drill, level, measuring tape, screws.
* **Skill Level:** Beginner to Intermediate (depending on the complexity of the shelving system)
**Step-by-Step Guide:**
1. **Plan Your Attack:** Before you even think about picking up a drill, assess your space. Where do you need the most storage? What kind of items will you be storing? Measure the wall space and sketch out a rough plan of how you want your shelves to look. Consider the depth and height of the shelves based on what you’ll be storing. For example, books need deeper shelves than picture frames.
2. **Gather Your Supplies:** Head to your local hardware store and grab your shelves, brackets, screws, drill bits, level, measuring tape, and pencil. Don’t skimp on quality! Sturdy brackets are essential for supporting heavier items. If you want to paint or stain your shelves to match your decor, grab those supplies too. I personally love using a semi-gloss paint for shelves because it’s easy to wipe clean.
3. **Mark Your Studs:** This is crucial! You want to anchor your shelves to wall studs for maximum stability. Use a stud finder to locate the studs in your wall. Mark their locations with a pencil. If you can’t find studs, you’ll need to use drywall anchors, but be aware that they won’t support as much weight.
4. **Install the Brackets:** Using your measuring tape and level, mark the locations for your brackets on the wall. Make sure they’re evenly spaced and aligned. Pre-drill pilot holes to make screwing in the brackets easier and prevent the wood from splitting. Attach the brackets to the wall using screws. If you’re using drywall anchors, follow the instructions on the packaging.
5. **Attach the Shelves:** Place the shelves on top of the brackets. Use screws to secure the shelves to the brackets from underneath. This will prevent the shelves from shifting or falling.
6. **Load ‘Em Up!** Once the shelves are securely attached, you can start loading them up with your belongings. Be mindful of the weight capacity of your shelves and brackets. Distribute the weight evenly to prevent sagging.
Under-the-Bed Bonanza: Hidden Storage Goldmine
That space under your bed? It’s prime real estate just waiting to be exploited!
* **Goal:** Transform unused under-bed space into organized storage.
* **Materials:** Under-bed storage containers (plastic bins, fabric drawers), vacuum storage bags (optional), labels.
* **Skill Level:** Beginner
**Step-by-Step Guide:**
1. **Measure the Space:** Before you buy anything, measure the height and width of the space under your bed. This will help you determine the size of the storage containers you can use.
2. **Choose Your Containers:** Opt for under-bed storage containers with lids to protect your belongings from dust and dirt. Plastic bins are great for storing heavier items like books or clothes, while fabric drawers are ideal for lighter items like linens or shoes. I prefer clear bins so I can easily see what’s inside.
3. **Declutter and Sort:** Before you start filling your containers, take some time to declutter your belongings. Get rid of anything you don’t need or use. Sort your items into categories (e.g., winter clothes, extra blankets, holiday decorations).
4. **Pack and Label:** Pack your items into the storage containers, making sure not to overfill them. Use vacuum storage bags for bulky items like comforters or sweaters to save space. Label each container clearly so you know what’s inside without having to rummage through everything.
5. **Slide and Store:** Slide the filled containers under your bed. Make sure they’re easily accessible so you can retrieve items when you need them.
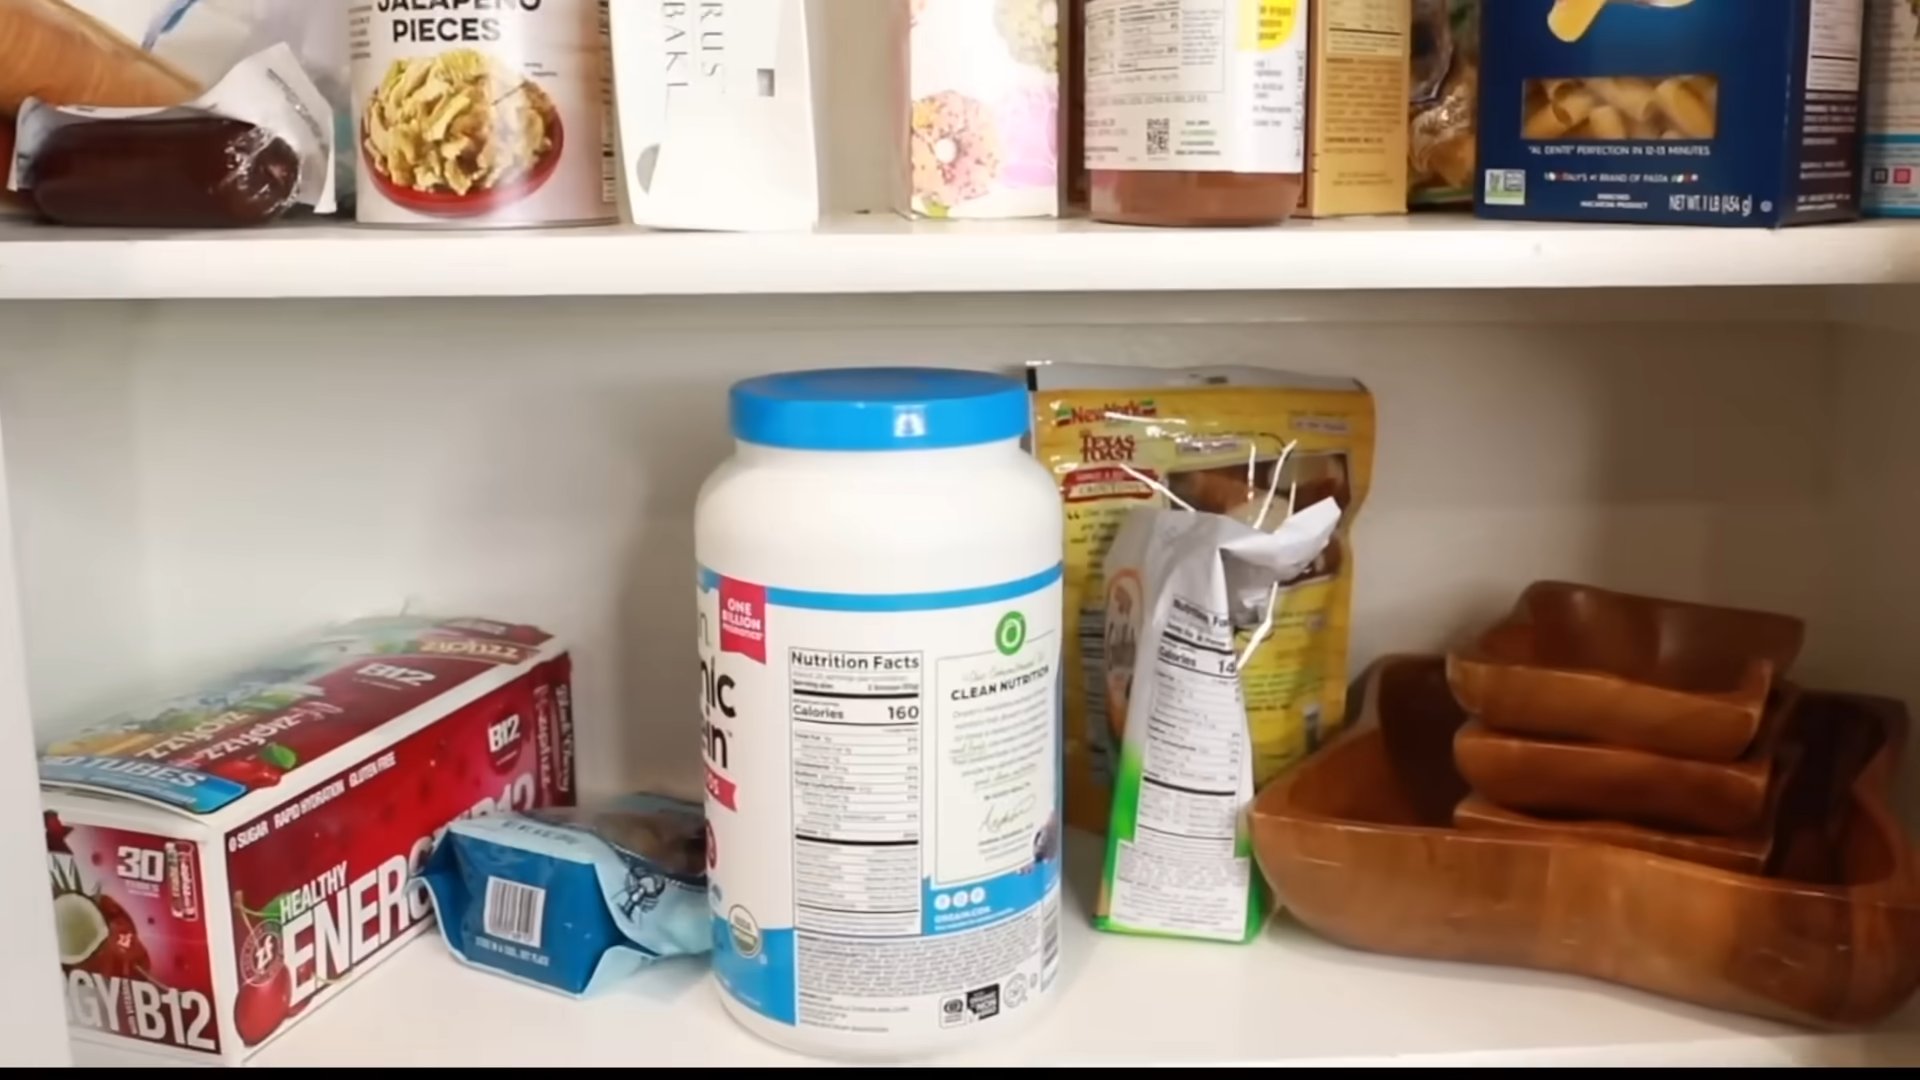
Kitchen Cabinet Chaos to Culinary Command Center
Kitchen cabinets can quickly become a black hole of mismatched containers and forgotten ingredients. Let’s tame that beast!
* **Goal:** Maximize kitchen cabinet space and improve organization.
* **Materials:** Shelf organizers, drawer dividers, lazy Susans, spice racks, clear containers, labels.
Okay, let’s face it. We all crave more storage. Whether you’re battling overflowing closets, a cramped kitchen, or a garage that’s more “stuff-age” than storage, I’m here to help! This guide is packed with DIY projects and clever hacks to maximize every nook and cranny of your home. Get ready to declutter and organize like a pro!
Vertical Thinking: Taking Storage to New Heights
The first rule of storage maximization? Look up! Walls are your best friend.
* **Goal:** Utilize vertical space to free up floor space.
* **Materials:** Shelves, brackets, paint (optional), drill, level, measuring tape, screws.
* **Skill Level:** Beginner to Intermediate (depending on the complexity of the shelving system)
**Step-by-Step Guide:**
1. **Plan Your Attack:** Before you even think about picking up a drill, assess your space. Where do you need the most storage? What kind of items will you be storing? Measure the wall space and sketch out a rough plan of how you want your shelves to look. Consider the depth and height of the shelves based on what you’ll be storing. For example, books need deeper shelves than picture frames.
2. **Gather Your Supplies:** Head to your local hardware store and grab your shelves, brackets, screws, drill bits, level, measuring tape, and pencil. Don’t skimp on quality! Sturdy brackets are essential for supporting heavier items. If you want to paint or stain your shelves to match your decor, grab those supplies too. I personally love using a semi-gloss paint for shelves because it’s easy to wipe clean.
3. **Mark Your Studs:** This is crucial! You want to anchor your shelves to wall studs for maximum stability. Use a stud finder to locate the studs in your wall. Mark their locations with a pencil. If you can’t find studs, you’ll need to use drywall anchors, but be aware that they won’t support as much weight.
4. **Install the Brackets:** Using your measuring tape and level, mark the locations for your brackets on the wall. Make sure they’re evenly spaced and aligned. Pre-drill pilot holes to make screwing in the brackets easier and prevent the wood from splitting. Attach the brackets to the wall using screws. If you’re using drywall anchors, follow the instructions on the packaging.
5. **Attach the Shelves:** Place the shelves on top of the brackets. Use screws to secure the shelves to the brackets from underneath. This will prevent the shelves from shifting or falling.
6. **Load ‘Em Up!** Once the shelves are securely attached, you can start loading them up with your belongings. Be mindful of the weight capacity of your shelves and brackets. Distribute the weight evenly to prevent sagging.
Under-the-Bed Bonanza: Hidden Storage Goldmine
That space under your bed? It’s prime real estate just waiting to be exploited!
* **Goal:** Transform unused under-bed space into organized storage.
* **Materials:** Under-bed storage containers (plastic bins, fabric drawers), vacuum storage bags (optional), labels.
* **Skill Level:** Beginner
**Step-by-Step Guide:**
1. **Measure the Space:** Before you buy anything, measure the height and width of the space under your bed. This will help you determine the size of the storage containers you can use.
2. **Choose Your Containers:** Opt for under-bed storage containers with lids to protect your belongings from dust and dirt. Plastic bins are great for storing heavier items like books or clothes, while fabric drawers are ideal for lighter items like linens or shoes. I prefer clear bins so I can easily see what’s inside.
3. **Declutter and Sort:** Before you start filling your containers, take some time to declutter your belongings. Get rid of anything you don’t need or use. Sort your items into categories (e.g., winter clothes, extra blankets, holiday decorations).
4. **Pack and Label:** Pack your items into the storage containers, making sure not to overfill them. Use vacuum storage bags for bulky items like comforters or sweaters to save space. Label each container clearly so you know what’s inside without having to rummage through everything.
5. **Slide and Store:** Slide the filled containers under your bed. Make sure they’re easily accessible so you can retrieve items when you need them.
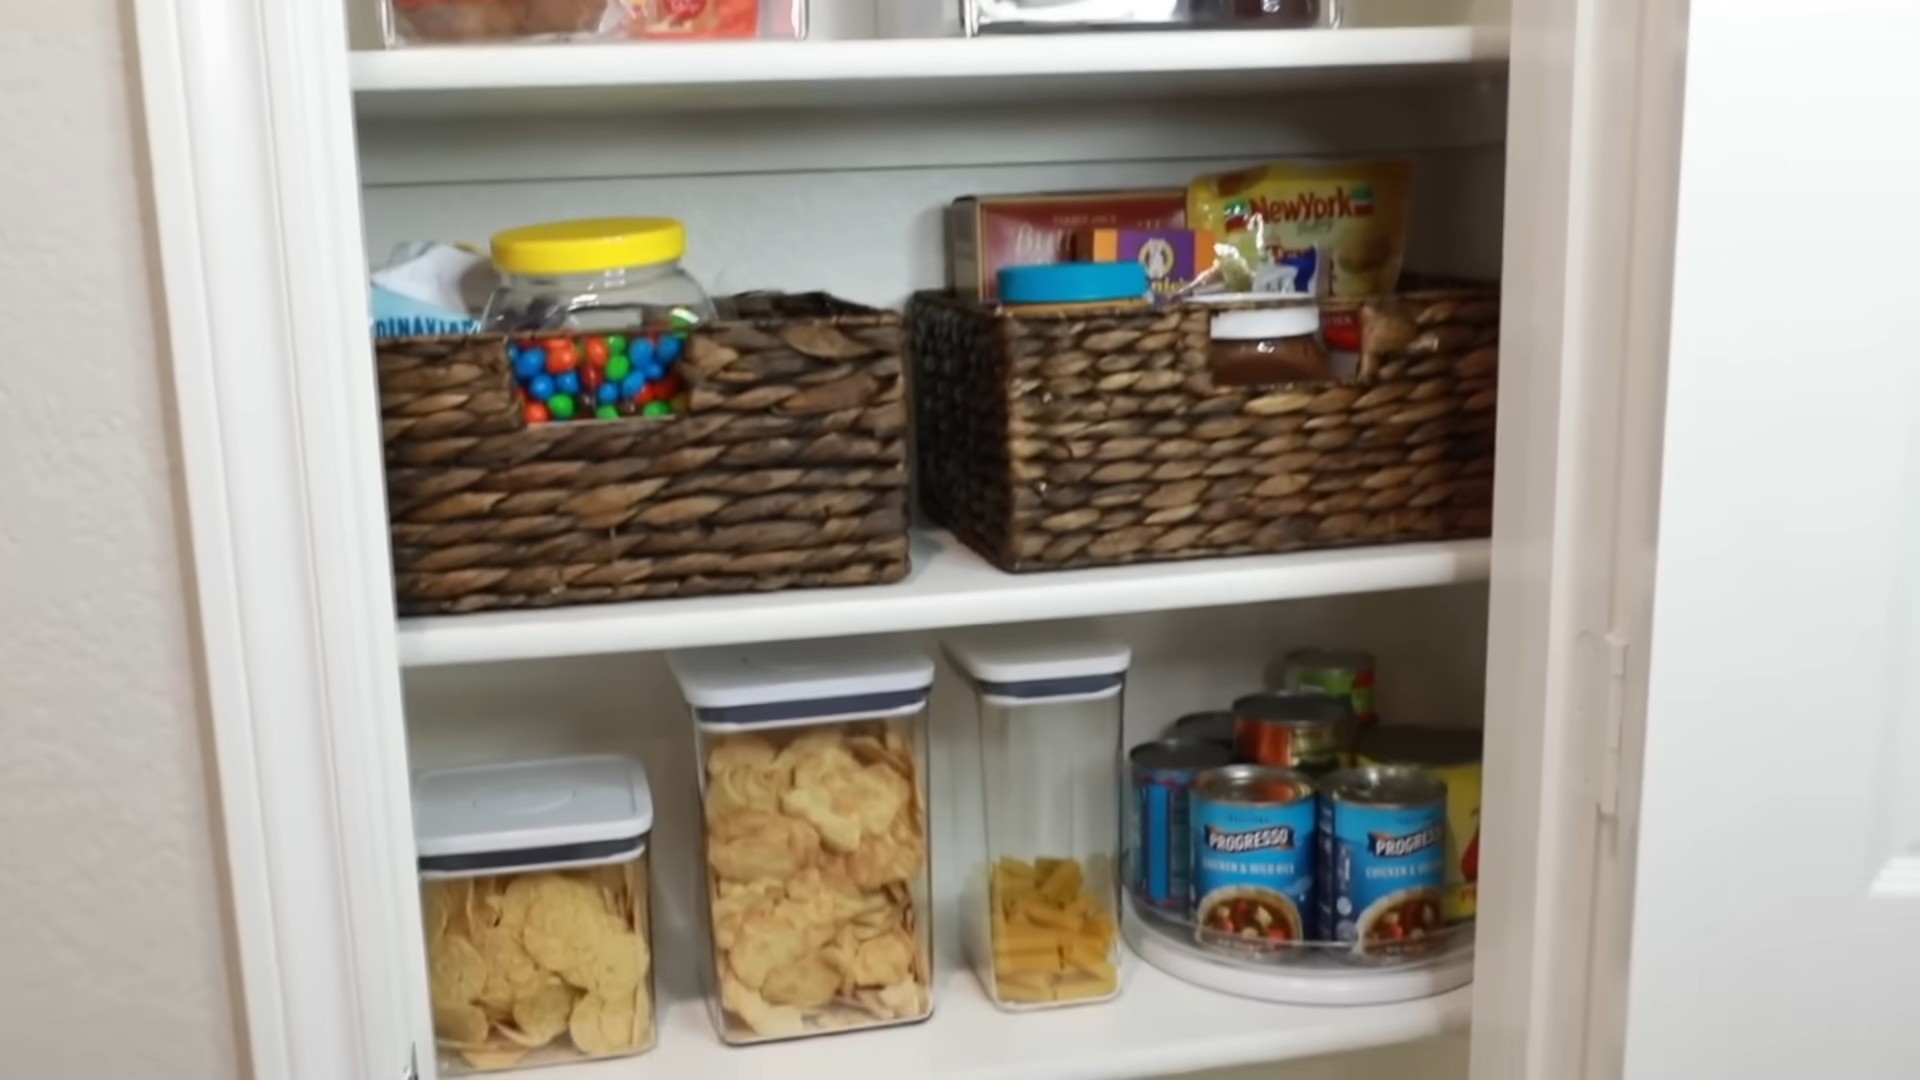
Kitchen Cabinet Chaos to Culinary Command Center
Kitchen cabinets can quickly become a black hole of mismatched containers and forgotten ingredients. Let’s tame that beast!
* **Goal:** Maximize kitchen cabinet space and improve organization.
* **Materials:** Shelf organizers, drawer dividers, lazy Susans, spice racks, clear containers, labels.
* **Skill Level:** Beginner
**Step-by-Step Guide:**
1. **Empty and Assess:** The first step is to completely empty your kitchen cabinets. This will give you a clear picture of what you have and how much space you’re working with. Take this opportunity to wipe down the shelves and drawers.
2. **Purge and Declutter:** Be ruthless! Get rid of any expired food, broken dishes, or duplicate items. If you haven’t used something in six months, chances are you don’t need it.
3. **Plan Your Layout:** Before you start putting things back, plan how you want to organize your cabinets. Group similar items together (e.g., baking supplies, spices, canned goods). Consider the frequency with which you use certain items. Keep frequently used items within easy reach.
4. **Implement Organizers:** This is where the magic happens!
* **Shelf Organizers:** Use shelf organizers to create extra vertical space in your cabinets. These are great for stacking plates, bowls, or canned goods.
* **Drawer Dividers:** Drawer dividers will keep your utensils, silverware, and cooking tools neatly organized.
* **Lazy Susans:** Lazy Susans are perfect for corner cabinets or for organizing spices and condiments.
* **Spice Racks:** A spice rack will keep your spices organized and easily accessible. You can mount it on the inside of a cabinet door or on a wall.
* **Clear Containers:** Transfer dry goods like flour, sugar, and pasta into clear containers. This will not only keep them fresh but also make it easier to see what you have on hand.
5. **Load and Label:** Start putting your items back into the cabinets, using your planned layout as a guide. Label everything clearly so you know where things are.
Closet Conquest: From Cluttered to Curated
A well-organized closet can save you time, stress, and money. Let’s transform your closet from a chaotic mess into a curated collection.
* **Goal:** Maximize closet space and create an organized and functional wardrobe.
* **Materials:** Matching hangers, shelf dividers, hanging organizers, shoe racks, storage bins, labels.
* **Skill Level:** Beginner to Intermediate (depending on the complexity of the closet system)
**Step-by-Step Guide:**
1. **Empty the Closet:** Take everything out of your closet. Yes, everything! This is the only way to truly assess what you have and how much space you’re working with.
2. **Declutter Ruthlessly:** This is the hardest part, but it’s essential. Ask yourself these questions about each item:
* Have I worn this in the past year?
* Does it fit me properly?
* Is it in good condition?
* Do I love it?
If the answer to any of these questions is no, it’s time to let it go. Donate, sell, or discard items you no longer need or use.
3. **Organize and Categorize:** Sort your remaining clothes into categories (e.g., shirts, pants, skirts, dresses, sweaters). Further subdivide each category by color or style.
4. **Upgrade Your Hangers:** Invest in matching hangers. This will instantly make your closet look more organized and streamlined. I prefer slim velvet hangers because they save space and prevent clothes from slipping.
5. **Maximize Vertical Space:**
* **Shelf Dividers:** Use shelf dividers to keep stacks of clothes from toppling over.
* **Hanging Organizers:** Hanging organizers are great for storing shoes, sweaters, or accessories.
* **Double Hang Rods:** If you have high ceilings, consider installing a double hang rod to double your hanging space.
6. **Utilize Floor Space:**
* **Shoe Racks:** A shoe rack will keep your shoes organized and off the floor.
* **Storage Bins:** Use storage bins to store out-of-season clothes, accessories, or other items.
7. **Put It All Back:** Start putting your clothes back into the closet, using your organized categories as a guide. Hang clothes that wrinkle easily and fold clothes that are more casual.
8. **Accessorize and Label:** Store accessories like scarves, belts, and jewelry in drawers or organizers. Label everything clearly so you know where things are.
Garage Glory: Taming the Tool Jungle
Conclusion
So, there you have it! Mastering the art of maximizing storage space doesn’t have to involve expensive renovations or complicated organizational systems. This simple, yet incredibly effective, DIY trick offers a practical and budget-friendly solution to decluttering and optimizing your living areas. We’ve shown you how to transform overlooked nooks and crannies into functional storage havens, freeing up valuable space and bringing a sense of order to your home.
The beauty of this method lies in its adaptability. Feel free to experiment with different container sizes, materials, and placement strategies to perfectly suit your specific needs and aesthetic preferences. Consider using clear containers for easy visibility of contents, or opt for decorative baskets to add a touch of style to your storage solutions. You can even paint or label your containers to further enhance organization and visual appeal.
Beyond the immediate benefits of increased storage, this DIY project offers a sense of accomplishment and control over your environment. By taking a proactive approach to decluttering and organizing, you’re not just creating more space; you’re creating a more peaceful and functional living environment that supports your well-being.
This DIY storage maximization trick is a game-changer for anyone struggling with limited space. It’s a cost-effective, customizable, and surprisingly satisfying project that yields tangible results. Imagine the relief of finally having a designated spot for everything, the joy of a clutter-free home, and the satisfaction of knowing you created it all yourself.
We wholeheartedly encourage you to give this DIY trick a try. Whether you’re tackling a small closet, a cramped kitchen, or an entire home, the principles remain the same: identify underutilized spaces, choose appropriate containers, and implement a system that works for you.
Don’t be afraid to get creative and personalize your storage solutions to reflect your unique style and needs. The possibilities are endless!
And most importantly, we want to hear about your experiences! Share your before-and-after photos, your creative adaptations, and any tips or tricks you discover along the way. Let’s build a community of storage maximization enthusiasts and inspire each other to create more organized and functional living spaces. Use the hashtag #MaximizeStorageSpaceDIY when you share your creations on social media. We can’t wait to see what you come up with!
Frequently Asked Questions (FAQ)
What kind of containers are best for maximizing storage space?
The best containers depend on what you’re storing and where you’re storing it. Clear plastic bins are excellent for visibility, allowing you to easily see the contents without having to open each container. They’re also durable and stackable, making them ideal for closets, shelves, and under-bed storage. Woven baskets offer a more aesthetically pleasing option and are great for storing items in living areas or bedrooms. Fabric storage cubes are perfect for organizing clothes, toys, or linens, and they often come in various sizes and colors to match your decor. Consider airtight containers for food storage to keep items fresh and prevent pests. Ultimately, choose containers that are the right size for your items, durable enough to withstand regular use, and visually appealing to you.
How do I decide what to keep and what to get rid of when decluttering?
Decluttering can be overwhelming, but a systematic approach can make it easier. Start by asking yourself these questions about each item: Have I used it in the past year? Do I love it? Is it essential for my daily life? If the answer to all three is no, it’s likely time to let it go. Consider donating items in good condition to charity, selling them online or at a consignment shop, or responsibly disposing of items that are no longer usable. Be honest with yourself about what you truly need and use, and don’t be afraid to part with items that are simply taking up space. Remember, decluttering is about creating a more functional and enjoyable living environment.
How can I maximize storage space in a small apartment?
Small apartments require creative storage solutions. Utilize vertical space by installing shelves, hanging organizers, and tall cabinets. Look for furniture with built-in storage, such as ottomans with hidden compartments or beds with drawers underneath. Use wall-mounted organizers for items like keys, mail, and kitchen utensils. Consider using over-the-door organizers for shoes, toiletries, or cleaning supplies. Maximize closet space by using space-saving hangers and shelf dividers. Don’t forget about under-bed storage – flat storage containers are perfect for storing out-of-season clothing or extra linens. The key is to think vertically and find hidden storage opportunities in every room.
What are some creative ways to maximize storage space in the kitchen?
The kitchen is often a storage challenge. Install a pot rack to hang pots and pans, freeing up cabinet space. Use shelf organizers to stack plates and bowls vertically. Install a spice rack to keep spices organized and accessible. Use drawer dividers to keep utensils and kitchen gadgets neatly arranged. Consider using a rolling kitchen cart for extra storage and counter space. Hang measuring cups and spoons on the inside of cabinet doors. Use clear containers to store pantry items, making it easy to see what you have on hand. Don’t forget about the space above your cabinets – use decorative baskets to store items you don’t use frequently.
How can I maintain my organized storage space once I’ve created it?
Maintaining an organized storage space requires consistent effort. Make it a habit to put things back in their designated place immediately after using them. Regularly declutter and get rid of items you no longer need or use. Rotate seasonal items to keep your storage space organized and efficient. Label containers clearly so you know what’s inside. Set aside a few minutes each week to tidy up your storage areas and prevent clutter from accumulating. The key is to make organization a part of your daily routine.
What if I don’t have a lot of money to spend on storage containers?
You don’t need to spend a fortune to maximize storage space. Repurpose old boxes, jars, and containers for storage. Use inexpensive plastic bins from discount stores. Shop at thrift stores for baskets and other storage solutions. Get creative with DIY storage projects using materials you already have on hand. For example, you can turn old shoe boxes into decorative storage containers by covering them with fabric or wrapping paper. The key is to be resourceful and find affordable ways to organize your belongings.
How do I maximize storage space when moving?
Moving is a great opportunity to declutter and maximize storage space. Before you start packing, go through your belongings and get rid of anything you no longer need or use. Use appropriately sized boxes and pack them efficiently. Label each box clearly with its contents and the room it belongs to. Use vacuum-sealed bags to compress clothing and linens. Consider renting a storage unit if you need extra space. When you unpack, take the time to organize your belongings in a way that maximizes storage space in your new home.
Is there a way to maximize storage space without making my home look cluttered?
Yes! The key is to choose storage solutions that are both functional and aesthetically pleasing. Use decorative baskets, bins, and boxes to store items in a stylish way. Choose furniture with built-in storage to keep clutter out of sight. Use wall-mounted organizers to keep items off the floor and countertops. Arrange your storage solutions in a way that is visually appealing and complements your decor. The goal is to create a storage system that is both functional and beautiful.
What are some tips for maximizing storage space in a shared living space?
Shared living spaces require clear communication and collaboration. Designate specific storage areas for each person. Use vertical space to maximize storage without taking up too much floor space. Invest in multi-functional furniture that can serve multiple purposes. Establish clear rules for shared storage areas and ensure that everyone follows them. Regularly declutter and get rid of items that are no longer needed. The key is to create a storage system that is fair, functional, and respectful of everyone’s needs.
How can I maximize storage space for seasonal items?
Seasonal items, such as holiday decorations and winter clothing, can take up a lot of space. Store these items in labeled containers and keep them in a designated storage area, such as a closet, attic, or basement. Use vacuum-sealed bags to compress clothing and linens. Rotate seasonal items regularly to keep your storage space organized and efficient. Consider using a storage unit if you don’t have enough space in your home. The key is to keep seasonal items organized and out of the way when they’re not in use.

Leave a Comment