
Growing Chard at Home can seem daunting, but trust me, it’s easier than you think! Have you ever dreamed of stepping into your backyard and harvesting vibrant, nutritious greens for a delicious salad or side dish? Well, dream no more! This article is packed with simple, DIY tricks and hacks that will transform your garden into a chard-producing paradise, even if you’re a complete beginner.
Chard, with its colorful stalks and crinkled leaves, has a rich history, dating back to ancient Greece and Rome, where it was valued for its medicinal properties and culinary versatility. Today, it’s a staple in healthy diets worldwide. But why buy it at the store when you can easily grow your own, knowing exactly where it came from and how it was nurtured?
Let’s face it, grocery store produce can be expensive and sometimes lacks the freshness and flavor we crave. Plus, there’s something incredibly satisfying about nurturing a plant from seed to table. That’s where these DIY tricks come in. I’m going to share my favorite tips for growing chard at home successfully, from choosing the right variety to protecting your plants from pests. Get ready to unleash your inner gardener and enjoy a bountiful harvest of fresh, homegrown chard!
Growing Vibrant Chard at Home: A DIY Guide
Hey there, fellow gardening enthusiasts! I’m so excited to share my experience with growing chard at home. It’s surprisingly easy, incredibly rewarding, and adds a burst of color and nutrition to your meals. Chard is a fantastic leafy green that’s packed with vitamins and minerals, and it’s much more forgiving than some other garden vegetables. Plus, those vibrant stems are just gorgeous! Let’s dive into how you can grow your own beautiful and bountiful chard patch.
Choosing Your Chard Variety
Before we get our hands dirty, let’s talk about chard varieties. This is where the fun begins because you have so many options! Each variety offers a slightly different flavor profile and, most importantly, a unique color.
* Bright Lights: This is probably the most popular variety, and for good reason! It boasts a mix of stems in vibrant shades of red, orange, yellow, pink, and white. It’s a real showstopper in the garden and on your plate.
* Ruby Red: As the name suggests, this variety has stunning deep red stems and dark green leaves. It’s a classic choice for adding a pop of color.
* Fordhook Giant: If you’re looking for a more traditional chard, Fordhook Giant is a great option. It has dark green, heavily crumpled leaves and thick white stems. It’s known for its excellent flavor and productivity.
* Lucullus: This variety features light green leaves and thick, pale green stems. It has a mild, slightly sweet flavor.
* Golden Sunrise: This variety offers bright yellow stems and green leaves, adding a sunny touch to your garden.
I personally love growing Bright Lights because of the variety of colors, but feel free to experiment and find your favorite!
Preparing Your Garden Bed
Chard isn’t too picky, but it does appreciate a well-prepared bed. Here’s what I do to get my garden ready:
* Sunlight: Chard thrives in full sun (6-8 hours of direct sunlight per day), but it can tolerate partial shade, especially in hotter climates.
* Soil: Chard prefers well-draining soil that’s rich in organic matter. A slightly acidic to neutral pH (6.0-7.0) is ideal.
* Amendments: Before planting, I amend my soil with plenty of compost or well-rotted manure. This adds nutrients and improves drainage. I also like to add a slow-release organic fertilizer to give the chard a good start.
Planting Chard
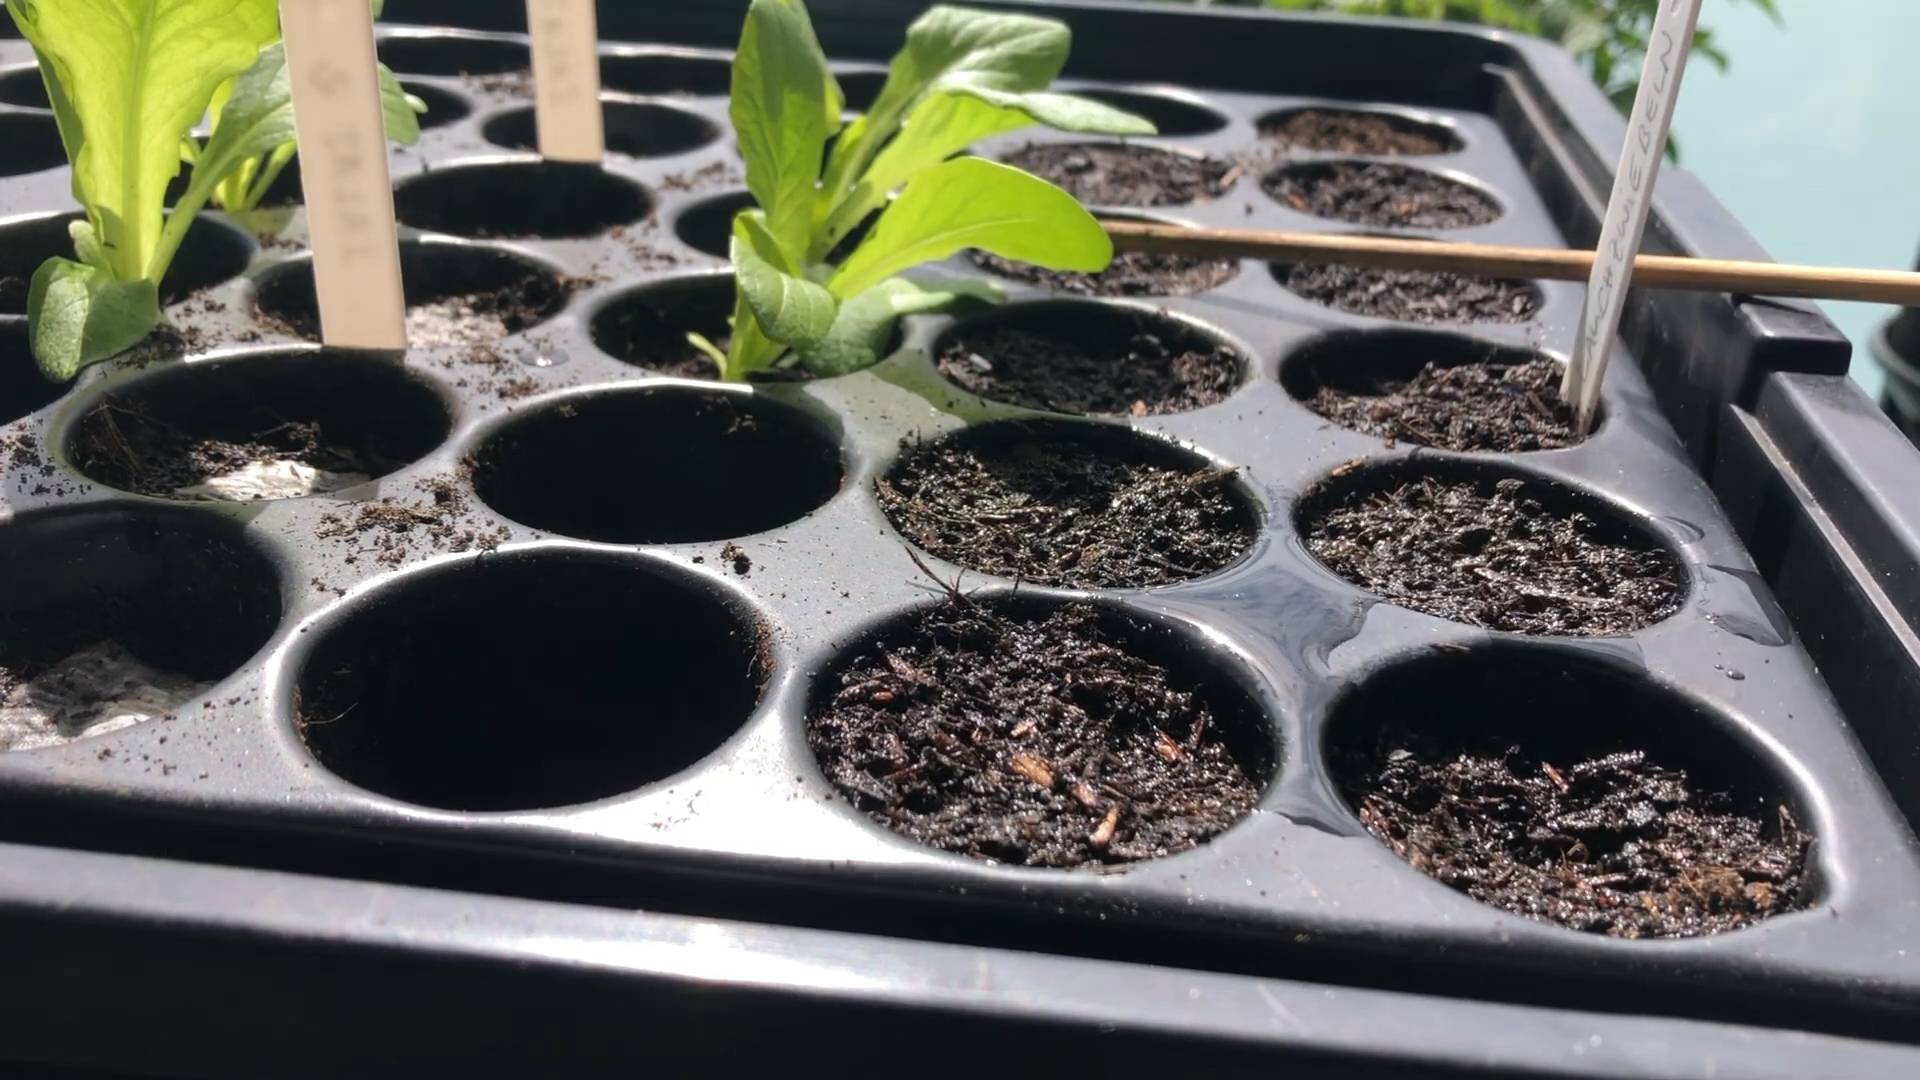
You can start chard from seed either indoors or directly in the garden. I usually start mine indoors to get a head start, especially if I’m planting early in the season.
* Starting Seeds Indoors:
1. Timing: Start seeds 4-6 weeks before the last expected frost.
2. Containers: Use seed starting trays or small pots filled with seed starting mix.
3. Sowing: Sow seeds about ½ inch deep and gently cover with soil.
4. Watering: Keep the soil consistently moist but not soggy.
5. Light: Provide plenty of light, either with a grow light or by placing the seedlings in a sunny window.
6. Hardening Off: Before transplanting outdoors, gradually acclimate the seedlings to outdoor conditions by exposing them to increasing amounts of sunlight and fresh air over a week or two.
* Direct Sowing:
1. Timing: Sow seeds directly in the garden after the last expected frost.
2. Spacing: Sow seeds about ½ inch deep and 2-3 inches apart in rows that are 12-18 inches apart.
3. Thinning: Once the seedlings emerge, thin them to 8-12 inches apart.
Caring for Your Chard
Once your chard is planted, it’s relatively low-maintenance. Here’s what I do to keep my chard happy and healthy:
* Watering: Water regularly, especially during dry periods. Chard needs consistent moisture to thrive. Aim for about 1 inch of water per week.
* Fertilizing: Side-dress with compost or a balanced organic fertilizer every few weeks to provide ongoing nutrients.
* Weeding: Keep the area around your chard free of weeds. Weeds compete for nutrients and water.
* Pest Control: Chard is generally pest-resistant, but keep an eye out for common garden pests like aphids, slugs, and snails. I usually hand-pick pests or use organic pest control methods like insecticidal soap or diatomaceous earth.
* Mulching: Apply a layer of mulch around your chard plants to help retain moisture, suppress weeds, and regulate soil temperature.
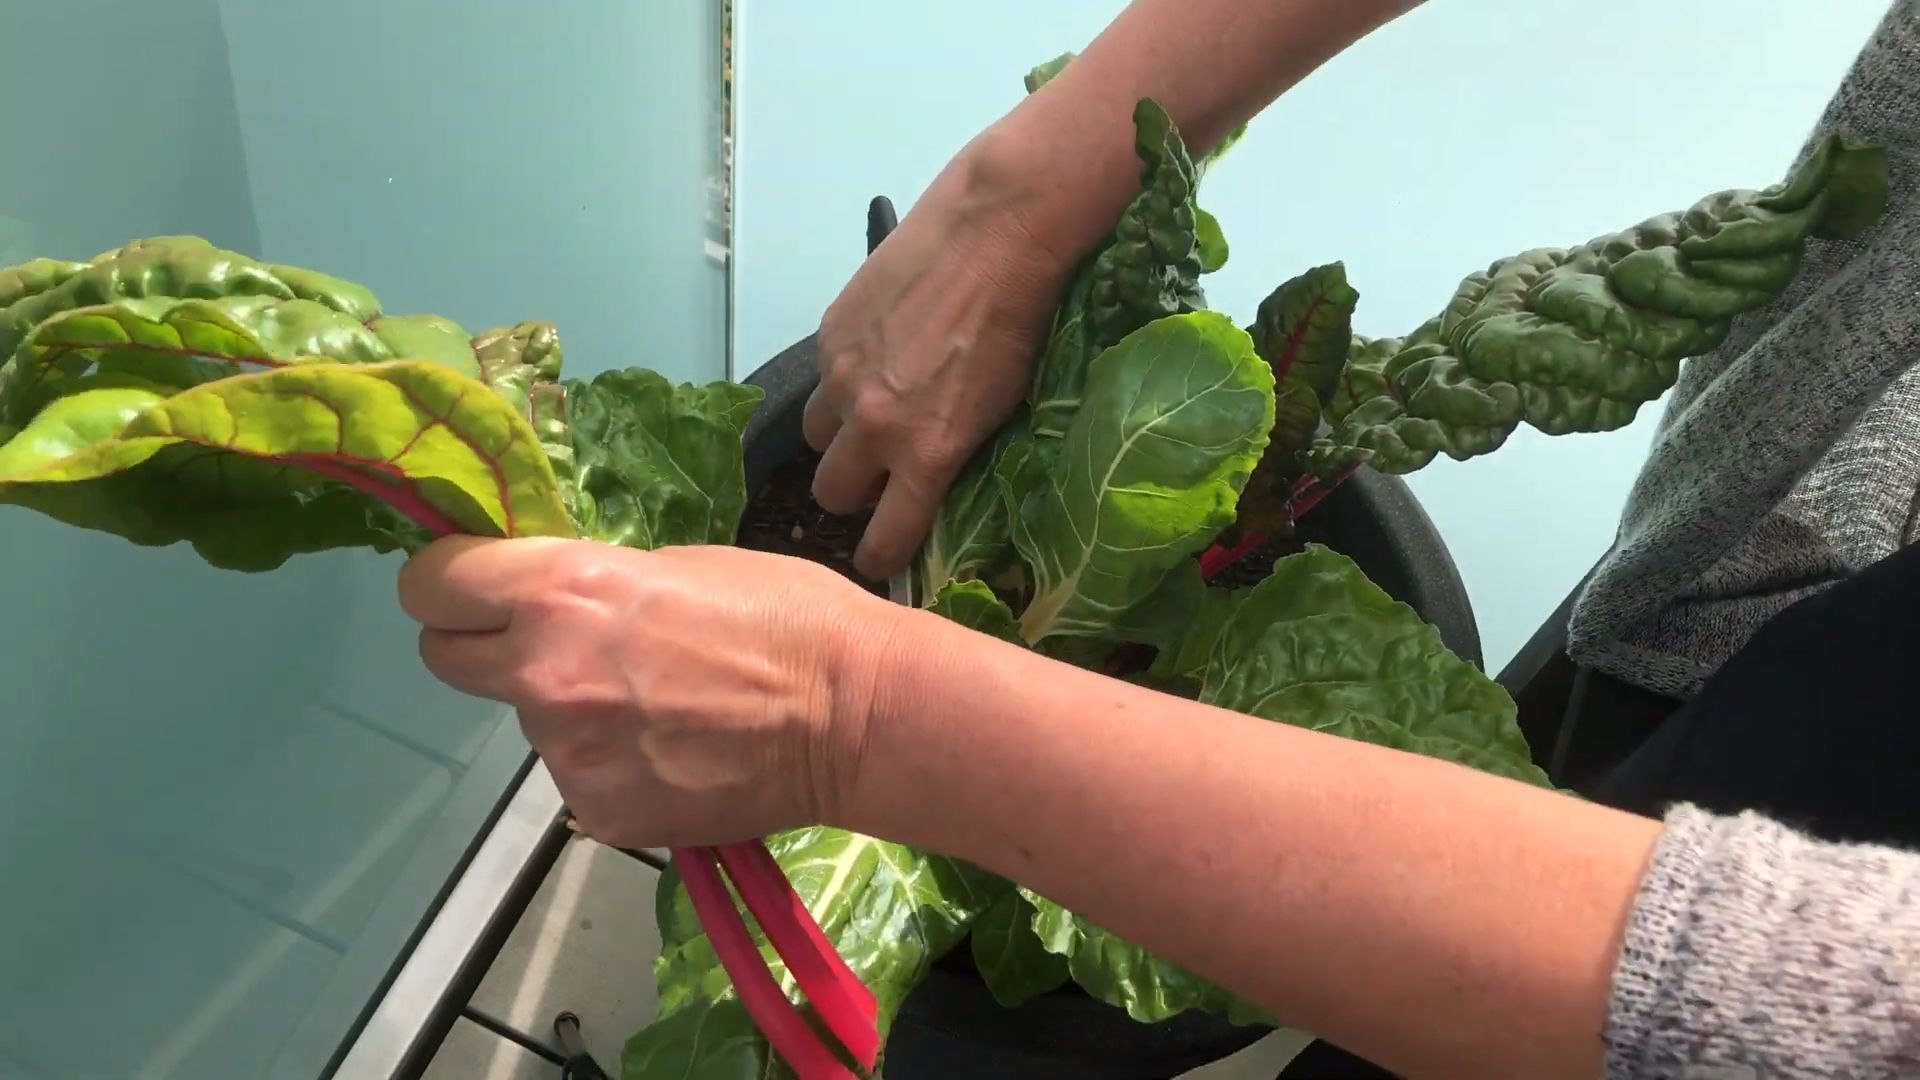
Harvesting Your Chard
This is the best part! You can start harvesting chard leaves as soon as they’re large enough to eat, usually about 6-8 inches long.
* Cut-and-Come-Again: The best way to harvest chard is using the “cut-and-come-again” method. Simply cut the outer leaves near the base of the plant, leaving the inner leaves to continue growing. This allows you to harvest chard continuously throughout the growing season.
* Whole Plant Harvest: You can also harvest the entire plant at once, but this will obviously stop further production from that plant.
* Timing: Harvest chard in the morning when the leaves are crisp and fresh.
* Storage: Store harvested chard in the refrigerator for up to a week.
Troubleshooting Common Chard Problems
Even with the best care, you might encounter a few problems while growing chard. Here are some common issues and how to address them:
* Aphids: These tiny pests can suck the sap from chard leaves, causing them to become distorted and yellow. Spray aphids with insecticidal soap or neem oil.
* Slugs and Snails: These slimy creatures can munch on chard leaves, leaving holes. Hand-pick slugs and snails or use slug bait.
* Leaf Miners: These pests tunnel inside chard leaves, creating unsightly trails. Remove and destroy affected leaves.
* Bolting: Bolting occurs when chard prematurely produces flower stalks, usually due to hot weather or stress. Once chard bolts, the leaves become bitter. To prevent bolting, provide shade during hot weather and water regularly.
Creative Ways to Use Your Homegrown Chard
Now that you’ve harvested your beautiful chard, it’s time to get creative in the kitchen! Chard is incredibly versatile and can be used in a variety of dishes.
* Sautéed Chard: Sauté chard with garlic, olive oil, and a pinch of salt and pepper for a simple and delicious side dish.
* Chard in Soups and Stews: Add chopped chard to soups and stews for extra nutrients and flavor.
* Chard in Salads: Use young, tender chard leaves in salads.
* Chard in Frittatas and Quiches: Add chopped chard to frittatas and quiches for a healthy and flavorful breakfast or brunch.
* Chard in Smoothies: Blend chard into smoothies for a nutrient boost.
* Chard Stems: Don’t throw away the stems! They can be sautéed, roasted, or pickled.
Extending Your Chard Season
Want to enjoy fresh chard for as long as possible? Here are a few tips for extending your chard season:
* Succession Planting: Sow seeds every few weeks to ensure a continuous harvest.
* Cold Frames or Row Covers: Use cold frames or row covers to protect chard from frost and extend the growing season into the fall and winter.
* Overwintering: In mild climates, chard can be overwintered. Cut back the plants in the fall and cover them with a thick layer of mulch. They will resprout in the spring.
Saving Chard Seeds
If you want to save seeds from your chard plants, allow a few plants to bolt and produce flowers. Once the flowers dry and the seed pods mature, harvest the seeds and store them in a cool, dry place. Keep in mind that chard can cross-pollinate with beets, so if you’re growing both, you may not get true-to-type seeds.
Growing chard at home is such a rewarding experience. Not only do you get to enjoy fresh, delicious, and nutritious greens, but you also get to add a touch of beauty to your garden. I hope this guide has inspired you to give it a try. Happy gardening!
Conclusion
So, there you have it! Growing chard at home is not only surprisingly simple, but it’s also incredibly rewarding. Imagine stepping out into your garden and harvesting fresh, vibrant leaves for your next meal. Forget those wilted, overpriced bunches at the grocery store. With a little effort, you can have a constant supply of this nutritious and delicious leafy green right at your fingertips.
This isn’t just about saving money; it’s about connecting with your food, understanding where it comes from, and enjoying the unparalleled flavor of homegrown produce. The satisfaction of nurturing a plant from seed to table is a feeling that’s hard to beat. Plus, you’ll be adding a beautiful splash of color to your garden with chard’s stunning rainbow varieties.
But the benefits don’t stop there. Growing your own chard allows you to control exactly what goes into your food. No pesticides, no herbicides, just pure, natural goodness. You can tailor your growing practices to your specific needs and preferences, ensuring that you’re getting the healthiest and most flavorful chard possible.
And speaking of flavor, don’t be afraid to experiment! Try different varieties of chard to find your favorites. ‘Bright Lights’ is a popular choice for its vibrant colors, while ‘Fordhook Giant’ offers a more classic, robust flavor. You can also adjust your growing conditions to influence the taste. For example, slightly stressing the plants by withholding water can intensify their flavor.
Consider companion planting to further enhance your chard’s growth and flavor. Planting chard alongside beans, onions, or carrots can create a mutually beneficial relationship, improving soil health and deterring pests. You can even use chard as a natural mulch, chopping up the leaves and spreading them around other plants to suppress weeds and retain moisture.
Ready to take the plunge? We highly encourage you to give growing chard at home a try. It’s a fantastic way to add fresh, healthy greens to your diet, beautify your garden, and connect with nature. Whether you have a sprawling backyard or just a small balcony, there’s a way to make it work.
Don’t be intimidated if you’re a beginner gardener. Chard is a relatively forgiving plant, and with a little bit of care, you’ll be harvesting delicious leaves in no time. Start small, experiment, and most importantly, have fun!
We’re confident that you’ll be amazed by the results. And once you’ve experienced the joy of growing your own chard, you’ll never want to go back to store-bought again.
So, grab some seeds, get your hands dirty, and start growing! We can’t wait to hear about your experiences. Share your photos, tips, and tricks in the comments below. Let’s build a community of chard-loving gardeners and inspire others to discover the joys of homegrown produce. Happy gardening!
Frequently Asked Questions
What are the best varieties of chard to grow at home?
There are many fantastic chard varieties to choose from, each with its own unique characteristics. ‘Bright Lights’ is a popular choice for its vibrant rainbow of colors, adding a visual appeal to your garden. ‘Fordhook Giant’ is known for its large, dark green leaves and robust flavor, making it a great option for cooking. ‘Lucullus’ is a reliable and productive variety with tender, mild-flavored leaves. Consider your personal preferences and growing conditions when selecting your chard varieties. Experimenting with different types is a great way to discover your favorites!
How much sunlight does chard need?
Chard thrives in full sun, requiring at least 6 hours of direct sunlight per day. However, it can also tolerate partial shade, especially in hotter climates. If you live in an area with intense summer heat, providing some afternoon shade can help prevent the leaves from scorching. When planting chard, choose a location that receives ample sunlight but is also protected from strong winds.
What kind of soil is best for growing chard?
Chard prefers well-drained, fertile soil that is rich in organic matter. Before planting, amend your soil with compost or well-rotted manure to improve its drainage and nutrient content. Chard also prefers a slightly acidic to neutral soil pH, ideally between 6.0 and 7.0. You can test your soil pH using a soil testing kit and adjust it accordingly with lime or sulfur.
How often should I water my chard plants?
Chard needs consistent moisture to thrive. Water your plants deeply whenever the top inch of soil feels dry to the touch. Avoid overwatering, as this can lead to root rot. During hot, dry weather, you may need to water your chard plants more frequently. Mulching around the plants can help retain moisture in the soil and reduce the need for watering.
When is the best time to harvest chard?
You can begin harvesting chard leaves as soon as they are large enough to eat, typically when they are about 6-8 inches long. Harvest the outer leaves first, leaving the inner leaves to continue growing. This cut-and-come-again harvesting method allows you to enjoy a continuous supply of fresh chard throughout the growing season. Avoid harvesting more than one-third of the plant at a time to ensure its continued growth.
What are some common pests and diseases that affect chard?
Chard is generally a relatively pest-resistant plant, but it can be susceptible to certain pests and diseases. Common pests include aphids, flea beetles, and leaf miners. You can control these pests with insecticidal soap or neem oil. Diseases that can affect chard include downy mildew and leaf spot. To prevent these diseases, ensure good air circulation around your plants and avoid overhead watering.
Can I grow chard in containers?
Yes, chard can be successfully grown in containers. Choose a container that is at least 12 inches deep and wide to provide ample space for the roots to grow. Use a high-quality potting mix that is well-draining and rich in organic matter. Water your container-grown chard plants regularly and fertilize them every few weeks with a balanced fertilizer.
How can I store harvested chard?
To store harvested chard, wash the leaves thoroughly and pat them dry. Wrap the leaves in a damp paper towel and store them in a plastic bag in the refrigerator. Chard can typically be stored in the refrigerator for up to a week. You can also freeze chard for longer storage. To freeze chard, blanch the leaves in boiling water for 2 minutes, then plunge them into ice water to stop the cooking process. Drain the leaves thoroughly and store them in freezer bags.
Can I eat the stems of chard?
Yes, the stems of chard are edible and delicious! They have a slightly different texture and flavor than the leaves, but they are equally nutritious. You can cook the stems separately from the leaves, as they take longer to cook. Try sautéing the stems with garlic and olive oil, or adding them to soups and stews.
What are some creative ways to use chard in cooking?
Chard is a versatile ingredient that can be used in a variety of dishes. You can sauté it with garlic and olive oil, add it to soups and stews, use it in salads, or even make chard chips. Chard is also a great substitute for spinach in many recipes. Get creative and experiment with different ways to incorporate chard into your meals!
Leave a Comment