
Grow Arugula Indoors Easily and enjoy fresh, peppery greens all year round! Have you ever craved a vibrant salad in the dead of winter, only to be disappointed by the limp, tasteless options at the grocery store? I know I have! That’s why I’m so excited to share my favorite DIY tricks for cultivating your own thriving arugula patch right inside your home.
Arugula, also known as rocket, has a rich history dating back to ancient Rome, where it was prized for its culinary and medicinal properties. From adding a zesty kick to salads to being used as an aphrodisiac (yes, really!), arugula has been a staple in various cultures for centuries. But you don’t need a sprawling Roman garden to enjoy this delicious green.
In today’s fast-paced world, access to fresh, healthy produce can be a challenge. Store-bought arugula often lacks the robust flavor of homegrown varieties, and let’s be honest, it can be expensive! Learning how to grow arugula indoors easily empowers you to take control of your food source, save money, and enjoy the unparalleled taste of freshly harvested greens. Plus, it’s incredibly rewarding to watch your little seedlings sprout and flourish. So, let’s dive into the simple steps and clever hacks that will transform your windowsill into a mini arugula farm!
Grow Your Own Arugula Indoors: A Simple DIY Guide
Hey there, fellow plant enthusiasts! Are you craving that peppery, fresh taste of arugula but don’t have a garden or the right climate? No worries! I’m going to show you how to easily grow arugula indoors, right on your windowsill. It’s surprisingly simple, rewarding, and gives you access to delicious, healthy greens year-round. Let’s get started!
What You’ll Need
Before we dive in, let’s gather our supplies. This is a pretty low-cost project, which is always a bonus!
* **A Container:** You can use almost anything! A pot, a plastic container, a window box, even a recycled yogurt container will work. Just make sure it has drainage holes. I personally love using rectangular planters because they fit nicely on my windowsill.
* **Potting Mix:** Don’t use garden soil! It’s too dense for containers. Opt for a good quality potting mix that’s light and airy. Seed starting mix is also a great choice, especially if you’re starting from seed.
* **Arugula Seeds:** You can find these at most garden centers or online. Look for organic seeds if you prefer.
* **Watering Can or Spray Bottle:** For gentle watering.
* **A Sunny Spot:** Arugula needs at least 6 hours of sunlight per day. A south-facing windowsill is ideal. If you don’t have enough natural light, you can supplement with a grow light.
* **Optional: Seed Starting Tray:** If you want to get a head start, you can start your seeds in a seed starting tray before transplanting them to your container.
* **Optional: Fertilizer:** A balanced liquid fertilizer can help boost growth, but it’s not essential.
Getting Started: Planting Your Arugula
Okay, now for the fun part! We’re going to plant those tiny seeds and watch them sprout into delicious arugula.
1. **Prepare Your Container:** If you’re using a new container, give it a quick rinse. If it’s a recycled container, make sure it’s clean. Fill your container with potting mix, leaving about an inch of space at the top. Gently pat down the soil to level it.
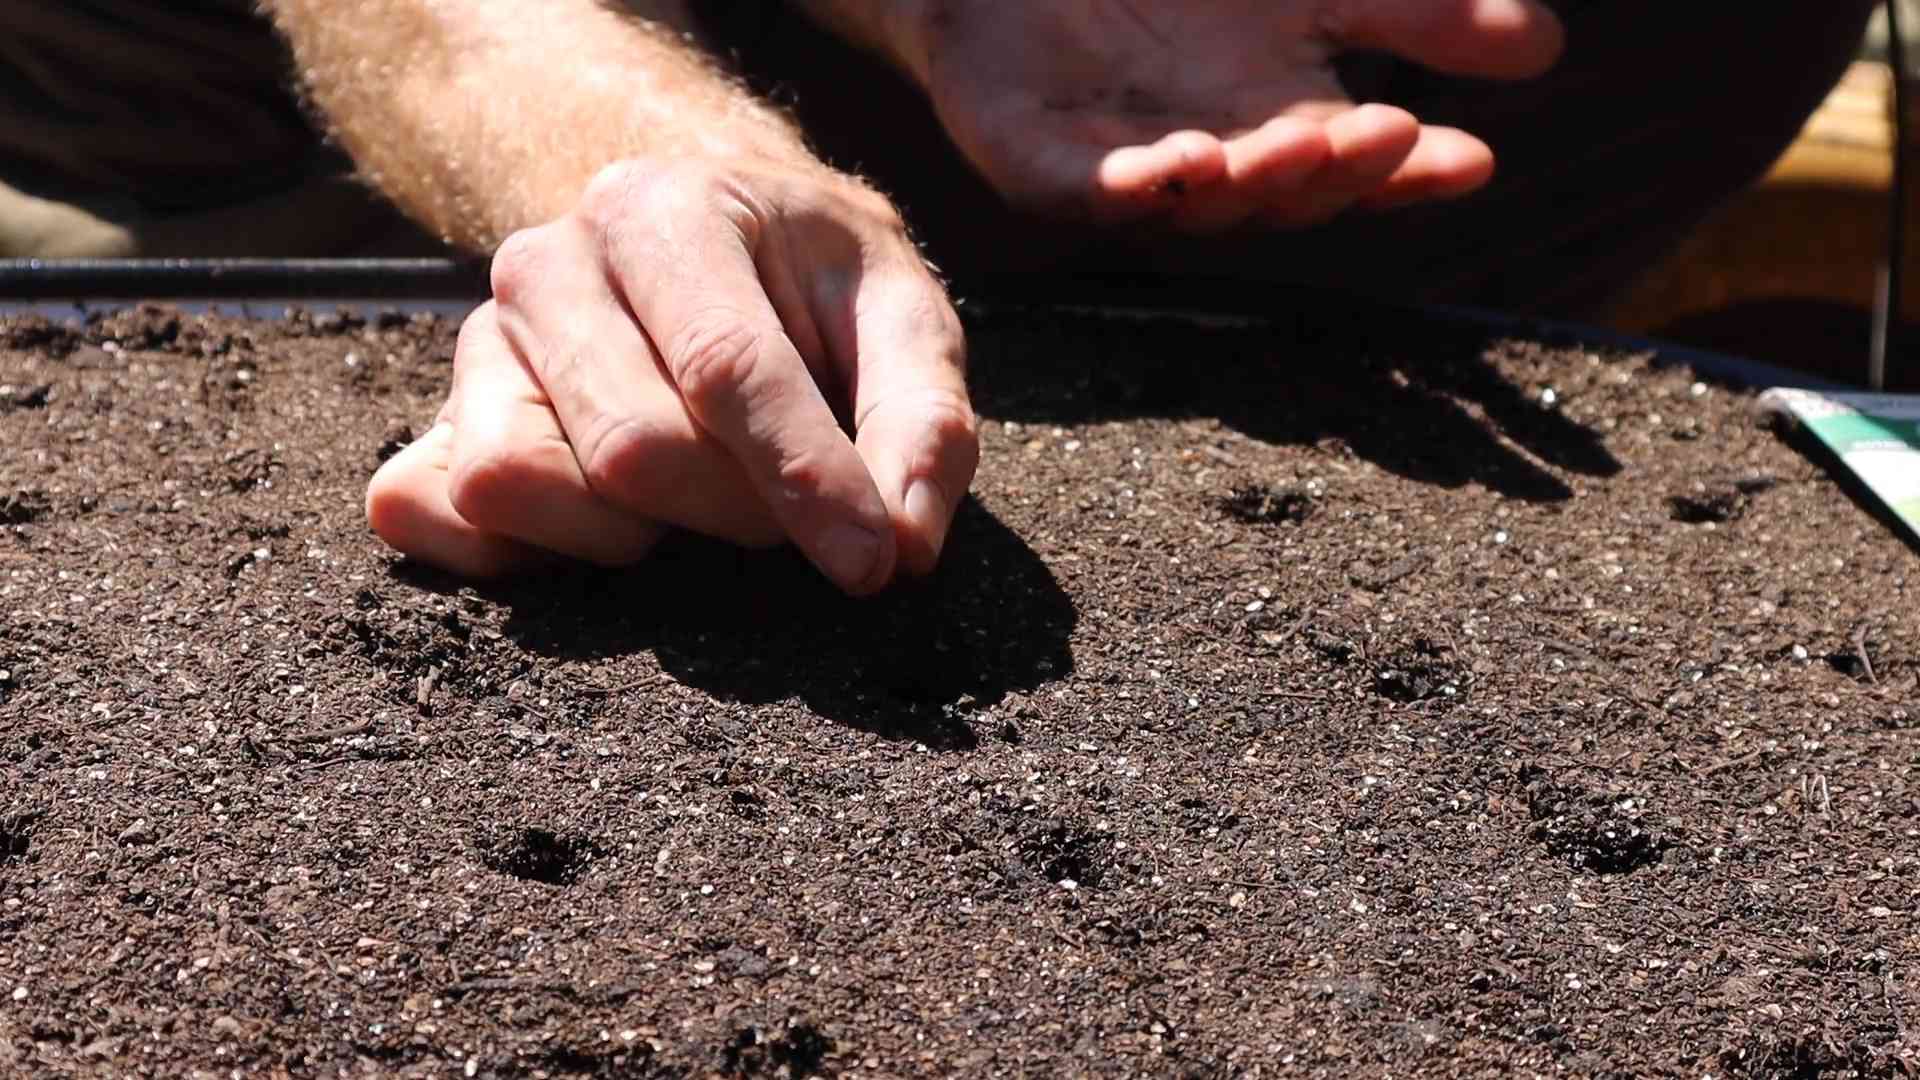
2. **Sow the Seeds:** Arugula seeds are small, so you don’t need to plant them too deep. Sprinkle the seeds evenly over the surface of the soil. I like to aim for about 1/4 inch spacing between seeds. You can also sow them in rows if you prefer.
3. **Cover the Seeds:** Lightly cover the seeds with a thin layer of potting mix, about 1/4 inch deep.
4. **Water Gently:** Use a watering can or spray bottle to gently water the soil. You want to moisten the soil without disturbing the seeds. The soil should be damp but not soggy.
5. **Find a Sunny Spot:** Place your container in a sunny spot, like a south-facing windowsill. If you’re using a grow light, position it a few inches above the soil.
6. **Keep the Soil Moist:** Check the soil daily and water as needed to keep it consistently moist. Don’t let the soil dry out completely, but also avoid overwatering.
Nurturing Your Arugula: Care Tips
Now that your arugula is planted, it’s time to give it some TLC. Here are a few tips to help your plants thrive:
* **Watering:** As I mentioned before, keep the soil consistently moist. Water when the top inch of soil feels dry to the touch. Avoid watering the leaves directly, as this can lead to fungal diseases.
* **Light:** Arugula needs plenty of light to grow well. If you’re not getting enough natural light, supplement with a grow light.
* **Temperature:** Arugula prefers cooler temperatures, around 60-70°F (15-21°C). Avoid placing your container near a heat source, like a radiator.
* **Fertilizing (Optional):** If you want to give your arugula a boost, you can fertilize it every few weeks with a balanced liquid fertilizer. Follow the instructions on the fertilizer label. I usually dilute the fertilizer to half strength to avoid burning the plants.
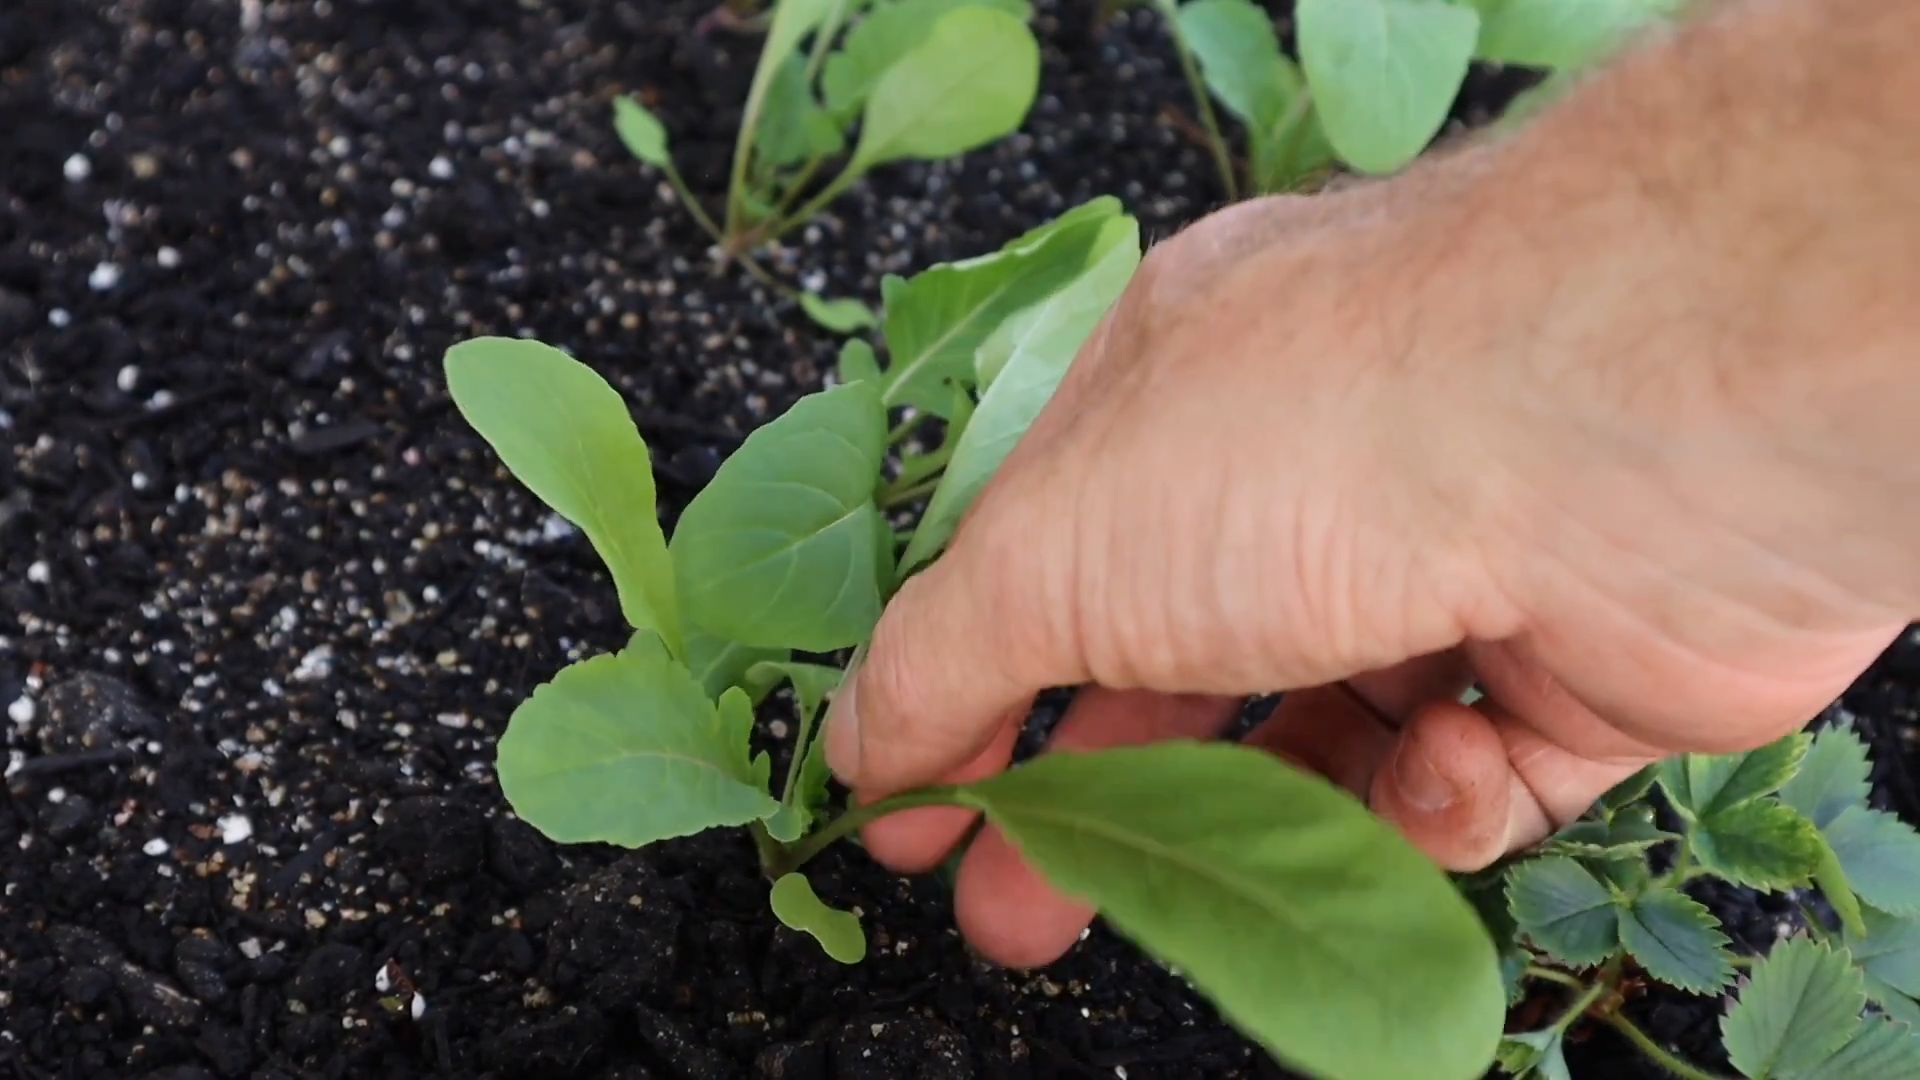
* **Thinning (Optional):** If your seedlings are growing too close together, you can thin them out by snipping off some of the weaker plants at the soil line. This will give the remaining plants more room to grow.
* **Pest Control:** Arugula is generally pest-resistant, but you may occasionally encounter aphids or other small pests. If you see any pests, you can try spraying them with a mixture of water and dish soap.
Harvesting Your Arugula: Time to Enjoy!
The best part of growing your own arugula is, of course, harvesting and eating it!
1. **When to Harvest:** You can start harvesting arugula leaves when they are about 2-3 inches long. The younger leaves will have a milder flavor, while the older leaves will be more peppery.
2. **How to Harvest:** Use scissors or your fingers to snip off the leaves at the base of the plant. You can harvest individual leaves or cut the entire plant back to about an inch above the soil line.
3. **Succession Planting:** To ensure a continuous supply of arugula, you can sow new seeds every few weeks. This is called succession planting.
4. **Enjoy Your Harvest:** Arugula is delicious in salads, sandwiches, pizzas, and more! You can also use it to make pesto or add it to soups and stews.
Troubleshooting: Common Issues and Solutions
Even with the best care, you might encounter a few issues while growing arugula indoors. Here are some common problems and how to fix them:
* **Leggy Seedlings:** If your seedlings are tall and spindly, they’re probably not getting enough light. Move them to a sunnier spot or use a grow light.
* **Yellowing Leaves:** Yellowing leaves can be a sign of overwatering, underwatering, or nutrient deficiency. Check the soil moisture and adjust your watering accordingly. If you suspect a nutrient deficiency, try fertilizing with a balanced liquid fertilizer.
* **Slow Growth:** Slow growth can be caused by a variety of factors, including lack of light, poor soil, or cool temperatures. Make sure your arugula is getting enough light and that the soil is well-draining. If the temperature is too cool, try moving your container to a warmer location.
* **Pests:** As mentioned before, aphids and other small pests can sometimes be a problem. Spray them with a mixture of water and dish soap. You can also try introducing beneficial insects, like ladybugs, to your growing area.
* **Bolting:** Bolting is when the plant starts to flower and the leaves become bitter. This is usually caused by hot weather or stress. To prevent bolting, keep your arugula well-watered and avoid exposing it to extreme temperatures. If your arugula does bolt, you can still eat the flowers, which have a mild, peppery flavor.
Extra Tips for Arugula Success
Here are a few extra tips to help you grow the best arugula possible:
* Choose the Right Variety: Some arugula varieties are more heat-tolerant than others. If you live in a warm climate, look for varieties that are specifically bred for hot weather.
* Use a Self-Watering Container: If you tend to forget to water your plants, a self-watering container can be a lifesaver. These containers have a reservoir that holds water and gradually releases it to the soil.
* Rotate Your Crops: If you’re growing arugula in the same container year after year, it’s a good idea to rotate your crops. This means planting different types of plants in the container each year to prevent soil depletion and pest problems.
* Don’t Be Afraid to Experiment: Gardening is all about experimentation! Don’t be afraid to try different techniques and see what works best for you.
Growing arugula indoors is a fun and rewarding project that anyone can do. With a little bit of care and attention, you can enjoy fresh, peppery greens all year round. So, grab your seeds, get planting, and get ready to enjoy the delicious taste of homegrown arugula! Happy gardening!
Conclusion
So, there you have it! Growing arugula indoors easily is not just a possibility; it’s a rewarding and accessible project for anyone, regardless of their gardening experience. We’ve walked through the simple steps, from selecting the right container and soil to providing adequate light and water. The beauty of this DIY trick lies in its simplicity and the immediate gratification of harvesting fresh, peppery greens right from your windowsill.
Why is this a must-try? Because it puts you in control of your food source, reduces your reliance on store-bought produce (often shipped from far away), and adds a vibrant touch of green to your indoor space. Imagine the satisfaction of sprinkling freshly harvested arugula on your salads, pizzas, or sandwiches, knowing you nurtured it from seed to plate. The flavor is undeniably superior to store-bought arugula, boasting a more intense and nuanced peppery bite.
But the fun doesn’t stop there! Feel free to experiment with different varieties of arugula. Some are spicier than others, while some have more delicate leaves. Try growing ‘Sylvetta’ for a wilder, more robust flavor, or ‘Slow Bolt’ for a variety that’s less prone to bolting (going to seed) in warmer indoor conditions. You can also experiment with companion planting. Try planting some chives or basil alongside your arugula to deter pests and enhance the flavor of both herbs.
Another variation to consider is succession planting. Sow a new batch of seeds every two weeks to ensure a continuous supply of fresh arugula throughout the year. This way, you’ll never be without your favorite peppery green. You can also try using different types of grow lights to see which one works best for your indoor environment and maximizes your arugula yield. LED grow lights are energy-efficient and provide the full spectrum of light that arugula needs to thrive.
Don’t be intimidated by the thought of indoor gardening. Arugula is a forgiving plant, and even if you make a few mistakes along the way, you’ll still likely end up with a delicious harvest. The key is to pay attention to your plants, observe their needs, and adjust your care accordingly.
We wholeheartedly encourage you to give this DIY trick a try. It’s a simple, affordable, and incredibly rewarding way to bring fresh, healthy greens into your life. And most importantly, we want to hear about your experience! Share your photos, tips, and challenges in the comments below. Let’s create a community of indoor arugula growers and learn from each other. What kind of container did you use? What lighting setup did you find most effective? What are your favorite ways to use your homegrown arugula? Your insights could help other aspiring gardeners succeed. So, grab some seeds, get your hands dirty, and start growing arugula indoors easily today! You’ll be amazed at how simple and satisfying it is.
Frequently Asked Questions (FAQ)
What kind of soil is best for growing arugula indoors?
Arugula thrives in well-draining soil that is rich in organic matter. A good option is a potting mix specifically formulated for vegetables or herbs. You can also create your own mix by combining equal parts of potting soil, compost, and perlite or vermiculite. The compost provides essential nutrients, while the perlite or vermiculite improves drainage and aeration. Avoid using garden soil, as it can be too heavy and may contain pests or diseases.
How much light does arugula need when grown indoors?
Arugula needs at least 6 hours of direct sunlight per day to thrive. If you don’t have a sunny windowsill, you can supplement with grow lights. Fluorescent or LED grow lights are excellent options. Place the lights about 6-12 inches above the plants and keep them on for 12-16 hours per day. Rotate the plants regularly to ensure even light exposure. Insufficient light can lead to leggy growth and a less flavorful harvest.
How often should I water my indoor arugula plants?
Water arugula plants when the top inch of soil feels dry to the touch. Avoid overwatering, as this can lead to root rot. Water thoroughly until the water drains out of the bottom of the pot. Empty the saucer underneath the pot to prevent the plants from sitting in water. During warmer months, you may need to water more frequently. Check the soil moisture daily and adjust your watering schedule accordingly.
How long does it take for arugula to germinate and be ready for harvest?
Arugula seeds typically germinate within 5-7 days. You can start harvesting the leaves about 3-4 weeks after germination, when they are 2-3 inches long. Harvest the outer leaves first, allowing the inner leaves to continue growing. Regular harvesting encourages continued production.
What are some common pests and diseases that affect indoor arugula?
Arugula is generally pest-resistant, but aphids, flea beetles, and whiteflies can sometimes be a problem. Inspect your plants regularly for signs of infestation. If you find pests, you can try washing them off with a strong stream of water or using insecticidal soap. Avoid using harsh chemicals, especially if you plan to eat the arugula. Overwatering can lead to fungal diseases like damping-off. Ensure good air circulation and avoid overcrowding the plants to prevent these problems.
Can I grow arugula indoors year-round?
Yes, you can grow arugula indoors year-round, provided you provide adequate light and temperature. Arugula prefers cooler temperatures, ideally between 60-70°F (15-21°C). If your indoor environment is too warm, the arugula may bolt (go to seed), which can make the leaves bitter. You can try moving the plants to a cooler location or using a fan to improve air circulation.
How do I harvest arugula leaves?
Harvest arugula leaves by snipping them off with scissors or gently plucking them from the stem. Harvest the outer leaves first, allowing the inner leaves to continue growing. Regular harvesting encourages continued production. Harvest in the morning for the best flavor.
Why is my arugula tasting bitter?
Arugula can taste bitter if it’s stressed, either from too much heat, too little water, or bolting. Ensure your plants are getting adequate water and are not exposed to excessive heat. If the plants start to bolt (produce flower stalks), harvest the leaves immediately, as they will become increasingly bitter.
Can I save seeds from my indoor arugula plants?
Yes, you can save seeds from your indoor arugula plants, but it requires allowing the plants to bolt and produce flowers. Once the flowers dry and form seed pods, you can harvest the pods and extract the seeds. Allow the seeds to dry completely before storing them in an airtight container in a cool, dark place. Keep in mind that seeds from hybrid varieties may not produce plants that are true to type.
What are some creative ways to use my homegrown arugula?
Arugula is a versatile green that can be used in a variety of dishes. Add it to salads, sandwiches, pizzas, or pasta dishes. Use it as a topping for grilled meats or fish. Blend it into pesto or smoothies. Arugula also pairs well with cheese, nuts, and fruits. Experiment with different combinations to find your favorite ways to enjoy your homegrown arugula.

Leave a Comment