
Grow Brussels Sprouts Kitchen: Ever dreamt of plucking fresh, vibrant Brussels sprouts right from your own kitchen? I know I have! Forget those sad, pre-packaged sprouts from the grocery store – imagine the satisfaction of nurturing your own little sprout farm, right on your windowsill. This isn’t just about gardening; it’s about connecting with nature, even in the smallest of spaces.
For centuries, Brussels sprouts have been a staple in European cuisine, with their cultivation dating back to, you guessed it, Brussels, Belgium! They were particularly popular during the Roman Empire. Now, you don’t need a sprawling farm to enjoy this historical veggie. In this DIY guide, I’m going to show you how to grow Brussels sprouts kitchen style, even if you’re a complete beginner.
Let’s face it, fresh produce can be expensive, and sometimes the quality just isn’t there. Plus, there’s something incredibly therapeutic about tending to your own plants. This DIY trick not only saves you money but also provides you with the freshest, most delicious Brussels sprouts you can imagine. So, grab your gardening gloves (or don’t, it’s up to you!), and let’s get started on this exciting journey of growing your own Brussels sprouts indoors!
Growing Brussels Sprouts Indoors: A Beginner’s Guide
Hey there, fellow gardening enthusiasts! Ever thought about growing your own Brussels sprouts? I know, I know, they might not be everyone’s favorite veggie, but trust me, fresh, homegrown Brussels sprouts are a whole different ballgame. And guess what? You don’t even need a huge garden to enjoy them. I’m going to walk you through how to grow these little cabbages indoors, right in your kitchen!
What You’ll Need
Before we dive in, let’s gather our supplies. Here’s a list of everything you’ll need to get started:
* **Brussels Sprouts Seeds:** Choose a variety that’s known for its compact growth, like ‘Dwarf Improved’ or ‘Long Island Improved’. These are better suited for indoor growing.
* **Seed Starting Trays or Small Pots:** These will be your nursery for the first few weeks.
* **Seed Starting Mix:** This is a light, sterile mix that’s perfect for delicate seedlings.
* **Larger Pots (at least 12 inches in diameter):** These will be the permanent homes for your Brussels sprouts plants.
* **Potting Soil:** A good quality potting mix that drains well is essential.
* **Grow Lights:** Brussels sprouts need a lot of light, so grow lights are a must, especially during the shorter days of the year.
* **Liquid Fertilizer:** A balanced liquid fertilizer will help your plants thrive.
* **Watering Can or Spray Bottle:** For gentle watering.
* **Spray Bottle with Water:** For misting the seedlings.
* **Small Fan (optional):** To improve air circulation and prevent fungal diseases.
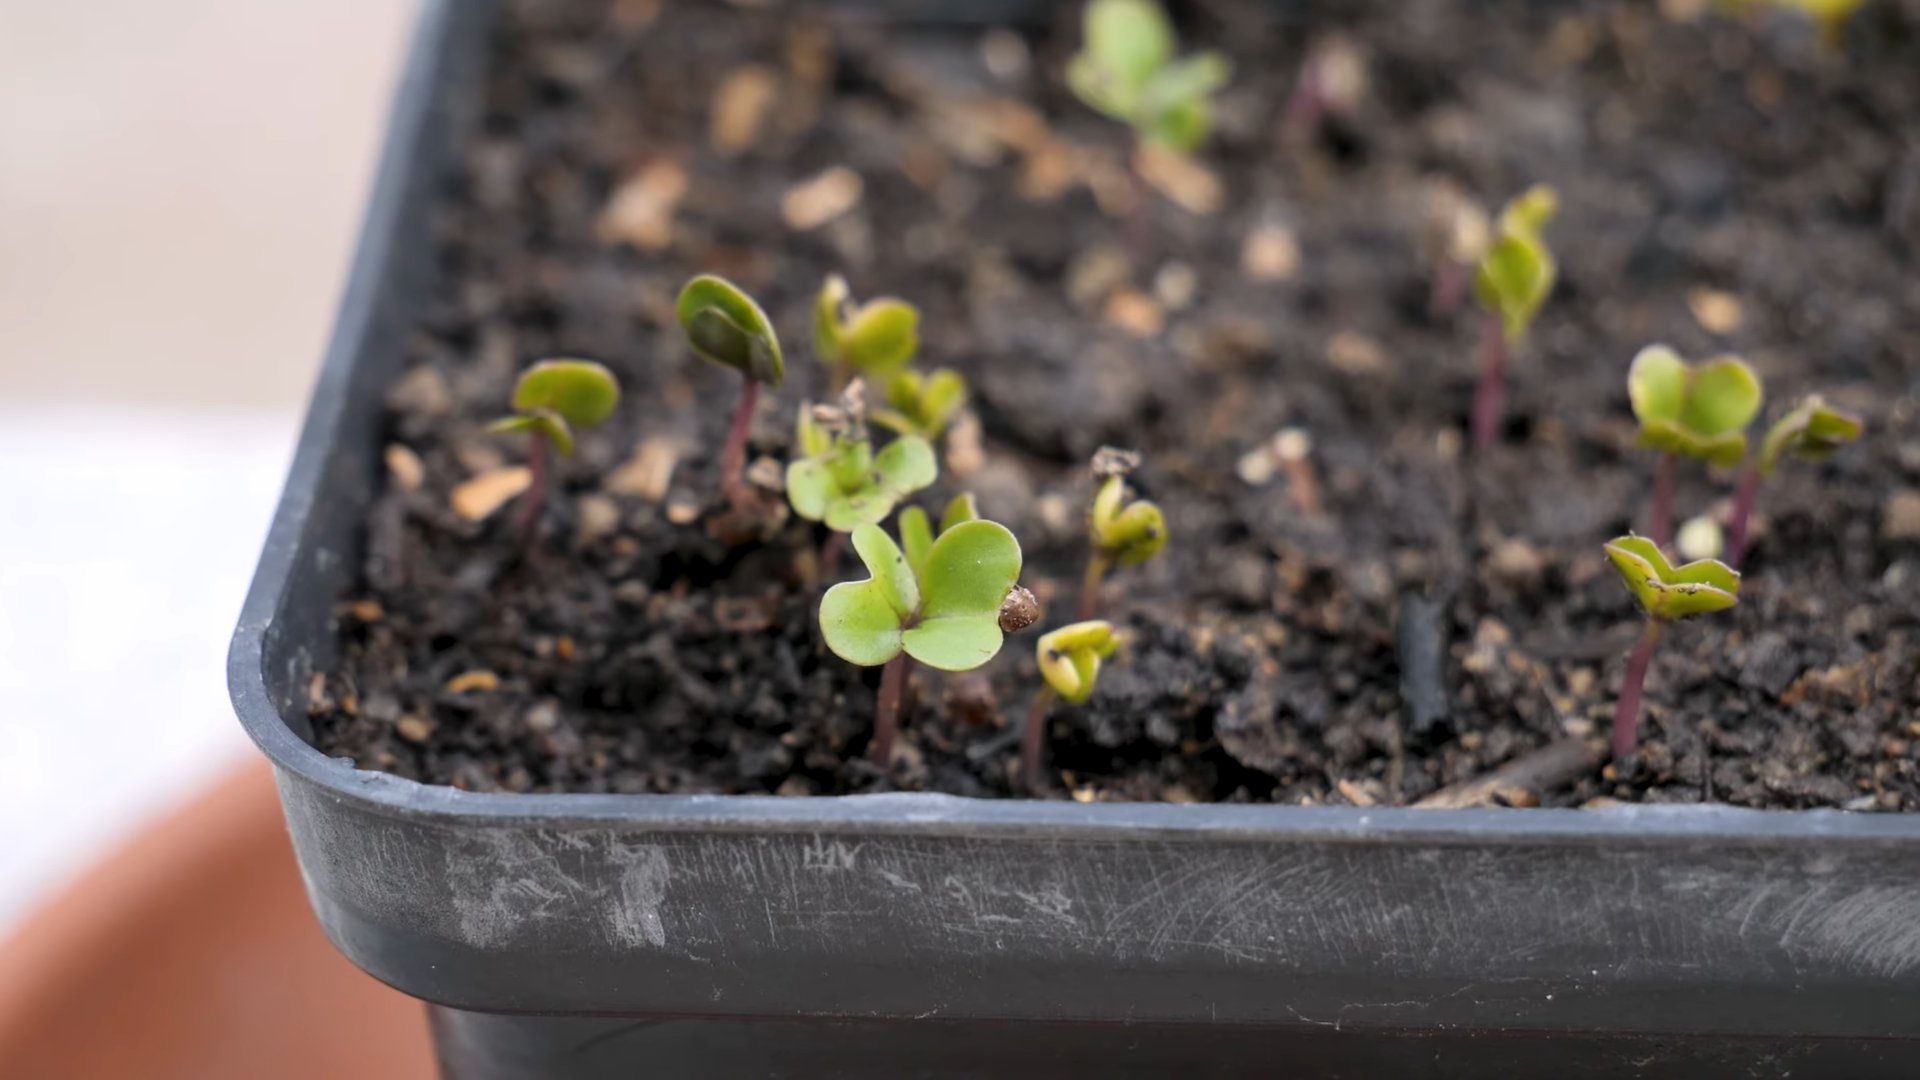
Phase 1: Starting Your Seeds
This is where the magic begins! We’re going to nurture those tiny seeds into healthy seedlings.
1. **Prepare Your Seed Starting Trays:** Fill your seed starting trays or small pots with seed starting mix. Gently press the mix down to remove any air pockets.
2. **Sow the Seeds:** Make a small indentation (about ¼ inch deep) in the center of each cell or pot. Place one or two Brussels sprouts seeds in each indentation.
3. **Cover the Seeds:** Lightly cover the seeds with more seed starting mix.
4. **Water Gently:** Use a spray bottle to gently moisten the soil. You want it to be damp, but not soggy.
5. **Provide Warmth and Light:** Place the trays or pots in a warm location (around 70-75°F or 21-24°C). You can use a heat mat to speed up germination. Place the trays under grow lights, keeping the lights a few inches above the soil surface.
6. **Maintain Moisture:** Keep the soil consistently moist by misting it with water whenever the surface feels dry.
7. **Wait for Germination:** Brussels sprouts seeds typically germinate in 5-10 days.
Phase 2: Nurturing the Seedlings
Once your seeds have sprouted, it’s time to give them some extra TLC.
1. **Thin the Seedlings:** If you planted two seeds per cell or pot and both germinated, thin them out by snipping off the weaker seedling at the soil line. This will give the remaining seedling more room to grow.
2. **Adjust the Grow Lights:** As the seedlings grow, adjust the height of the grow lights to keep them a few inches above the plants.
3. **Water Regularly:** Water the seedlings whenever the top inch of soil feels dry. Avoid overwatering, as this can lead to root rot.
4. **Fertilize Lightly:** Once the seedlings have their first set of true leaves (the leaves that look like miniature Brussels sprouts leaves), start fertilizing them with a diluted liquid fertilizer. Follow the instructions on the fertilizer label.
5. **Provide Air Circulation:** Use a small fan to gently circulate the air around the seedlings. This will help prevent fungal diseases and strengthen the stems.
Phase 3: Transplanting to Larger Pots
When your seedlings are about 4-6 inches tall and have a few sets of true leaves, it’s time to transplant them to their permanent homes.
1. **Prepare the Larger Pots:** Fill the larger pots (at least 12 inches in diameter) with potting soil.
2. **Carefully Remove the Seedlings:** Gently remove the seedlings from their seed starting trays or small pots. Be careful not to damage the roots.
3. **Plant the Seedlings:** Make a hole in the center of each pot that’s large enough to accommodate the seedling’s root ball. Place the seedling in the hole and gently backfill with potting soil.
4. **Water Thoroughly:** Water the transplanted seedlings thoroughly.
5. **Place Under Grow Lights:** Return the pots to their location under the grow lights.
Phase 4: Ongoing Care
Now that your Brussels sprouts plants are in their permanent homes, it’s time to provide them with the ongoing care they need to thrive.
1. **Light:** Brussels sprouts need at least 6-8 hours of light per day. If you’re using grow lights, keep them on for 14-16 hours per day.
2. **Watering:** Water your plants whenever the top inch of soil feels dry. Avoid overwatering, as this can lead to root rot.
3. **Fertilizing:** Fertilize your plants every 2-3 weeks with a balanced liquid fertilizer. Follow the instructions on the fertilizer label.
4. **Temperature:** Brussels sprouts prefer cool temperatures (60-70°F or 15-21°C). Avoid exposing them to temperatures above 80°F (27°C).
5. **Humidity:** Brussels sprouts prefer moderate humidity. If the air in your home is very dry, you can increase the humidity by placing a tray of water near the plants or using a humidifier.
6. **Air Circulation:** Continue to provide good air circulation around your plants to prevent fungal diseases.
7. **Pest Control:** Keep an eye out for pests like aphids, cabbage worms, and whiteflies. If you find any pests, you can control them with insecticidal soap or neem oil.
8. **Support:** As your Brussels sprouts plants grow taller, they may need some support. You can use stakes or tomato cages to keep them from falling over.
Phase 5: Harvesting Your Brussels Sprouts
The moment we’ve all been waiting for! Harvesting your homegrown Brussels sprouts.
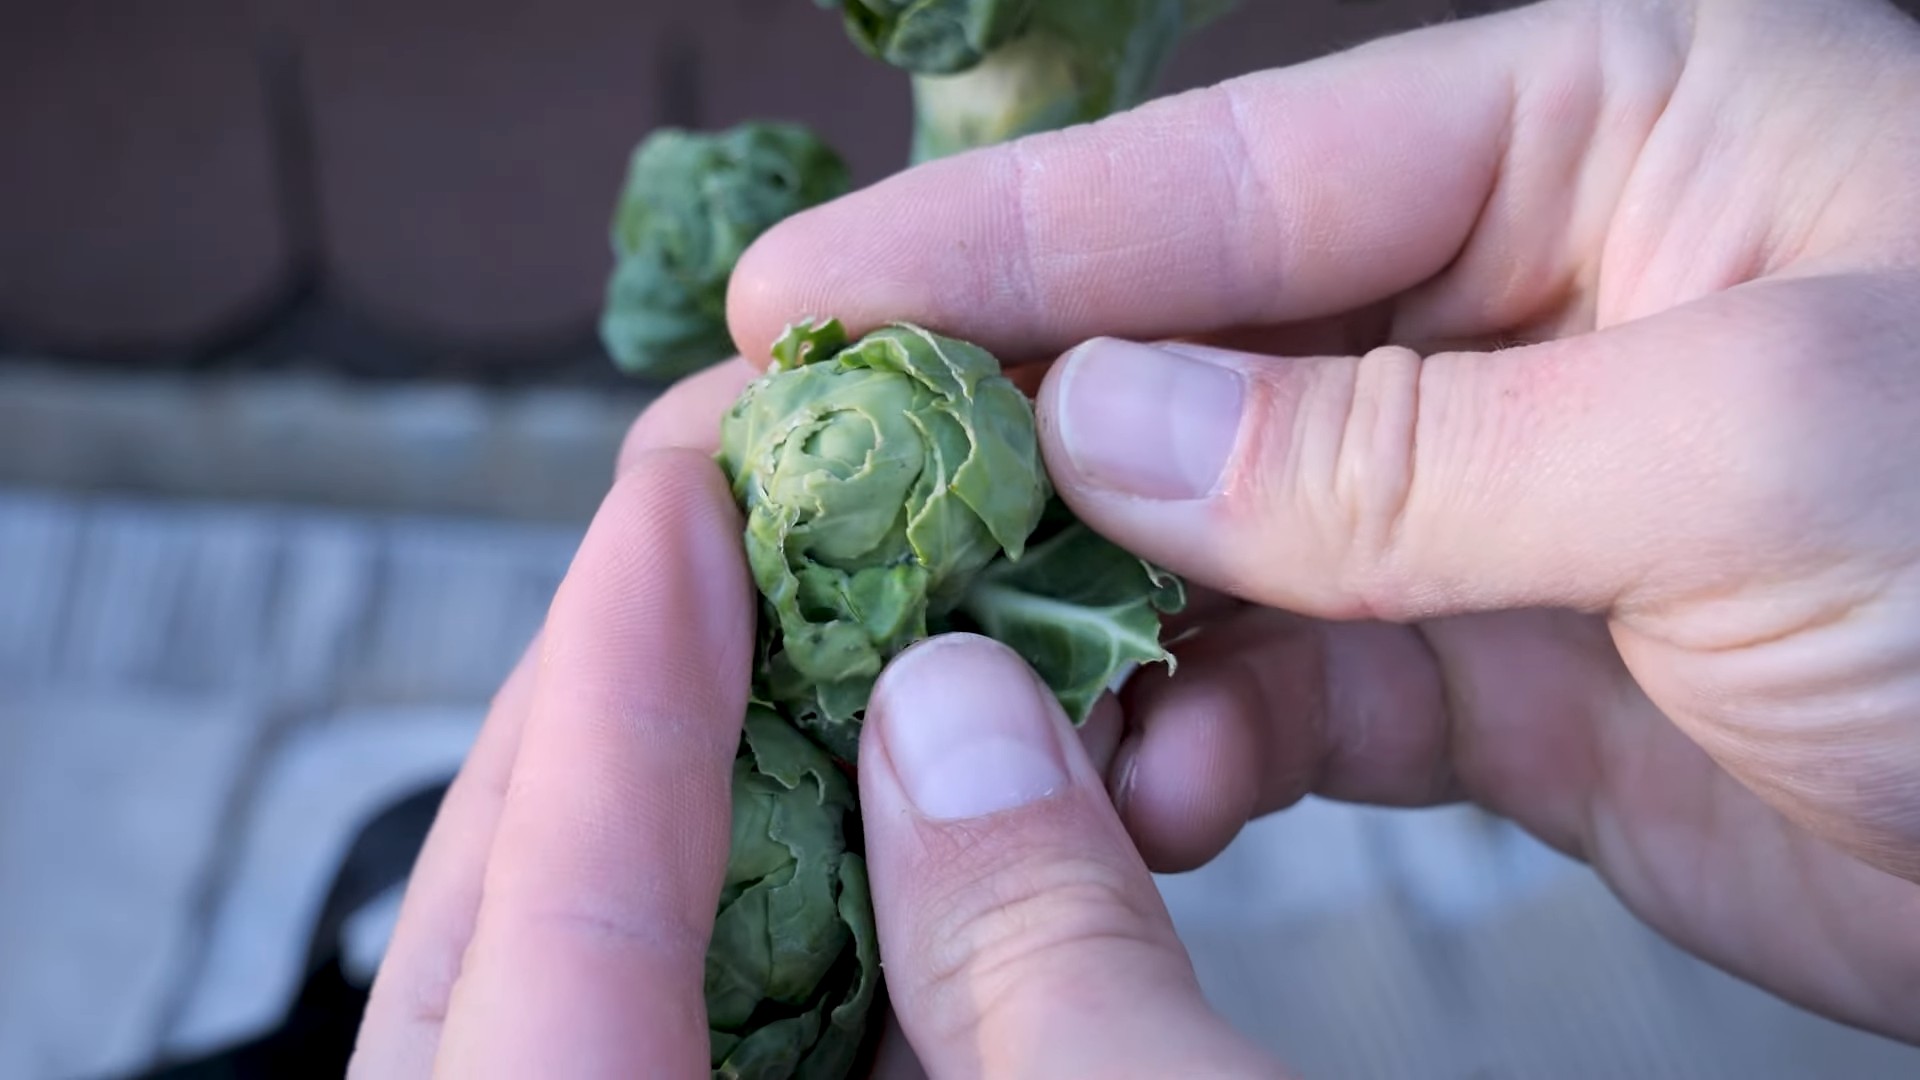
1. **Timing:** Brussels sprouts are typically ready to harvest about 90-100 days after planting. The sprouts should be firm, green, and about 1-2 inches in diameter.
2. **Harvesting:** Start harvesting the sprouts from the bottom of the plant first. Twist or cut them off the stem.
3. **Continued Harvest:** Continue to harvest the sprouts as they mature. The plant will continue to produce sprouts until the top of the plant starts to bolt (produce flowers).
4. **Storage:** Freshly harvested Brussels sprouts can be stored in the refrigerator for up to a week.
Troubleshooting
Even with the best care, you might encounter some problems along the way. Here are a few common issues and how to address them:
* **Yellowing Leaves:** This could be a sign of overwatering, underwatering, or nutrient deficiency. Check the soil moisture and adjust your watering accordingly. Fertilize your plants with a balanced liquid fertilizer.
* **Leggy Seedlings:** This is usually caused by insufficient light. Make sure your seedlings are getting enough light from your grow lights.
* **Sprouts Not Forming:** This could be due to high temperatures, insufficient light, or nutrient deficiency. Make sure your plants are getting enough light and nutrients, and try to keep them in a cool location.
* **Pests:** Regularly inspect your plants for pests and take action as soon as you see them.
Choosing the Right Brussels Sprouts Variety
Selecting the right variety is crucial for indoor success. Here are a few recommendations:
* **’Dwarf Improved’:** As the name suggests, this variety is compact and well-suited for container gardening. It produces small to medium-sized sprouts with a mild flavor.
* **’Long Island Improved’:** Another compact variety that’s known for its reliable yields. It produces medium-sized sprouts with a slightly nutty flavor.
* **’Redarling’:** If you’re looking for something a little different, try ‘Redarling’. This variety produces beautiful red-purple sprouts that are packed with antioxidants.
Tips for Success
Here are a few extra tips to help you grow the best Brussels sprouts possible:
* **Rotate Your Crops:** If you’re growing Brussels sprouts in the same pots year after year, rotate them with other crops to prevent soilborne diseases.
* **Improve Air Circulation:** Good air circulation is essential for preventing fungal diseases. Use a small fan to gently circulate the air around your plants.
* **Monitor Soil pH:** Brussels sprouts prefer a slightly acidic soil pH (around 6.0-6.8). You can test your soil pH with
Conclusion
So, there you have it! Growing Brussels sprouts in your kitchen, while seemingly unconventional, is a surprisingly rewarding and sustainable way to enjoy fresh, homegrown vegetables year-round. This DIY trick isn’t just about saving money; it’s about connecting with your food, reducing your carbon footprint, and experiencing the sheer joy of nurturing life from a tiny seed to a plate full of delicious Brussels sprouts.
Why is this a must-try? Because it puts you in control. You dictate the growing conditions, ensuring your sprouts are free from harmful pesticides and herbicides. You harvest them at their peak freshness, maximizing their flavor and nutritional value. And you do it all from the comfort of your own home, regardless of the weather outside.
But the benefits don’t stop there. This method is incredibly space-efficient, making it perfect for apartment dwellers or anyone with limited outdoor gardening space. It’s also a fantastic educational opportunity, especially for children, teaching them about plant life cycles and the importance of sustainable food practices.
Ready to experiment? Consider these variations to personalize your indoor Brussels sprouts garden:
* Hydroponics: For a soil-free approach, try growing your sprouts hydroponically. This method involves suspending the roots in nutrient-rich water, allowing for faster growth and higher yields.
* Vertical Gardening: Maximize your space by creating a vertical Brussels sprouts garden using stacked planters or hanging baskets. This adds a visually appealing element to your kitchen while increasing your growing capacity.
* Companion Planting: Introduce companion plants like marigolds or basil to deter pests and attract beneficial insects. These plants can also enhance the flavor of your Brussels sprouts.
* Different Varieties: Explore different varieties of Brussels sprouts to find your favorite flavor profile. Some varieties are sweeter, while others have a more robust, earthy taste.
Ultimately, the success of your indoor Brussels sprouts garden depends on your dedication and willingness to learn. Don’t be afraid to experiment, adapt, and troubleshoot along the way. The journey is just as rewarding as the destination.
We wholeheartedly encourage you to give this DIY trick a try. Imagine the satisfaction of serving a meal featuring Brussels sprouts you grew yourself, knowing exactly where they came from and how they were nurtured. It’s a truly empowering and fulfilling experience.
Once you’ve embarked on your indoor Brussels sprouts adventure, we’d love to hear about your experience! Share your tips, tricks, and triumphs in the comments below. Let’s build a community of indoor gardeners and inspire others to embrace the joy of growing their own food. Let us know what kind of soil you used, what kind of light you used, and how long it took for your sprouts to mature. Your insights could be invaluable to someone just starting out. So, grab your seeds, prepare your soil, and get ready to grow Brussels sprouts right in your kitchen!
Frequently Asked Questions (FAQ)
Q: What is the best time of year to start growing Brussels sprouts indoors?
A: While you can technically start growing Brussels sprouts indoors any time of year, the ideal time is typically late winter or early spring. This allows you to get a head start on the growing season and potentially transplant your seedlings outdoors once the weather warms up, if you choose to. Starting indoors also gives you more control over the growing environment, protecting your young plants from harsh weather conditions. However, with proper lighting and temperature control, you can successfully grow Brussels sprouts indoors year-round.
Q: How much light do Brussels sprouts need when grown indoors?
A: Brussels sprouts require a significant amount of light to thrive, typically 6-8 hours of direct sunlight per day. When growing indoors, this can be challenging to achieve naturally, especially during the winter months. Therefore, it’s highly recommended to supplement natural light with artificial grow lights. LED grow lights are an excellent option as they are energy-efficient and provide the full spectrum of light that plants need for photosynthesis. Position the grow lights close enough to the plants (but not too close to burn them) to ensure they receive adequate illumination. Monitor your plants closely and adjust the lighting as needed based on their growth and development. If the leaves are pale or leggy, it’s a sign that they need more light.
Q: What type of soil is best for growing Brussels sprouts in containers?
A: Brussels sprouts prefer well-draining, fertile soil that is rich in organic matter. A good potting mix specifically formulated for vegetables is an excellent choice. You can also create your own soil mix by combining equal parts of compost, peat moss (or coconut coir), and perlite or vermiculite. Compost provides essential nutrients, peat moss or coconut coir helps retain moisture, and perlite or vermiculite improves drainage. Avoid using garden soil in containers, as it can become compacted and doesn’t drain well, which can lead to root rot. Ensure the soil pH is slightly acidic to neutral, ideally between 6.0 and 7.0. You can test the soil pH using a soil testing kit and amend it as needed with lime (to raise the pH) or sulfur (to lower the pH).
Q: How often should I water my indoor Brussels sprouts plants?
A: The watering frequency for indoor Brussels sprouts plants depends on several factors, including the size of the container, the type of soil, the temperature, and the humidity. As a general rule, water thoroughly when the top inch of soil feels dry to the touch. Avoid overwatering, as this can lead to root rot. Ensure the container has drainage holes to allow excess water to escape. During hot and dry periods, you may need to water more frequently. Conversely, during cooler and more humid periods, you may need to water less frequently. Monitor the soil moisture regularly and adjust your watering schedule accordingly. A moisture meter can be a helpful tool for determining when to water.
Q: How do I fertilize my indoor Brussels sprouts plants?
A: Brussels sprouts are heavy feeders and require regular fertilization to support their growth and development. Start fertilizing your plants about two weeks after they emerge from the soil. Use a balanced liquid fertilizer specifically formulated for vegetables, following the instructions on the label. Alternatively, you can use a slow-release granular fertilizer that is incorporated into the soil at planting time. Fertilize every two to three weeks during the growing season. As the plants begin to form sprouts, switch to a fertilizer that is higher in potassium, which promotes sprout development. Avoid over-fertilizing, as this can lead to excessive foliage growth and reduced sprout production.
Q: How long does it take for Brussels sprouts to mature when grown indoors?
A: The time it takes for Brussels sprouts to mature when grown indoors can vary depending on the variety, the growing conditions, and the care provided. Generally, it takes about 80 to 100 days from seed to harvest. However, some varieties may mature faster, while others may take longer. Provide your plants with optimal growing conditions, including adequate light, water, nutrients, and temperature, to ensure they mature as quickly as possible. Monitor the sprouts closely and harvest them when they are firm, green, and about 1 to 1.5 inches in diameter.
Q: What are some common pests and diseases that affect indoor Brussels sprouts plants?
A: While growing Brussels sprouts indoors can help reduce the risk of pest and disease problems, they are still susceptible to certain issues. Common pests that may affect indoor Brussels sprouts plants include aphids, spider mites, and whiteflies. These pests can be controlled with insecticidal soap or neem oil. Common diseases that may affect indoor Brussels sprouts plants include powdery mildew and root rot. Powdery mildew can be prevented by ensuring good air circulation and avoiding overhead watering. Root rot can be prevented by avoiding overwatering and using well-draining soil. Regularly inspect your plants for signs of pests or diseases and take action promptly to prevent them from spreading.
Q: Can I transplant my indoor Brussels sprouts seedlings outdoors?
A: Yes, you can transplant your indoor Brussels sprouts seedlings outdoors once the weather warms up and the risk of frost has passed. Before transplanting, harden off the seedlings by gradually exposing them to outdoor conditions for a week or two. Start by placing them in a sheltered location for a few hours each day, gradually increasing the amount of time they spend outdoors. Choose a sunny location with well-draining soil for transplanting. Space the plants about 18 to 24 inches apart. Water the plants thoroughly after transplanting and protect them from strong winds and direct sunlight for a few days.
Q: How do I harvest Brussels sprouts?
A: Brussels sprouts are typically harvested from the bottom of the plant upwards. The sprouts are ready to harvest when they are firm, green, and about 1 to 1.5 inches in diameter. To harvest, simply twist or snap the sprouts off the stem. You can harvest the sprouts over a period of several weeks as they mature. After harvesting the sprouts, you can store them in the refrigerator for up to a week.

Leave a Comment