
Microwave cooking tips and tricks – are you ready to unlock the full potential of that unassuming appliance sitting on your kitchen counter? For years, the microwave has been relegated to reheating leftovers and popping popcorn, but I’m here to tell you it’s capable of so much more! Think of it as your secret weapon for quick, easy, and surprisingly delicious meals.
While the microwave might seem like a modern invention, its roots actually trace back to the 1940s, born from radar technology during World War II. Imagine, a technology initially designed for defense now helping us whip up a speedy dinner! Over the decades, it’s become a staple in homes worldwide, saving us precious time and energy.
But let’s be honest, how many times have you ended up with a rubbery chicken breast or a soggy plate of vegetables? That’s where these microwave cooking tips and tricks come in. In this article, I’m going to share my favorite hacks to transform your microwave cooking experience. From perfectly steamed veggies to surprisingly fluffy cakes, you’ll learn how to avoid common pitfalls and create amazing meals in minutes. Because let’s face it, we all need a little help in the kitchen, especially when time is of the essence!
Harvesting Backyard Zucchini: A Beginner’s Guide
Okay, so you’ve got zucchini plants bursting with, well, zucchini! That’s fantastic! But knowing when and how to harvest them is key to enjoying their delicious flavor and keeping your plants producing. Trust me, letting them get too big is a common mistake, and nobody wants a giant, seedy, flavorless zucchini. Let’s dive into how to harvest your backyard zucchini like a pro.
Knowing When to Harvest
This is probably the most crucial part. Size matters, but so does the overall appearance.
* Size: Generally, you want to harvest zucchini when they’re between 6-8 inches long. This is when they’re at their peak tenderness and flavor. Some varieties might be best a little smaller or larger, so check your seed packet or plant tag for specific recommendations.
* Skin: The skin should be smooth, firm, and a deep, consistent color. Avoid zucchini with dull, wrinkled, or blemished skin.
* Fingernail Test: Gently press your fingernail into the skin. If it easily punctures, it’s ready to harvest. If it’s tough and resistant, give it a few more days.
* Frequency: Check your plants every day or two, especially during peak growing season. Zucchini can grow incredibly fast, and you don’t want to miss the window of opportunity.
Tools You’ll Need
You don’t need a ton of fancy equipment for this, thankfully!
* Sharp Knife or Pruning Shears: A sharp blade is essential for a clean cut. Dull tools can damage the plant and make it more susceptible to disease.
* Gloves (Optional): Zucchini plants can sometimes have prickly stems, so gloves can protect your hands.
* Basket or Bag: To carry your harvest!
The Harvesting Process: Step-by-Step
Alright, let’s get down to the nitty-gritty. Here’s how I harvest my zucchini:
1. Identify the Zucchini: Choose the zucchini that meet the criteria we discussed earlier – the right size, smooth skin, and passes the fingernail test.
2. Position Yourself Carefully: Get close to the plant, being mindful of any prickly leaves or stems. You want to have a clear view of where the zucchini stem connects to the main plant.
3. Make the Cut: Using your sharp knife or pruning shears, make a clean, angled cut through the stem about 2-3 inches away from the zucchini. This leaves a little bit of stem attached, which helps prevent rot and extends the zucchini’s shelf life.
4. Support the Zucchini: As you cut, support the zucchini with your other hand to prevent it from falling and bruising.
5. Inspect the Cut End: Make sure the cut is clean and free of any ragged edges. If necessary, trim it up a bit.
6. Place in Basket/Bag: Gently place the harvested zucchini in your basket or bag. Avoid piling them on top of each other, as this can cause bruising.
7. Repeat: Continue harvesting any other zucchini that are ready.
8. Check the Plant: After harvesting, take a quick look at the plant for any signs of pests or diseases. Addressing these issues early can prevent them from spreading.
Dealing with Overgrown Zucchini (It Happens!)
Okay, so maybe you missed a few days and now you have a zucchini the size of a small child. Don’t panic! It happens to the best of us. While it might not be as tender as a smaller zucchini, it’s still usable.
* Seeds: The biggest issue with overgrown zucchini is the large, tough seeds. You’ll need to scoop these out before cooking.
* Texture: The flesh will be less tender and more watery. You might want to grate it and squeeze out the excess moisture before using it in recipes.
* Uses: Overgrown zucchini are great for making zucchini bread, muffins, or soup. The strong flavor and texture are less noticeable in these dishes. You can also shred it and freeze it for later use.
Encouraging Continued Production
Harvesting regularly is the best way to encourage your zucchini plants to keep producing. When you leave zucchini on the vine for too long, the plant thinks it has completed its mission of producing seeds and slows down or stops producing new fruit.
* Regular Harvesting: As mentioned, check your plants every day or two and harvest any zucchini that are ready.
* Fertilizing: Zucchini plants are heavy feeders, so make sure they’re getting enough nutrients. Use a balanced fertilizer according to the package directions.
* Watering: Water deeply and regularly, especially during hot, dry weather. Aim for about an inch of water per week.
* Sunlight: Zucchini plants need at least 6 hours of sunlight per day.
Storing Your Harvest
Proper storage is key to keeping your zucchini fresh and delicious.
* Refrigeration: Store zucchini in the refrigerator crisper drawer. They’ll last for about a week.
* Avoid Washing: Don’t wash zucchini until you’re ready to use them. Washing them beforehand can promote rot.
* Freezing: If you have a bumper crop, you can freeze zucchini for later use. Wash, trim, and slice or grate the zucchini. Blanch it in boiling water for 1-2 minutes, then immediately plunge it into ice water to stop the cooking process. Drain well and pack into freezer bags or containers. Frozen zucchini is best used in cooked dishes, as it will be softer than fresh zucchini.
Troubleshooting Common Problems
Sometimes, things don’t go exactly as planned. Here are a few common problems you might encounter:
* Blossom End Rot: This is a condition where the blossom end of the zucchini turns brown and rots. It’s usually caused by a calcium deficiency or inconsistent watering. Make sure your plants are getting enough calcium and water regularly.
* Powdery Mildew: This is a fungal disease that causes a white, powdery coating on the leaves. Improve air circulation around the plants and treat with a fungicide if necessary.
* Squash Vine Borers: These pests can tunnel into the stems of zucchini plants and kill them. Look for small holes in the stems and treat with an insecticide if necessary. You can also try wrapping the base of the stems with aluminum foil to prevent the borers from laying their eggs.
Zucchini Recipe Ideas
Now that you’ve harvested your zucchini, it’s time to get cooking! Here are a few of my favorite zucchini recipes:
* Zucchini Bread: A classic for a reason! It’s moist, delicious, and a great way to use up a lot of zucchini.
* Zucchini Fritters: These are crispy, savory, and perfect as an appetizer or side dish.
* Zucchini Noodles (Zoodles): A healthy and delicious alternative to pasta.
* Stuffed Zucchini: Hollow out zucchini and fill them with a mixture of meat, rice, and vegetables.
* Grilled Zucchini: Simple, flavorful, and perfect for summer barbecues. Just slice them lengthwise, brush with olive oil, and grill until tender.
Final Thoughts
Harvesting zucchini is a rewarding experience. With a little knowledge and practice, you’ll be enjoying fresh, delicious zucchini from your backyard garden all season long. Happy gardening!
Conclusion
So, there you have it! Mastering these microwave cooking tips and tricks can truly revolutionize your kitchen routine. No longer will your microwave be relegated to reheating leftovers or popping popcorn. It can become a powerful ally in creating delicious, quick, and even healthy meals. The beauty of these techniques lies in their simplicity and adaptability. They’re designed to make your life easier, not harder.
Think about the possibilities! Imagine whipping up a perfectly steamed salmon fillet in minutes, or creating a fluffy baked potato without ever turning on your oven. Envision melting chocolate without the risk of burning, or proofing dough in record time. These are just a few examples of how these microwave cooking tips can transform your cooking experience.
But the real magic happens when you start experimenting and personalizing these techniques. Try adding different herbs and spices to your steamed vegetables. Experiment with various cheeses when melting for nachos or quesadillas. Use different types of potatoes for your baked potato experiment. The possibilities are endless!
Don’t be afraid to make mistakes. Cooking is a journey, and every mishap is a learning opportunity. The microwave can be a forgiving appliance, and with a little practice, you’ll be amazed at what you can achieve.
We wholeheartedly encourage you to try these microwave cooking tips and tricks. Start with something simple, like reheating a slice of pizza or steaming some broccoli. As you gain confidence, move on to more complex recipes.
And most importantly, share your experiences with us! We’d love to hear about your successes, your challenges, and any variations you discover along the way. Leave a comment below, tag us on social media, or send us an email. Your feedback will help us continue to improve and refine these techniques, and it will inspire others to embark on their own microwave cooking adventures.
Ultimately, the goal is to make cooking more enjoyable and accessible for everyone. These microwave cooking tips are a step in that direction. So, grab your microwave, gather your ingredients, and get ready to unlock a whole new world of culinary possibilities. You might just surprise yourself with what you can create!
Frequently Asked Questions (FAQ)
Q: What types of containers are safe to use in the microwave?
A: This is a crucial question! Always prioritize microwave-safe containers. Look for containers specifically labeled as “microwave-safe.” These are typically made of glass, ceramic, or certain types of plastic designed to withstand microwave radiation without leaching harmful chemicals into your food. Avoid using metal containers, aluminum foil (unless specifically instructed in a recipe and used very carefully to shield certain areas), or containers with metallic trim, as these can cause sparks and potentially damage your microwave. Single-use plastic containers, like those from takeout, are generally not microwave-safe and should be avoided. When in doubt, err on the side of caution and use a glass or ceramic container.
Q: How do I prevent food from exploding in the microwave?
A: Food explosions in the microwave are a common and frustrating occurrence. The key is to release steam and prevent pressure buildup. For foods with skins, like potatoes, sweet potatoes, or tomatoes, pierce them several times with a fork before microwaving. This allows steam to escape. When reheating liquids, such as soups or sauces, stir them frequently during the heating process. This helps distribute the heat evenly and prevents superheating, which can cause the liquid to erupt violently. Covering food with a microwave-safe lid or plastic wrap (with a small vent) can also help retain moisture and prevent splattering, but be sure to leave a small opening for steam to escape.
Q: How do I ensure food is cooked evenly in the microwave?
A: Uneven cooking is a common complaint with microwave ovens. Several factors contribute to this issue. First, ensure your food is arranged in a single layer, rather than piled on top of each other. This allows the microwaves to reach all parts of the food more effectively. Second, use a microwave-safe turntable if your microwave has one. This helps rotate the food and ensures more even exposure to the microwaves. Third, stir or rotate the food halfway through the cooking time. This helps distribute the heat and prevents some areas from overcooking while others remain undercooked. For thicker items, like chicken breasts or roasts, consider using a lower power setting and cooking for a longer period. This allows the heat to penetrate the food more evenly.
Q: Can I cook raw meat in the microwave?
A: While it is technically possible to cook raw meat in the microwave, it’s generally not recommended due to the increased risk of uneven cooking and potential foodborne illness. Microwaves cook food from the inside out, which can lead to some areas being cooked while others remain raw. If you choose to cook raw meat in the microwave, use a microwave-safe thermometer to ensure the internal temperature reaches the recommended safe minimum for that type of meat. It’s also crucial to follow a recipe specifically designed for microwave cooking, as these recipes will provide precise cooking times and instructions to minimize the risk of uneven cooking. For best results and food safety, consider cooking raw meat using more conventional methods, such as baking, grilling, or pan-frying.
Q: How do I reheat leftovers in the microwave without them drying out?
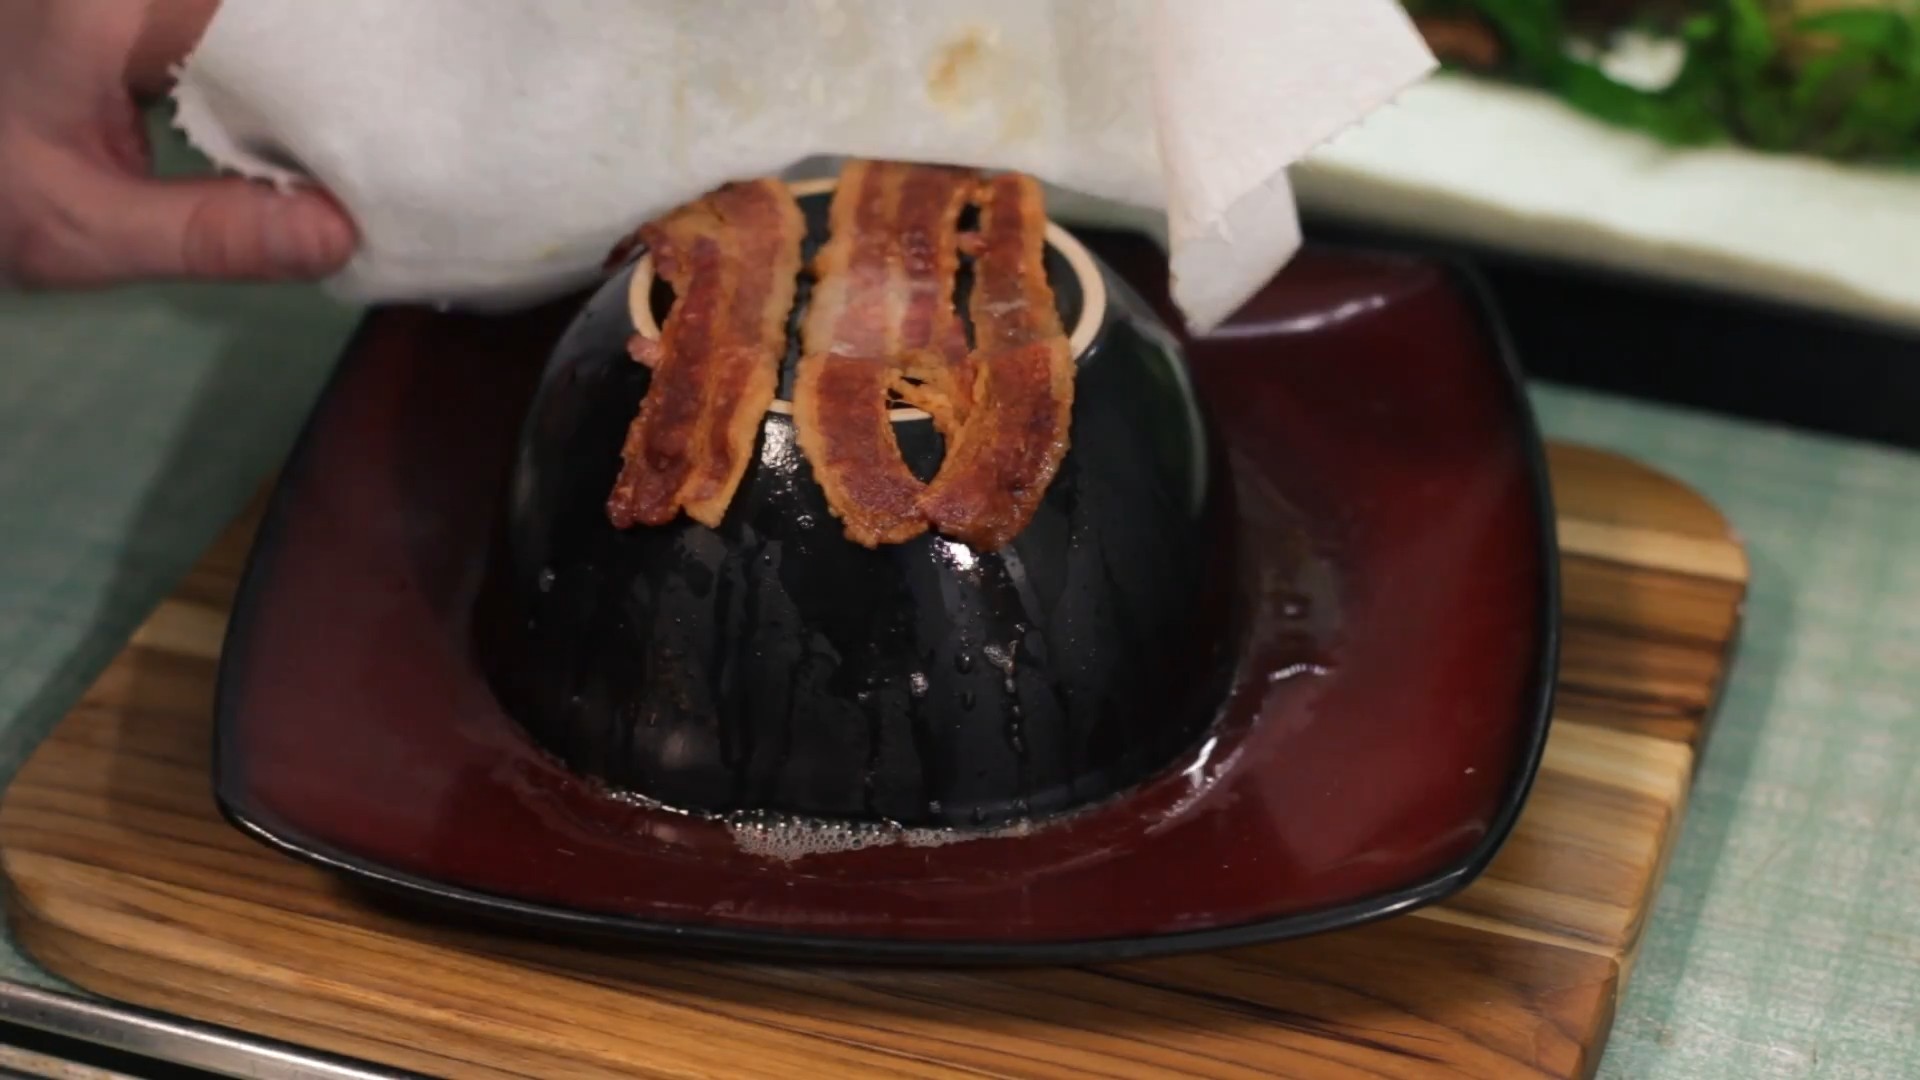
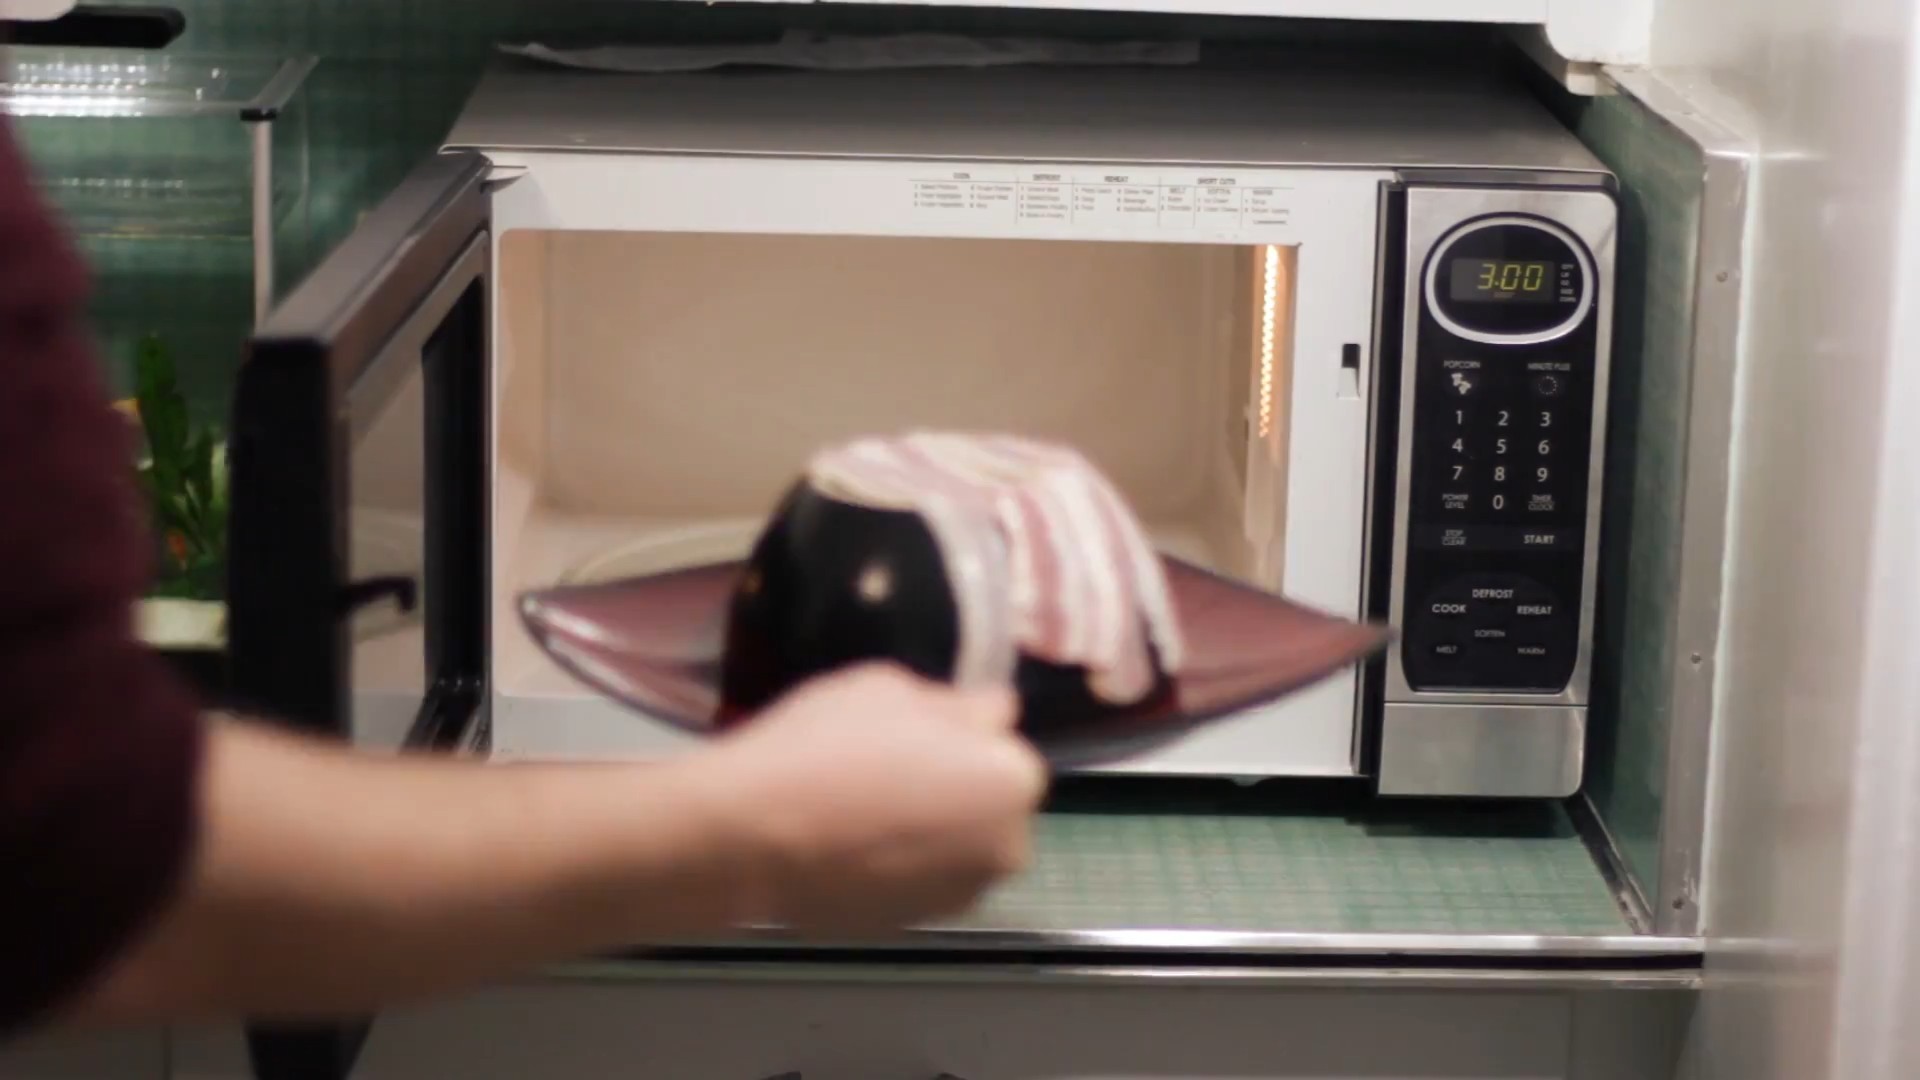
A: Reheating leftovers in the microwave can often result in dry, rubbery food. To prevent this, add a small amount of moisture to the food before reheating. This can be as simple as sprinkling a few drops of water over the food or covering it with a damp paper towel. Covering the food with a microwave-safe lid or plastic wrap (with a small vent) will also help trap moisture and prevent it from drying out. Use a lower power setting and reheat the food gradually, stirring or rotating it occasionally to ensure even heating. Avoid overcooking the food, as this will only exacerbate the dryness. For foods that are particularly prone to drying out, such as pasta or rice, consider adding a small amount of sauce or broth before reheating.
Q: How do I melt chocolate in the microwave without burning it?
A: Melting chocolate in the microwave requires a delicate touch to prevent burning. The key is to use short bursts of heat and stir frequently. Place the chocolate in a microwave-safe bowl and microwave it in 30-second intervals, stirring well after each interval. Continue this process until the chocolate is almost completely melted, then stir until the remaining pieces melt and the chocolate is smooth. Be careful not to overheat the chocolate, as this can cause it to seize up and become grainy. Adding a small amount of butter or shortening to the chocolate can help prevent it from burning and create a smoother consistency.
Q: How do I proof dough in the microwave?
A: Proofing dough in the microwave can significantly speed up the process. Fill a microwave-safe cup with 1 cup of water and microwave it on high for 2-3 minutes, or until it boils. Carefully remove the cup of water (it will be very hot!) and place the dough in a microwave-safe bowl. Cover the bowl with plastic wrap and place it in the microwave. Close the door and let the dough proof for 20-30 minutes, or until it has doubled in size. The residual heat and moisture from the boiling water will create a warm, humid environment that is ideal for proofing dough. Be sure to check the dough frequently to prevent it from overheating.


Leave a Comment