
Vinegar cleaning hacks – who knew this humble kitchen staple could be your secret weapon to a sparkling clean home? I’m always on the lookout for simple, effective, and budget-friendly ways to keep my space tidy, and let me tell you, vinegar has become my go-to solution for so many cleaning dilemmas.
For centuries, vinegar has been more than just a condiment. Ancient civilizations, from the Egyptians to the Romans, recognized its potent cleaning and preserving properties. They used it to disinfect wounds, clean surfaces, and even preserve food. Talk about a multi-tasker!
In today’s world, we’re bombarded with harsh chemicals and expensive cleaning products. But what if I told you that you could achieve the same, if not better, results with something you probably already have in your pantry? That’s where these vinegar cleaning hacks come in. From tackling stubborn stains to deodorizing your fridge, vinegar offers a natural and eco-friendly alternative to conventional cleaners. Plus, it’s incredibly affordable! Who doesn’t love saving money while keeping their home fresh and clean?
I’m excited to share my favorite DIY tricks and hacks using vinegar that will revolutionize your cleaning routine. Get ready to ditch those harsh chemicals and embrace the power of this amazing natural cleaner!
Unlocking the Cleaning Power of Vinegar: DIY Hacks for a Sparkling Home
Vinegar, that humble bottle sitting in your pantry, is a cleaning superhero in disguise! It’s cheap, eco-friendly, and surprisingly effective against a wide range of household messes. I’ve been using vinegar for years, and I’m constantly amazed by its versatility. So, let’s dive into some of my favorite DIY vinegar cleaning hacks that will leave your home sparkling without breaking the bank or harming the environment.
Descaling Your Showerhead with Vinegar
Hard water can leave unsightly mineral deposits on your showerhead, reducing water pressure and making your shower less enjoyable. But don’t worry, vinegar is here to save the day!
What you’ll need:
* White vinegar
* A plastic bag (sandwich bag or grocery bag will work)
* Rubber band or twist tie
Step-by-step instructions:
1. Prepare the vinegar bath: Pour enough white vinegar into the plastic bag to fully submerge your showerhead.
2. Secure the bag: Carefully position the bag over the showerhead, ensuring the showerhead is completely immersed in the vinegar. Use a rubber band or twist tie to tightly secure the bag around the showerhead’s neck. This will prevent leaks and keep the vinegar in contact with the mineral deposits.
3. Soak overnight: Leave the bag in place overnight (or for at least a few hours). This allows the vinegar to work its magic, dissolving the mineral buildup.
4. Remove and rinse: The next morning, remove the bag and discard the vinegar. Turn on the shower and let the water run for a few minutes to flush out any remaining vinegar and loosened deposits.
5. Wipe clean: Use a clean cloth or sponge to wipe away any lingering residue. Your showerhead should now be sparkling clean and delivering a much stronger, more satisfying spray!
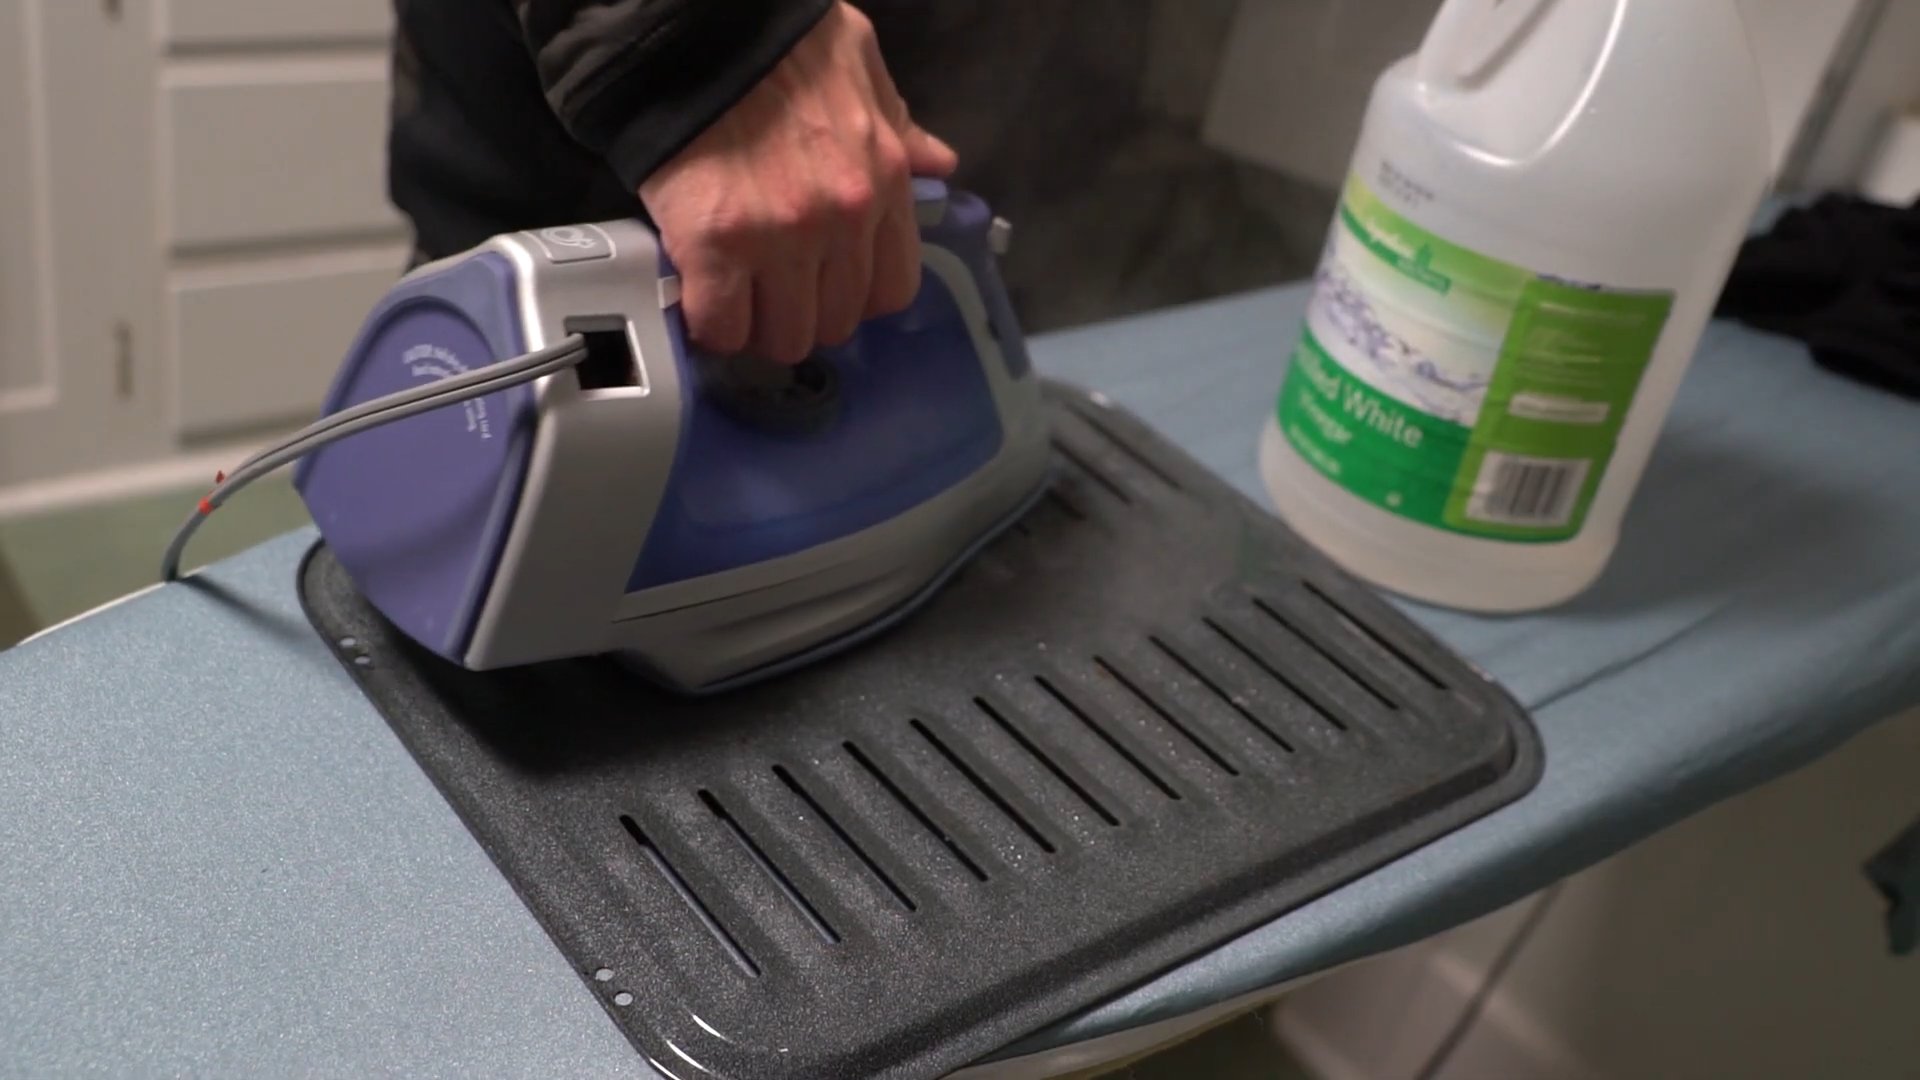
Cleaning Your Microwave with Vinegar Steam
Microwaves are notorious for accumulating splatters and spills. Cleaning them can be a chore, but this vinegar steam trick makes it a breeze.
What you’ll need:
* White vinegar
* Water
* Microwave-safe bowl
* Sponge or cloth
Step-by-step instructions:
1. Prepare the vinegar solution: In the microwave-safe bowl, mix equal parts white vinegar and water (about 1 cup of each).
2. Microwave the solution: Place the bowl in the microwave and heat on high for 5-10 minutes, or until the solution boils and the microwave is filled with steam. The steam will loosen the grime and splatters inside.
3. Let it sit: After microwaving, leave the door closed for another 2-3 minutes. This allows the steam to further penetrate the stuck-on food.
4. Wipe clean: Carefully remove the bowl (it will be hot!). Use a sponge or cloth to easily wipe away the loosened grime from the inside of the microwave. The vinegar steam will have softened everything, making it a quick and effortless task.
5. Dry and enjoy: Dry the inside of the microwave with a clean cloth. Your microwave will be clean, fresh, and ready to use!
Deodorizing Your Garbage Disposal with Vinegar Ice Cubes
A smelly garbage disposal can be a real nuisance. These vinegar ice cubes are a simple and effective way to freshen it up and break down any lingering food particles.
What you’ll need:
* White vinegar
* Ice cube tray
Step-by-step instructions:
1. Fill the ice cube tray: Pour white vinegar into an ice cube tray.
2. Freeze: Place the tray in the freezer and let the vinegar freeze completely.
3. Grind the cubes: Once frozen, drop a few vinegar ice cubes into your garbage disposal.
4. Run the disposal: Turn on the cold water and run the garbage disposal until the ice cubes are completely ground up. The frozen vinegar will help to dislodge any stuck-on food particles and neutralize odors.
5. Repeat as needed: Repeat this process as needed to keep your garbage disposal fresh and clean. I usually do this once a week.
Cleaning Your Coffee Maker with Vinegar
Over time, mineral deposits can build up in your coffee maker, affecting the taste of your coffee. Vinegar is a great way to descale your coffee maker and keep it brewing delicious coffee.
What you’ll need:
* White vinegar
* Water
Step-by-step instructions:
1. Prepare the vinegar solution: Fill the coffee maker’s water reservoir with a solution of equal parts white vinegar and water.
2. Brew halfway: Start the brewing cycle and let it run until the reservoir is about halfway empty.
3. Let it sit: Turn off the coffee maker and let the vinegar solution sit in the carafe for about 30-60 minutes. This allows the vinegar to dissolve the mineral deposits.
4. Finish brewing: Turn the coffee maker back on and let it complete the brewing cycle.
5. Rinse thoroughly: Empty the carafe and rinse it thoroughly. Fill the water reservoir with fresh water and run a full brewing cycle to rinse out any remaining vinegar. Repeat this rinsing process at least twice to ensure all traces of vinegar are gone.
6. Enjoy fresh coffee: Your coffee maker is now clean and ready to brew delicious, scale-free coffee!
Removing Water Stains from Wood Furniture with Vinegar and Olive Oil
Those pesky white rings left by water glasses on your wood furniture can be frustrating. But don’t despair! A simple mixture of vinegar and olive oil can often do the trick.
What you’ll need:
* White vinegar
* Olive oil
* Soft cloth
Step-by-step instructions:
1. Prepare the solution: Mix equal parts white vinegar and olive oil in a small bowl.
2. Apply to the stain: Dip a soft cloth into the mixture and gently rub it onto the water stain, following the grain of the wood.
3. Buff the surface: Use a clean, dry cloth to buff the area until the stain disappears and the wood is shiny.
4. Repeat if necessary: If the stain is stubborn, repeat the process.
5. Admire your restored furniture: Your wood furniture should now be free of water stains and looking its best!
Cleaning Windows and Mirrors with Vinegar
Forget expensive window cleaners! Vinegar is a fantastic, streak-free alternative for cleaning windows and mirrors.
What you’ll need:
* White vinegar
* Water
* Spray bottle
* Microfiber cloth or newspaper
Step-by-step instructions:
1. Prepare the cleaning solution: Mix equal parts white vinegar and water in a spray bottle.
2. Spray the surface: Spray the vinegar solution onto the window or mirror.
3. Wipe clean: Use a clean microfiber cloth or crumpled newspaper to wipe the surface clean. Newspaper works surprisingly well for streak-free results!
4. Dry if needed: If necessary, use a dry cloth to buff the surface and remove any remaining moisture.
5. Enjoy sparkling windows and mirrors: Your windows and mirrors will be sparkling clean and streak-free!
Removing Soap Scum from Shower Doors with Vinegar
Soap scum can be a real pain to remove from shower doors. Vinegar’s acidity helps to break down the soap scum, making it easier to wipe away.
What you’ll need:
* White vinegar
* Spray bottle
* Sponge or cloth
Step-by-step instructions:
1. Heat the vinegar (optional): For extra cleaning power, you can heat the vinegar in the microwave for a minute or two (be careful not to boil it).
2. Spray the shower doors: Pour the vinegar into a spray bottle and spray it liberally onto the shower doors, focusing on areas with heavy soap scum buildup.
3. Let it sit: Allow the vinegar to sit on the shower doors for 15-30 minutes to allow it to break down the soap scum.
4. Scrub and rinse: Use a sponge or cloth to scrub the shower doors, paying attention to stubborn areas. Rinse the doors thoroughly with water.
5. Dry and admire: Dry the shower doors with a clean cloth or squeegee. Your shower doors will be sparkling clean and free of soap scum!
Freshening Laundry with Vinegar
Vinegar can be a surprisingly effective laundry booster. It can help to brighten colors, soften fabrics, and remove odors.
What you’ll need:
* White vinegar
Step-by-step instructions:
1. Add to the wash: Add 1/2 cup of white vinegar to your washing machine’s fabric softener dispenser.
2. Wash as usual: Wash your clothes as
Conclusion
So, there you have it! This simple yet powerful **vinegar cleaning hacks** guide unlocks a world of possibilities for a sparkling clean home without harsh chemicals or breaking the bank. We’ve explored how this humble pantry staple can tackle everything from stubborn hard water stains to lingering odors, proving its versatility and effectiveness.
But why is this DIY approach a must-try? Beyond the cost savings and eco-friendliness, it’s about taking control of your cleaning routine. You know exactly what’s going into your cleaning solutions, avoiding potentially harmful ingredients found in many commercial products. Plus, there’s a certain satisfaction in creating something yourself that works so well.
The benefits are undeniable:
* Cost-Effective: Vinegar is significantly cheaper than most specialized cleaning products.
* Eco-Friendly: A natural and biodegradable alternative to harsh chemicals.
* Versatile: Cleans a wide range of surfaces and tackles various cleaning challenges.
* Safe: Generally safe for use around children and pets when diluted properly.
Now, let’s talk variations and suggestions. While white vinegar is the workhorse of these hacks, you can experiment with infused vinegars for added fragrance. Simply steep citrus peels, herbs like lavender or rosemary, or even spices like cinnamon sticks in vinegar for a few weeks. Strain before using for a subtle, natural scent boost.
For tougher stains or grime, consider increasing the concentration of vinegar in your cleaning solution. However, always test on an inconspicuous area first to ensure it doesn’t damage the surface. Baking soda is another excellent addition to your cleaning arsenal. When combined with vinegar, it creates a fizzing action that helps lift dirt and grime. Just be mindful that the reaction produces carbon dioxide, so use in a well-ventilated area.
Don’t be afraid to get creative and adapt these hacks to your specific needs and preferences. The key is to experiment and find what works best for you and your home.
We wholeheartedly encourage you to give these **vinegar cleaning hacks** a try. Start with a small project, like cleaning your microwave or descaling your showerhead, and witness the magic for yourself. We’re confident you’ll be amazed by the results.
But the journey doesn’t end here! We want to hear about your experiences. Did you discover a new and innovative way to use vinegar for cleaning? Did you encounter any challenges or have any tips to share? Please, share your thoughts, successes, and even your failures in the comments below. Your feedback will not only help us improve this guide but also inspire others to embrace the power of natural cleaning. Let’s build a community of eco-conscious cleaners, one vinegar-soaked sponge at a time!
Frequently Asked Questions
Is vinegar safe to use on all surfaces?
No, vinegar is not safe to use on all surfaces. Avoid using it on natural stone surfaces like marble, granite, and limestone, as the acidity can etch and damage them. It’s also best to avoid using vinegar on waxed wood furniture, as it can strip the wax finish. Always test vinegar on an inconspicuous area before applying it to a larger surface. Other surfaces to avoid include aluminum (can cause pitting) and electronics screens (can damage the anti-glare coating). When in doubt, consult the manufacturer’s instructions for the surface you’re cleaning.
What type of vinegar is best for cleaning?
White distilled vinegar is generally considered the best type of vinegar for cleaning. It has a high acidity level (around 5%) and is clear, so it won’t stain surfaces. Apple cider vinegar can also be used, but it has a lower acidity level and may leave a slight residue. Avoid using flavored vinegars, as they may contain sugars or other additives that can leave a sticky residue.
How do I get rid of the vinegar smell after cleaning?
The vinegar smell typically dissipates within a few hours. To speed up the process, you can open windows and doors to ventilate the area. You can also place a bowl of baking soda in the room to absorb odors. Another option is to add a few drops of essential oils, such as lemon, lavender, or eucalyptus, to your vinegar cleaning solution to mask the smell.
Can I mix vinegar with bleach?
No, never mix vinegar with bleach. This combination creates chlorine gas, which is highly toxic and can be fatal. Always use vinegar and bleach separately, and rinse surfaces thoroughly with water after using one before applying the other.
How do I clean my coffee maker with vinegar?
To clean your coffee maker with vinegar, fill the water reservoir with a solution of equal parts white vinegar and water. Run the coffee maker through a full brewing cycle. Then, run two cycles with just plain water to rinse away any remaining vinegar. This will help remove mineral buildup and improve the performance of your coffee maker.
Can vinegar kill mold?
Yes, vinegar can kill some types of mold. To kill mold with vinegar, spray undiluted white vinegar onto the affected area and let it sit for an hour. Then, scrub the area with a brush and wipe it clean with a damp cloth. Be sure to address the source of the moisture that is causing the mold growth to prevent it from returning. For severe mold infestations, it’s best to consult with a professional mold remediation service.
How do I clean my microwave with vinegar?
To clean your microwave with vinegar, combine 1 cup of water and 1/4 cup of white vinegar in a microwave-safe bowl. Microwave on high for 5-10 minutes, or until the solution boils and the microwave is filled with steam. Carefully remove the bowl and wipe down the inside of the microwave with a clean cloth. The steam will loosen any stuck-on food and make it easy to clean.
Is vinegar safe for septic systems?
Yes, vinegar is generally safe for septic systems. It’s a natural and biodegradable substance that won’t harm the bacteria in your septic tank. However, it’s important to use vinegar in moderation, as excessive amounts could potentially disrupt the balance of your septic system.
How often should I clean with vinegar?
The frequency of cleaning with vinegar depends on the area and the level of use. High-traffic areas like kitchens and bathrooms may require more frequent cleaning than other areas. As a general guideline, you can clean your kitchen counters and sinks with vinegar daily or every other day. You can clean your shower and toilet with vinegar weekly or bi-weekly.
Can I use vinegar to clean my laundry?
Yes, vinegar can be used to clean laundry. Adding 1/2 cup of white vinegar to your washing machine during the rinse cycle can help soften clothes, remove odors, and brighten colors. Vinegar can also be used to remove stains from clothing. Just be sure to test it on an inconspicuous area first to ensure it doesn’t damage the fabric.


Leave a Comment