
Growing Cape Gooseberries Home can feel like a delightful adventure, transforming your backyard into a treasure trove of tangy-sweet golden berries. Have you ever imagined plucking these little gems straight from your garden, knowing exactly where they came from and how they were grown? It’s a truly rewarding experience!
Cape Gooseberries, also known as Golden Berries or Physalis, have a fascinating history. Originating in South America, they’ve been cultivated for centuries, enjoyed for their unique flavor and medicinal properties. In some cultures, they’re even considered symbols of good luck and prosperity. I think that’s pretty neat!
But why should you bother with growing your own? Well, store-bought Cape Gooseberries can be expensive and sometimes hard to find. Plus, let’s be honest, nothing beats the taste of freshly picked, homegrown produce. Growing Cape Gooseberries Home allows you to control the entire process, ensuring you’re getting the healthiest, most delicious berries possible. In this article, I’m going to share some simple DIY tricks and hacks that will make growing these delightful fruits a breeze, even if you don’t have a green thumb. Get ready to unlock the secrets to a bountiful harvest!
Growing Cape Gooseberries: A DIY Guide to Golden Berry Goodness!
Hey there, fellow gardening enthusiasts! I’m so excited to share my experience with growing Cape Gooseberries (Physalis peruviana), also known as golden berries, Inca berries, or poha berries. These little gems are not only delicious but also surprisingly easy to grow at home. Trust me, once you taste a homegrown Cape Gooseberry, you’ll be hooked! This guide will walk you through every step, from starting seeds to harvesting your own golden bounty.
Choosing Your Growing Method: Seeds vs. Seedlings
Before we dive in, let’s talk about how you want to start your Cape Gooseberry journey. You have two main options: starting from seeds or buying seedlings.
* Starting from Seeds: This is the more economical option and allows you to choose from a wider variety of cultivars. However, it requires a bit more patience and attention.
* Buying Seedlings: This is the faster and easier option, especially if you’re short on time or new to gardening. You’ll get a head start on the growing season.
I personally prefer starting from seeds because I love the feeling of nurturing a plant from its earliest stages. But don’t worry, I’ll cover both methods in this guide!
Starting Cape Gooseberries from Seeds
If you’re like me and want to start from seeds, here’s what you need to do:
1. Gather Your Supplies:
* Cape Gooseberry seeds (available online or at your local garden center)
* Seed starting trays or small pots
* Seed starting mix (a light, well-draining mix is essential)
* Spray bottle with water
* Heat mat (optional, but helpful for germination)
* Grow light (optional, but recommended if you don’t have a sunny windowsill)
2. Sow the Seeds:
* Moisten the seed starting mix. It should be damp but not soggy.
* Fill the seed starting trays or pots with the moistened mix.
* Sprinkle the Cape Gooseberry seeds thinly over the surface of the soil. They are tiny, so don’t overcrowd them.
* Gently press the seeds into the soil. You don’t need to bury them deeply; just make sure they’re in contact with the soil.
* Lightly mist the surface with water using the spray bottle.
3. Create a Warm and Humid Environment:
* Cover the seed starting trays or pots with a clear plastic lid or plastic wrap to create a mini-greenhouse effect. This will help retain moisture and warmth.
* Place the trays or pots on a heat mat if you’re using one. The ideal germination temperature for Cape Gooseberries is around 70-75°F (21-24°C).
* If you don’t have a heat mat, place the trays or pots in a warm location, such as near a radiator or on top of your refrigerator.
4. Provide Light:
* Place the trays or pots under a grow light or on a sunny windowsill. Cape Gooseberry seeds need light to germinate.
* If using a grow light, keep it on for about 14-16 hours per day.
5. Maintain Moisture:
* Check the soil moisture daily. Keep the soil consistently moist but not waterlogged.
* Mist the surface with water as needed to prevent the soil from drying out.
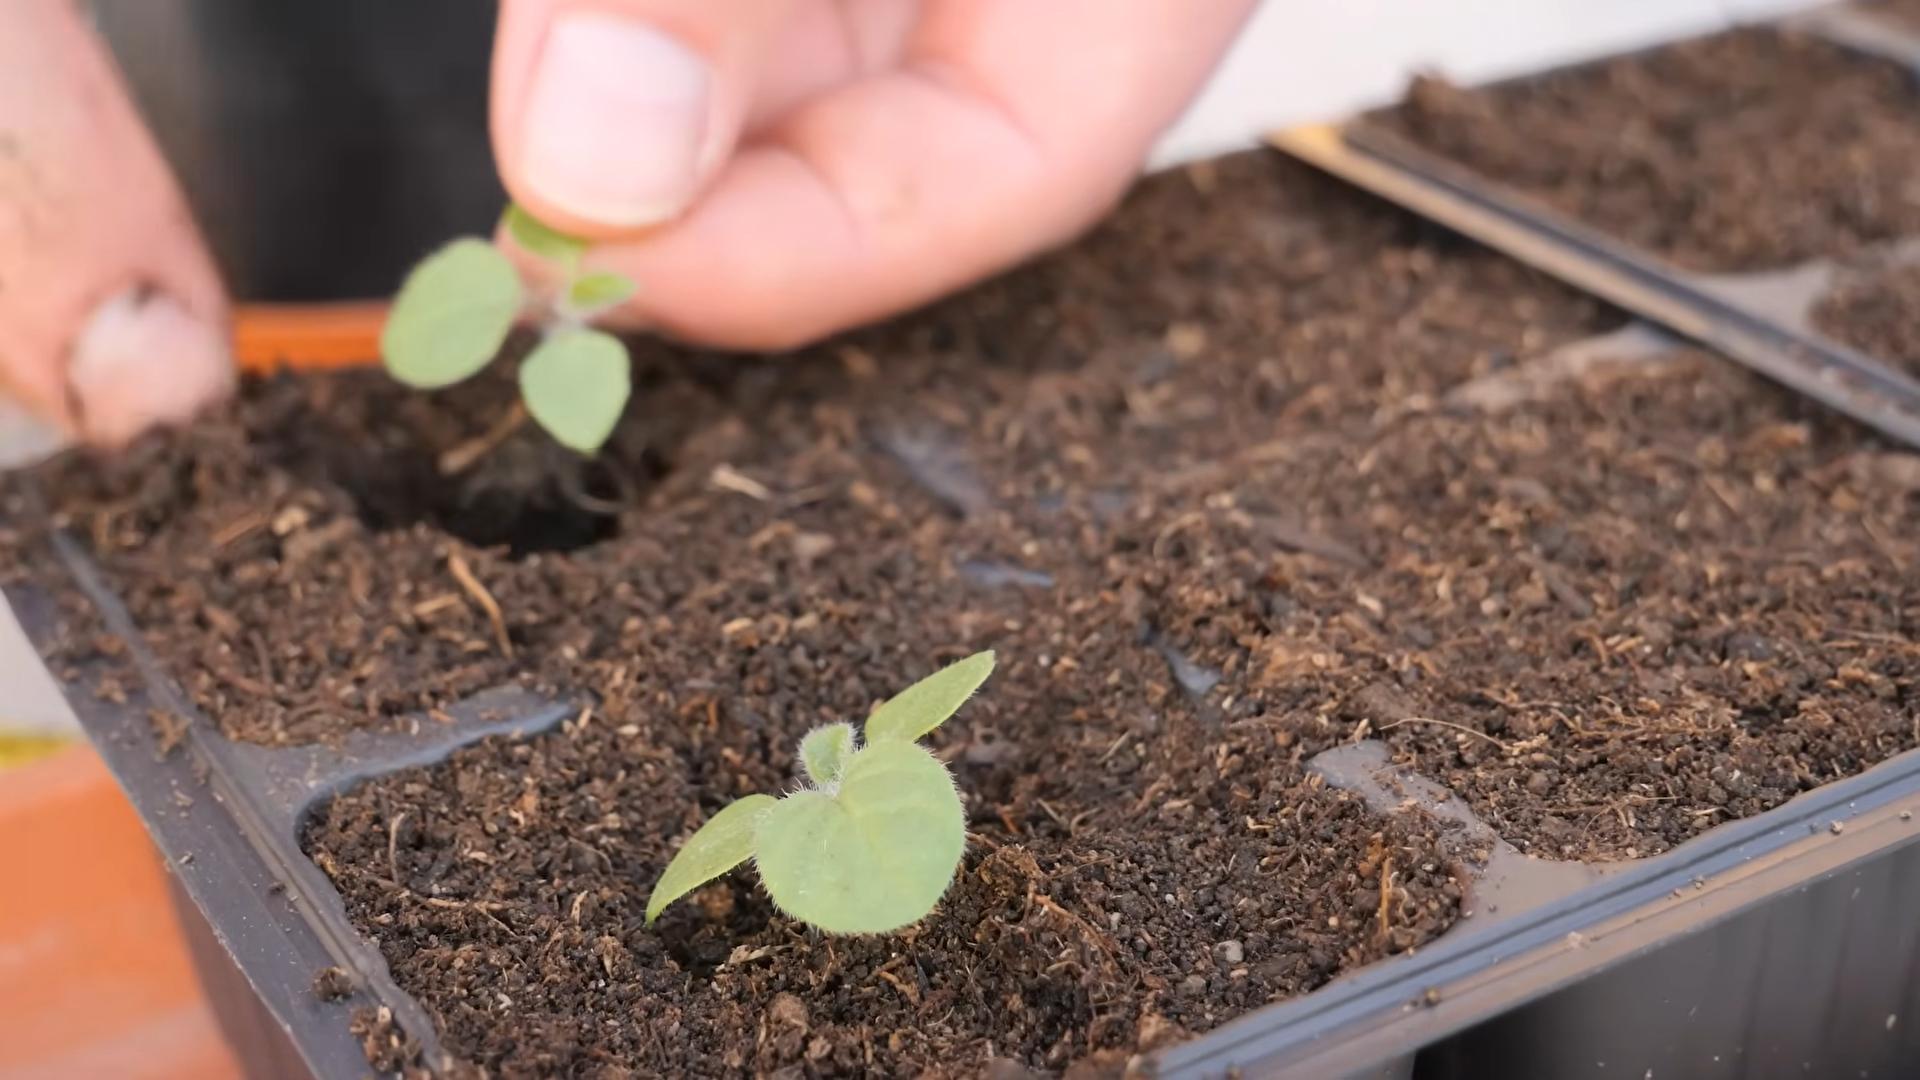
6. Wait for Germination:
* Cape Gooseberry seeds typically germinate in 10-21 days. Be patient!
* Once the seedlings emerge, remove the plastic lid or plastic wrap to allow for better air circulation.
7. Thin the Seedlings:
* Once the seedlings have developed a few sets of true leaves (the leaves that look like miniature versions of the adult plant’s leaves), thin them out so that only the strongest seedling remains in each cell or pot.
* To thin, carefully snip off the weaker seedlings at the soil line using scissors.
Caring for Cape Gooseberry Seedlings
Now that your seedlings have sprouted, it’s time to give them some extra TLC:
1. Provide Adequate Light:
* Continue to provide plenty of light, either from a grow light or a sunny windowsill.
* Rotate the seedlings regularly to ensure that they receive even light exposure on all sides. This will prevent them from becoming leggy and weak.
2. Water Regularly:
* Water the seedlings when the top inch of soil feels dry to the touch.
* Avoid overwatering, as this can lead to root rot.
3. Fertilize Sparingly:
* Once the seedlings have developed a few sets of true leaves, you can start fertilizing them with a diluted liquid fertilizer.
* Use a balanced fertilizer (e.g., 10-10-10) and dilute it to half strength.
* Fertilize every 2-3 weeks.
4. Harden Off the Seedlings:
* Before transplanting the seedlings outdoors, you need to harden them off. This process gradually acclimates them to the outdoor environment.
* Start by placing the seedlings outdoors in a sheltered location for a few hours each day.
* Gradually increase the amount of time they spend outdoors each day, and expose them to more sunlight and wind.
* After about a week or two, the seedlings should be fully hardened off and ready to be transplanted.
Transplanting Cape Gooseberry Seedlings or Planting Store-Bought Seedlings
Whether you started from seed or bought seedlings, the transplanting process is the same:
1. Choose a Sunny Location:
* Cape Gooseberries need at least 6-8 hours of sunlight per day to thrive.
* Choose a location in your garden that receives plenty of sunlight.
2. Prepare the Soil:
* Cape Gooseberries prefer well-draining soil that is rich in organic matter.
* Amend the soil with compost or other organic matter before planting.
* The ideal soil pH for Cape Gooseberries is between 6.0 and 7.0.
3. Dig the Planting Holes:
* Dig planting holes that are slightly larger than the root balls of the seedlings.
* Space the holes about 2-3 feet apart.
4. Transplant the Seedlings:
* Gently remove the seedlings from their pots or trays.
* Loosen the root ball slightly.
* Place the seedlings in the planting holes and backfill with soil.
* Water thoroughly.
5. Add Support (Optional):
* Cape Gooseberry plants can become quite bushy and may benefit from support.
* You can use stakes, cages, or trellises to support the plants.
Caring for Mature Cape Gooseberry Plants
Once your Cape Gooseberry plants are established, here’s how to keep them happy and productive:
1. Water Regularly:
* Water the plants deeply and regularly, especially during dry periods.
* Avoid overhead watering, as this can promote fungal diseases.
2. Fertilize Regularly:
* Fertilize the plants every 4-6 weeks with a balanced fertilizer.
* You can also use a fertilizer specifically formulated for tomatoes or peppers, as these plants have similar nutrient requirements.
3. Prune as Needed:
* Cape Gooseberry plants can become quite bushy, so pruning may be necessary to improve air circulation and light penetration.
* Remove any dead, damaged, or diseased branches.
* You can also prune the plants to shape them and control their size.
4. Control Pests and Diseases:
* Cape Gooseberries are generally resistant to pests and diseases, but they can be susceptible to aphids, whiteflies, and fungal diseases.
* Inspect the plants regularly for signs of pests or diseases.
* If you find any pests, you can try spraying them with insecticidal soap or neem oil.
* To prevent fungal diseases, ensure good air circulation and avoid overhead watering.
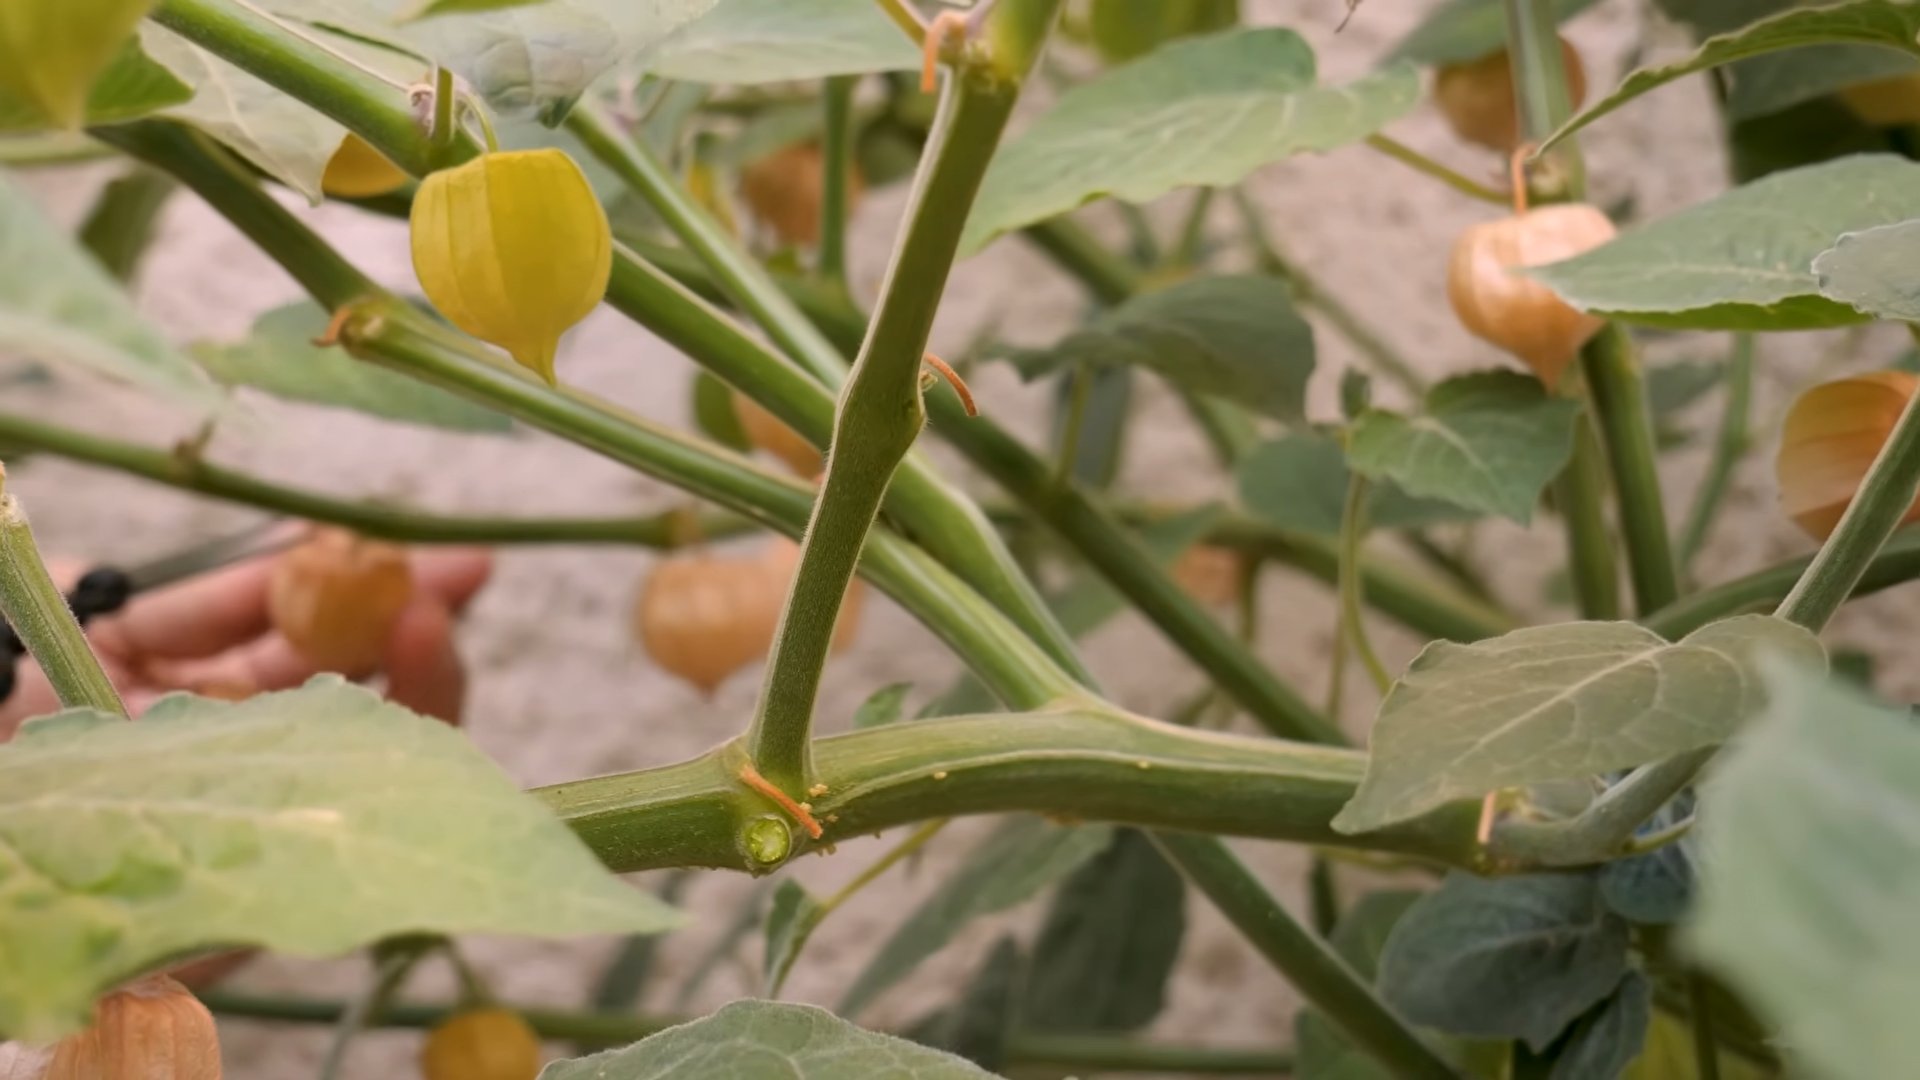
Harvesting Cape Gooseberries
The best part! Harvesting your golden berries:
1. Know When to Harvest:
* Cape Gooseberries are ready to harvest when the papery husk surrounding the fruit turns brown and dry.
* The fruit inside should be a golden-yellow color.
* The fruit will often drop to the ground when it’s ripe, so you can also collect them from the ground.
2. Harvest Carefully:
* Gently pluck the ripe fruits from the plant.
* If the fruit doesn’t come off easily, it’s probably not ripe yet.
3. Store Properly:
Conclusion
So, there you have it! Growing Cape Gooseberries at home is not only achievable but also incredibly rewarding. From the vibrant burst of flavor in each golden berry to the sheer satisfaction of nurturing a plant from seed to harvest, this DIY project is a must-try for any gardening enthusiast, food lover, or anyone simply looking to add a touch of the extraordinary to their backyard.
Why is this a must-try? Because store-bought Cape Gooseberries, if you can even find them, often lack the intense sweetness and nuanced flavor of homegrown ones. They may also be picked before they are fully ripe to withstand transportation, resulting in a less-than-optimal eating experience. When you grow your own, you control the entire process, ensuring that each berry is perfectly ripened and bursting with flavor. Plus, the process of nurturing a plant and watching it thrive is incredibly therapeutic and fulfilling.
But the benefits don’t stop there. Growing Cape Gooseberries offers a unique opportunity to experiment and personalize your gardening experience. Consider these suggestions and variations to tailor the process to your specific needs and preferences:
* Vertical Gardening: If you’re short on space, try growing your Cape Gooseberries in containers and training them up a trellis or other vertical support. This is a great way to maximize your yield in a small area.
* Companion Planting: Enhance your Cape Gooseberry patch by planting companion plants like basil, marigolds, or nasturtiums. These plants can help deter pests, attract beneficial insects, and even improve the flavor of your berries.
* Different Varieties: Explore different varieties of Cape Gooseberries to find your favorite flavor profile. Some varieties are sweeter, while others have a more tart or tangy taste. Experiment and discover which ones you enjoy the most.
* Preserving Your Harvest: Once you’ve harvested your bounty of Cape Gooseberries, don’t let them go to waste! Preserve them by making jam, jelly, chutney, or even drying them for a healthy snack.
* Seed Saving: Save seeds from your best-performing plants to ensure a continuous supply of high-quality Cape Gooseberries year after year. This is a great way to become more self-sufficient and develop your own unique strain of Cape Gooseberries.
Ultimately, the best way to discover the magic of growing Cape Gooseberries is to simply give it a try. Don’t be afraid to experiment, make mistakes, and learn from your experiences. Gardening is a journey, not a destination, and the rewards are well worth the effort.
So, grab some seeds, prepare your soil, and get ready to embark on a delicious adventure. We’re confident that you’ll be amazed by the results. And once you’ve harvested your first batch of homegrown Cape Gooseberries, we encourage you to share your experience with us. Tell us about your successes, your challenges, and your favorite ways to enjoy these delightful little fruits. Your insights can help inspire other gardeners and contribute to a growing community of Cape Gooseberry enthusiasts. Happy growing!
Frequently Asked Questions (FAQ)
What are Cape Gooseberries, and why should I grow them?
Cape Gooseberries ( *Physalis peruviana* ) are small, golden-orange fruits encased in a papery husk. They offer a unique sweet-tart flavor, often described as a mix of pineapple, strawberry, and tomato. Growing them yourself ensures you get the freshest, ripest, and most flavorful berries, unlike those often found in stores. Plus, it’s a fun and rewarding gardening project!
How do I start growing Cape Gooseberries?
You can start Cape Gooseberries from seeds or seedlings. Starting from seeds requires a bit more patience, as you’ll need to germinate them indoors 6-8 weeks before the last expected frost. Seedlings offer a quicker start but may be harder to find. Choose a sunny location with well-draining soil.
What kind of soil do Cape Gooseberries need?
Cape Gooseberries thrive in well-draining soil that is rich in organic matter. Amend your soil with compost or aged manure before planting to improve its fertility and drainage. A slightly acidic to neutral pH (around 6.0-7.0) is ideal.
How much sunlight do Cape Gooseberries need?
Cape Gooseberries need at least 6-8 hours of direct sunlight per day to produce a good crop of fruit. Choose a location in your garden that receives plenty of sunlight throughout the day.
How often should I water Cape Gooseberries?
Water Cape Gooseberries regularly, especially during dry periods. Keep the soil consistently moist but not waterlogged. Avoid overhead watering, as this can increase the risk of fungal diseases. Drip irrigation or soaker hoses are ideal for delivering water directly to the roots.
Do Cape Gooseberries need fertilizer?
Cape Gooseberries benefit from regular fertilization, especially during the growing season. Use a balanced fertilizer or one that is slightly higher in phosphorus to promote fruit production. Avoid over-fertilizing with nitrogen, as this can lead to excessive foliage growth at the expense of fruit.
How do I protect Cape Gooseberries from pests and diseases?
Cape Gooseberries are generally resistant to pests and diseases, but they can be susceptible to aphids, whiteflies, and fungal diseases like powdery mildew. Inspect your plants regularly for signs of pests or diseases and take action promptly. Use organic pest control methods like insecticidal soap or neem oil to control pests. Ensure good air circulation around your plants to prevent fungal diseases.
When are Cape Gooseberries ready to harvest?
Cape Gooseberries are ready to harvest when the papery husks turn brown and dry, and the berries inside turn a golden-orange color. The berries should also be slightly soft to the touch. Gently shake the plant to dislodge ripe berries.
How do I store Cape Gooseberries?
Cape Gooseberries can be stored in their husks at room temperature for several weeks. For longer storage, refrigerate them in their husks for up to several months. You can also freeze Cape Gooseberries for later use.
Can I grow Cape Gooseberries in containers?
Yes, Cape Gooseberries can be grown successfully in containers. Choose a large container (at least 12 inches in diameter) with drainage holes. Use a well-draining potting mix and provide regular watering and fertilization. Container-grown Cape Gooseberries may need to be watered more frequently than those grown in the ground.
Are Cape Gooseberries perennial or annual?
Cape Gooseberries are technically perennials in warm climates (zones 9-11), but they are often grown as annuals in colder regions. In areas with mild winters, they may survive and produce fruit for several years.
What are some ways to use Cape Gooseberries?
Cape Gooseberries can be eaten fresh, used in jams, jellies, and chutneys, or dried for a healthy snack. They can also be added to salads, desserts, and savory dishes. Their unique flavor pairs well with both sweet and savory ingredients.
Are Cape Gooseberries related to tomatoes?
Yes, Cape Gooseberries are members of the nightshade family (Solanaceae), which also includes tomatoes, peppers, and eggplants.
Are Cape Gooseberries safe to eat?
Yes, the ripe berries of Cape Gooseberries are safe to eat. However, the unripe berries and other parts of the plant contain solanine, a toxic alkaloid. Avoid eating unripe berries or any other part of the plant.
How can I save seeds from my Cape Gooseberries?
To save seeds from your Cape Gooseberries, allow the berries to fully ripen on the plant. Remove the seeds from the berries and rinse them thoroughly. Spread the seeds on a paper towel to dry completely. Store the dried seeds in an airtight container in a cool, dark place.

Leave a Comment