
Grow Sweet Potatoes
Have you ever dreamed of harvesting your own sweet, delicious sweet potatoes, bursting with flavor right from your own backyard? Well, dream no more! This article is packed with amazing grow sweet potatoes tricks and DIY hacks that will transform you from a novice gardener into a sweet potato pro. I’ll share my personal experiences and hard-earned knowledge to help you achieve a bountiful harvest, no matter your gardening skill level.
Growing sweet potatoes has a rich history, dating back centuries to the Americas. These versatile tubers weren’t just a staple food; they held cultural significance for many indigenous populations, representing sustenance and prosperity. Today, the joy of cultivating your own sweet potatoes remains, offering a rewarding connection to nature and a delicious reward for your efforts.
Why bother with all this DIY effort when you can just buy them at the store? Because there’s nothing quite like the taste of a homegrown sweet potato, freshly pulled from the earth. Plus, growing your own allows you to choose specific varieties, ensuring you get exactly the flavor and texture you prefer. And let’s be honest, the satisfaction of nurturing a plant from a simple slip to a harvest overflowing with sweet potatoes is incredibly fulfilling. This article will guide you through every step, from preparing the soil to harvesting your prize-winning grow sweet potatoes.
So, grab your gardening gloves, and let’s get started on this exciting journey of growing your own sweet potato paradise!
Growing Sweet Potatoes: A Complete DIY Guide
I love sweet potatoes! They’re delicious, versatile, and surprisingly easy to grow yourself, even if you’ve got limited space. This guide will walk you through the entire process, from preparing your “slips” (cuttings) to harvesting your delicious bounty. Let’s get started!
Phase 1: Preparing Your Sweet Potato Slips
- Selecting Sweet Potatoes: Choose healthy, organically grown sweet potatoes that are firm and free from blemishes. Avoid potatoes that are already sprouting excessively, as these may be too old.
- Preparing the “Slips”: This is where we create our planting material. Select a sweet potato that’s about 6-8 inches long. You’ll need a shallow container (about 4 inches deep) and a well-draining potting mix. I like to use a mix of peat moss, perlite, and vermiculite.
- Planting the Sweet Potato: Lay the sweet potato horizontally in the container, partially burying it in the potting mix. Make sure about half of the potato is exposed to the air. Gently water the mix, ensuring it’s moist but not soggy.
- Providing Light and Warmth: Place the container in a warm, sunny location. Ideally, the temperature should be between 70-80°F (21-27°C). You can use a grow light to supplement natural sunlight, especially if you’re starting your slips indoors during colder months.
- Watering and Monitoring: Keep the soil consistently moist but not waterlogged. Overwatering can lead to root rot. After a few weeks, you should see sprouts (slips) emerging from the sweet potato. These slips are what you’ll use to plant.
- Once the slips are about 4-6 inches tall and have developed a few leaves, they’re ready for transplanting. Gently remove the slips from the sweet potato, being careful not to damage the roots. You can use a sharp knife or scissors to separate them.
- Prepare individual small pots (about 4 inches in diameter) with the same well-draining potting mix you used for the initial planting. Plant one slip per pot, burying the stem up to the first set of leaves.
- Water the newly planted slips gently and place them in a warm, sunny location. Continue to monitor the moisture levels, ensuring the soil remains consistently moist.
- Allow the slips to grow in these pots for another 2-3 weeks, or until they are strong and healthy, with several sets of leaves. This will give them a head start before transplanting into the garden.
Phase 2: Preparing Your Garden Bed
- Choosing a Location: Sweet potatoes need at least 6-8 hours of direct sunlight per day. Select a location in your garden that receives ample sunlight. They also prefer well-drained soil, so avoid areas prone to waterlogging.
- Soil Preparation: Sweet potatoes thrive in loose, sandy loam soil. Amend heavy clay soils with plenty of organic matter, such as compost or well-rotted manure, to improve drainage and aeration. This will help prevent root rot.
- Soil Testing (Optional): A soil test can help determine the pH level of your soil. Sweet potatoes prefer a slightly acidic to neutral pH (6.0-7.0). Adjust the pH if necessary by adding lime (to raise pH) or sulfur (to lower pH).
- Weed Control: Remove any weeds or grass from the planting area. A clean planting area will help prevent competition for nutrients and water.
Phase 3: Transplanting and Ongoing Care
- Selecting Sweet Potatoes: Choose healthy, organically grown sweet potatoes that are firm and free from blemishes. Avoid potatoes that are already sprouting excessively, as these may be too old.
- Preparing the “Slips”: This is where we create our planting material. Select a sweet potato that’s about 6-8 inches long. You’ll need a shallow container (about 4 inches deep) and a well-draining potting mix. I like to use a mix of peat moss, perlite, and vermiculite.
- Planting the Sweet Potato: Lay the sweet potato horizontally in the container, partially burying it in the potting mix. Make sure about half of the potato is exposed to the air. Gently water the mix, ensuring it’s moist but not soggy.
- Providing Light and Warmth: Place the container in a warm, sunny location. Ideally, the temperature should be between 70-80°F (21-27°C). You can use a grow light to supplement natural sunlight, especially if you’re starting your slips indoors during colder months.
- Watering and Monitoring: Keep the soil consistently moist but not waterlogged. Overwatering can lead to root rot. After a few weeks, you should see sprouts (slips) emerging from the sweet potato. These slips are what you’ll use to plant.
- Once the slips are about 4-6 inches tall and have developed a few leaves, they’re ready for transplanting. Gently remove the slips from the sweet potato, being careful not to damage the roots. You can use a sharp knife or scissors to separate them.
- Prepare individual small pots (about 4 inches in diameter) with the same well-draining potting mix you used for the initial planting. Plant one slip per pot, burying the stem up to the first set of leaves.
- Water the newly planted slips gently and place them in a warm, sunny location. Continue to monitor the moisture levels, ensuring the soil remains consistently moist.
- Allow the slips to grow in these pots for another 2-3 weeks, or until they are strong and healthy, with several sets of leaves. This will give them a head start before transplanting into the garden.
- Choosing a Location: Sweet potatoes need at least 6-8 hours of direct sunlight per day. Select a location in your garden that receives ample sunlight. They also prefer well-drained soil, so avoid areas prone to waterlogging.
- Soil Preparation: Sweet potatoes thrive in loose, sandy loam soil. Amend heavy clay soils with plenty of organic matter, such as compost or well-rotted manure, to improve drainage and aeration. This will help prevent root rot.
- Soil Testing (Optional): A soil test can help determine the pH level of your soil. Sweet potatoes prefer a slightly acidic to neutral pH (6.0-7.0). Adjust the pH if necessary by adding lime (to raise pH) or sulfur (to lower pH).
- Weed Control: Remove any weeds or grass from the planting area. A clean planting area will help prevent competition for nutrients and water.
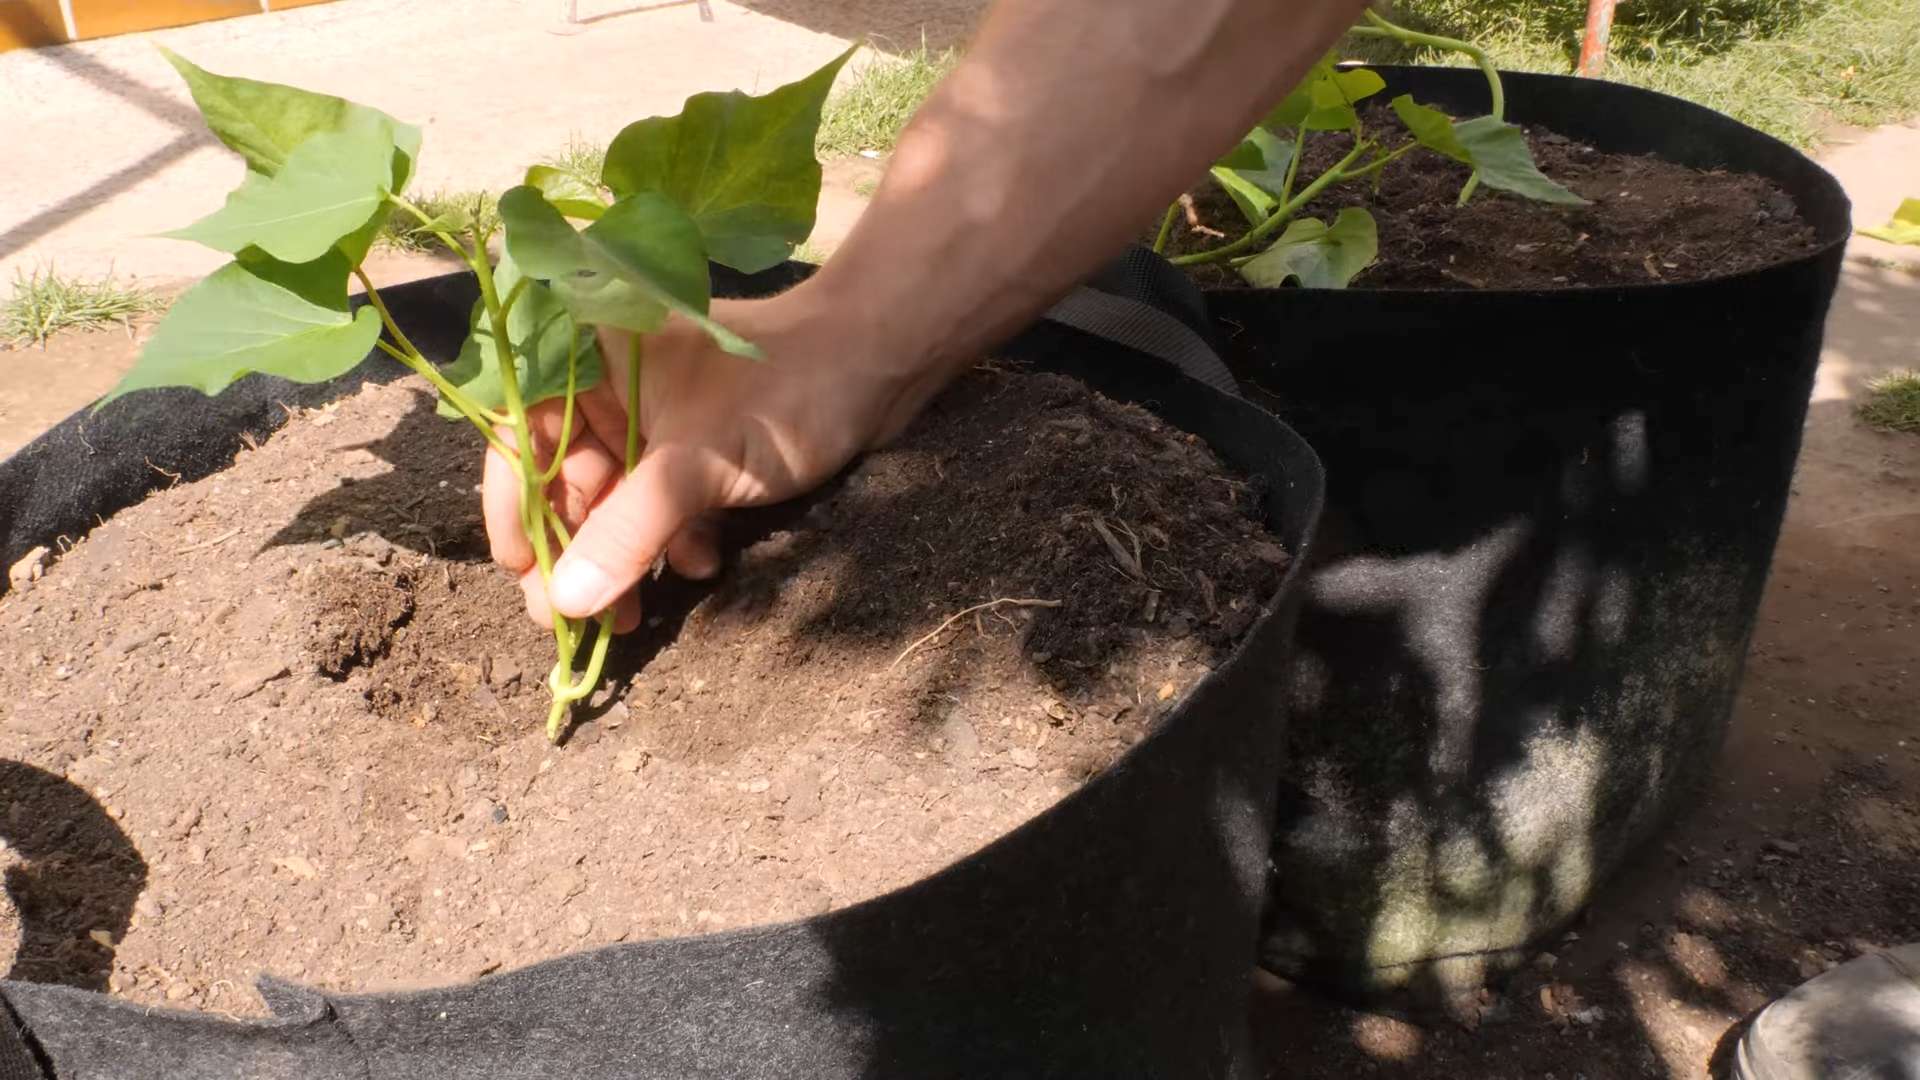
- Transplanting: Once the danger of frost has passed and the soil has warmed up (at least 60-70°F or 15-21°C), it’s time to transplant your sweet potato slips into the garden. Dig holes about 12-18 inches apart and 6-8 inches deep.
- Planting the Slips: Carefully remove the slips from their pots, being mindful not to damage the roots. Plant the slips in the holes, burying them up to the first set of leaves. Gently firm the soil around the base of each slip.
- Watering: Water the newly transplanted slips thoroughly. Consistent watering is crucial, especially during dry periods. Aim for about 1 inch of water per week, either through rainfall or supplemental irrigation.
- Weed Control: Regularly weed around your sweet potato plants to prevent competition for nutrients and water. Mulching can help suppress weeds and retain soil moisture.
- Fertilizing: While sweet potatoes aren’t heavy feeders, a light application of balanced fertilizer can promote growth. Follow the instructions on the fertilizer package for application rates.
- Pest and Disease Control: Monitor your plants regularly for pests and diseases. Common pests include sweet potato weevils and aphids. Treat any infestations promptly using appropriate organic pest control methods.
- Hilling: As the plants grow, gradually hill the soil around the base of the plants. This encourages the development of more sweet potatoes. You can do this every few weeks, adding a few inches of soil each time.
- Harvest Time: Sweet potatoes are typically ready for harvest 3-4 months after transplanting, depending on the variety and growing conditions. The leaves will start to yellow and die back as the potatoes mature.
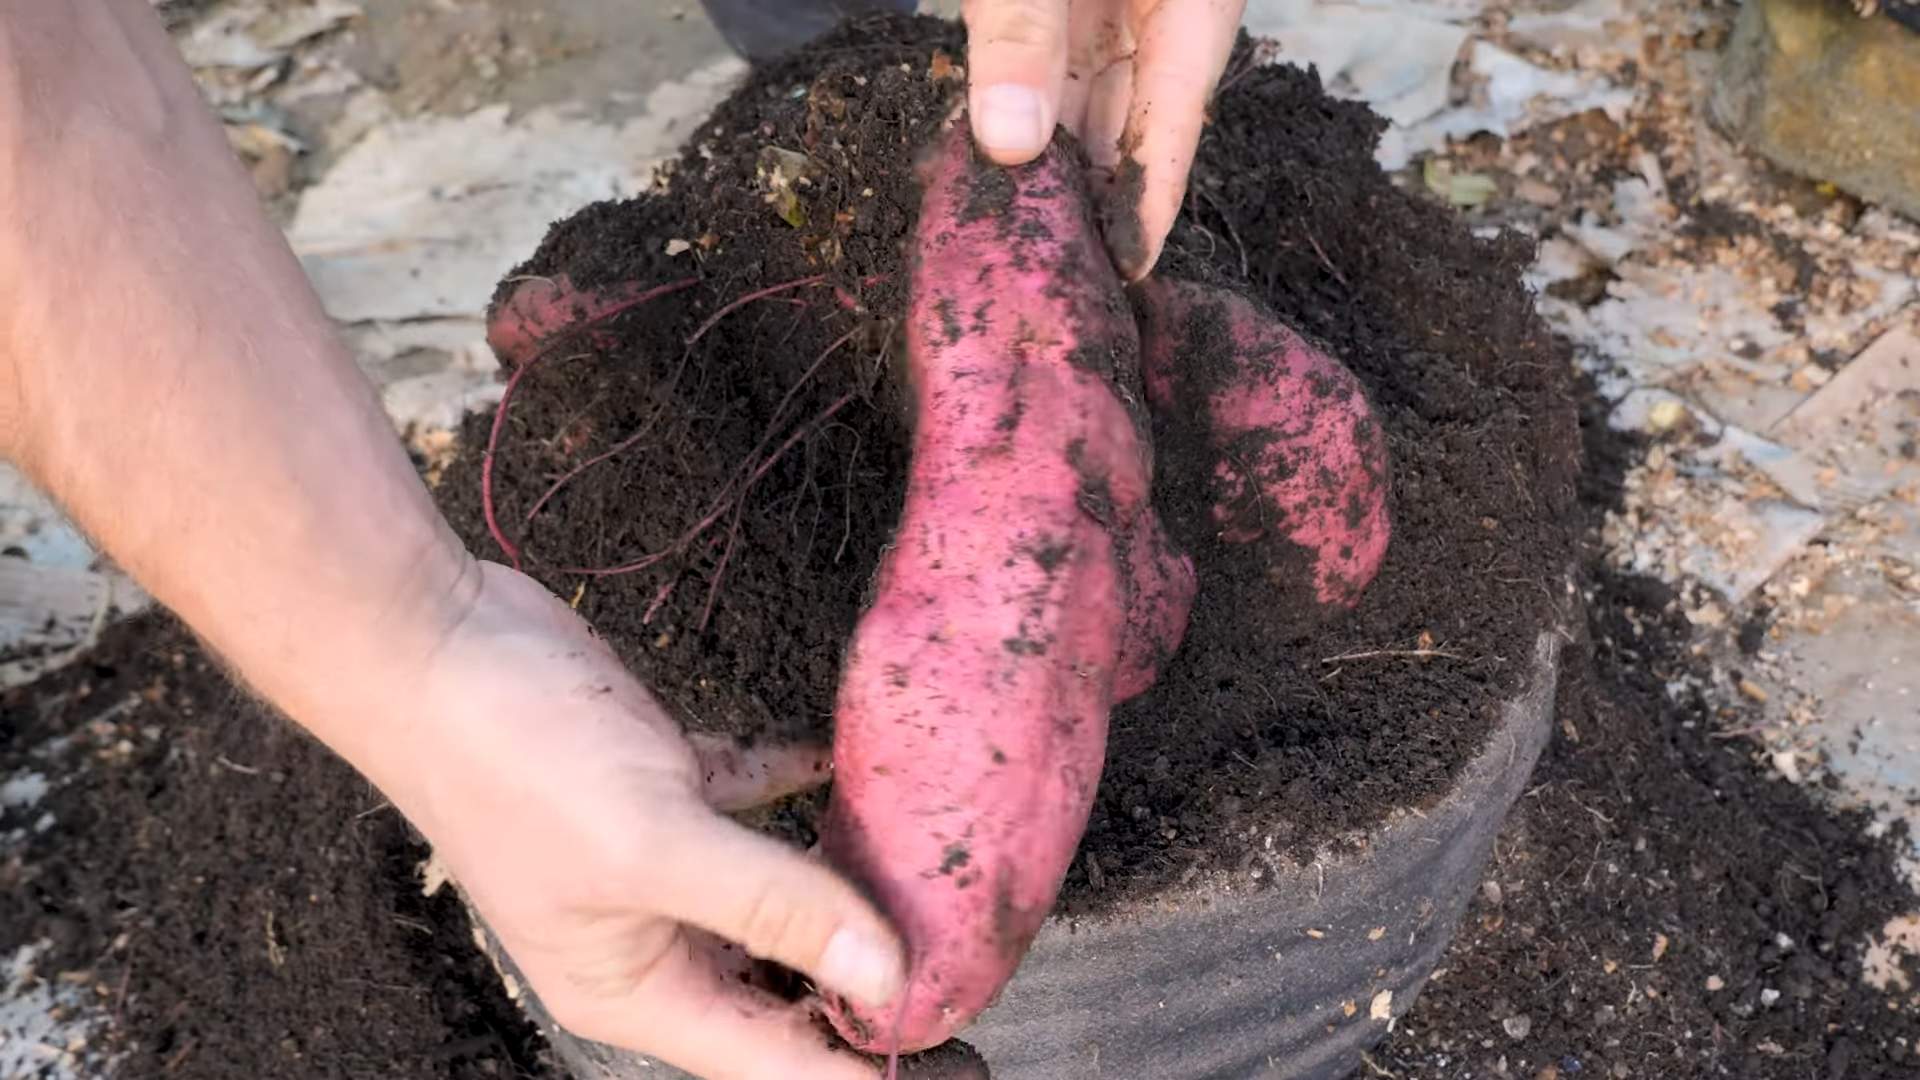
- Harvesting: On a dry day, carefully dig up the sweet potatoes using a garden fork or shovel. Be gentle to avoid damaging the potatoes. Avoid pulling on the vines, as this can break the potatoes.
- Curing: After harvesting, allow the sweet potatoes to cure for 7-10 days in a warm, dry, well-ventilated area. This process helps improve their flavor and storage life. Spread them out in a single layer and allow them to dry slightly.
- Storage: Once cured, store your sweet potatoes in a cool, dark, and dry place. Ideal storage temperatures are between 50-55°F (10-13°C). They should keep for several months under these conditions.
I love sweet potatoes! They’re delicious, versatile, and surprisingly easy to grow yourself, even if you’ve got limited space. This guide will walk you through the entire process, from preparing your “slips” (cuttings) to harvesting your delicious bounty. Let’s get started!
Phase 1: Preparing Your Sweet Potato Slips
Phase 2: Preparing Your Garden Bed
Phase 3: Transplanting and Ongoing Care
Phase 4: Harvesting Your Sweet Potatoes
And there you have it! With a little patience and care, you can enjoy the sweet rewards of your own homegrown sweet potatoes. Happy gardening!
Conclusion
So there you have it – a comprehensive guide to growing your own sweet potatoes! This DIY trick isn’t just about saving money; it’s about experiencing the incredible satisfaction of nurturing a plant from a humble slip to a bountiful harvest. Growing sweet potatoes from slips is surprisingly easy, rewarding, and offers a level of control over the quality and taste that you simply can’t get from store-bought tubers. You get to choose the variety, ensuring you have the perfect sweet potato for your recipes, whether it’s a creamy, intensely sweet variety for pies or a firm, dry one for roasting. The process itself is a journey of discovery, connecting you with the natural world and providing a fulfilling activity for all ages. Beyond the delicious results, growing your own sweet potatoes contributes to a more sustainable lifestyle, reducing your carbon footprint and fostering a deeper appreciation for where your food comes from. Don’t be intimidated by the seemingly complex process; with a little patience and the guidance provided in this article, you’ll be enjoying the fruits (or rather, the roots!) of your labor in no time. We strongly encourage you to try this method and experience the joy of harvesting your homegrown sweet potatoes. Share your experiences, photos, and tips with us – we’d love to hear about your sweet potato growing journey! Remember to tag us on social media and use #GrowSweetPotatoes to connect with other enthusiastic gardeners. Let’s cultivate a community of sweet potato enthusiasts together!
Variations and Suggestions
While the core method remains consistent, there are several ways to personalize your sweet potato growing experience. Experiment with different varieties of sweet potatoes to discover your favorites. Consider using different containers – larger pots, raised beds, or even directly in the ground if you have suitable soil and climate. For those with limited space, vertical gardening techniques can be surprisingly effective. You can also explore companion planting, pairing your sweet potatoes with plants that benefit each other, such as beans or marigolds. Remember to adjust your watering and fertilizing schedule based on your specific environment and the growth stage of your plants. Don’t be afraid to experiment and find what works best for you and your garden. The beauty of this DIY method lies in its adaptability.
Troubleshooting Common Issues
Even with careful planning, you might encounter some challenges along the way. If your plants appear to be wilting, check the soil moisture levels and adjust your watering accordingly. Yellowing leaves could indicate nutrient deficiencies, so consider supplementing with a balanced fertilizer. Pest infestations can be addressed with natural remedies like neem oil or insecticidal soap. Remember to research the specific pests affecting your region and choose the most appropriate solution. Don’t hesitate to consult online resources or experienced gardeners for advice if you encounter unexpected problems. The key is to observe your plants closely and respond to their needs promptly.
Frequently Asked Questions (FAQs)
What type of soil is best for growing sweet potatoes?
Sweet potatoes thrive in well-drained, sandy loam soil. Heavy clay soils can lead to root rot, so amending the soil with compost or other organic matter to improve drainage is crucial. The soil should be loose and allow for easy root penetration. A slightly acidic pH (around 6.0-6.8) is ideal.
How much sunlight do sweet potatoes need?
Sweet potatoes are sun-worshippers! They require at least six to eight hours of direct sunlight per day for optimal growth. Choose a location in your garden or on your patio that receives ample sunlight throughout the day. Insufficient sunlight can lead to reduced yields and smaller tubers.
When is the best time to plant sweet potato slips?
The best time to plant sweet potato slips is after the last frost and when the soil has warmed up to at least 60-70°F (15-21°C). This typically falls between late spring and early summer, depending on your geographic location. Planting too early can expose the tender slips to frost damage.
How often should I water my sweet potatoes?
Consistent moisture is essential, but avoid overwatering, which can lead to root rot. Water deeply and regularly, especially during dry periods. The soil should be moist but not soggy. Check the soil moisture level before watering, and adjust your watering schedule based on the weather conditions and the growth stage of your plants. Mulching can help retain soil moisture and suppress weeds.
How long does it take to harvest sweet potatoes?
The time it takes to harvest sweet potatoes depends on the variety and growing conditions, but generally, it takes around 100-120 days from planting slips to harvest. You can start checking for mature tubers around this time by gently probing the soil near the plants. The tubers are ready for harvest when the leaves begin to yellow and die back.
Can I grow sweet potatoes in containers?
Absolutely! Container gardening is a great option, especially for those with limited space. Choose large containers (at least 12 inches in diameter and depth) with drainage holes to prevent waterlogging. Use a well-draining potting mix and ensure the containers receive ample sunlight.
What are the common problems encountered while growing sweet potatoes?
Some common problems include root rot (due to overwatering or poorly drained soil), pest infestations (such as sweet potato weevils or aphids), and nutrient deficiencies (leading to yellowing leaves). Regular monitoring, proper watering, and appropriate pest control measures can help prevent these issues. Addressing problems early on is crucial for a successful harvest.
What are some tips for storing harvested sweet potatoes?
After harvesting, cure your sweet potatoes in a warm, dry, and well-ventilated area for about 10-14 days. This allows the skin to heal and improves their storage life. Once cured, store them in a cool, dark, and dry place, such as a root cellar or a cool pantry. Avoid storing them in the refrigerator, as this can damage their flavor and texture. Proper storage can extend the shelf life of your sweet potatoes for several months. Remember to inspect them regularly and remove any that show signs of spoilage.

Leave a Comment