
Growing Kale at Home can seem daunting, but trust me, it’s easier than you think! Have you ever dreamt of stepping into your backyard and harvesting fresh, vibrant kale for a healthy smoothie or a delicious salad? Imagine the satisfaction of knowing exactly where your food comes from and that it’s packed with nutrients. Well, that dream can become a reality with a few simple tricks and DIY hacks.
Kale, a nutritional powerhouse, has been cultivated for over 2,000 years, with its roots tracing back to the eastern Mediterranean. The Romans considered it a staple, and it has since become a beloved ingredient in cuisines worldwide. From hearty Tuscan soups to trendy kale chips, this leafy green has proven its versatility and enduring appeal. But why rely on expensive grocery store kale when you can easily grow your own?
In today’s world, where we’re increasingly conscious of our health and the environment, growing kale at home offers a fantastic solution. Not only does it provide you with a constant supply of fresh, organic greens, but it also reduces your carbon footprint and saves you money. Plus, it’s a rewarding and therapeutic hobby! This article will guide you through some easy-to-follow DIY tricks and hacks that will have you harvesting your own bountiful kale crop in no time. Let’s get started!
Growing Kale: Your Guide for Home Cultivation
Hey garden friends! I love harvesting fresh vegetables straight from my garden, and kale/cabbage is no exception. It’s super healthy, versatile, and surprisingly easy to grow, even if you don’t have a huge garden. In this article, I’ll show you how to successfully grow kale and cabbage at home, from sowing to harvest. Let’s get started!
Why Grow Kale Yourself?
Before we get into the details, let me briefly tell you why I’m so enthusiastic about growing these plants:
- Freshness and Taste: Homegrown kale and cabbage simply taste better! They are crunchier and more flavorful than those from the supermarket.
- Health Benefits: They are rich in vitamins, minerals, and antioxidants. A true superfood!
- Sustainability: You reduce your ecological footprint by growing your own vegetables.
- Save Money: In the long run, you save money as you need to buy fewer vegetables.
- Relaxation: Gardening is a great way to relieve stress and connect with nature.
Kale Varieties: Which One Should I Choose?
There are countless varieties of kale and cabbage, and the choice can be overwhelming. Here are a few of my favorites that are well-suited for growing in a home garden:
- Kale (Brassica oleracea var. sabellica): The classic! It is hardy and provides fresh leaves throughout the winter. It comes in various types, from curly-leaf to smooth-leaf.
- Lacinato Kale (Brassica oleracea var. palmifolia): Also known as Tuscan kale or Cavolo Nero. It has long, narrow, dark green leaves and a slightly sweet taste.
- Red Kale: A colorful variety that is not only delicious but also a real eye-catcher in the garden.
- Ornamental Kale (Brassica oleracea var. acephala): Not just beautiful to look at, but also edible! It is particularly hardy and retains its color even in frost.
Preparation: What You Need
Before you get started, you should make sure you have everything you need on hand. Here is a list of the most important things:
- Seeds: Choose a variety that you like and that is suitable for your climate.
- Seed starting mix: Special seed starting mix is low in nutrients and loose, ideal for seed germination.
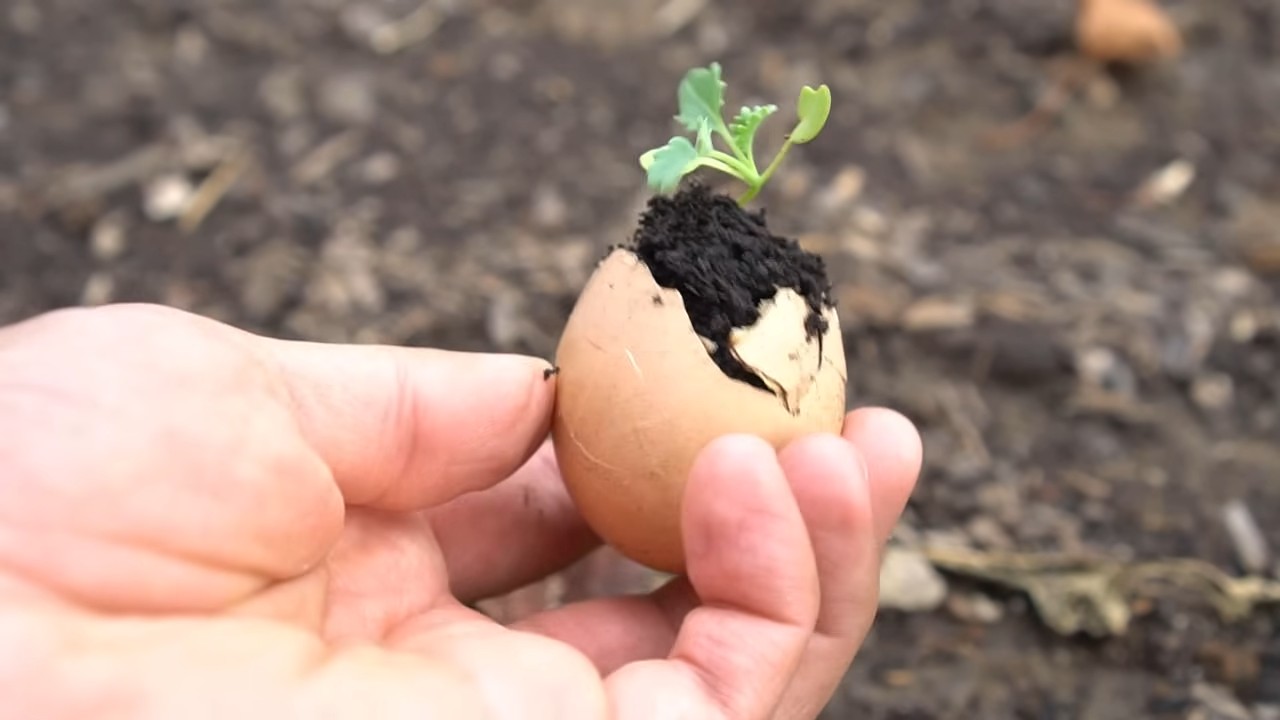
- Seed starting containers: Small pots, seed trays, or egg cartons are great for starting seeds indoors.
- Garden soil: For planting out in the garden bed or in larger pots.
- Compost or organic fertilizer: To enrich the soil with nutrients.
- Watering can or spray bottle: For watering the plants.
- Garden tools: Spade, rake, trowel.
- Slug pellets (optional): To protect your young plants from slugs.
- Stakes (optional): To support the plants if needed.
Sowing: The Start of a Green Life
There are two ways to grow kale and cabbage: you can either sow the seeds directly into the garden bed or start the plants indoors. I recommend starting them indoors, as you can better control germination and protect the young plants from pests.
Starting Indoors:
- Prepare seed containers: Fill the seed starting containers with seed starting mix.
- Sow seeds: Place 1-2 seeds per container on the soil and cover them lightly with soil (about 0.5 cm / ¼ inch).
- Water: Gently moisten the soil with a spray bottle. It should be damp, but not wet.
- Keep warm: Place the seed containers in a warm, bright place (e.g., on a windowsill). The ideal germination temperature is 18-22°C (65-72°F).
- Keep moist: Keep the soil evenly moist by spraying it regularly.
- Wait for germination: The seeds usually germinate within 5-10 days.
- Pricking out: Once the seedlings have formed their first true leaves (after the cotyledons), you can prick them out. This means you carefully take them out of the seed containers and transplant them into larger pots with garden soil. Be careful not to damage the roots.
Direct Sowing in the Garden Bed:
- Prepare the soil: Loosen the soil in the bed and remove weeds.
- Sow seeds: Sow the seeds in rows or groups. The distance between rows should be about 30-40 cm (12-16 inches).
- Cover: Cover the seeds lightly with soil (about 0.5 cm / ¼ inch).
- Water: Gently moisten the soil with a watering can.
- Keep moist: Keep the soil evenly moist until the seeds have germinated.
- Thinning: Once the seedlings are large enough, thin them out so they have enough space to grow. The distance between plants should be about 30-40 cm (12-16 inches).
Planting Out: Into the Bed!
Once the young plants are strong enough (about 10-15 cm / 4-6 inches high), you can plant them out in the garden bed or in larger pots.
- Prepare the soil: Loosen the soil in the bed and remove weeds. Enrich the soil with compost or organic fertilizer.
- Dig planting holes: Dig planting holes that are slightly larger than the plants’ root balls. The distance between plants should be about 30-40 cm (12-16 inches).
- Plant the seedlings: Carefully place the plants in the planting holes and fill the holes with soil. Gently press the soil down.
- Water: Water the plants thoroughly.
- Protective measures: Protect the young plants from slugs by scattering slug pellets or setting up a slug fence. You can also cover the plants with a garden fleece to protect them from pests and frost.
Care: Helping Your Kale & Cabbage Thrive
These plants are relatively low-maintenance, but you should keep a few things in mind for them to grow optimally:
Staking: For tall varieties (e.g., Lacinato kale), it can be useful to support the plants with stakes to prevent them from falling over.
Watering: They need regular water, especially during dry periods. Make sure the soil is always slightly moist.
Fertilizing: They are heavy feeders and need a lot of nutrients. Fertilize the plants regularly with compost, organic fertilizer, or a special cabbage/kale fertilizer.
Weed control: Regularly remove weeds so they don’t take nutrients away from your plants.
Pest control: Check the plants regularly for pests like cabbage whites, aphids, or flea beetles. If necessary, you can use biological pest control methods.
Conclusion
So, there you have it! Growing kale at home isn’t just a trendy gardening fad; it’s a genuinely rewarding experience that puts fresh, nutritious greens right at your fingertips. We’ve walked through the simple steps, from selecting the right kale variety to harvesting your bountiful crop. But why is this DIY trick a must-try?
First and foremost, consider the unparalleled freshness. Store-bought kale, while convenient, simply can’t compete with the vibrant flavor and crisp texture of kale harvested moments before it hits your plate. You control the entire process, ensuring your kale is free from unwanted pesticides and chemicals. This is especially important if you’re health-conscious or have young children.
Secondly, growing your own kale is incredibly cost-effective. A single packet of seeds can yield a continuous supply of kale for months, far outweighing the cost of repeatedly purchasing it from the grocery store. Think of all the delicious kale salads, smoothies, and stir-fries you can enjoy without breaking the bank!
Thirdly, it’s a fantastic way to connect with nature and learn about the growing process. Gardening is a therapeutic activity that can reduce stress and improve your overall well-being. Watching your kale plants thrive from tiny seedlings to leafy greens is incredibly satisfying.
But the beauty of growing kale at home lies in its versatility. Feel free to experiment with different varieties. Try the classic curly kale for its robust flavor and texture, or opt for the milder, sweeter taste of Tuscan kale (also known as Lacinato or dinosaur kale). Red Russian kale adds a beautiful splash of color to your garden and has a slightly peppery flavor.
Don’t be afraid to get creative with your growing methods, either. If you’re short on space, kale thrives in containers on patios or balconies. You can even grow it indoors with the help of grow lights. Consider companion planting to deter pests and improve soil health. Marigolds, for example, are known to repel aphids, while herbs like rosemary and thyme can attract beneficial insects.
And remember, growing kale at home is a learning process. Don’t be discouraged if you encounter challenges along the way. Every gardener, even the most experienced, faces setbacks. The key is to learn from your mistakes and keep experimenting.
We wholeheartedly encourage you to give this DIY trick a try. Start small, be patient, and enjoy the journey. Once you taste the difference between homegrown kale and store-bought kale, you’ll never go back.
We’d love to hear about your experiences! Share your tips, tricks, and photos of your homegrown kale on social media using [Your Hashtag Here]. Let’s build a community of kale-loving gardeners and inspire others to discover the joys of growing their own food. Happy gardening!
Frequently Asked Questions (FAQs)
What is the best time of year to plant kale?
The best time to plant kale depends on your climate. Kale is a cool-season crop, meaning it thrives in cooler temperatures. In most regions, you can plant kale in early spring for a summer harvest or in late summer/early fall for a fall and winter harvest. If you live in a region with mild winters, you can even grow kale year-round. For spring planting, start seeds indoors 6-8 weeks before the last expected frost. For fall planting, sow seeds directly into the garden in late summer.
How much sunlight does kale need?
Kale needs at least 6 hours of sunlight per day to thrive. However, it can tolerate partial shade, especially in hotter climates. If you’re growing kale indoors, make sure to provide it with adequate artificial light using grow lights. Insufficient sunlight can result in leggy, weak plants with poor leaf development.
What kind of soil is best for growing kale?
Kale prefers well-drained soil that is rich in organic matter. The ideal soil pH is between 6.0 and 7.5. Before planting, amend your soil with compost or other organic matter to improve its fertility and drainage. You can also add a slow-release fertilizer to provide your kale plants with the nutrients they need. Avoid planting kale in heavy clay soil, as this can lead to root rot.
How often should I water my kale plants?
Water your kale plants regularly, especially during dry periods. Keep the soil consistently moist, but avoid overwatering, which can lead to root rot. A good rule of thumb is to water deeply once or twice a week, depending on the weather conditions. Mulching around your kale plants can help to retain moisture in the soil and suppress weeds.
What are some common pests and diseases that affect kale?
Kale can be susceptible to various pests and diseases, including aphids, cabbage worms, flea beetles, and downy mildew. To prevent pest and disease problems, practice good garden hygiene. Remove any dead or diseased leaves promptly, and keep your garden free of weeds. You can also use organic pest control methods, such as insecticidal soap or neem oil, to control aphids and other pests. Row covers can also be used to protect your kale plants from pests. For fungal diseases like downy mildew, ensure good air circulation around your plants and avoid overhead watering.
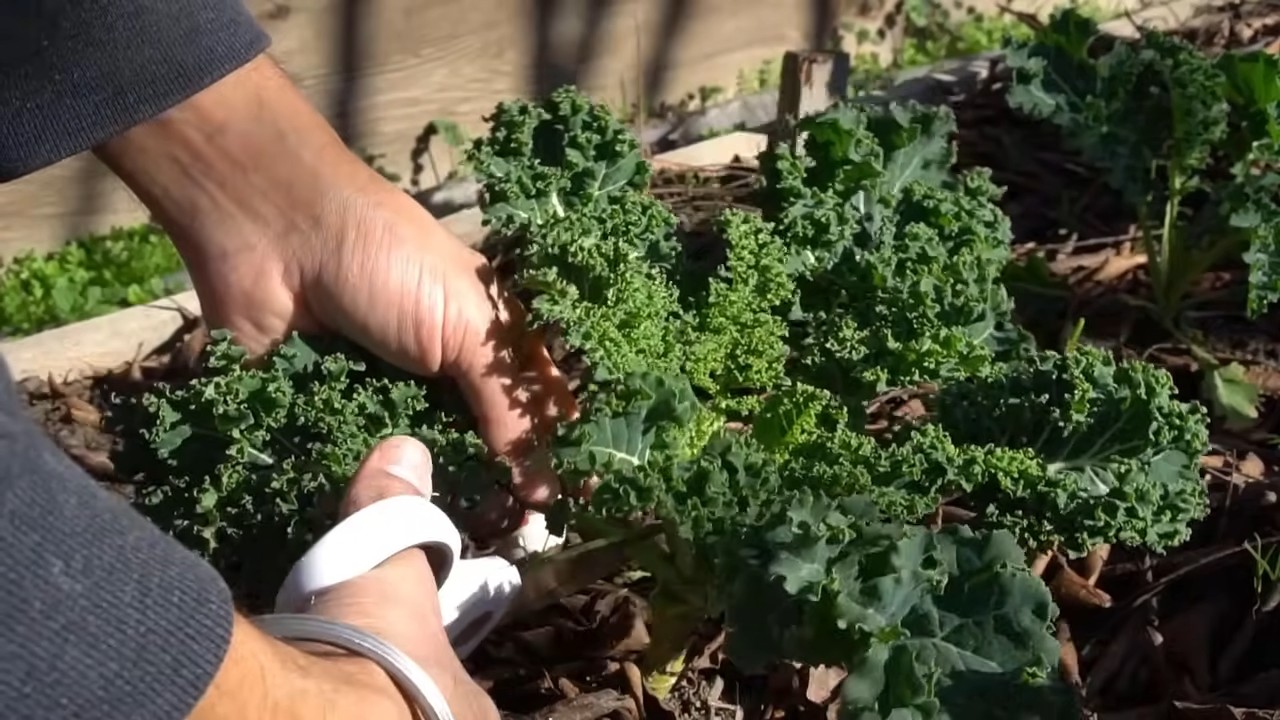
How do I harvest kale?
You can start harvesting kale leaves when they are about 4-6 inches long. Harvest the outer leaves first, leaving the inner leaves to continue growing. This will allow you to harvest kale continuously throughout the growing season. To harvest, simply cut or snap off the leaves near the base of the plant. Avoid harvesting more than one-third of the plant at a time, as this can stress the plant and reduce its yield.
Can I grow kale in containers?
Yes, kale grows well in containers. Choose a container that is at least 12 inches in diameter and has drainage holes. Fill the container with a high-quality potting mix and plant your kale seedlings or seeds. Water regularly and fertilize every few weeks with a liquid fertilizer. Container-grown kale may need to be watered more frequently than kale grown in the ground, especially during hot weather.
How do I store harvested kale?
To store harvested kale, wash it thoroughly and dry it with a salad spinner or paper towels. Wrap the kale in a damp paper towel and store it in a plastic bag in the refrigerator. Kale can be stored in the refrigerator for up to a week. You can also freeze kale for longer storage. To freeze kale, blanch it in boiling water for 2-3 minutes, then plunge it into ice water to stop the cooking process. Drain the kale well and store it in freezer bags or containers.
Can I eat kale stems?
Yes, you can eat kale stems, but they can be tough and fibrous. To make them more palatable, remove the tough outer layer of the stem with a vegetable peeler. You can then chop the stems and add them to soups, stews, or stir-fries. Alternatively, you can juice the kale stems for a nutritious boost.
What are some creative ways to use homegrown kale?
Beyond salads and smoothies, homegrown kale can be used in a variety of creative ways. Try adding it to soups, stews, and casseroles. Sauté it with garlic and olive oil for a simple and delicious side dish. Use it as a topping for pizza or tacos. Make kale chips by baking kale leaves with olive oil and seasonings. You can even add kale to your favorite pasta dishes or use it as a filling for omelets and frittatas. The possibilities are endless!
Leave a Comment