
Growing chives in the kitchen is easier than you might think, and I’m here to show you how! Forget those sad, wilted bunches from the grocery store – imagine snipping fresh, flavorful chives right from your windowsill whenever you need them. This simple DIY project will not only add a touch of green to your kitchen but also elevate your culinary creations.
For centuries, chives have been a staple in gardens and kitchens worldwide. Originating in Asia, they’ve been cherished for their delicate onion flavor and versatility in dishes. From garnishing soups and salads to adding a zing to omelets and dips, chives are a culinary workhorse. But beyond their flavor, they’re also incredibly easy to grow, making them perfect for even the most novice gardener.
In today’s busy world, having fresh herbs readily available can make all the difference. No more last-minute trips to the store or settling for dried herbs that lack that vibrant, fresh taste. Growing chives in the kitchen provides a sustainable and convenient way to enhance your meals. Plus, it’s a fun and rewarding project that anyone can enjoy. So, let’s dive in and discover the secrets to cultivating your own thriving chive patch indoors!
Growing Chives in the Kitchen: Your DIY Guide for Fresh Herbs
Hey herb friend! Do you want to always have fresh chives on hand without constantly running to the supermarket? Then you’ve come to the right place! I’ll show you how to easily grow chives in your kitchen. It’s super easy and a lot of fun!
What you need:
- Chive seeds or a chive plant: You can either start with seeds or buy a small plant to see results faster.
- A pot or container: Choose a pot with good drainage that is at least 15 cm (6 inches) in diameter.
- High-quality potting soil: Chives like nutrient-rich soil.
- Water: It’s best to use tap water that has been left to stand, or rainwater.
- A sunny spot: Chives love light! A windowsill is ideal.
- Optional: Seed starting pots, a spray bottle, fertilizer (organic).
Growing Chives from Seed:
If you’re starting with seeds, you’ll need a bit more patience, but it’s a great way to experience the entire process from the very beginning.
Preparing to Sow:
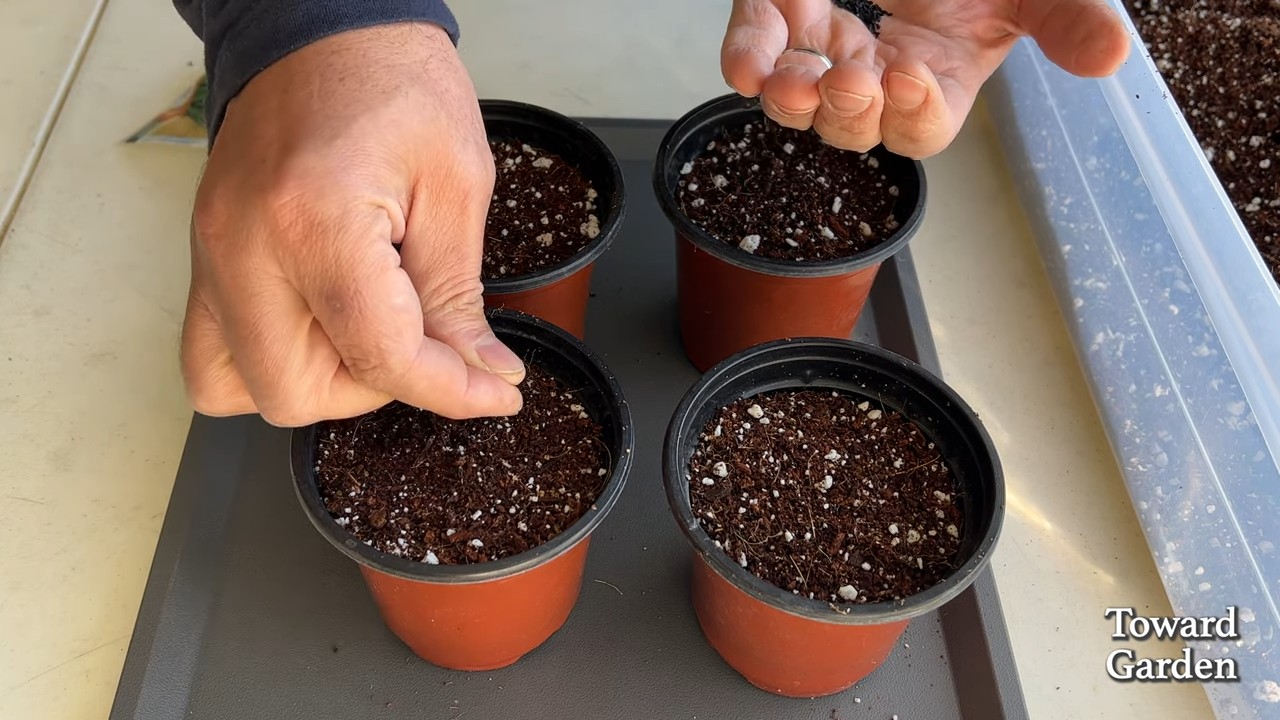
- Prepare the seed starting pots: Fill small seed starting pots with seed starting mix. This is particularly fine and low in nutrients, ideal for seedlings.
- Sow the seeds: Distribute 2-3 seeds per pot. Press them down lightly and cover them with a thin layer of soil (about 0.5 cm / ¼ inch).
- Watering: Gently moisten the soil with a spray bottle. It should be damp, but not wet.
- Keep it warm and bright: Place the seed starting pots in a warm and bright location. A temperature of 18-20°C (65-68°F) is ideal. A mini-greenhouse or a clear plastic cover helps to retain moisture.
Caring for the Seedlings:
- Maintain moisture: Make sure the soil always stays slightly moist. Spray it regularly with water.
- Ventilate: If you are using a mini-greenhouse or a plastic cover, ventilate it regularly to prevent mold.
- Thinning: Once the seedlings are a few centimeters tall and have their first true leaves, you can thin them. This means you remove the weaker seedlings, leaving only one strong seedling per pot.
Repotting:
- Preparation: Fill the larger pot with potting soil.
- Transplanting: Carefully lift the small chive plants out of the seed starting pots and place them in the larger pot. Be careful not to damage the roots.
- Watering: Water the plants well after repotting.
Growing Chives from a Plant:
If you want a faster and easier method, you can buy a small chive plant at a garden center or supermarket.
- Prepare the pot: Fill the pot with potting soil.
- Repot the plant: Carefully lift the chive plant out of its old pot and place it in the new one. Be careful not to damage the roots.
- Watering: Water the plant well after repotting.
The Right Care:
Whether you start with seeds or a plant, proper care is crucial for healthy and lush chives.
- Location: Chives love the sun! Place the pot in a sunny spot, for example, on a windowsill. At least 6 hours of sunlight per day is ideal.
- Watering: Water the chives regularly, but avoid waterlogging. The soil should always be slightly moist. In the summer, you may need to water daily.
- Fertilizing: Fertilize the chives every few weeks with an organic fertilizer. This ensures strong growth and aromatic leaves.
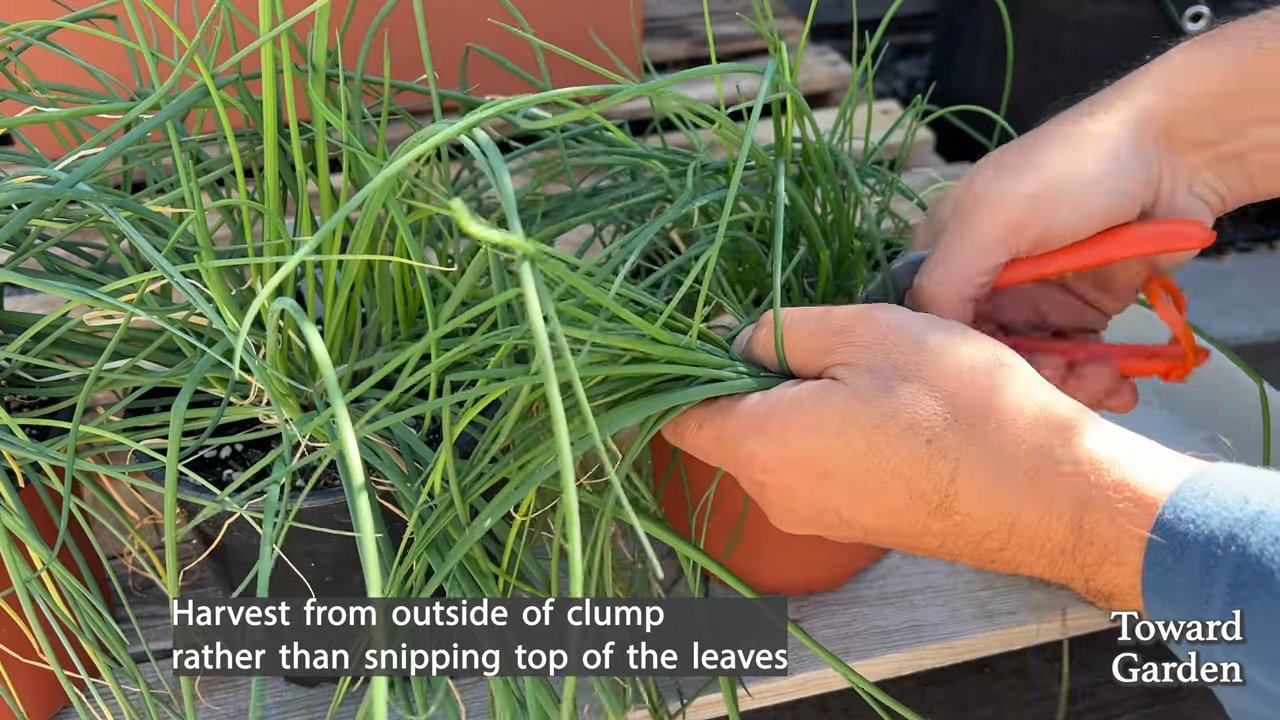
- Cutting: Cut the chives regularly to stimulate growth. It’s best to cut the blades just above the soil. Don’t worry, they grow back quickly!
- Removing flowers: If the chives bloom, you should remove the flowers. This costs the plant unnecessary energy and makes the leaves tough.
Common Problems and Solutions:
Problems can also arise when growing chives. Here are a few tips on how to solve them:
- Yellow leaves: Yellow leaves can be a sign of too much or too little water. Check the soil moisture and adjust your watering accordingly.
- Mold: Mold can be caused by high humidity. Ventilate the room regularly and avoid waterlogging.
- Pests: Chives can be infested by aphids or other pests. Spray the plant with a mild soap solution or use an organic pesticide.
- Slow growth: Slow growth can be due to a lack of nutrients. Fertilize the chives regularly with an organic fertilizer.
Harvesting and Using Chives:
The best part of growing chives is, of course, the harvest!
- Harvesting: Cut the chive blades with scissors just above the soil.
- Using: Chives are versatile. They are excellent in salads, soups, egg dishes, dips, and much more. You can use them fresh or freeze them.
- Storing: You can store fresh chives in the refrigerator for a few days in a damp cloth. To freeze, chop them up and put them in a freezer bag or an ice cube tray with water.
Overwintering Chives:
Chives are hardy, but in a pot, they need some protection.
- Cutting back: Cut the chives back to just above the soil in the fall.
- Protection: Place the pot in a sheltered location, for example, against a house wall or in a shed.
- Watering: Water the chives sparingly in winter, just enough to keep the soil from drying out.
- Spring: As soon as the temperatures rise, you can move the chives back to a sunny spot and resume regular watering and fertilizing.
Additional Tips and Tricks:
- Propagating chives: You can also propagate chives by division. Dig up the plant in spring or fall and divide the root ball into several pieces. Then plant the pieces in separate pots.
- Chives outdoors: If you have a garden, you can also grow chives outdoors. Choose a sunny spot with well-draining soil.
- Chives as insect repellent: Chives can help keep pests away from other plants. Simply plant them near roses or strawberries.
- Chive blossoms: The flowers of the chive are edible and have a mild garlic flavor. You can use them for salads or as a decoration.
I hope this guide helps you to grow your own chives in the kitchen. It’s really simple and fun! Good luck and enjoy your meal
Conclusion
So, there you have it! Growing chives in your kitchen is not just a whimsical idea; it’s a practical, economical, and incredibly rewarding experience. We’ve walked you through the simple steps, from choosing the right chives to providing the optimal environment for their growth. But why is this DIY trick a must-try?
Firstly, consider the unparalleled freshness. Imagine snipping vibrant, flavorful chives directly from your kitchen garden to garnish your omelets, salads, soups, or baked potatoes. The difference in taste compared to store-bought chives is remarkable. The intense, oniony zest is simply unmatched, elevating your culinary creations to a whole new level.
Secondly, think about the cost savings. Those little bunches of chives at the grocery store can add up quickly. By growing your own, you’re making a one-time investment that yields a continuous supply of fresh herbs. It’s a sustainable and budget-friendly way to enhance your meals.
Thirdly, and perhaps most importantly, growing chives in your kitchen is incredibly easy and satisfying. Even if you don’t have a green thumb, you can succeed with this project. It’s a low-maintenance plant that thrives indoors with minimal effort. Watching your chives sprout and flourish is a truly rewarding experience, connecting you to the natural world in a small but meaningful way.
But don’t stop there! Feel free to experiment with variations. Try growing different varieties of chives, such as garlic chives, for a slightly different flavor profile. You can also use different types of containers, from terracotta pots to repurposed jars, to add a touch of personality to your kitchen garden. Consider companion planting with other herbs like parsley or basil to create a mini indoor herb garden.
Ready to embark on your chive-growing adventure? We wholeheartedly encourage you to give this DIY trick a try. It’s a simple, affordable, and rewarding way to add fresh flavor to your meals and a touch of green to your kitchen.
And now, we want to hear from you! Share your experiences, tips, and photos of your kitchen-grown chives in the comments below. Let’s create a community of chive enthusiasts and inspire others to discover the joys of growing their own herbs. What are you waiting for? Get planting!
Frequently Asked Questions (FAQ)
What kind of chives should I grow?
There are several varieties of chives available, each with its own unique characteristics. Common chives (Allium schoenoprasum) are the most popular choice, known for their mild onion flavor and delicate green leaves. Garlic chives (Allium tuberosum) offer a stronger, more garlicky taste and have flat, broader leaves. Siberian chives (Allium sibiricum) are larger and more robust than common chives, with a slightly more pungent flavor. Ultimately, the best type of chives to grow depends on your personal preferences and culinary needs. Consider trying a few different varieties to see which ones you enjoy the most.
How much sunlight do chives need?
Chives thrive in bright, indirect sunlight. Ideally, they should receive at least 6 hours of sunlight per day. If you don’t have a sunny windowsill, you can supplement with a grow light. Place the grow light about 6-12 inches above the plants and keep it on for 12-14 hours per day. Insufficient sunlight can lead to leggy growth and a weaker flavor. Rotate your chives regularly to ensure that all sides receive adequate light.
What kind of soil should I use for growing chives?
Chives prefer well-draining soil that is rich in organic matter. A good potting mix specifically formulated for herbs is an excellent choice. You can also create your own potting mix by combining equal parts of potting soil, compost, and perlite or vermiculite. Avoid using heavy clay soil, as it can retain too much moisture and lead to root rot. Ensure that your container has drainage holes to prevent waterlogging.
How often should I water my chives?
Water your chives regularly, keeping the soil consistently moist but not soggy. Check the soil moisture by sticking your finger about an inch into the soil. If it feels dry, it’s time to water. Avoid overwatering, as this can lead to root rot. During the warmer months, you may need to water more frequently. In the winter, when growth slows down, you can reduce watering.
How do I harvest chives?
Harvesting chives is easy and encourages continued growth. Simply snip off the leaves with scissors or kitchen shears, cutting them about an inch above the soil line. Avoid cutting off all the leaves at once, as this can weaken the plant. Harvest regularly to promote new growth and prevent the chives from flowering. Flowering chives can develop a tougher texture and a less desirable flavor.
Can I grow chives from seed?
Yes, you can grow chives from seed. Start seeds indoors 6-8 weeks before the last expected frost. Sow the seeds about ¼ inch deep in a seed-starting mix. Keep the soil moist and warm (around 70-75°F). Once the seedlings have developed a few sets of true leaves, you can transplant them into individual pots or directly into your garden. Alternatively, you can sow chive seeds directly into your garden in the spring after the last frost.
How do I fertilize my chives?
Chives are not heavy feeders, but they benefit from occasional fertilization. Use a balanced liquid fertilizer diluted to half strength every 2-3 weeks during the growing season. Alternatively, you can amend the soil with compost or worm castings to provide a slow-release source of nutrients. Avoid over-fertilizing, as this can lead to excessive foliage growth at the expense of flavor.
Why are my chives turning yellow?
Yellowing chives can be caused by several factors, including overwatering, underwatering, nutrient deficiencies, or pest infestations. Check the soil moisture to ensure that you are watering correctly. If the soil is consistently soggy, reduce watering. If the soil is dry, increase watering. If you suspect a nutrient deficiency, fertilize with a balanced liquid fertilizer. Inspect the plants for pests, such as aphids or spider mites, and treat accordingly.
Can I freeze chives?
Yes, you can freeze chives to preserve them for later use. Wash and dry the chives thoroughly. Chop them into small pieces and spread them out on a baking sheet lined with parchment paper. Freeze for about 2 hours, or until the chives are frozen solid. Transfer the frozen chives to a freezer bag or airtight container and store them in the freezer for up to 6 months. Frozen chives may lose some of their texture, but they will retain their flavor.
My chives are flowering. Should I remove the flowers?
While chive flowers are edible and can add a beautiful touch to salads, they can also detract from the flavor and texture of the leaves. If you prefer a milder flavor, it’s best to remove the flowers as soon as they appear. Simply snip them off with scissors or kitchen shears. Removing the flowers will also encourage the plant to produce more leaves. You can use the flowers as a garnish or add them to vinegars or oils for a subtle onion flavor.

Leave a Comment