
Grow Bean Sprouts Easily, even if you think you have a black thumb! Have you ever craved a fresh, crunchy addition to your salad or stir-fry, only to be disappointed by the wilted, expensive sprouts at the grocery store? Well, fret no more! This DIY guide will unlock the secrets to cultivating your own vibrant bean sprouts right in your kitchen.
Sprouting beans is an ancient practice, dating back thousands of years in Asian cultures. It was a clever way to access fresh, nutritious greens even during harsh winters or in regions with limited growing seasons. Think of it as a miniature, indoor garden that provides a burst of vitamins and minerals when you need them most.
I know what you’re thinking: “Sounds complicated!” But trust me, it’s surprisingly simple. In today’s fast-paced world, we often overlook the joy of creating something nourishing with our own hands. Learning how to grow bean sprouts easily is not only a cost-effective way to add healthy food to your diet, but it’s also a rewarding experience that connects you to the natural world. Plus, it’s a fantastic project for kids, teaching them about plant life and where their food comes from. So, let’s ditch the store-bought sprouts and embark on this fun and easy journey together!

Bohnensprossen einfach selbst ziehen: Eine Schritt-für-Schritt-Anleitung
Hey Leute! Ich liebe frische Sprossen, besonders Bohnensprossen. Sie sind knackig, gesund und super vielseitig in der Küche. Aber anstatt sie immer im Supermarkt zu kaufen, habe ich angefangen, sie selbst zu ziehen. Und wisst ihr was? Es ist total einfach und macht sogar Spaß! Ich zeige euch, wie ihr das auch hinbekommt, ganz ohne kompliziertes Equipment.
Was du brauchst:
* Bohnen: Am besten eignen sich Mungbohnen, aber auch Adzukibohnen oder Linsen funktionieren prima. Achte darauf, dass sie unbehandelt und keimfähig sind. Du findest sie oft im Bioladen oder Reformhaus.
* Ein Keimglas oder ein großes Einmachglas: Ein normales Einmachglas tut’s auch. Wichtig ist nur, dass es sauber ist.
* Ein Stück Gaze oder ein feines Sieb: Das dient als Deckel, damit die Bohnen nicht rausfallen, aber trotzdem Luft reinkommt.
* Ein Gummiring oder eine Schnur: Um die Gaze am Glas zu befestigen.
* Wasser: Am besten gefiltertes Wasser oder abgekochtes Leitungswasser.
* Ein dunkler Ort: Ein Schrank oder eine Schublade sind ideal.
* Geduld: Sprossen brauchen ein paar Tage, um zu wachsen. Aber das Warten lohnt sich!
Die Vorbereitung:
Bevor wir loslegen, ist es wichtig, die Bohnen richtig vorzubereiten. Das ist der Schlüssel für eine erfolgreiche Sprossenzucht.
1. Bohnen auswählen und waschen: Nimm dir eine Handvoll Bohnen (ungefähr 2-3 Esslöffel reichen für ein normales Einmachglas) und sortiere sie aus. Entferne alle beschädigten oder verfärbten Bohnen. Spüle die restlichen Bohnen gründlich unter fließendem Wasser ab.
2. Bohnen einweichen: Gib die gewaschenen Bohnen in das Keimglas oder Einmachglas. Fülle das Glas mit reichlich Wasser, sodass die Bohnen gut bedeckt sind. Bohnen quellen auf, also lieber etwas mehr Wasser nehmen.
3. Einweichzeit: Lass die Bohnen für 8-12 Stunden einweichen. Am besten über Nacht. Das Einweichen weckt die Bohnen auf und bereitet sie auf das Keimen vor.
Der Keimprozess:
Jetzt geht’s ans Eingemachte! Der Keimprozess ist eigentlich ganz einfach, aber es ist wichtig, die Sprossen regelmäßig zu spülen, damit sie nicht schimmeln.
1. Wasser abgießen: Nach dem Einweichen gießt du das Wasser ab. Benutze die Gaze oder das Sieb, um die Bohnen im Glas zu halten.
2. Glas abdecken: Befestige die Gaze oder das Sieb mit dem Gummiring oder der Schnur am Glas. Achte darauf, dass es fest sitzt, aber nicht zu eng.
3. Glas spülen: Spüle die Bohnen gründlich mit frischem Wasser. Schwenke das Glas dabei, damit alle Bohnen benetzt werden. Gieße das Wasser anschließend wieder ab.
4. Glas positionieren: Stelle das Glas schräg in eine Schüssel oder einen Abtropfständer. So kann überschüssiges Wasser ablaufen und die Bohnen bekommen trotzdem genug Luft.
5. Dunkler Ort: Stelle das Glas an einen dunklen Ort. Licht hemmt das Wachstum der Sprossen.
6. Regelmäßiges Spülen: Spüle die Bohnen 2-3 Mal täglich mit frischem Wasser. Das ist super wichtig, um Schimmelbildung zu verhindern. Achte darauf, dass das Wasser gut abläuft.
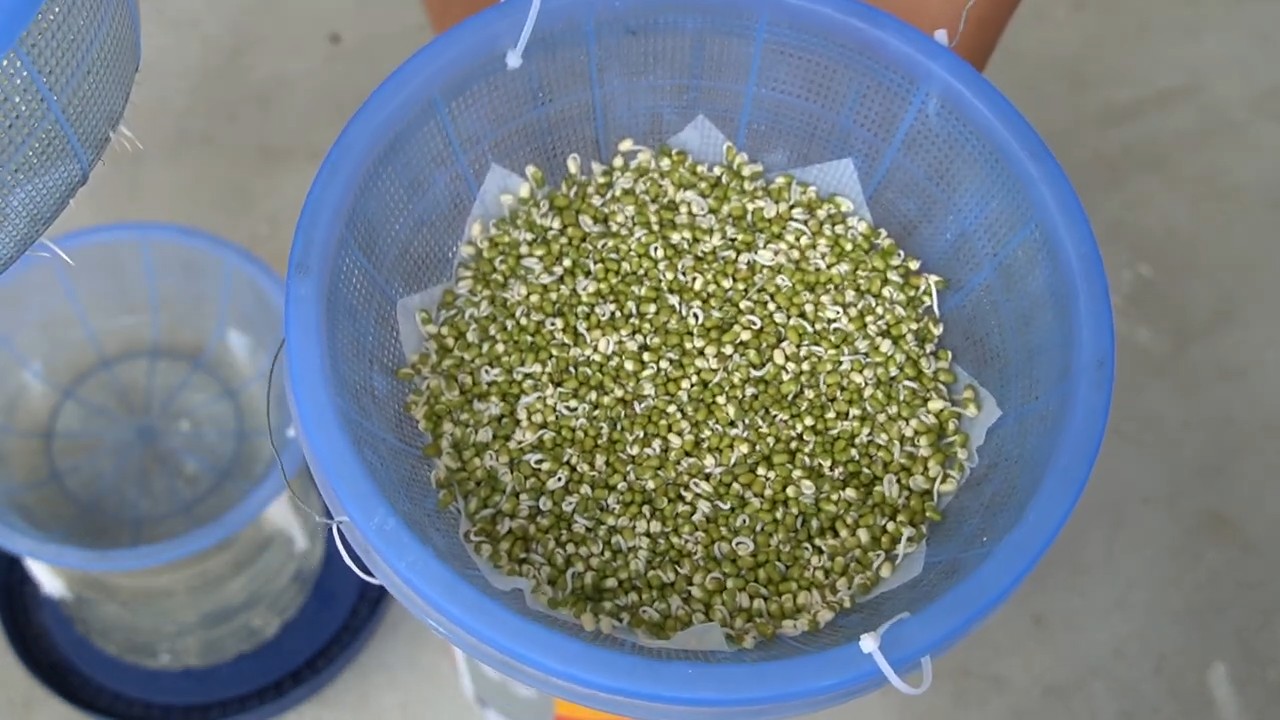
7. Wachstum beobachten: Nach 2-3 Tagen solltest du die ersten kleinen Sprossen sehen. Je nach Temperatur und Bohnensorte dauert es unterschiedlich lange, bis die Sprossen fertig sind.
Die Ernte und Lagerung:
Wenn die Sprossen die gewünschte Länge erreicht haben (meistens nach 4-7 Tagen), ist es Zeit für die Ernte!
1. Sprossen ernten: Spüle die Sprossen noch einmal gründlich ab. Entferne eventuelle Schalenreste.
2. Sprossen trocknen: Lass die Sprossen gut abtropfen oder tupfe sie mit einem Küchentuch trocken.
3. Sprossen lagern: Bewahre die Sprossen in einem luftdichten Behälter im Kühlschrank auf. Sie halten sich dort etwa 3-5 Tage.
Tipps und Tricks für perfekte Bohnensprossen:
* Hygiene ist wichtig: Achte darauf, dass alle Utensilien sauber sind, um Schimmelbildung zu vermeiden.
* Nicht zu viele Bohnen: Verwende nicht zu viele Bohnen auf einmal, sonst haben die Sprossen nicht genug Platz zum Wachsen.
* Regelmäßiges Spülen: Das ist das A und O für eine erfolgreiche Sprossenzucht.
* Temperatur: Die ideale Temperatur für das Keimen liegt zwischen 18 und 22 Grad Celsius.
* Licht: Vermeide direktes Sonnenlicht.
* Geschmack: Je länger die Sprossen wachsen, desto intensiver wird ihr Geschmack.
* Schimmel: Sollte sich doch mal Schimmel bilden, entsorge die Sprossen sofort.
* Abwechslung: Probiere verschiedene Bohnensorten aus, um deinen Lieblingsgeschmack zu finden.
Häufige Fehler und wie man sie vermeidet:
* Zu wenig Spülen: Das führt zu Schimmelbildung. Spüle die Sprossen mindestens 2 Mal täglich.
* Zu viele Bohnen: Die Sprossen haben nicht genug Platz und können nicht richtig wachsen.
* Falsche Temperatur: Zu hohe oder zu niedrige Temperaturen können das Wachstum hemmen.
* Direktes Sonnenlicht: Das hemmt das Wachstum und kann die Sprossen austrocknen.
Warum du deine Bohnensprossen selbst ziehen solltest:
* Frische: Selbstgezogene Sprossen sind viel frischer als gekaufte.
* Geschmack: Sie schmecken intensiver und aromatischer.
* Gesundheit: Sprossen sind reich an Vitaminen, Mineralstoffen und Enzymen.
* Nachhaltigkeit: Du sparst Verpackungsmüll und unterstützt eine nachhaltige Lebensweise.
* Kosten: Selbstgezogene Sprossen sind viel günstiger als gekaufte.
* Spaß: Es macht einfach Spaß, zu sehen, wie die kleinen Sprossen wachsen!
Verwendungsmöglichkeiten für Bohnensprossen:
Bohnensprossen sind unglaublich vielseitig in der Küche. Hier ein paar Ideen:
* Salate: Als knackige Zutat in Salaten.
* Wok-Gerichte: In Wok-Gerichten für den extra Crunch.
* Suppen: Als Topping für Suppen.
* Sandwiches: Auf Sandwiches oder Wraps.
* Frühlingsrollen: In Frühlingsrollen.
* Als Snack: Einfach pur als gesunder Snack.
Ich hoffe, diese Anleitung hilft dir dabei, deine eigenen Bohnensprossen zu ziehen. Es ist wirklich einfacher als du denkst! Viel Spaß beim Ausprobieren! Und denk dran: Übung macht den Meister! Lass mich wissen, wie es bei dir geklappt hat!
Conclusion
So, there you have it! Growing your own bean sprouts at home is not only incredibly easy and cost-effective, but it also provides you with a fresh, nutritious ingredient that you can add to a wide variety of dishes. Forget those limp, pre-packaged sprouts from the grocery store. With just a few simple supplies and a little patience, you can cultivate a vibrant batch of crisp, flavorful bean sprouts right in your own kitchen.
This DIY trick is a must-try for several reasons. First, you have complete control over the quality and freshness of your sprouts. You know exactly what you’re eating, free from any unwanted additives or preservatives. Second, it’s significantly cheaper than buying them regularly. Think of all the money you’ll save over time! Third, it’s a fun and rewarding project that connects you to your food in a more meaningful way. Watching those tiny seeds transform into crunchy sprouts is surprisingly satisfying.
But the best part? The possibilities are endless! While mung beans are the most common choice for sprouting, don’t be afraid to experiment with other varieties like adzuki beans, lentils, or even alfalfa seeds. Each type will offer a slightly different flavor and texture, allowing you to customize your sprouts to suit your preferences. You can also play around with the sprouting time to achieve your desired sprout length and crispness. Some people prefer shorter, more delicate sprouts, while others like them longer and crunchier.
Consider adding your freshly grown bean sprouts to salads, stir-fries, sandwiches, soups, or even as a topping for tacos. They add a delightful crunch and a boost of nutrients to any meal. For a spicier kick, try adding a pinch of chili flakes to the sprouting water. Or, for a more savory flavor, add a dash of soy sauce.
We wholeheartedly encourage you to give this DIY trick a try. It’s a simple, sustainable, and delicious way to enhance your culinary creations. And remember, the key to successful sprouting is patience and consistency. Don’t be discouraged if your first batch isn’t perfect. Just keep experimenting and tweaking the process until you find what works best for you.
Once you’ve mastered the art of growing bean sprouts, we’d love to hear about your experience! Share your tips, tricks, and favorite ways to use your homemade sprouts in the comments below. Let’s build a community of sprout enthusiasts and inspire others to embrace this simple and rewarding DIY project. Happy sprouting!
Frequently Asked Questions (FAQ)
What types of beans can I use to grow bean sprouts?
While mung beans are the most commonly used and readily available option, you can successfully sprout a variety of other beans and seeds. Adzuki beans, lentils, chickpeas, and even alfalfa seeds are all excellent choices. Each type will offer a slightly different flavor and texture profile. Experiment to find your favorites! Just be sure to use beans specifically intended for sprouting or consumption, as some beans may contain toxins that are neutralized during cooking but not during sprouting. Avoid using dried beans from the grocery store’s dry bean aisle unless they are specifically labeled as safe for sprouting.
How long does it take to grow bean sprouts?
The sprouting process typically takes between 3 to 5 days, depending on the type of bean, the temperature, and the humidity. Mung beans tend to sprout relatively quickly, while other varieties may take a bit longer. Keep an eye on your sprouts and harvest them when they reach your desired length and crispness. Remember to rinse them thoroughly every 8-12 hours to prevent mold growth and keep them hydrated.
What is the best container to use for growing bean sprouts?
A wide-mouth jar with a sprouting lid or cheesecloth secured with a rubber band is a popular and effective choice. You can also use a specialized sprouting tray or a colander lined with cheesecloth. The key is to choose a container that allows for good drainage and air circulation. Avoid using containers that are too deep or that don’t allow for adequate drainage, as this can lead to mold growth.
How often should I rinse the bean sprouts?
Rinsing your bean sprouts regularly is crucial for preventing mold growth and keeping them hydrated. Aim to rinse them thoroughly every 8-12 hours with cool, clean water. Make sure to drain the water completely after each rinse. This helps to remove any accumulated waste products and keeps the sprouts fresh and healthy.
What if my bean sprouts start to smell bad?
A foul odor is a sign of bacterial growth or mold, which can make your sprouts unsafe to eat. If you notice a bad smell, discard the entire batch immediately. To prevent this, ensure you are rinsing the sprouts frequently and thoroughly, using clean water, and providing adequate drainage and air circulation.
How do I store bean sprouts after they are grown?
Once your bean sprouts have reached your desired length, rinse them thoroughly and drain them well. Store them in an airtight container lined with a paper towel in the refrigerator. The paper towel will help to absorb any excess moisture and keep the sprouts fresh for up to a week.
Can I grow bean sprouts without light?
Yes, bean sprouts can be grown in a dark or dimly lit environment. In fact, some people prefer to grow them in the dark to prevent them from turning green and developing a slightly bitter taste. However, a little bit of indirect light can actually be beneficial for their growth and development. Experiment to see what works best for you.
Are there any health benefits to eating bean sprouts?
Absolutely! Bean sprouts are a nutritional powerhouse, packed with vitamins, minerals, and antioxidants. They are a good source of vitamin C, vitamin K, folate, and fiber. They are also low in calories and fat, making them a healthy addition to any diet. Eating bean sprouts can help boost your immune system, improve digestion, and protect against chronic diseases.
Can I eat the bean sprout roots?
Yes, the roots of bean sprouts are perfectly safe to eat. They are actually quite nutritious and add a pleasant crunch to your dishes. Some people prefer to trim the roots before eating, but this is purely a matter of personal preference.
What can I do if my bean sprouts are not sprouting?
If your bean sprouts are not sprouting, there could be several reasons. First, make sure your beans are viable and specifically intended for sprouting. Old or damaged beans may not germinate properly. Second, ensure that the temperature is warm enough (around 70-75°F or 21-24°C). Third, make sure you are rinsing the beans regularly and providing adequate moisture. Finally, be patient! Some beans may take a bit longer to sprout than others. If you’ve tried all of these tips and your beans still aren’t sprouting, try starting with a fresh batch of beans.

Leave a Comment