
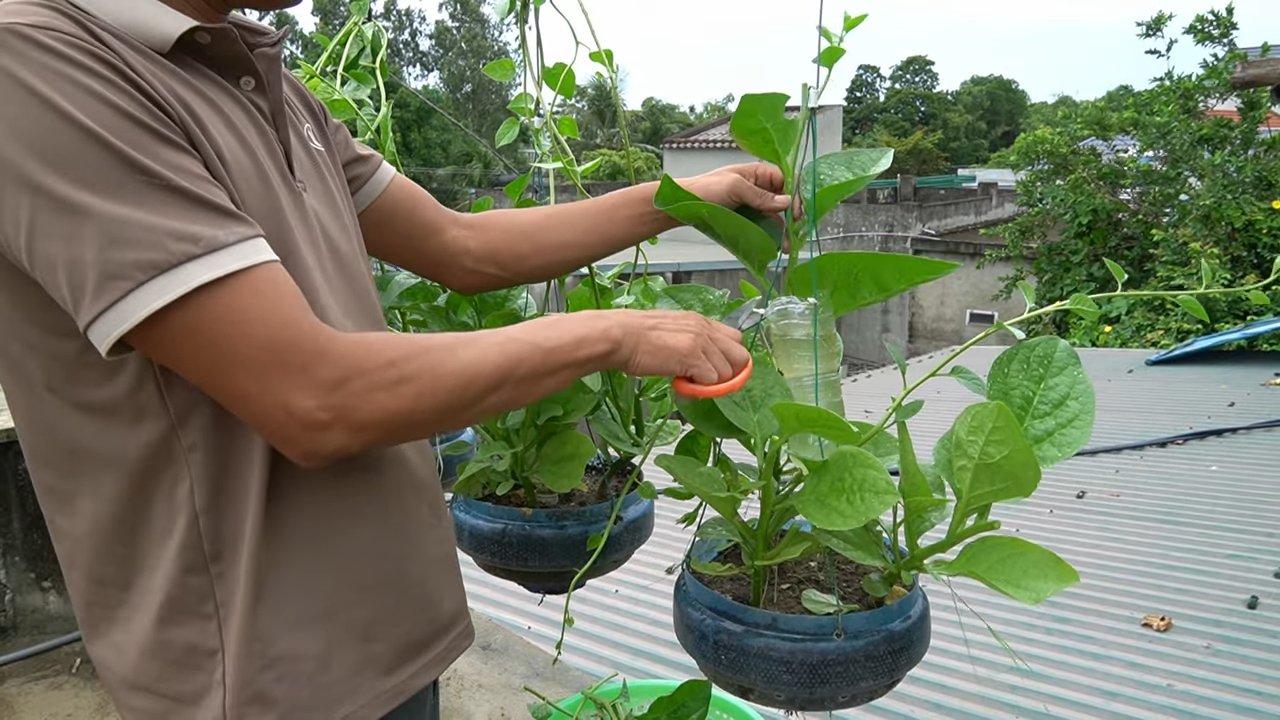
Malabar Spinach Home Harvest: Imagine stepping into your backyard and plucking fresh, vibrant green leaves for a delicious and nutritious meal. Sounds dreamy, right? Well, it doesn’t have to be just a dream! I’m here to show you how to achieve a bountiful Malabar Spinach Home Harvest, even if you think you don’t have a green thumb.
Malabar spinach, also known as Basella alba, isn’t just another leafy green; it’s a plant with a rich history, particularly in Asian and African cuisines. For centuries, it’s been cherished for its mild flavor, succulent texture, and impressive nutritional benefits. Think of it as a heat-tolerant alternative to spinach, perfect for those scorching summer months when regular spinach wilts.
But why should you bother with a DIY Malabar spinach harvest? In today’s world, where we’re increasingly conscious of what we eat and where it comes from, growing your own food offers unparalleled satisfaction and control. Plus, store-bought produce often lacks the freshness and flavor of homegrown goodies. This DIY guide will equip you with simple, effective tricks and hacks to cultivate a thriving Malabar spinach plant and enjoy a continuous supply of fresh leaves right at your doorstep. Get ready to unlock the secrets to a successful and rewarding Malabar spinach home harvest!
Malabar Spinat Ernte: Dein DIY-Leitfaden für eine reiche Ausbeute
Hallo Gartenfreunde! Ich freue mich riesig, euch heute zu zeigen, wie ihr euren Malabar Spinat (auch bekannt als Ceylon Spinat oder Indischer Spinat) zu Hause ernten könnt, um eine üppige und fortlaufende Ernte zu gewährleisten. Malabar Spinat ist nicht nur super einfach anzubauen, sondern auch unglaublich nahrhaft und vielseitig in der Küche. Also, krempeln wir die Ärmel hoch und legen los!
Was du für die Malabar Spinat Ernte brauchst:
* Eine scharfe Gartenschere oder eine Schere
* Einen Korb oder eine Schüssel für die Ernte
* Eventuell Gartenhandschuhe (optional, aber empfehlenswert, um deine Hände sauber zu halten)
Wann ist der richtige Zeitpunkt für die Ernte?
Der beste Zeitpunkt für die Ernte von Malabar Spinat ist, wenn die Blätter eine gute Größe erreicht haben, in der Regel etwa 7-10 cm lang. Du kannst mit der Ernte beginnen, sobald die Pflanze eine Höhe von etwa 30 cm erreicht hat. Das Tolle am Malabar Spinat ist, dass er kontinuierlich neue Blätter produziert, solange du ihn regelmäßig erntest.
Die richtige Erntetechnik: So geht’s!
Die Art und Weise, wie du deinen Malabar Spinat erntest, beeinflusst maßgeblich, wie gut er weiterwächst und wie viel du letztendlich ernten kannst. Hier sind ein paar wichtige Punkte, die du beachten solltest:
* Regelmäßigkeit ist der Schlüssel: Ernte deinen Malabar Spinat regelmäßig, idealerweise alle paar Tage oder einmal pro Woche. Das fördert das Wachstum neuer Blätter und verhindert, dass die Pflanze zu blühen beginnt (was die Blattproduktion reduziert).
* Nicht alles auf einmal: Ernte niemals alle Blätter auf einmal. Lass immer genügend Blätter an der Pflanze, damit sie weiterhin Photosynthese betreiben und wachsen kann.
* Die richtige Schnitttechnik: Schneide die Stängel knapp oberhalb eines Blattknotens ab. Ein Blattknoten ist die Stelle, an der ein Blatt oder ein Seitentrieb aus dem Hauptstängel wächst. Wenn du oberhalb eines Blattknotens schneidest, wird die Pflanze an dieser Stelle neue Triebe bilden.
* Junge Blätter bevorzugen: Ernte vorzugsweise die jüngeren, zarten Blätter. Sie sind schmackhafter und haben eine bessere Textur als die älteren, härteren Blätter.
* Blüten entfernen: Wenn du Blüten an deiner Malabar Spinat Pflanze entdeckst, entferne sie sofort. Die Blütenbildung lenkt die Energie der Pflanze von der Blattproduktion ab.
Schritt-für-Schritt Anleitung zur Malabar Spinat Ernte
Jetzt, wo wir die Grundlagen geklärt haben, gehen wir die eigentliche Ernte Schritt für Schritt durch:
1. Vorbereitung: Zieh deine Gartenhandschuhe an (wenn du welche verwendest) und nimm deine Gartenschere oder Schere zur Hand. Stelle deinen Korb oder deine Schüssel in Reichweite bereit.
2. Inspektion der Pflanze: Untersuche deine Malabar Spinat Pflanze sorgfältig. Suche nach Blättern, die die richtige Größe (7-10 cm) haben und gesund aussehen. Vermeide Blätter, die vergilbt, beschädigt oder von Insekten befallen sind.
3. Auswahl der Blätter: Wähle die Blätter aus, die du ernten möchtest. Denke daran, vorzugsweise die jüngeren, zarten Blätter zu nehmen.
4. Schneiden der Stängel: Nimm deine Gartenschere oder Schere und schneide den Stängel knapp oberhalb eines Blattknotens ab. Achte darauf, den Hauptstängel der Pflanze nicht zu beschädigen.
5. Sammeln der Ernte: Lege die geernteten Blätter in deinen Korb oder deine Schüssel.
6. Wiederholung: Wiederhole die Schritte 3-5, bis du die gewünschte Menge an Malabar Spinat geerntet hast. Denke daran, nicht alle Blätter auf einmal zu ernten und genügend Blätter an der Pflanze zu lassen.
7. Entfernen von Blüten: Wenn du Blüten entdeckst, entferne sie sofort, indem du den Stängel, an dem die Blüte wächst, knapp oberhalb eines Blattknotens abschneidest.
8. Reinigung: Spüle die geernteten Blätter gründlich unter kaltem Wasser ab, um Schmutz und Insekten zu entfernen.
9. Lagerung: Lagere den geernteten Malabar Spinat im Kühlschrank. Am besten bewahrst du ihn in einem Plastikbeutel oder einer Frischhaltebox auf. Er hält sich im Kühlschrank etwa 3-5 Tage.
Tipps und Tricks für eine noch bessere Ernte
Hier sind noch ein paar zusätzliche Tipps, die dir helfen können, deine Malabar Spinat Ernte zu optimieren:
* Düngung: Dünge deinen Malabar Spinat regelmäßig mit einem organischen Dünger, um das Wachstum zu fördern. Ich verwende gerne Komposttee oder verdünnte Fisch-Emulsion.
* Bewässerung: Achte darauf, dass dein Malabar Spinat ausreichend bewässert wird, besonders während trockener Perioden. Der Boden sollte immer leicht feucht sein, aber nicht durchnässt.
* Mulchen: Mulche den Boden um deine Malabar Spinat Pflanze mit organischem Material wie Stroh oder Holzhackschnitzeln. Das hilft, Feuchtigkeit im Boden zu halten, Unkraut zu unterdrücken und den Boden zu verbessern.
* Schutz vor Schädlingen: Obwohl Malabar Spinat relativ resistent gegen Schädlinge ist, kann er gelegentlich von Blattläusen oder Schnecken befallen werden. Kontrolliere deine Pflanzen regelmäßig und ergreife bei Bedarf Maßnahmen zur Schädlingsbekämpfung. Ich verwende gerne natürliche Methoden wie das Besprühen mit Neemöl oder das Ausbringen von Kaffeesatz.
* Rankhilfe: Malabar Spinat ist eine Kletterpflanze und benötigt eine Rankhilfe, um optimal zu wachsen. Du kannst ihm ein Spalier, einen Zaun oder ein anderes stabiles Gerüst zur Verfügung stellen.
* Samen gewinnen: Wenn du möchtest, kannst du auch Samen von deinem Malabar Spinat gewinnen. Lass einfach ein paar Blüten an der Pflanze, bis sie Samen bilden. Die Samen sind reif, wenn sie schwarz und trocken sind. Sammle die Samen und lagere sie an einem kühlen, trockenen Ort.
Verwendungsmöglichkeiten für deinen geernteten Malabar Spinat
Malabar Spinat ist unglaublich vielseitig in der Küche. Du kannst ihn roh in Salaten verwenden, gekocht wie Spinat zubereiten oder in Suppen, Eintöpfen und Currys hinzufügen. Hier sind ein paar Ideen, wie du deinen geernteten Malabar Spinat verwenden kannst:
* Salate: Die jungen, zarten Blätter eignen sich hervorragend für Salate. Sie haben einen milden, leicht säuerlichen Geschmack.
* Gekochter Spinat: Du kannst Malabar Spinat genauso zubereiten wie normalen Spinat. Dünste ihn mit etwas Knoblauch und Olivenöl oder verwende ihn in Spinatknödeln oder Spinatrouladen.
* Suppen und Eintöpfe: Füge Malabar Spinat am Ende der Garzeit zu Suppen und Eintöpfen hinzu. Er verleiht ihnen eine schöne grüne Farbe und einen nahrhaften Schub.
* Currys: Malabar Spinat ist eine beliebte Zutat in indischen Currys. Er passt gut zu Kokosmilch, Gewürzen und Hülsenfrüchten.
* Smoothies: Füge eine Handvoll Malabar Spinat zu deinen Smoothies hinzu, um sie mit Vitaminen und Mineralstoffen anzureichern.
Häufige Fehler vermeiden
Um sicherzustellen, dass deine Malabar Spinat Ernte erfolgreich ist, solltest du diese häufigen Fehler vermeiden:
* Zu spätes Ernten: Wenn du zu lange mit der Ernte wartest, werden die Blätter hart und bitter.
* Zu wenig Ernten: Wenn du nicht regelmäßig erntest, wird die Pflanze zu blühen beginnen und die Blattproduktion reduzieren.
* Falsche Schnitttechnik: Wenn du die Stängel nicht knapp oberhalb eines Blattknotens abschneidest, wird die Pflanze keine neuen Triebe bilden.
* Mangelnde Pflege: Wenn du deinen Malabar Spinat nicht ausreichend düngst und bewässerst, wird er nicht optimal wachsen

Conclusion
So, there you have it! Mastering the art of harvesting your own Malabar spinach at home is not just a gardening endeavor; it’s an investment in fresh, nutritious, and readily available greens right at your fingertips. We’ve walked through the simple yet effective steps to ensure you’re reaping the maximum yield from your Malabar spinach plants, all while promoting their continued growth and vitality.
Why is this DIY trick a must-try? Because it empowers you to control the quality and freshness of your food. Store-bought spinach, even when fresh, can’t compare to the vibrant flavor and nutritional punch of homegrown Malabar spinach, harvested just moments before it graces your plate. Plus, it’s incredibly rewarding to nurture a plant from seedling to harvest, knowing you’re contributing to a more sustainable and self-sufficient lifestyle.
Beyond the basic harvest, consider experimenting with different harvesting techniques. For example, you can selectively harvest individual leaves for a continuous supply, or you can prune back entire stems to encourage bushier growth and a larger yield in the long run. Think about the dishes you love to make with spinach and tailor your harvesting strategy accordingly. If you’re planning a large batch of saag paneer, a more substantial harvest might be in order. If you just want a handful for a smoothie, a few carefully selected leaves will do the trick.
Another exciting variation is to explore different ways to preserve your Malabar spinach harvest. Blanching and freezing is a classic method, allowing you to enjoy your homegrown greens throughout the year. You can also dehydrate the leaves to create a nutritious powder that can be added to soups, stews, or even smoothies for an extra boost of vitamins and minerals. Pickling the stems is another unique way to preserve the harvest and add a tangy twist to your meals.
But the real magic happens when you share your harvest with others. Imagine gifting a bag of freshly harvested Malabar spinach to a neighbor or friend, along with a simple recipe suggestion. It’s a wonderful way to spread the joy of gardening and encourage others to explore the benefits of homegrown food.
We wholeheartedly encourage you to give this DIY Malabar spinach home harvest a try. It’s easier than you might think, and the rewards are well worth the effort. Don’t be afraid to experiment, adapt the techniques to your specific growing conditions, and most importantly, have fun!
Once you’ve experienced the satisfaction of harvesting your own Malabar spinach, we’d love to hear about it. Share your experiences, tips, and tricks in the comments below. Let us know what worked well for you, what challenges you encountered, and what delicious dishes you created with your homegrown greens. Your feedback will not only help us improve this guide but also inspire other gardeners to embark on their own Malabar spinach harvesting adventures. So go ahead, get your hands dirty, and discover the joy of fresh, homegrown Malabar spinach!
Frequently Asked Questions (FAQ)
What is the best time of day to harvest Malabar spinach?
The best time to harvest Malabar spinach is generally in the morning, after the dew has dried but before the heat of the day sets in. Harvesting during this time helps to minimize wilting and ensures that the leaves retain their crispness and flavor. The cooler temperatures also help to preserve the nutrients in the leaves. Avoid harvesting during the hottest part of the day, as the leaves may be stressed and more prone to damage.
How often can I harvest Malabar spinach?
Malabar spinach is a prolific grower, and you can typically harvest it every one to two weeks, depending on the growth rate of your plants and the amount of foliage you need. Regular harvesting encourages the plant to produce more leaves and stems, resulting in a larger overall yield. Avoid harvesting more than one-third of the plant at any one time, as this can stress the plant and slow down its growth.
What tools do I need to harvest Malabar spinach?
The tools you need for harvesting Malabar spinach are quite simple. A sharp pair of scissors or pruning shears is essential for making clean cuts and preventing damage to the plant. A basket or container is also helpful for collecting the harvested leaves and stems. Gloves are optional but recommended, especially if you have sensitive skin, as the sap from the plant can sometimes cause irritation.
How do I store Malabar spinach after harvesting?
To store Malabar spinach after harvesting, gently wash the leaves and stems to remove any dirt or debris. Pat them dry with a clean towel or spin them in a salad spinner. Store the spinach in a plastic bag or container lined with a paper towel in the refrigerator. The paper towel will help to absorb excess moisture and keep the spinach fresh for longer. Properly stored Malabar spinach can last for up to a week in the refrigerator.
Can I eat the stems of Malabar spinach?
Yes, the stems of Malabar spinach are edible and can be used in a variety of dishes. They have a slightly different texture than the leaves, being a bit more crunchy and succulent. The stems can be stir-fried, added to soups and stews, or even pickled. When harvesting, you can choose to harvest just the leaves or include the stems as well, depending on your preference and the recipe you’re using.
How do I encourage more growth after harvesting?
To encourage more growth after harvesting Malabar spinach, it’s important to provide the plant with adequate nutrients and water. Fertilize the plant with a balanced fertilizer or compost tea every few weeks to replenish the nutrients that were used during growth. Water the plant regularly, especially during dry periods, to keep the soil moist but not waterlogged. Pruning the plant regularly, even when you’re not harvesting, can also help to promote bushier growth and a larger yield.
What if my Malabar spinach leaves are turning yellow?
Yellowing leaves on Malabar spinach can be a sign of several issues, including nutrient deficiencies, overwatering, underwatering, or pest infestations. Check the soil moisture to ensure that the plant is not being overwatered or underwatered. Fertilize the plant with a balanced fertilizer to address any nutrient deficiencies. Inspect the leaves for signs of pests, such as aphids or spider mites, and treat accordingly. If the problem persists, consider testing the soil pH to ensure that it is within the optimal range for Malabar spinach.
Is Malabar spinach the same as regular spinach?
No, Malabar spinach (Basella alba) is not the same as regular spinach (Spinacia oleracea). While both are leafy green vegetables, they belong to different plant families and have different characteristics. Malabar spinach is a heat-tolerant vine that thrives in warm climates, while regular spinach prefers cooler temperatures. Malabar spinach has thicker, more succulent leaves and a slightly different flavor than regular spinach. It’s often described as having a mild, slightly peppery taste.
Can I grow Malabar spinach in a container?
Yes, Malabar spinach can be successfully grown in a container, making it a great option for gardeners with limited space. Choose a large container with good drainage and fill it with a well-draining potting mix. Provide the plant with a trellis or other support structure to climb on. Water the plant regularly and fertilize it every few weeks. Place the container in a sunny location that receives at least six hours of sunlight per day.
How do I deal with pests on my Malabar spinach?
Malabar spinach can be susceptible to certain pests, such as aphids, spider mites, and snails. Regularly inspect the plants for signs of infestation. For aphids and spider mites, you can try spraying the plants with a strong stream of water or using insecticidal soap. For snails, you can handpick them off the plants or use snail bait. Encourage beneficial insects, such as ladybugs and lacewings, to help control pest populations naturally.

Leave a Comment