
Growing Onions in Plastic Bottles might sound unconventional, but trust me, it’s a game-changer for any home gardener, especially those with limited space! Are you tired of battling weeds, struggling with poor soil, or simply dreaming of a bountiful onion harvest without dedicating a huge chunk of your garden? Then you’re in the right place!
Onions have been cultivated for thousands of years, with evidence suggesting their use dates back to ancient Egypt. They were valued not only for their culinary properties but also for their medicinal and even symbolic significance. Today, we still cherish onions as a staple ingredient in countless dishes, and the satisfaction of growing your own is simply unmatched.
But let’s face it, traditional gardening can be challenging. That’s where this DIY trick comes in.
Why should you try growing onions in plastic bottles?
It’s a fantastic way to recycle, conserve water, and create a controlled environment for your onions to thrive. Plus, it’s incredibly easy and requires minimal effort. I’m going to show you how to transform those discarded plastic bottles into mini onion farms, maximizing your yield and minimizing your gardening headaches. Get ready to unlock a simple yet effective method for growing onions in plastic bottles and enjoy fresh, homegrown onions all season long!
Zwiebeln ziehen in Plastikflaschen: Ein DIY-Gartenprojekt für Jedermann
Hallo Gartenfreunde! Habt ihr euch jemals gefragt, ob es eine einfache und platzsparende Möglichkeit gibt, Zwiebeln anzubauen, auch wenn ihr keinen großen Garten habt? Ich habe die Antwort: Zwiebeln in Plastikflaschen! Es ist ein super einfaches DIY-Projekt, das nicht nur nachhaltig ist, weil wir Plastikmüll wiederverwenden, sondern auch unglaublich befriedigend. Lasst uns gemeinsam in dieses Abenteuer eintauchen!
Was du brauchst: Die Materialliste
Bevor wir loslegen, hier eine Liste aller Materialien, die du benötigst. Keine Sorge, die meisten davon hast du wahrscheinlich schon zu Hause!
* Plastikflaschen: Am besten eignen sich 1,5-Liter- oder 2-Liter-Flaschen. Je größer, desto besser, da die Zwiebeln Platz zum Wachsen brauchen.
* Erde: Hochwertige Blumenerde ist ideal. Du kannst auch Gartenerde mit Kompost mischen, um die Nährstoffversorgung zu verbessern.
* Zwiebelsetzlinge oder Zwiebeln: Du kannst entweder kleine Zwiebeln (Setzlinge) kaufen oder Zwiebeln verwenden, die bereits zu Hause keimen.
* Messer oder Schere: Zum Zuschneiden der Plastikflaschen. Sei vorsichtig!
* Bohrer oder Nagel: Zum Bohren von Löchern für die Drainage.
* Wasser: Zum Gießen, natürlich!
* Optional: Kieselsteine oder Tonscherben für die Drainage.
* Optional: Pflanzetiketten, um den Überblick zu behalten.
Vorbereitung ist alles: Die Flaschen vorbereiten
Dieser Schritt ist entscheidend, um sicherzustellen, dass deine Zwiebeln in den Plastikflaschen gut gedeihen.
1. Flaschen reinigen: Zuerst musst du die Plastikflaschen gründlich reinigen. Entferne alle Etiketten und spüle sie mit warmem Seifenwasser aus. Achte darauf, dass keine Seifenreste zurückbleiben.
2. Flaschen zuschneiden: Jetzt kommt der spaßige Teil! Schneide die Plastikflaschen in der Mitte durch. Du kannst entweder beide Hälften verwenden oder nur die untere Hälfte. Wenn du beide Hälften verwendest, kannst du die obere Hälfte umgedreht als eine Art Mini-Gewächshaus auf die untere Hälfte setzen, um die Keimung zu beschleunigen. Ich bevorzuge es, nur die untere Hälfte zu verwenden, da es einfacher zu handhaben ist.
3. Drainagelöcher bohren: Das ist super wichtig! Bohre oder steche mit einem Nagel mehrere Löcher in den Boden der Flasche. Diese Löcher sorgen dafür, dass überschüssiges Wasser ablaufen kann und die Zwiebeln nicht in Staunässe stehen. Staunässe ist der Feind jeder Zwiebel!
4. Optional: Drainage verbessern: Wenn du ganz sicher gehen willst, dass das Wasser gut abfließen kann, kannst du eine Schicht Kieselsteine oder Tonscherben auf den Boden der Flasche legen, bevor du die Erde einfüllst. Das hilft, die Drainage zusätzlich zu verbessern.
Pflanzzeit: Die Zwiebeln einpflanzen
Jetzt kommt der aufregendste Teil: das Einpflanzen der Zwiebeln!
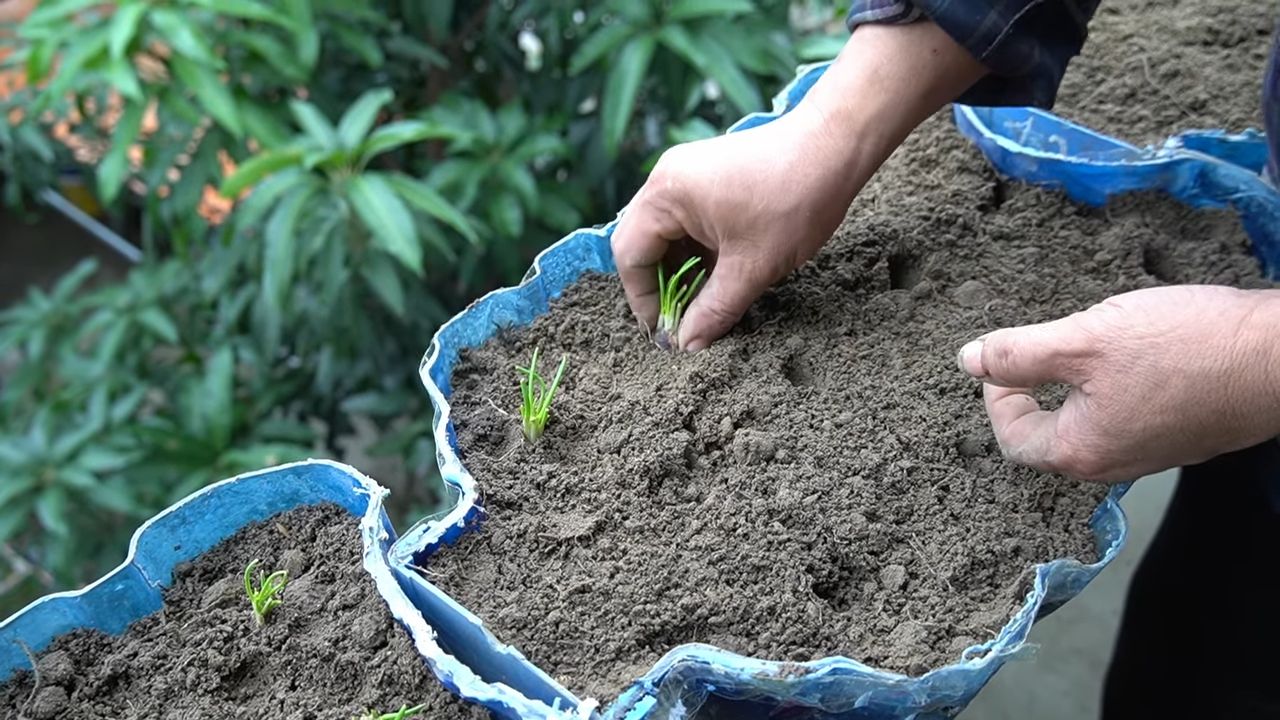
1. Erde einfüllen: Fülle die vorbereiteten Plastikflaschen mit Erde. Lass oben etwa 2-3 cm Platz, damit du beim Gießen nicht alles überschwemmst.
2. Zwiebeln setzen: Drücke die Zwiebelsetzlinge oder die keimenden Zwiebeln vorsichtig in die Erde. Achte darauf, dass die Wurzeln nach unten zeigen und der obere Teil der Zwiebel (wo die grünen Triebe herauskommen) leicht aus der Erde herausschaut.
3. Abstand halten: Wenn du mehrere Zwiebeln in eine Flasche pflanzt, achte darauf, dass sie genügend Abstand zueinander haben. Etwa 5-7 cm sollten ausreichen, damit sie sich nicht gegenseitig behindern.
4. Angießen: Gieße die Zwiebeln nach dem Einpflanzen gründlich an. Achte darauf, dass die Erde gut durchfeuchtet ist, aber nicht durchnässt.
Pflegeleicht: Die Zwiebeln hegen und pflegen
Zwiebeln sind relativ pflegeleicht, aber ein paar Dinge solltest du beachten, damit sie gut wachsen.
1. Standort: Zwiebeln lieben die Sonne! Stelle die Plastikflaschen an einen sonnigen Standort, an dem sie mindestens 6 Stunden Sonnenlicht pro Tag bekommen. Ein Südfenster oder ein sonniger Balkon sind ideal.
2. Gießen: Gieße die Zwiebeln regelmäßig, aber nicht zu viel. Die Erde sollte immer leicht feucht sein, aber nicht nass. Überprüfe die Feuchtigkeit der Erde, indem du mit dem Finger in die Erde stichst. Wenn sie sich trocken anfühlt, ist es Zeit zum Gießen.
3. Düngen: Zwiebeln sind hungrig! Dünge sie alle paar Wochen mit einem organischen Flüssigdünger. Achte darauf, dass der Dünger für Gemüse geeignet ist.
4. Unkraut entfernen: Halte die Erde sauber und entferne regelmäßig Unkraut, das in den Flaschen wächst. Unkraut kann Nährstoffe und Wasser stehlen.
5. Schädlinge beobachten: Achte auf Schädlinge wie Blattläuse oder Zwiebelfliegen. Wenn du Schädlinge entdeckst, kannst du sie mit einem natürlichen Insektizid bekämpfen.
6. Drehen: Drehe die Flaschen regelmäßig, damit alle Seiten der Zwiebeln gleichmäßig Sonnenlicht bekommen.
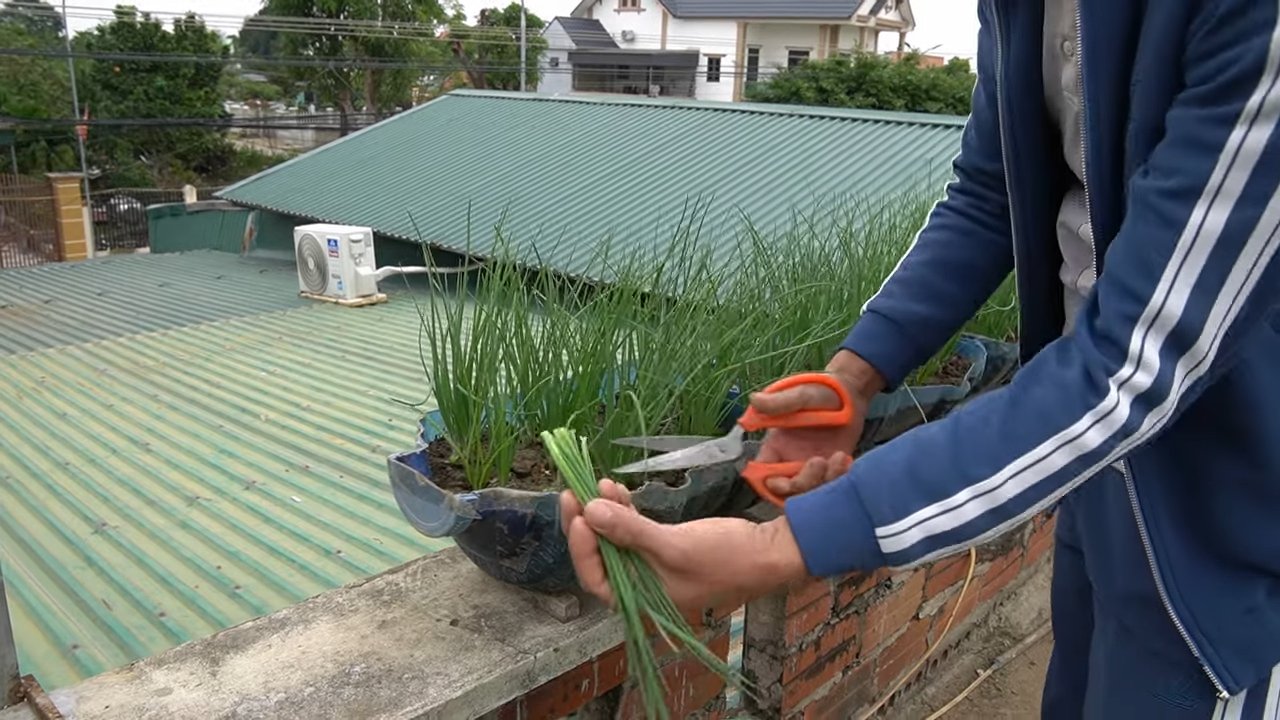
Erntezeit: Die Früchte deiner Arbeit genießen
Nach einigen Monaten (je nach Zwiebelsorte) sind deine Zwiebeln erntereif!
1. Erntezeitpunkt: Du erkennst, dass die Zwiebeln reif sind, wenn die grünen Blätter gelb werden und umknicken.
2. Ernten: Ziehe die Zwiebeln vorsichtig aus der Erde. Wenn sie sich nicht leicht herausziehen lassen, kannst du die Erde etwas auflockern.
3. Trocknen: Lasse die geernteten Zwiebeln ein paar Tage an einem trockenen und luftigen Ort trocknen. Das hilft, sie länger haltbar zu machen.
4. Lagern: Lagere die getrockneten Zwiebeln an einem kühlen, trockenen und dunklen Ort.
Extra-Tipps für den Zwiebelanbau in Flaschen
* Verschiedene Zwiebelsorten: Probiere verschiedene Zwiebelsorten aus, um herauszufinden, welche am besten in deinen Plastikflaschen wachsen. Es gibt gelbe, rote und weiße Zwiebeln, jede mit ihrem eigenen Geschmack und ihren eigenen Eigenschaften.
* Frühlingszwiebeln: Du kannst auch Frühlingszwiebeln in Plastikflaschen anbauen. Sie wachsen schnell und sind eine tolle Ergänzung zu Salaten und anderen Gerichten.
* Kombinationen: Pflanze neben den Zwiebeln auch andere Kräuter oder Gemüse in die Flaschen. Das kann helfen, Schädlinge abzuwehren und die Nährstoffversorgung zu verbessern.
* Upcycling: Verwende nicht nur Plastikflaschen, sondern auch andere recycelte Materialien wie Joghurtbecher oder Konservendosen.
* Beschriftung: Beschrifte die Flaschen mit den jeweiligen Zwiebelsorten, damit du den Überblick behältst.
Häufige Probleme und Lösungen
* Gelbe Blätter: Gelbe Blätter können ein Zeichen für Überwässerung, Nährstoffmangel oder Schädlingsbefall sein. Überprüfe die Feuchtigkeit der Erde, dünge die Zwiebeln und suche nach Schädlingen.
* Schimmel: Schimmel kann auftreten, wenn die Erde zu feucht ist oder die Luftzirkulation schlecht ist. Sorge für eine gute Drainage und stelle die Flaschen an einen luftigen Ort.
* Kleine Zwiebeln: Kleine Zwiebeln können ein Zeichen für Nährstoffmangel oder zu wenig Sonnenlicht sein. Dünge die Zwiebeln regelmäßig und stelle sie an einen sonnigeren Standort.
Fazit: Ein lohnendes Projekt
Ich hoffe, dieser Leitfaden hat dir geholfen, das
Conclusion
So, there you have it! Growing onions in plastic bottles isn’t just a quirky gardening experiment; it’s a surprisingly effective and space-saving method that can yield a bountiful harvest, even in the most compact environments. We’ve walked you through the simple steps, from preparing your bottles and soil to planting and nurturing your onion seedlings. The beauty of this DIY trick lies in its accessibility – almost everyone has access to plastic bottles, and the other materials are readily available and inexpensive.
But why is this method a must-try? Firstly, it’s incredibly efficient. Vertical gardening maximizes your growing space, allowing you to cultivate more onions in a smaller area compared to traditional ground planting. This is a game-changer for apartment dwellers, balcony gardeners, or anyone with limited yard space. Secondly, the enclosed environment of the plastic bottle offers a degree of protection against pests and diseases, reducing the need for harmful pesticides. Thirdly, it’s a fantastic way to recycle and repurpose plastic bottles, contributing to a more sustainable lifestyle. You’re not just growing onions; you’re also reducing waste!
Beyond the basic method, there’s plenty of room for experimentation and personalization. Consider using different types of plastic bottles – larger bottles can accommodate more onions or larger varieties. You could also try different soil mixes to see which one yields the best results in your specific climate. For example, adding compost or worm castings can significantly boost the nutrient content of the soil, leading to healthier and more productive onion plants.
Another exciting variation is to explore different onion varieties. While we’ve focused on common bulb onions, you could also try growing scallions or shallots in plastic bottles. These smaller varieties are particularly well-suited to this method and can provide a continuous supply of fresh greens for your culinary creations. You can even experiment with companion planting by adding herbs like basil or thyme to the bottles, which can help deter pests and enhance the flavor of your onions.
Don’t be afraid to get creative with the aesthetics of your plastic bottle garden. You can paint the bottles in vibrant colors, decorate them with patterns, or even create a vertical wall of onions by hanging the bottles from a trellis or fence. This not only adds a touch of personality to your garden but also makes it a visually appealing conversation starter.
Growing onions in plastic bottles is more than just a gardening technique; it’s a testament to the power of innovation and resourcefulness. It’s a way to connect with nature, grow your own food, and contribute to a more sustainable future, all while enjoying the satisfaction of nurturing life from a simple seed.
So, what are you waiting for? Gather your plastic bottles, prepare your soil, and embark on this exciting gardening adventure. We’re confident that you’ll be amazed by the results. And most importantly, we encourage you to share your experiences with us! Post photos of your plastic bottle onion gardens on social media, tag us, and let us know what you’ve learned. Your insights and tips can inspire others to try this method and join the growing community of DIY gardeners. Happy growing!
Frequently Asked Questions (FAQ)
1. What type of plastic bottles are best for growing onions?
Ideally, you should use sturdy, food-grade plastic bottles. Two-liter soda bottles or larger water bottles work well. Avoid using bottles that have contained harsh chemicals or pesticides, as these could contaminate your soil and affect the growth of your onions. Make sure to thoroughly clean the bottles before using them to remove any residue. The color of the bottle doesn’t significantly impact growth, but clear or translucent bottles allow you to monitor the soil moisture levels more easily.
2. What kind of soil should I use for growing onions in plastic bottles?
A well-draining potting mix is essential for growing healthy onions in plastic bottles. You can use a commercially available potting mix or create your own by combining equal parts of garden soil, compost, and perlite or vermiculite. The compost provides essential nutrients, while the perlite or vermiculite improves drainage and aeration. Avoid using heavy clay soil, as it can become waterlogged and suffocate the onion roots. Adding a slow-release fertilizer to the soil mix can also provide a steady supply of nutrients throughout the growing season.
3. How often should I water my onions grown in plastic bottles?
Watering frequency depends on the climate, the type of soil you’re using, and the size of the plastic bottle. Generally, you should water your onions whenever the top inch of soil feels dry to the touch. Avoid overwatering, as this can lead to root rot. Ensure that the plastic bottles have adequate drainage holes to prevent water from accumulating at the bottom. During hot and dry weather, you may need to water your onions more frequently. Check the soil moisture levels regularly and adjust your watering schedule accordingly.
4. How much sunlight do onions need when grown in plastic bottles?
Onions require at least 6-8 hours of direct sunlight per day to thrive. Place your plastic bottle onion garden in a sunny location, such as a south-facing balcony or windowsill. If you don’t have access to enough natural sunlight, you can supplement with artificial grow lights. LED grow lights are energy-efficient and provide the full spectrum of light that onions need for optimal growth. Rotate the plastic bottles regularly to ensure that all sides of the plants receive adequate sunlight.
5. How do I protect my onions from pests and diseases when grown in plastic bottles?
The enclosed environment of the plastic bottle offers some protection against pests and diseases, but it’s still important to take preventative measures. Regularly inspect your onion plants for signs of pests, such as aphids, thrips, or onion maggots. If you spot any pests, you can try removing them by hand or using an insecticidal soap. To prevent fungal diseases, ensure good air circulation around the plants and avoid overwatering. You can also apply a fungicide if necessary. Companion planting with herbs like basil or thyme can help deter pests and improve the overall health of your onion plants.
6. When and how do I harvest my onions grown in plastic bottles?
The harvesting time depends on the variety of onion you’re growing and your personal preference. Generally, bulb onions are ready to harvest when the tops start to turn yellow and fall over. You can gently pull the onions out of the plastic bottles, being careful not to damage the bulbs. Scallions and shallots can be harvested at any time when they reach a desired size. After harvesting, cure the onions by laying them out in a dry, well-ventilated area for a few days to allow the outer layers to dry and harden. This will help them store longer.
7. Can I reuse the plastic bottles for growing onions again?
Yes, you can reuse the plastic bottles for growing onions multiple times. However, it’s important to thoroughly clean and disinfect the bottles before each use to prevent the spread of diseases. Wash the bottles with soap and water, and then rinse them with a solution of bleach and water (1 part bleach to 10 parts water). Allow the bottles to air dry completely before using them again. You may also need to replace the soil mix if it has become depleted of nutrients.
8. What are some common problems I might encounter when growing onions in plastic bottles, and how can I fix them?
Some common problems include yellowing leaves, stunted growth, and root rot. Yellowing leaves can be caused by nutrient deficiencies, overwatering, or underwatering. Stunted growth can be due to insufficient sunlight, poor soil quality, or pest infestations. Root rot is typically caused by overwatering and poor drainage. To fix these problems, adjust your watering schedule, fertilize your onions regularly, provide adequate sunlight, and ensure good drainage. If you suspect a pest infestation, take appropriate measures to control the pests.
9. Can I grow other vegetables in plastic bottles using the same method?
Yes, you can grow a variety of other vegetables in plastic bottles using a similar method. Some popular choices include lettuce, spinach, herbs, strawberries, and even tomatoes (smaller varieties). The key is to choose vegetables that are well-suited to container gardening and that have relatively shallow root systems. Adjust the size of the plastic bottle and the soil mix according to the specific needs of the vegetable you’re growing.
10. Is growing onions in plastic bottles environmentally friendly?
Growing onions in plastic bottles can be an environmentally friendly practice, as it promotes recycling and reduces waste. By repurposing plastic bottles, you’re diverting them from landfills and giving them a new life. Additionally, growing your own onions reduces your reliance on commercially grown produce, which often involves transportation and packaging that contribute to carbon emissions. However, it’s important to consider the overall environmental impact of your gardening practices, including the use of water, fertilizers, and pesticides. Opting for organic and sustainable gardening methods can further enhance the environmental benefits of growing onions in plastic bottles.

Leave a Comment