
Growing peanuts in bottles might sound like something out of a science fiction movie, but trust me, it’s a surprisingly simple and rewarding DIY project! Have you ever wondered where your favorite peanut butter comes from? Or maybe you’ve always been curious about the process of growing your own food? Well, now’s your chance to dive in, even if you don’t have a sprawling garden.
Peanuts, also known as groundnuts, have a rich history, dating back thousands of years to South America. They’ve become a staple in cuisines worldwide, from savory snacks to creamy spreads. But beyond their culinary uses, growing peanuts offers a unique connection to nature and a sense of accomplishment.
In today’s world, where space is often a premium, and access to fresh, homegrown produce can be limited, this DIY trick is a game-changer. Growing peanuts in bottles allows you to cultivate your own little peanut patch, regardless of whether you have a backyard or just a sunny windowsill. I’m going to show you how to bypass the need for a traditional garden bed and enjoy the satisfaction of harvesting your own homegrown peanuts. Plus, it’s a fantastic educational activity for kids (and adults!) to learn about plant life cycles. So, grab your bottles, some soil, and let’s get started on this exciting gardening adventure!

Erdnüsse im Haus anbauen: Ein DIY-Guide für Flaschen-Gärtner
Hey Leute! Habt ihr euch jemals gefragt, ob man Erdnüsse auch in Innenräumen anbauen kann? Die Antwort ist: Ja, das geht! Und es ist sogar einfacher, als ihr vielleicht denkt. Ich zeige euch, wie ihr mit ein paar leeren Flaschen und etwas Geduld eure eigenen Erdnüsse zu Hause ziehen könnt. Es ist ein super spannendes Projekt, besonders für Kinder, und ihr werdet am Ende mit leckeren, selbst gezogenen Erdnüssen belohnt. Los geht’s!
Was ihr braucht:
* Erdnüsse: Rohe, ungesalzene Erdnüsse (am besten Bio, um sicherzustellen, dass sie nicht behandelt wurden). Achtet darauf, dass sie noch ihre Haut haben.
* Plastikflaschen: Mehrere leere Plastikflaschen (2-Liter-Flaschen sind ideal).
* Erde: Hochwertige Blumenerde oder eine Mischung aus Gartenerde, Kompost und Sand.
* Wasser: Zum Gießen.
* Messer oder Schere: Zum Zuschneiden der Flaschen.
* Sprühflasche: Zum Befeuchten der Erde.
* Optional: Kleine Steine oder Kies für die Drainage.
* Optional: Eine Unterlage, um den Boden sauber zu halten.
Vorbereitung der Flaschen:
1. Reinigung: Zuerst müsst ihr die Plastikflaschen gründlich reinigen. Entfernt alle Etiketten und spült sie mit warmem Seifenwasser aus. Achtet darauf, dass keine Seifenreste zurückbleiben.
2. Zuschneiden: Jetzt kommt der spaßige Teil! Schneidet die Flaschen in der Mitte durch. Ihr könnt entweder beide Hälften verwenden oder nur die untere Hälfte. Wenn ihr beide Hälften verwendet, könnt ihr die obere Hälfte umgedreht als eine Art Mini-Gewächshaus auf die untere Hälfte setzen, um die Keimung zu beschleunigen.
3. Drainage (optional): Wenn ihr wollt, könnt ihr eine Schicht kleiner Steine oder Kies auf den Boden der Flasche legen. Das sorgt für eine bessere Drainage und verhindert Staunässe, was für Erdnüsse sehr wichtig ist.
Aussaat der Erdnüsse:
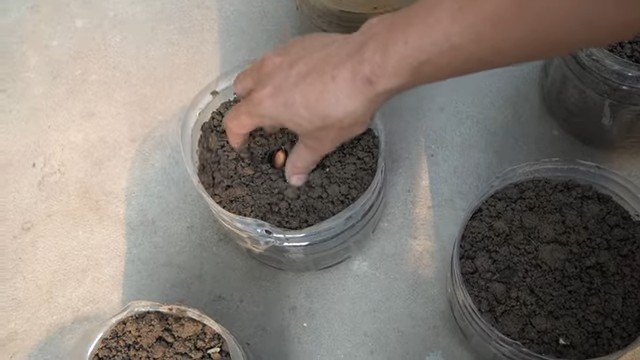
1. Erde einfüllen: Füllt die Flaschen mit Erde. Lasst etwa 2-3 cm Platz bis zum Rand. Die Erde sollte locker und gut durchlässig sein.
2. Erdnüsse pflanzen: Nehmt eure rohen Erdnüsse und drückt sie etwa 2-3 cm tief in die Erde. Legt nicht zu viele Erdnüsse in eine Flasche, da sie Platz zum Wachsen brauchen. Ich würde sagen, 3-4 Erdnüsse pro Flasche sind ideal.
3. Gießen: Gießt die Erde vorsichtig an, bis sie gut durchfeuchtet ist. Achtet darauf, dass ihr nicht zu viel gießt, da die Erde nicht durchnässt sein sollte.
4. Befeuchten: Besprüht die Oberfläche der Erde mit einer Sprühflasche, um sie feucht zu halten.
5. Mini-Gewächshaus (optional): Wenn ihr die obere Hälfte der Flasche behalten habt, könnt ihr sie jetzt umgedreht auf die untere Hälfte setzen. Das schafft ein Mini-Gewächshaus, das die Keimung beschleunigt. Achtet aber darauf, dass ihr die Flasche regelmäßig lüftet, um Schimmelbildung zu vermeiden.
Pflege der Erdnusspflanzen:
1. Standort: Stellt die Flaschen an einen warmen und sonnigen Ort. Erdnüsse lieben die Sonne! Ein Fensterbrett mit Südausrichtung ist ideal.
2. Gießen: Gießt die Erdnusspflanzen regelmäßig, aber nicht zu viel. Die Erde sollte immer leicht feucht sein, aber nicht durchnässt. Überprüft die Feuchtigkeit der Erde, indem ihr mit dem Finger in die Erde stecht. Wenn sie sich trocken anfühlt, ist es Zeit zum Gießen.
3. Düngen (optional): Wenn ihr wollt, könnt ihr die Erdnusspflanzen während der Wachstumsphase düngen. Verwendet einen organischen Dünger oder einen Flüssigdünger für Gemüse. Achtet darauf, die Anweisungen auf der Verpackung zu befolgen.
4. Beobachtung: Beobachtet eure Erdnusspflanzen regelmäßig. Achtet auf Anzeichen von Schädlingen oder Krankheiten. Wenn ihr etwas Ungewöhnliches bemerkt, handelt schnell, um das Problem zu beheben.
5. Stützen (optional): Wenn die Pflanzen größer werden, können sie etwas Unterstützung gebrauchen. Ihr könnt ihnen kleine Stäbe oder Bambusstäbe geben, an denen sie sich festhalten können.
Die Ernte:
1. Wartezeit: Erdnüsse brauchen etwa 4-5 Monate, um zu reifen. Geduld ist hier gefragt!
2. Anzeichen der Reife: Die Blätter der Erdnusspflanzen werden gelb und beginnen zu welken. Das ist ein Zeichen dafür, dass die Erdnüsse reif sind.
3. Ernte: Wenn die Blätter welk sind, könnt ihr die Erdnusspflanzen vorsichtig aus der Erde ziehen. Schüttelt die Erde ab und wascht die Erdnüsse sauber.
4. Trocknen: Legt die Erdnüsse an einen warmen und trockenen Ort, um sie zu trocknen. Das kann ein paar Tage bis zu einer Woche dauern.
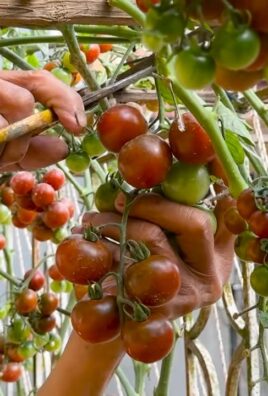
5. Genießen: Sobald die Erdnüsse trocken sind, könnt ihr sie genießen! Ihr könnt sie roh essen, rösten oder zu Erdnussbutter verarbeiten.
Häufige Probleme und Lösungen:
* Schimmelbildung: Wenn sich Schimmel auf der Erde bildet, ist die Erde zu feucht. Reduziert die Wassermenge und sorgt für eine bessere Belüftung.
* Schädlinge: Erdnusspflanzen können von Blattläusen oder anderen Schädlingen befallen werden. Besprüht die Pflanzen mit einer Lösung aus Wasser und Spülmittel oder verwendet ein biologisches Insektizid.
* Gelbe Blätter: Gelbe Blätter können ein Zeichen für Nährstoffmangel sein. Düngt die Pflanzen mit einem geeigneten Dünger.
* Keine Erdnüsse: Manchmal bilden die Pflanzen keine Erdnüsse. Das kann an mangelnder Bestäubung liegen. Ihr könnt die Pflanzen von Hand bestäuben, indem ihr mit einem Pinsel die Blüten berührt.
Zusätzliche Tipps:
* Sortenwahl: Es gibt verschiedene Erdnusssorten. Informiert euch, welche Sorte am besten für den Anbau in Innenräumen geeignet ist.
* Beleuchtung: Wenn eure Pflanzen nicht genügend Sonnenlicht bekommen, könnt ihr sie mit einer Pflanzenlampe unterstützen.
* Umpflanzen: Wenn die Pflanzen zu groß für die Flaschen werden, könnt ihr sie in größere Töpfe umpflanzen.
* Experimentieren: Probiert verschiedene Anbaumethoden aus und findet heraus, was für euch am besten funktioniert.
Warum Erdnüsse in Flaschen anbauen?
* Platzsparend: Ideal für kleine Wohnungen oder Balkone.
* Lehrreich: Ein tolles Projekt für Kinder, um etwas über Pflanzen und den Anbau von Lebensmitteln zu lernen.
* Nachhaltig: Wiederverwendung von Plastikflaschen.
* Frische Erdnüsse: Genießt den Geschmack von selbst gezogenen Erdnüssen.
* Befriedigend: Es ist einfach ein tolles Gefühl, etwas selbst anzubauen und zu ernten.
Ich hoffe, dieser Guide hilft euch dabei, eure eigenen Erdnüsse in Flaschen anzubauen. Es ist ein spannendes und lohnendes Projekt, das euch viel Freude bereiten wird. Viel Glück und viel Spaß beim Gärtnern! Lasst mich wissen, wie es bei euch läuft! Ich bin gespannt auf eure Erfahrungen.
Conclusion
So, there you have it! Growing peanuts in bottles is not just a quirky gardening experiment; it’s a surprisingly rewarding and accessible way to cultivate your own fresh, delicious peanuts, even if you’re short on space or live in an apartment. This method offers a unique opportunity to witness the entire peanut life cycle up close, from the initial sprouting to the eventual formation of those delectable underground treasures.
Why is this DIY trick a must-try? Firstly, it’s incredibly space-efficient. Forget needing a large garden plot; a sunny windowsill or balcony is all you need. Secondly, it’s a fantastic educational experience, especially for children. They can learn about plant growth, the importance of soil, and the fascinating way peanuts develop underground. Thirdly, it’s a sustainable way to enjoy fresh produce. You’re reducing your carbon footprint by growing your own food and minimizing reliance on commercially grown peanuts that may have traveled long distances. Finally, and perhaps most importantly, the taste of homegrown peanuts is simply unmatched. They’re fresher, more flavorful, and you have the satisfaction of knowing you nurtured them from seed to snack.
But the fun doesn’t stop there! Experiment with different peanut varieties. Virginia peanuts, known for their large size, might be a fun challenge. Or try Spanish peanuts, which are smaller and sweeter. You can also play around with different soil mixtures. While a well-draining potting mix is generally recommended, adding some compost or aged manure can provide extra nutrients for your peanut plants. Consider adding a small trellis or support structure as the plants grow larger to help them stay upright and prevent them from toppling over. For those in colder climates, you can even start the peanuts indoors earlier in the season to give them a head start before transplanting them into bottles once the weather warms up.
Don’t be afraid to get creative with your bottle setup! You can decorate the bottles with paint or markers to add a personal touch. Just be sure not to cover the bottle entirely, as the roots still need some access to light. You can also group several bottles together to create a mini peanut garden.
We wholeheartedly encourage you to give this DIY peanut growing trick a try. It’s a simple, fun, and rewarding project that will bring a touch of nature into your home and provide you with a delicious harvest. And most importantly, don’t forget to share your experiences with us! We’d love to see your peanut bottle creations and hear about your successes (and any challenges you encounter along the way). Share your photos and stories on social media using #BottlePeanuts or leave a comment below. Let’s build a community of bottle peanut growers and learn from each other! Growing peanuts in bottles is a journey, and we’re excited to embark on it with you.
Frequently Asked Questions (FAQ)
1. What kind of bottle is best for growing peanuts?
The ideal bottle is a clear plastic bottle with a wide mouth. A two-liter soda bottle or a large juice bottle works well. The clear plastic allows you to monitor the root growth and soil moisture. Make sure to thoroughly clean the bottle before using it to remove any residue that could harm the plants. Avoid using bottles that have contained harsh chemicals. The size of the bottle is also important; it needs to be large enough to accommodate the root system of the peanut plant as it grows. A bottle that is too small will restrict root growth and limit peanut production.
2. What type of soil should I use?
A well-draining potting mix is crucial for growing peanuts in bottles. Peanuts need soil that retains moisture but doesn’t become waterlogged. A mix of peat moss, perlite, and vermiculite is a good option. You can also add some compost or aged manure to provide extra nutrients. Avoid using heavy clay soil, as it can compact and hinder root growth. The pH of the soil should be slightly acidic to neutral, around 6.0 to 7.0. You can test the soil pH using a soil testing kit available at most garden centers.
3. How many peanut seeds should I plant in each bottle?
Planting 2-3 peanut seeds per bottle is a good starting point. This increases the chances of at least one seed germinating. Once the seedlings emerge, you can thin them out to one strong plant per bottle. To plant the seeds, make small holes in the soil about an inch deep and place the seeds in the holes. Cover the seeds with soil and gently water. Keep the soil moist but not waterlogged until the seeds germinate.
4. How much sunlight do peanut plants need?
Peanut plants need at least 6-8 hours of direct sunlight per day to thrive. Place the bottles in a sunny location, such as a windowsill or balcony. If you don’t have enough natural sunlight, you can supplement with artificial grow lights. Rotate the bottles regularly to ensure that all sides of the plant receive adequate sunlight. Insufficient sunlight can lead to weak, leggy growth and reduced peanut production.
5. How often should I water my peanut plants?
Water peanut plants regularly, keeping the soil consistently moist but not waterlogged. Check the soil moisture by sticking your finger into the soil; if it feels dry to the touch, it’s time to water. Avoid overwatering, as this can lead to root rot. The frequency of watering will depend on the weather conditions and the type of soil you’re using. In hot, dry weather, you may need to water more frequently.
6. How long does it take for peanuts to grow in bottles?
It typically takes about 120-150 days for peanuts to mature from planting to harvest. The exact time will depend on the peanut variety and the growing conditions. You’ll know the peanuts are ready to harvest when the leaves start to turn yellow and the plant begins to die back. You can also gently dig around the base of the plant to check the size and maturity of the peanuts.
7. How do I harvest peanuts from a bottle?
Harvesting peanuts from a bottle is relatively easy. Gently tip the bottle on its side and carefully remove the plant and the soil. You can then separate the peanuts from the roots and soil. Wash the peanuts thoroughly to remove any dirt. Allow the peanuts to dry in a well-ventilated area for several days before storing them.
8. Can I reuse the soil from the bottle for other plants?
Yes, you can reuse the soil from the bottle for other plants, but it’s a good idea to amend it with fresh compost or other organic matter to replenish the nutrients. Peanut plants can deplete the soil of certain nutrients, so adding fresh compost will help to improve the soil fertility. You can also sterilize the soil by baking it in the oven to kill any potential pests or diseases.
9. What are some common problems when growing peanuts in bottles?
Some common problems when growing peanuts in bottles include pests, diseases, and nutrient deficiencies. Pests such as aphids and spider mites can attack peanut plants. You can control these pests by spraying the plants with insecticidal soap or neem oil. Diseases such as leaf spot can also affect peanut plants. Prevent diseases by providing good air circulation and avoiding overwatering. Nutrient deficiencies can cause yellowing leaves or stunted growth. You can correct nutrient deficiencies by fertilizing the plants with a balanced fertilizer.
10. Can I grow peanuts indoors year-round?
Yes, you can grow peanuts indoors year-round if you provide them with adequate light and warmth. Use grow lights to supplement natural sunlight, especially during the winter months. Maintain a consistent temperature of around 70-80°F (21-27°C). Ensure good air circulation to prevent diseases. With proper care, you can enjoy fresh homegrown peanuts even in the middle of winter.

Leave a Comment