
Growing Chili Peppers at Home can seem daunting, but trust me, it’s more achievable (and rewarding!) than you might think. Forget those bland, store-bought peppers – imagine plucking fiery, flavorful chilies straight from your own garden! For centuries, chili peppers have added zest and vibrancy to cuisines around the globe, from the ancient Aztecs who used them in rituals to the fiery curries of India. But you don’t need to be a seasoned gardener to enjoy the fruits (or should I say, peppers?) of your labor.
This DIY guide is your secret weapon to unlocking a bountiful chili pepper harvest, even if you’re a complete beginner. We’ll explore simple, effective tricks and hacks that will have you growing chili peppers at home like a pro in no time. I’ll share my personal experiences and proven methods to help you avoid common pitfalls and maximize your yield. Why spend money on expensive peppers when you can cultivate your own delicious supply? Let’s get started and transform your garden (or even your windowsill!) into a chili pepper paradise!
Chili-Anbau für Jedermann: So ziehst du scharfe Schoten zu Hause!
Hey Chili-Liebhaber! Bist du bereit, deine eigenen feurigen Chilis zu züchten? Ich zeige dir, wie du das ganz einfach zu Hause hinbekommst, egal ob du einen Garten, einen Balkon oder nur ein sonniges Fensterbrett hast. Keine Angst, es ist einfacher als du denkst!
Was du brauchst: Die Chili-Grundausstattung
Bevor wir loslegen, hier eine Liste mit allem, was du für den Chili-Anbau benötigst:
* Chili-Samen: Wähle deine Lieblingssorten! Von mild bis extrem scharf ist alles dabei. Achte auf qualitativ hochwertige Samen von einem vertrauenswürdigen Anbieter.
* Anzuchterde: Spezielle Anzuchterde ist nährstoffarm und locker, ideal für die Keimung.
* Anzuchttöpfe oder -schalen: Kleine Töpfe oder Schalen mit Drainagelöchern sind perfekt für die Anzucht.
* Sprühflasche: Zum Befeuchten der Erde.
* Mini-Gewächshaus (optional): Hilft, die Luftfeuchtigkeit hoch zu halten und die Keimung zu beschleunigen.
* Pikierstab oder Löffel: Zum vorsichtigen Vereinzeln der Sämlinge.
* Größere Töpfe oder Kübel: Für die spätere Umpflanzung.
* Blumenerde: Nährstoffreiche Erde für das Wachstum der Pflanzen.
* Dünger: Spezieller Chili-Dünger oder Tomatendünger.
* Gießkanne: Zum Bewässern der Pflanzen.
* Sonnenlicht: Chilis lieben die Sonne!
* Geduld: Der Anbau braucht Zeit und Pflege.
Phase 1: Die Anzucht – Der Start ins Chili-Abenteuer
Die Anzucht ist der erste und wichtigste Schritt. Hier legen wir den Grundstein für eine reiche Chili-Ernte.
1. Samen vorbereiten (optional): Um die Keimung zu beschleunigen, kannst du die Samen für 12-24 Stunden in lauwarmem Wasser quellen lassen. Das weicht die Samenschale auf und erleichtert das Keimen.
2. Anzuchttöpfe befüllen: Fülle die Anzuchttöpfe oder -schalen mit Anzuchterde. Drücke die Erde leicht an.
3. Samen aussäen: Lege pro Topf 1-2 Samen auf die Erde. Bedecke die Samen mit einer dünnen Schicht Anzuchterde (ca. 0,5 cm).
4. Befeuchten: Befeuchte die Erde vorsichtig mit einer Sprühflasche. Die Erde sollte feucht, aber nicht nass sein.
5. Mini-Gewächshaus (optional): Stelle die Töpfe in ein Mini-Gewächshaus oder decke sie mit Frischhaltefolie ab, um die Luftfeuchtigkeit zu erhöhen.
6. Warm stellen: Stelle die Töpfe an einen warmen Ort (22-28°C). Eine Heizmatte kann helfen, die Temperatur konstant zu halten.
7. Geduld haben: Die Keimung kann je nach Chilisorte 1-3 Wochen dauern. Halte die Erde feucht und lüfte das Mini-Gewächshaus regelmäßig, um Schimmelbildung zu vermeiden.
Phase 2: Pikieren – Den kleinen Chili-Pflanzen mehr Raum geben
Sobald die ersten Blätter erscheinen, ist es Zeit zum Pikieren. Das bedeutet, dass wir die kleinen Chili-Pflanzen in größere Töpfe umsetzen, damit sie genügend Platz zum Wachsen haben.
1. Warten, bis die ersten “echten” Blätter da sind: Warte, bis die Sämlinge neben den Keimblättern (die ersten beiden Blätter) auch die ersten “echten” Blätter entwickelt haben.
2. Vorbereiten: Fülle größere Töpfe (ca. 8-10 cm Durchmesser) mit Blumenerde.
3. Vereinzeln: Löse die Sämlinge vorsichtig mit einem Pikierstab oder Löffel aus der Anzuchterde. Achte darauf, die Wurzeln nicht zu beschädigen.
4. Umpflanzen: Setze jeden Sämling in einen eigenen Topf. Die Wurzeln sollten genügend Platz haben.
5. Angießen: Gieße die Pflanzen vorsichtig an.
6. Heller Standort: Stelle die Töpfe an einen hellen, aber nicht zu sonnigen Ort.
Phase 3: Pflege – Damit deine Chilis prächtig gedeihen
Jetzt beginnt die eigentliche Pflege. Mit der richtigen Pflege werden deine Chili-Pflanzen zu kräftigen, ertragreichen Gewächsen.
1. Gießen: Gieße die Pflanzen regelmäßig, aber vermeide Staunässe. Die Erde sollte immer leicht feucht sein.
2. Düngen: Beginne ca. 2-3 Wochen nach dem Pikieren mit dem Düngen. Verwende einen speziellen Chili-Dünger oder Tomatendünger. Befolge die Anweisungen auf der Verpackung.
3. Sonnenlicht: Chilis lieben die Sonne! Stelle die Pflanzen an einen möglichst sonnigen Standort. Mindestens 6 Stunden Sonne pro Tag sind ideal.
4. Drehen: Drehe die Töpfe regelmäßig, damit die Pflanzen gleichmäßig wachsen.
5. Ausgeizen (optional): Bei einigen Chilisorten kann es sinnvoll sein, die Seitentriebe (Geiztriebe) auszugeizen, um die Bildung von Früchten zu fördern. Informiere dich, ob das für deine Sorte empfehlenswert ist.
6. Schädlinge kontrollieren: Achte auf Schädlinge wie Blattläuse oder Spinnmilben. Bei Befall kannst du natürliche Schädlingsbekämpfungsmittel einsetzen.
7. Unterstützung (optional): Wenn die Pflanzen größer werden und viele Früchte tragen, kann es sinnvoll sein, sie mit Stäben oder Schnüren zu stützen.
Phase 4: Umpflanzen in den Garten oder größere Töpfe
Wenn die Chili-Pflanzen groß genug sind und das Wetter mitspielt, ist es Zeit, sie in den Garten oder in größere Töpfe umzupflanzen.
1. Warten auf warmes Wetter: Warte, bis die Temperaturen nachts nicht mehr unter 10°C fallen. Chilis sind frostempfindlich.
2. Abhärten: Bevor du die Pflanzen ins Freie pflanzt, solltest du sie einige Tage lang abhärten. Stelle sie tagsüber für einige Stunden ins Freie und hole sie nachts wieder rein.
3. Standort vorbereiten: Wähle einen sonnigen Standort mit gut durchlässigem Boden.
4. Pflanzloch ausheben: Hebe ein Pflanzloch aus, das etwas größer ist als der Wurzelballen.
5. Pflanzen einsetzen: Setze die Chili-Pflanzen vorsichtig in die Pflanzlöcher.
6. Angießen: Gieße die Pflanzen gründlich an.
7. Mulchen (optional): Mulche den Boden um die Pflanzen herum, um die Feuchtigkeit zu halten und Unkraut zu unterdrücken.
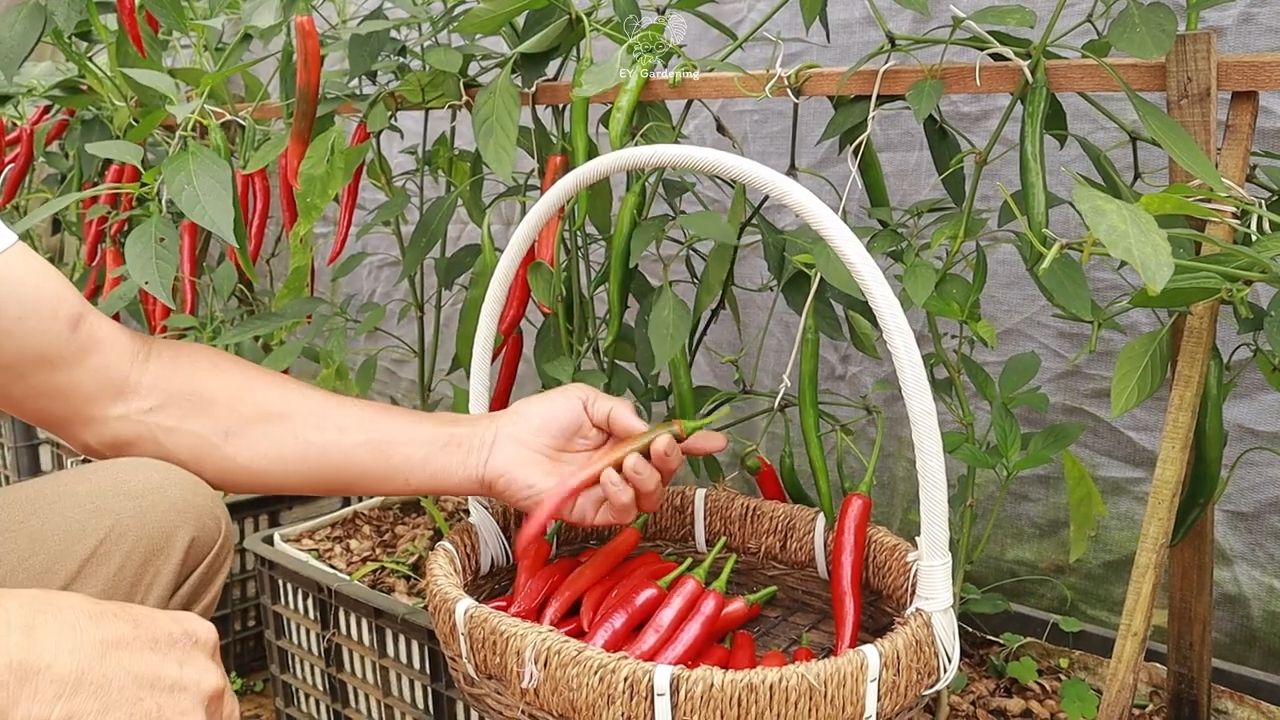
Phase 5: Ernte – Der Lohn deiner Mühe
Endlich ist es soweit: Die Chilis sind reif und können geerntet werden!
1. Reife erkennen: Die Farbe der Chilis ändert sich, wenn sie reif sind. Je nach Sorte werden sie rot, gelb, orange oder braun.
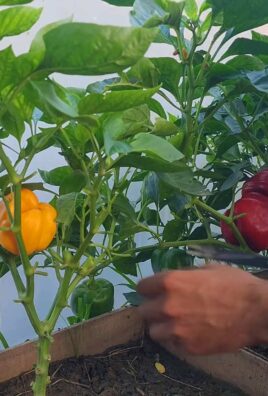
2. Ernten: Schneide die Chilis mit einer Schere oder einem Messer ab.
3. Verarbeiten: Du kannst die Chilis frisch verwenden, trocknen, einlegen oder zu Soßen und Pulvern verarbeiten.
Zusätzliche Tipps für den Chili-Anbau
* Sortenwahl: Wähle Chilisorten, die zu deinem Geschmack und deinem Klima passen.
* Bodenqualität: Achte auf eine gute Bodenqualität. Chilis bevorzugen einen lockeren, nährstoffreichen Boden.
* Bewässerung: Gieße die Pflanzen regelmäßig, aber vermeide Staunässe.
* Düngung: Dünge die Pflanzen regelmäßig, um ein gesundes Wachstum und eine reiche Ernte zu fördern.
* Schädlinge: Kontrolliere die Pflanzen regelmäßig auf

Conclusion
So, there you have it! Growing chili peppers at home isn’t just a fun hobby; it’s a gateway to a world of flavor, freshness, and fiery satisfaction. We’ve explored the simple yet effective DIY trick of using coffee grounds to enrich your soil and boost your pepper production. This method, utilizing a readily available resource, is a game-changer for both novice and experienced gardeners alike.
Why is this DIY trick a must-try? Because it’s sustainable, cost-effective, and demonstrably improves the health and yield of your chili pepper plants. Coffee grounds provide a slow-release source of nitrogen, a vital nutrient for leafy growth and fruit development. They also improve soil drainage and aeration, creating an optimal environment for root growth. Furthermore, they can help suppress certain soilborne diseases and deter pests, giving your chili peppers a fighting chance against common garden adversaries.
But the beauty of gardening lies in experimentation! Feel free to adapt this method to your specific needs and preferences. For instance, if you’re growing your chili peppers in containers, consider mixing the coffee grounds with other organic amendments like compost or worm castings for an even richer soil blend. You can also experiment with different types of coffee grounds – light roast, dark roast, even decaf – to see if you notice any variations in plant growth or pepper flavor.
Another exciting variation is to create a “coffee ground tea” by steeping used coffee grounds in water for a few days. This liquid fertilizer can then be diluted and used to water your chili pepper plants, providing a readily available nutrient boost. This is particularly beneficial during periods of rapid growth or fruit production.
Don’t be afraid to get creative with your chili pepper varieties either! From the mild and fruity poblano to the scorching habanero, there’s a chili pepper out there for every palate. Experiment with different varieties to discover your favorites and tailor your growing techniques accordingly. Some chili peppers may require more sunlight or water than others, so be sure to research the specific needs of your chosen varieties.
Ultimately, the key to successful chili pepper gardening is observation and adaptation. Pay close attention to your plants, monitor their growth, and adjust your techniques as needed. And most importantly, don’t be discouraged by setbacks! Gardening is a learning process, and even experienced gardeners encounter challenges along the way.
We wholeheartedly encourage you to try this DIY trick for growing chili peppers at home. It’s a simple, effective, and rewarding way to enhance your gardening experience and enjoy a bountiful harvest of delicious, homegrown chili peppers.
Once you’ve given it a try, we’d love to hear about your experience! Share your tips, tricks, and successes in the comments section below. Let’s create a community of chili pepper enthusiasts and learn from each other’s experiences. Happy gardening!
Frequently Asked Questions (FAQ)
1. How often should I add coffee grounds to my chili pepper plants?
The frequency of application depends on several factors, including the size of your plants, the type of soil you’re using, and the climate you live in. As a general guideline, you can add a thin layer of coffee grounds (about 1/2 inch) around the base of your chili pepper plants every 2-4 weeks. Be sure to lightly incorporate the coffee grounds into the soil to prevent them from forming a crust. Avoid piling the coffee grounds directly against the stem of the plant, as this can lead to rot. Monitor your plants closely and adjust the frequency of application as needed. If you notice signs of nutrient deficiency, such as yellowing leaves, you may need to increase the frequency of application. Conversely, if you notice signs of nutrient overload, such as excessive leaf growth and stunted fruit production, you may need to decrease the frequency of application.
2. Are coffee grounds acidic, and will they make my soil too acidic for chili peppers?
This is a common concern, but used coffee grounds are actually only mildly acidic, with a pH of around 6.5-6.8, which is within the ideal range for most plants, including chili peppers. The brewing process neutralizes much of the acidity. However, it’s still a good idea to test your soil pH periodically to ensure it remains within the optimal range. You can purchase a soil pH testing kit at most garden centers. If your soil is too acidic, you can amend it with lime to raise the pH. If your soil is too alkaline, you can amend it with sulfur to lower the pH. Remember, healthy soil is the foundation for healthy plants.
3. Can I use fresh coffee grounds instead of used coffee grounds?
While you can technically use fresh coffee grounds, it’s generally not recommended. Fresh coffee grounds are much more acidic than used coffee grounds and can potentially burn your plants. They also contain higher levels of caffeine, which can inhibit plant growth. Used coffee grounds have been leached of much of their acidity and caffeine during the brewing process, making them a safer and more beneficial amendment for your chili pepper plants. If you do choose to use fresh coffee grounds, be sure to use them sparingly and mix them thoroughly with other organic matter to dilute their acidity.
4. What other benefits do coffee grounds provide to chili pepper plants besides nitrogen?
In addition to nitrogen, coffee grounds contain other essential nutrients for plant growth, including phosphorus, potassium, and micronutrients. They also improve soil structure by increasing drainage and aeration. The coarse texture of coffee grounds helps to break up compacted soil, allowing roots to penetrate more easily. Furthermore, coffee grounds can help suppress certain soilborne diseases and deter pests, such as slugs and snails. The abrasive texture of coffee grounds can make it difficult for these pests to travel across the soil surface.
5. Can I use coffee grounds in combination with other fertilizers?
Yes, you can absolutely use coffee grounds in combination with other fertilizers. In fact, using coffee grounds as part of a comprehensive fertilization program can be highly beneficial for your chili pepper plants. Coffee grounds provide a slow-release source of nutrients, while other fertilizers can provide a more immediate boost. When using coffee grounds in combination with other fertilizers, be sure to follow the instructions on the fertilizer packaging and avoid over-fertilizing your plants. Over-fertilizing can lead to nutrient imbalances and can actually harm your plants.
6. My chili pepper plants are in containers. Can I still use coffee grounds?
Absolutely! Coffee grounds are an excellent amendment for container-grown chili pepper plants. They can help improve drainage and aeration in containers, which is crucial for healthy root growth. When using coffee grounds in containers, be sure to mix them thoroughly with the potting mix before planting your chili pepper plants. You can also add a thin layer of coffee grounds to the surface of the potting mix every few weeks.
7. I don’t drink coffee. Where can I get used coffee grounds?
If you don’t drink coffee yourself, there are several places where you can obtain used coffee grounds. Many coffee shops are happy to give away their used coffee grounds for free. Simply ask the barista if they have any available. You can also check with local businesses that brew coffee, such as restaurants and offices. Another option is to ask your friends, neighbors, or family members who drink coffee to save their used coffee grounds for you.
8. How do I store used coffee grounds before using them in my garden?
To prevent mold growth, it’s important to dry used coffee grounds before storing them. Spread the coffee grounds out on a baking sheet or tray and allow them to air dry completely. Once the coffee grounds are dry, you can store them in an airtight container in a cool, dry place. Properly stored coffee grounds can last for several months.
9. What if I see mold growing on the coffee grounds in my garden?
Seeing mold on coffee grounds in your garden is not necessarily a cause for alarm. Mold is a natural part of the decomposition process and can actually be beneficial for your soil. However, if you’re concerned about the mold, you can simply mix the coffee grounds into the soil to bury the mold spores. You can also add a layer of mulch on top of the coffee grounds to help suppress mold growth.
10. Will coffee grounds attract pests to my chili pepper plants?
While coffee grounds can deter some pests, they may attract others. For example, coffee grounds can attract earthworms, which are beneficial for your soil. However, they may also attract slugs and snails, which can damage your chili pepper plants. To minimize the risk of attracting pests, be sure to use coffee grounds sparingly and monitor your plants regularly for signs of pest infestation. If you notice pests, take appropriate measures to control them, such as hand-picking, using organic pesticides, or setting traps.
Leave a Comment