
Growing Bottle Gourds Easily is something I’ve been passionate about for years, and I’m thrilled to share my secrets with you! Have you ever dreamed of harvesting your own unique, sculptural gourds right from your backyard? Imagine crafting beautiful birdhouses, whimsical lanterns, or even functional utensils from something you’ve nurtured from a tiny seed. This isn’t just a gardening project; it’s a gateway to creativity and self-sufficiency.
Bottle gourds, also known as calabash, have a rich history, dating back thousands of years. They weren’t just a food source; ancient civilizations across Africa, Asia, and the Americas used them for everything from carrying water to making musical instruments. This versatile plant has been a part of human culture for millennia, and now, you can bring that legacy into your own garden.
Many people shy away from growing bottle gourds, thinking they’re difficult or require vast amounts of space. But I’m here to tell you that growing bottle gourds easily is absolutely achievable, even in smaller gardens! This DIY guide will equip you with simple, effective tricks and hacks to overcome common challenges, ensuring a bountiful harvest. Whether you’re a seasoned gardener or just starting out, these tips will empower you to cultivate these fascinating plants and unlock their endless possibilities. Let’s get started and transform your garden into a gourd-growing paradise!
Flaschenkürbis Anbauen: Dein DIY-Leitfaden für eine reiche Ernte
Ich liebe es, meinen eigenen Garten zu haben und frische, gesunde Lebensmittel anzubauen. Eines meiner Lieblingsprojekte ist der Anbau von Flaschenkürbissen. Sie sind nicht nur unglaublich vielseitig, sondern auch relativ einfach anzubauen, wenn man ein paar grundlegende Dinge beachtet. In diesem Artikel zeige ich dir Schritt für Schritt, wie du Flaschenkürbisse erfolgreich anbauen kannst, von der Aussaat bis zur Ernte.
Was du für den Anbau von Flaschenkürbissen brauchst:
* Samen: Kaufe hochwertige Flaschenkürbissamen. Es gibt verschiedene Sorten, also wähle die, die dir am besten gefällt.
* Anzuchttöpfe oder -schalen: Für die Vorkultur der Samen.
* Anzuchterde: Eine leichte, nährstoffarme Erde für die Aussaat.
* Gartenerde: Nährstoffreiche Erde für das Beet oder den Kübel.
* Kompost oder organischer Dünger: Zur Verbesserung der Bodenqualität.
* Gießkanne oder Schlauch: Zum Bewässern der Pflanzen.
* Pflanzstäbe oder Rankhilfe: Flaschenkürbisse sind Kletterpflanzen und brauchen Unterstützung.
* Gartenschere: Zum Beschneiden der Pflanzen.
* Handschuhe: Zum Schutz deiner Hände.
* Geduld: Flaschenkürbisse brauchen Zeit zum Wachsen!
Aussaat und Vorkultur
Die Vorkultur ist ein wichtiger Schritt, besonders wenn du in einer Region mit kürzeren Sommern lebst. Sie gibt den Pflanzen einen Vorsprung und ermöglicht eine frühere Ernte.
1. Vorbereitung der Anzuchttöpfe: Fülle die Anzuchttöpfe oder -schalen mit Anzuchterde. Drücke die Erde leicht an.
2. Aussaat der Samen: Lege in jeden Topf ein bis zwei Samen, etwa 2-3 cm tief. Bedecke die Samen mit Erde und gieße sie vorsichtig an.
3. Standort: Stelle die Anzuchttöpfe an einen warmen, hellen Ort. Eine Fensterbank oder ein Gewächshaus sind ideal. Die ideale Keimtemperatur liegt zwischen 20 und 25 Grad Celsius.
4. Feuchtigkeit: Halte die Erde feucht, aber nicht nass. Vermeide Staunässe, da dies zu Fäulnis führen kann.
5. Keimung: Die Samen keimen in der Regel innerhalb von 7-14 Tagen. Sobald die Keimlinge erscheinen, sorge für ausreichend Licht.
6. Pikieren (optional): Wenn du mehrere Samen in einen Topf gesät hast und beide gekeimt sind, kannst du den schwächeren Keimling entfernen oder die Keimlinge in separate Töpfe pikieren, sobald sie ein paar Blätter haben.
Vorbereitung des Beetes oder Kübels
Flaschenkürbisse sind Starkzehrer und benötigen einen nährstoffreichen Boden. Eine gute Vorbereitung des Beetes oder Kübels ist daher entscheidend für eine erfolgreiche Ernte.
1. Standortwahl: Wähle einen sonnigen Standort für deine Flaschenkürbisse. Sie benötigen mindestens 6-8 Stunden Sonnenlicht pro Tag.
2. Bodenverbesserung: Lockere den Boden gründlich auf und entferne Unkraut. Mische reichlich Kompost oder organischen Dünger unter die Erde, um die Nährstoffversorgung zu verbessern.
3. Boden-pH-Wert: Flaschenkürbisse bevorzugen einen leicht sauren bis neutralen Boden mit einem pH-Wert zwischen 6,0 und 7,0.
4. Rankhilfe: Stelle sicher, dass du eine stabile Rankhilfe zur Verfügung hast. Flaschenkürbisse können sehr groß und schwer werden, daher ist eine robuste Konstruktion wichtig. Du kannst ein Spalier, einen Zaun oder ein Gerüst verwenden.
5. Kübel (optional): Wenn du Flaschenkürbisse in Kübeln anbauen möchtest, wähle einen großen Kübel mit einem Durchmesser von mindestens 60 cm. Verwende eine hochwertige Kübelpflanzenerde und sorge für eine gute Drainage.
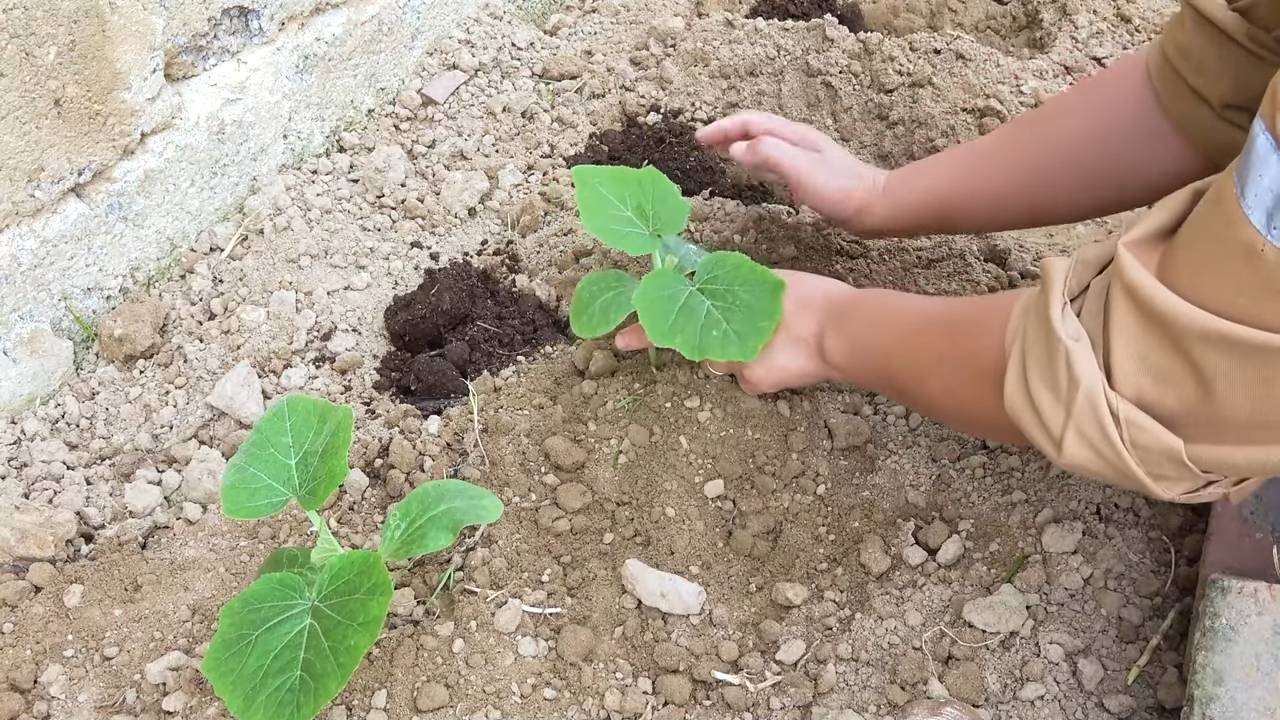
Auspflanzen der Jungpflanzen
Sobald die Jungpflanzen kräftig genug sind und keine Frostgefahr mehr besteht, können sie ins Freie gepflanzt werden.
1. Abhärten: Bevor du die Jungpflanzen auspflanzt, solltest du sie einige Tage lang abhärten. Stelle sie tagsüber ins Freie und hole sie nachts wieder herein. Dadurch gewöhnen sie sich an die äußeren Bedingungen.
2. Pflanzabstand: Pflanze die Jungpflanzen in einem Abstand von etwa 1 Meter zueinander.
3. Pflanzloch: Grabe ein Pflanzloch, das etwas größer ist als der Wurzelballen der Jungpflanze.
4. Einsetzen der Pflanze: Setze die Jungpflanze vorsichtig in das Pflanzloch und fülle es mit Erde auf. Drücke die Erde leicht an.
5. Angießen: Gieße die Pflanze gründlich an.
6. Mulchen: Bedecke den Boden um die Pflanze herum mit Mulch, um die Feuchtigkeit zu speichern und Unkrautwachstum zu unterdrücken.
Pflege der Flaschenkürbisse
Die richtige Pflege ist entscheidend für eine reiche Ernte.
1. Bewässerung: Gieße die Flaschenkürbisse regelmäßig, besonders während trockener Perioden. Achte darauf, dass der Boden immer feucht, aber nicht nass ist. Gieße am besten morgens, damit die Blätter über den Tag abtrocknen können.
2. Düngung: Dünge die Flaschenkürbisse regelmäßig mit einem organischen Dünger oder Kompost. Beginne etwa 2-3 Wochen nach dem Auspflanzen und wiederhole die Düngung alle 2-3 Wochen.
3. Beschneiden: Beschneide die Pflanzen regelmäßig, um das Wachstum zu fördern und die Fruchtbildung anzuregen. Entferne Seitentriebe, die keine Blüten tragen. Du kannst auch die Spitze der Haupttriebe abschneiden, um die Bildung von Seitentrieben zu fördern.
4. Rankhilfe: Leite die Triebe der Flaschenkürbisse an der Rankhilfe entlang. Befestige sie gegebenenfalls mit Pflanzenbindern.
5. Schutz vor Schädlingen und Krankheiten: Kontrolliere die Pflanzen regelmäßig auf Schädlinge und Krankheiten. Bei Bedarf kannst du biologische Schädlingsbekämpfungsmittel einsetzen. Mehltau kann ein Problem sein, besonders bei feuchtem Wetter. Sorge für eine gute Belüftung und entferne befallene Blätter.
6. Bestäubung: Flaschenkürbisse sind einhäusig, das heißt, sie haben männliche und weibliche Blüten auf derselben Pflanze. Die Bestäubung erfolgt in der Regel durch Insekten. Wenn du sicherstellen möchtest, dass die weiblichen Blüten bestäubt werden, kannst du sie auch von Hand bestäuben. Verwende dazu einen Pinsel, um den Pollen von den männlichen Blüten auf die weiblichen Blüten zu übertragen. Die weiblichen Blüten erkennst du an dem kleinen Fruchtansatz direkt unter der Blüte.
Ernte der Flaschenkürbisse
Die Erntezeit hängt von der Sorte und den klimatischen Bedingungen ab. In der Regel sind Flaschenkürbisse etwa 100-120 Tage nach der Aussaat erntereif.
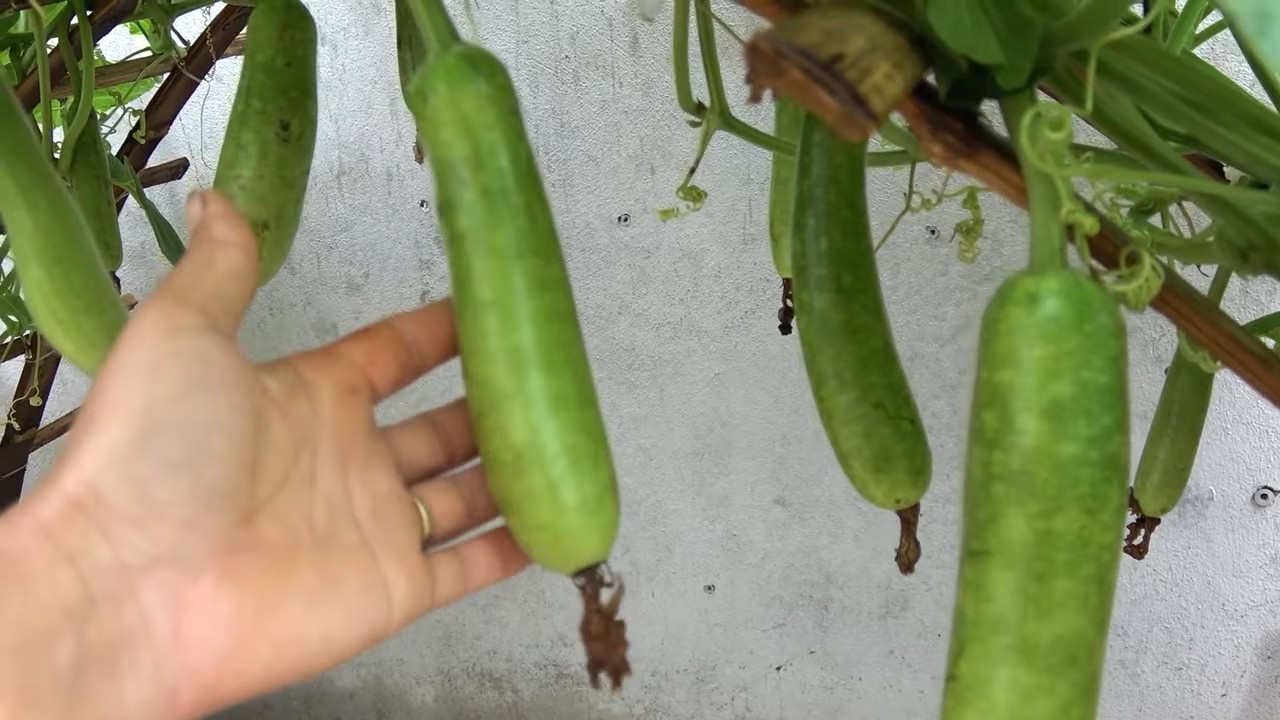
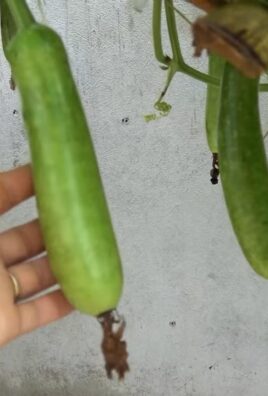
1. Reifezeichen: Die Flaschenkürbisse sind reif, wenn die Schale hart und undurchdringlich ist. Du kannst die Reife auch testen, indem du mit dem Finger auf die Schale klopfst. Wenn sie hohl klingt, ist der Kürbis reif.
2. Ernte: Schneide die Flaschenkürbisse mit einer Gartenschere ab, wobei du einen Stiel von etwa 5-10 cm Länge stehen lässt.
3. Trocknung: Lasse die geernteten Flaschenkürbisse an einem trockenen, gut belüfteten Ort für mehrere Wochen trocknen. Während der Trocknung härtet die Schale weiter aus und die Kürbisse werden leichter.
4. Lagerung: Lagere die getrockneten Flaschenkürbisse an einem kühlen, trockenen Ort. Sie können mehrere Monate oder sogar Jahre gelag
Conclusion
So, there you have it! Growing bottle gourds doesn’t have to be an intimidating endeavor. With a little planning, the right techniques, and a dash of patience, you can cultivate these fascinating and versatile vegetables right in your own backyard. This DIY approach to growing bottle gourds is a must-try for several compelling reasons.
First and foremost, it empowers you to control the entire growing process, from seed to harvest. You know exactly what goes into nurturing your gourds, ensuring they are free from harmful chemicals and pesticides. This is a significant advantage, especially if you prioritize organic and sustainable gardening practices. Secondly, growing your own bottle gourds is incredibly rewarding. Witnessing the transformation from a tiny seed to a mature gourd is a truly satisfying experience. It connects you to nature and provides a sense of accomplishment that is hard to replicate.
Beyond the practical benefits, growing bottle gourds opens up a world of creative possibilities. Once harvested and dried, these gourds can be transformed into stunning works of art, functional containers, or even musical instruments. The possibilities are truly endless, limited only by your imagination.
Don’t be afraid to experiment with different varieties of bottle gourds. Some are long and slender, while others are round and bulbous. Each variety offers unique characteristics and potential uses. Consider trying the ‘Dipper’ gourd for making ladles, or the ‘Bushel’ gourd for larger containers. You can also explore different training methods to shape your gourds as they grow. Try training them up a trellis for a vertical garden, or let them sprawl along the ground for a more natural look.
Remember to provide your bottle gourds with plenty of sunlight, water, and nutrients. Regular fertilization is essential for healthy growth and abundant yields. Keep an eye out for pests and diseases, and take prompt action to prevent them from spreading.
We wholeheartedly encourage you to embark on this exciting gardening adventure and try this DIY method for growing bottle gourds. It’s a fun, educational, and ultimately rewarding experience. Once you’ve harvested your first crop, we’d love to hear about your success! Share your photos, tips, and experiences in the comments below. Let’s build a community of bottle gourd enthusiasts and inspire others to discover the joys of growing their own food and crafting with nature’s bounty. This method of growing bottle gourds is not just about producing vegetables; it’s about connecting with nature, fostering creativity, and embracing a more sustainable lifestyle. So, grab your seeds, get your hands dirty, and prepare to be amazed by the wonders of the bottle gourd!
Variations and Further Exploration
Consider companion planting with your bottle gourds. Marigolds can help deter pests, while beans can fix nitrogen in the soil, benefiting the gourds. You can also experiment with different soil amendments to improve drainage and fertility. Adding compost or well-rotted manure can significantly boost growth.
For those in cooler climates, starting your bottle gourd seeds indoors can give them a head start. Transplant them outdoors once the weather warms up and the risk of frost has passed.
Finally, don’t forget to save some seeds from your best gourds for next year’s crop. This is a great way to ensure a continuous supply of your favorite varieties and adapt them to your local growing conditions.
Frequently Asked Questions (FAQ)
What is the best time to plant bottle gourd seeds?
The ideal time to plant bottle gourd seeds is after the last frost, when the soil has warmed up to at least 65°F (18°C). Bottle gourds are warm-season crops and are sensitive to cold temperatures. In most regions, this typically falls between late spring and early summer. If you live in a cooler climate, you can start the seeds indoors 4-6 weeks before the last expected frost and transplant them outdoors once the weather is suitable.
How much sunlight do bottle gourds need?
Bottle gourds require at least 6-8 hours of direct sunlight per day to thrive. Choose a planting location that receives ample sunlight throughout the day. Insufficient sunlight can lead to stunted growth, reduced yields, and increased susceptibility to diseases.
What type of soil is best for growing bottle gourds?
Bottle gourds prefer well-drained, fertile soil that is rich in organic matter. The ideal soil pH is between 6.0 and 7.0. Before planting, amend the soil with compost, well-rotted manure, or other organic materials to improve drainage, fertility, and water retention. Avoid planting in heavy clay soil, as it can become waterlogged and hinder root development.
How often should I water bottle gourds?
Bottle gourds need consistent watering, especially during hot and dry weather. Water deeply and regularly, ensuring that the soil remains moist but not waterlogged. Aim to water at the base of the plant to avoid wetting the foliage, which can increase the risk of fungal diseases. A good rule of thumb is to water when the top inch of soil feels dry to the touch. Mulching around the plants can help retain moisture and suppress weeds.
What are some common pests and diseases that affect bottle gourds?
Bottle gourds can be susceptible to various pests and diseases, including squash bugs, squash vine borers, aphids, powdery mildew, and downy mildew. Regularly inspect your plants for signs of infestation or disease. Use organic pest control methods, such as insecticidal soap or neem oil, to manage pests. Ensure good air circulation and avoid overhead watering to prevent fungal diseases. Remove any infected leaves or plants promptly to prevent the spread of disease.
How do I train bottle gourds to grow on a trellis?
Bottle gourds are vigorous climbers and benefit from being trained on a trellis or other support structure. As the vines grow, gently guide them onto the trellis and secure them with plant ties or twine. Prune any side shoots that are not needed to maintain the desired shape and prevent overcrowding. Training bottle gourds on a trellis not only saves space but also improves air circulation and reduces the risk of diseases.
When are bottle gourds ready to harvest?
The harvesting time for bottle gourds depends on the intended use. For ornamental purposes, harvest the gourds when they are fully mature and the skin has hardened. The stem should be dry and brown. For culinary purposes, harvest the gourds when they are young and tender, before the skin becomes too tough. The size and color of the gourd will vary depending on the variety.
How do I dry bottle gourds for crafting?
To dry bottle gourds for crafting, first wash them thoroughly with soap and water. Then, dry them completely with a towel. Place the gourds in a well-ventilated area, such as a garage or shed, away from direct sunlight. Elevate the gourds on a wire rack or wooden pallets to allow air to circulate around them. It can take several months for the gourds to dry completely. During the drying process, the gourds may develop mold or soft spots. Remove any mold with a bleach solution and discard any gourds that are severely damaged. Once the gourds are dry, they will be lightweight and the seeds will rattle inside.
Can I eat bottle gourds?
Yes, young and tender bottle gourds can be eaten. They have a mild, slightly sweet flavor and can be used in a variety of dishes, such as soups, stews, curries, and stir-fries. However, it is important to note that some bottle gourds can contain bitter compounds that are toxic. Always taste a small piece of the gourd before cooking it. If it tastes bitter, discard it immediately. It is also advisable to peel the gourd before cooking it, as the skin can be tough and bitter.
How do I save seeds from bottle gourds?
To save seeds from bottle gourds, allow the gourds to mature fully on the vine. Once the gourds are dry and the seeds rattle inside, cut them open and remove the seeds. Wash the seeds thoroughly and spread them out on a paper towel to dry completely. Store the dried seeds in an airtight container in a cool, dark, and dry place. Properly stored bottle gourd seeds can remain viable for several years.
Leave a Comment