
Growing Water Spinach Easily is simpler than you might think, and I’m here to show you how! Have you ever been captivated by the vibrant green stalks of water spinach (also known as Ong Choy or Kang Kong) in Asian cuisine? This semi-aquatic leafy green is not only delicious but also packed with nutrients. For centuries, it has been a staple in Southeast Asian diets, gracing tables with its unique flavor and versatility. But what if I told you that you could cultivate this culinary gem right in your own backyard, regardless of your gardening experience?
Many people shy away from growing water spinach, believing it requires specialized conditions or extensive knowledge. However, that’s a common misconception! With a few simple tricks and a little DIY spirit, you can enjoy a bountiful harvest of fresh, homegrown water spinach. Imagine the satisfaction of snipping off crisp, tender leaves for your stir-fries, soups, or salads, knowing exactly where your food comes from.
This article will unlock the secrets to growing water spinach easily, even if you’re a complete beginner. We’ll explore practical DIY techniques, from seed selection to harvesting, ensuring you have all the information you need to succeed. Say goodbye to expensive grocery store prices and hello to a thriving water spinach patch in your very own home garden!
Wasserspinat einfach selbst anbauen: Mein DIY-Guide für den Garten oder Balkon
Wasserspinat, auch bekannt als Kangkong oder Ong Choy, ist ein köstliches und nahrhaftes Blattgemüse, das in der asiatischen Küche sehr beliebt ist. Ich liebe es, weil es so schnell wächst und man es super einfach selbst anbauen kann, egal ob im Garten oder auf dem Balkon. Hier zeige ich dir, wie du mit ein paar einfachen Schritten deinen eigenen Wasserspinat ernten kannst!
Was du brauchst:
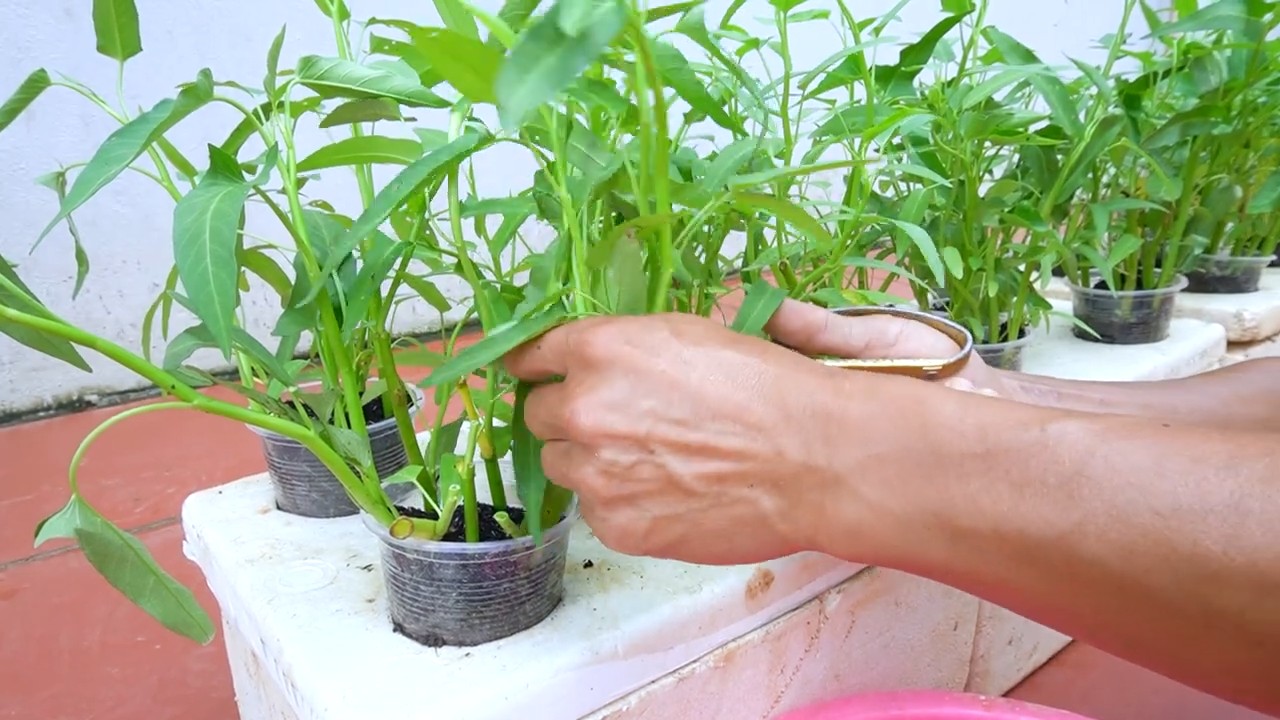
* Samen oder Stecklinge: Du kannst Wasserspinat entweder aus Samen ziehen oder Stecklinge von einer bereits gewachsenen Pflanze nehmen. Ich persönlich finde Stecklinge einfacher, weil sie schneller wachsen.
* Behälter: Ein Topf, Kübel oder sogar ein Eimer mit ausreichend Volumen (mindestens 10 Liter) ist perfekt. Achte darauf, dass er Drainagelöcher hat.
* Erde: Eine gute, nährstoffreiche Blumenerde ist ideal. Du kannst auch Kompost untermischen, um die Erde noch fruchtbarer zu machen.
* Wasser: Wasserspinat liebt Wasser, also sorge für eine regelmäßige Bewässerung.
* Sonnenlicht: Wasserspinat braucht viel Sonne, mindestens 6 Stunden am Tag.
* Optional: Flüssigdünger für Gemüse, um das Wachstum zu fördern.
Wasserspinat aus Samen ziehen:
1. Samen vorbereiten: Um die Keimung zu beschleunigen, weiche die Samen für 24 Stunden in lauwarmem Wasser ein. Das hilft, die harte Samenschale aufzuweichen.
2. Aussaat: Fülle deinen Behälter mit Erde und befeuchte sie gut. Verteile die Samen gleichmäßig auf der Oberfläche und bedecke sie mit einer dünnen Schicht Erde (ca. 1 cm).
3. Feuchtigkeit halten: Besprühe die Erde regelmäßig mit Wasser, um sie feucht zu halten. Du kannst den Behälter auch mit Frischhaltefolie abdecken, um ein feuchtes Klima zu schaffen. Vergiss aber nicht, die Folie täglich kurz zu lüften, um Schimmelbildung zu vermeiden.
4. Keimung: Die Samen keimen normalerweise innerhalb von 7-14 Tagen. Sobald die Keimlinge groß genug sind, kannst du sie vereinzeln, falls sie zu dicht beieinander stehen.
5. Pflege: Stelle den Behälter an einen sonnigen Ort und gieße regelmäßig. Dünge die Pflanzen alle zwei Wochen mit einem Flüssigdünger für Gemüse.
Wasserspinat aus Stecklingen ziehen:
1. Stecklinge schneiden: Suche dir eine gesunde Wasserspinatpflanze und schneide ca. 15-20 cm lange Stecklinge ab. Entferne die unteren Blätter, damit die Stecklinge ihre Energie in die Wurzelbildung stecken können.
2. Bewurzelung: Du hast zwei Möglichkeiten, die Stecklinge zu bewurzeln:
* Im Wasser: Stelle die Stecklinge in ein Glas Wasser. Achte darauf, dass die unteren Blätter nicht im Wasser sind, da sie sonst faulen können. Wechsle das Wasser alle paar Tage. Nach etwa einer Woche sollten sich Wurzeln bilden.
* Direkt in der Erde: Stecke die Stecklinge direkt in feuchte Erde. Halte die Erde feucht und stelle den Behälter an einen hellen, aber nicht direkt sonnigen Ort.
3. Einpflanzen: Sobald die Stecklinge ausreichend Wurzeln gebildet haben, kannst du sie in deinen Behälter mit Erde einpflanzen.
4. Pflege: Stelle den Behälter an einen sonnigen Ort und gieße regelmäßig. Dünge die Pflanzen alle zwei Wochen mit einem Flüssigdünger für Gemüse.
Die richtige Pflege für deinen Wasserspinat:
* Gießen: Wasserspinat liebt es feucht, aber nicht nass. Gieße regelmäßig, besonders an heißen Tagen. Die Erde sollte immer leicht feucht sein.
* Düngen: Dünge die Pflanzen alle zwei Wochen mit einem Flüssigdünger für Gemüse. Das sorgt für ein kräftiges Wachstum und eine reiche Ernte.
* Sonnenlicht: Wasserspinat braucht viel Sonne, mindestens 6 Stunden am Tag. Stelle den Behälter an einen sonnigen Ort, z.B. auf den Balkon oder ins Gewächshaus.
* Schneiden: Schneide die Triebe regelmäßig zurück, um das Wachstum anzuregen. Du kannst die abgeschnittenen Triebe direkt in der Küche verwenden.
* Schädlinge: Wasserspinat ist relativ resistent gegen Schädlinge. Gelegentlich können Blattläuse auftreten. Diese kannst du einfach mit einem Wasserstrahl abspülen oder mit einem biologischen Schädlingsbekämpfungsmittel behandeln.
Erntezeit!
Du kannst deinen Wasserspinat ernten, sobald die Triebe etwa 20-30 cm lang sind. Schneide die Triebe einfach mit einer Schere ab. Die Pflanze wird weiterwachsen und neue Triebe bilden, sodass du über einen längeren Zeitraum ernten kannst.
Wasserspinat in der Küche:
Wasserspinat ist vielseitig einsetzbar in der Küche. Du kannst ihn roh in Salaten verwenden, gedünstet als Beilage servieren oder in Wok-Gerichten mitbraten. Er schmeckt besonders gut mit Knoblauch, Chili und Sojasauce.
Zusätzliche Tipps für den erfolgreichen Anbau:
* Wasserspinat im Wasser anbauen: Wasserspinat kann auch hydroponisch, also im Wasser, angebaut werden. Dazu benötigst du einen Behälter mit Wasser und eine Nährlösung. Die Wurzeln der Pflanzen hängen im Wasser und nehmen die Nährstoffe auf.
* Wasserspinat im Gewächshaus anbauen: Im Gewächshaus kannst du Wasserspinat auch in kälteren Regionen anbauen. Das Gewächshaus schützt die Pflanzen vor Frost und sorgt für ein optimales Klima.
* Wasserspinat als Bodendecker: Wasserspinat kann auch als Bodendecker verwendet werden. Er breitet sich schnell aus und bedeckt den Boden mit seinen Blättern. Das hilft, Unkraut zu unterdrücken und den Boden feucht zu halten.
Häufige Probleme und Lösungen:
* Gelbe Blätter: Gelbe Blätter können ein Zeichen für Nährstoffmangel sein. Dünge die Pflanzen mit einem Flüssigdünger für Gemüse.
* Schlechter Wuchs: Schlechter Wuchs kann verschiedene Ursachen haben, z.B. zu wenig Sonnenlicht, zu wenig Wasser oder Nährstoffmangel. Überprüfe die Bedingungen und passe sie gegebenenfalls an.
* Schädlinge: Bei Schädlingsbefall solltest du schnell handeln. Spüle die Schädlinge mit einem Wasserstrahl ab oder verwende ein biologisches Schädlingsbekämpfungsmittel.
Ich hoffe, dieser Guide hilft dir dabei, deinen eigenen Wasserspinat erfolgreich anzubauen. Es ist wirklich einfacher als man denkt und es macht Spaß, seine eigenen frischen Zutaten zu ernten. Viel Erfolg und guten Appetit!

Conclusion
So, there you have it! Growing water spinach easily at home is not only achievable, but it’s also incredibly rewarding. Forget those expensive, often wilted bunches at the grocery store. Imagine stepping out to your own backyard or balcony and harvesting fresh, crisp water spinach whenever you need it. The vibrant green leaves, bursting with nutrients and flavor, will elevate your stir-fries, soups, and salads to a whole new level.
This DIY trick is a must-try for several compelling reasons. First and foremost, it puts you in control. You know exactly what goes into growing your water spinach – no harmful pesticides or questionable farming practices. You’re providing your family with the freshest, healthiest produce possible. Secondly, it’s incredibly cost-effective. Once you have your initial setup, the ongoing costs are minimal. You’ll be amazed at how much money you save compared to buying water spinach regularly. Thirdly, it’s a fantastic learning experience. Gardening is a therapeutic and educational activity, connecting you with nature and teaching you valuable skills.
But the benefits don’t stop there. Growing your own water spinach allows for endless experimentation and customization. Want to try different varieties? Go for it! Some popular options include the slender-stemmed variety, known for its delicate texture, and the broader-leafed variety, which offers a more robust flavor. You can also adjust the growing conditions to suit your preferences. Experiment with different nutrient solutions, lighting levels, and growing mediums to find what works best for you.
Consider these variations to personalize your water spinach growing experience:
* Vertical Gardening: If you’re short on space, try growing water spinach vertically using stacked planters or hanging baskets. This is a great way to maximize your yield in a small area.
* Aquaponics: Combine growing water spinach with raising fish in an aquaponic system. The fish waste provides nutrients for the plants, and the plants filter the water for the fish. It’s a symbiotic relationship that’s both sustainable and efficient.
* Container Gardening: Use large containers or tubs filled with a rich potting mix. Ensure adequate drainage to prevent waterlogging. This is a simple and convenient option for beginners.
* Hydroponics: For a more advanced approach, explore hydroponic systems. These systems use nutrient-rich water solutions without soil, allowing for faster growth and higher yields.
Don’t be intimidated by the prospect of growing your own water spinach. It’s a surprisingly easy and forgiving plant to cultivate. With a little bit of effort and attention, you’ll be harvesting delicious, homegrown water spinach in no time.
We wholeheartedly encourage you to give this DIY trick a try. It’s a rewarding experience that will transform the way you think about fresh produce. And most importantly, we want to hear about your experiences! Share your successes, your challenges, and your tips with us in the comments below. Let’s create a community of water spinach enthusiasts and learn from each other. What growing medium did you find most effective? Did you encounter any pests or diseases? What are your favorite ways to prepare your homegrown water spinach? Your insights will be invaluable to other readers who are just starting out. So, grab your seeds or cuttings, get your hands dirty, and embark on this exciting journey of growing water spinach easily at home. Happy gardening!
Frequently Asked Questions (FAQ)
What are the ideal growing conditions for water spinach?
Water spinach thrives in warm, humid environments with plenty of sunlight. Aim for at least 6 hours of direct sunlight per day. The ideal temperature range is between 75°F and 90°F (24°C and 32°C). Water spinach also requires consistently moist soil or water. If growing in soil, water regularly to keep the soil damp but not waterlogged. If growing hydroponically, ensure the nutrient solution is properly balanced and aerated.
How long does it take for water spinach to grow?
Water spinach is a fast-growing plant. You can typically start harvesting leaves within 4-6 weeks of planting. The exact time will depend on the growing conditions, such as temperature, sunlight, and nutrient availability. Regular harvesting encourages further growth, so don’t be afraid to start picking leaves once they reach a usable size.
What kind of soil is best for growing water spinach?
Water spinach prefers a rich, well-draining soil with a slightly acidic to neutral pH (around 6.0 to 7.0). A good potting mix amended with compost or other organic matter is ideal. If you’re growing in heavy clay soil, consider adding sand or perlite to improve drainage.
Can I grow water spinach indoors?
Yes, you can grow water spinach indoors, but you’ll need to provide adequate lighting. A sunny windowsill that receives at least 6 hours of direct sunlight is a good option. Alternatively, you can use grow lights to supplement natural light. Ensure the plants have enough space to grow and that the humidity is relatively high.
What are some common pests and diseases that affect water spinach?
Water spinach is generally resistant to pests and diseases, but it can be susceptible to aphids, spider mites, and fungal infections. Regularly inspect your plants for any signs of infestation or disease. If you spot pests, try spraying them with a strong stream of water or using insecticidal soap. For fungal infections, ensure good air circulation and avoid overwatering.
How do I harvest water spinach?
Harvest water spinach by cutting the stems about 4-6 inches above the soil line. This will encourage new growth from the cut stems. You can also harvest individual leaves as needed. Harvest regularly to keep the plants productive and prevent them from becoming too leggy.
Can I grow water spinach from cuttings?
Yes, growing water spinach from cuttings is a very easy and effective method of propagation. Simply take cuttings that are 6-8 inches long and remove the lower leaves. Place the cuttings in water or directly into moist soil. Roots will typically develop within a week or two.
Is water spinach safe to eat?
Yes, water spinach is safe to eat when grown properly. However, it’s important to source your seeds or cuttings from a reputable supplier to ensure they are free from contaminants. Also, avoid growing water spinach in areas that may be polluted with heavy metals or other toxins. Thoroughly wash the leaves before eating.
How do I store harvested water spinach?
Store harvested water spinach in the refrigerator in a plastic bag or container. It will stay fresh for several days. To prolong its shelf life, you can wrap the stems in a damp paper towel before storing.
What are some popular ways to cook water spinach?
Water spinach is a versatile vegetable that can be used in a variety of dishes. It’s commonly stir-fried with garlic, chili, and soy sauce. It can also be added to soups, stews, and salads. In Southeast Asian cuisine, it’s often used in dishes like kangkong belacan (stir-fried water spinach with shrimp paste) and gado-gado (Indonesian salad with peanut sauce).
What are the nutritional benefits of water spinach?
Water spinach is a nutrient-rich vegetable that is low in calories and high in vitamins and minerals. It’s a good source of vitamin A, vitamin C, iron, and calcium. It also contains antioxidants and fiber.
How often should I fertilize my water spinach?
If you’re growing water spinach in soil, fertilize it every 2-3 weeks with a balanced fertilizer. If you’re growing hydroponically, follow the instructions for your specific nutrient solution. Avoid over-fertilizing, as this can lead to excessive vegetative growth and reduced yields.
Can I grow water spinach in a pond?
Yes, water spinach can be grown in a pond, but it’s important to ensure that the pond water is clean and free from pollutants. You can either plant the water spinach directly in the pond or grow it in containers that are placed in the pond. Be aware that water spinach can spread rapidly, so you may need to control its growth to prevent it from becoming invasive.
What if my water spinach leaves are turning yellow?
Yellowing leaves can indicate several problems, such as nutrient deficiency, overwatering, or underwatering. Check the soil moisture and ensure that the plants are receiving adequate nutrients. If the soil is waterlogged, improve drainage. If the soil is dry, water more frequently. If the problem persists, consider testing the soil pH and adjusting it as needed.

Leave a Comment