
Growing mushrooms in a bowl might sound like something out of a fairy tale, but trust me, it’s a surprisingly simple and rewarding DIY project you can tackle right in your kitchen! Forget those expensive grocery store prices and the mystery of where your fungi friends came from. I’m going to show you how to cultivate your own delicious, fresh mushrooms with minimal effort and maximum satisfaction.
Mushrooms have been revered for centuries, not just for their culinary uses but also for their medicinal properties and even spiritual significance in some cultures. From ancient Roman feasts to traditional Chinese medicine, these fascinating fungi have held a special place in human history. Now, you can tap into that rich history and bring a little bit of that magic into your own home.
Why should you learn this DIY trick? Well, for starters, it’s incredibly convenient! Imagine having a constant supply of fresh, organic mushrooms right at your fingertips. Plus, it’s a fantastic way to reduce your carbon footprint by cutting down on transportation and packaging. But more than that, growing mushrooms in a bowl is a fun and educational experience that connects you to the natural world. It’s a chance to learn about the fascinating life cycle of fungi and to appreciate the simple joy of nurturing something from start to finish. So, let’s dive in and discover the secrets to successful home mushroom cultivation!
Pilzzucht im Wohnzimmer: Dein DIY-Guide für die Schalenkultur
Hey Pilzfreunde! Habt ihr euch jemals gefragt, wie es wäre, eure eigenen frischen Pilze zu Hause zu züchten? Es ist einfacher, als ihr denkt! Mit dieser DIY-Anleitung zeige ich euch, wie ihr in einer einfachen Schale köstliche Pilze ziehen könnt. Keine Angst, es ist ein super spannendes Projekt, das auch Anfängern gelingt. Los geht’s!
Was du brauchst: Die Zutaten für dein Pilzparadies
Bevor wir loslegen, hier eine Liste der Dinge, die du für dein Pilzzucht-Abenteuer benötigst:
* Eine geeignete Schale: Eine breite, flache Schale aus Kunststoff, Glas oder Keramik ist ideal. Sie sollte mindestens 15 cm Durchmesser und 10 cm Tiefe haben. Denk daran, sie muss sauber sein!
* Substrat: Das ist die Grundlage, auf der deine Pilze wachsen. Du kannst verschiedene Substrate verwenden, z.B. Kaffeesatz, Stroh, Sägemehl oder eine Mischung daraus. Ich empfehle für Anfänger Kaffeesatz, da er leicht verfügbar ist und gut funktioniert.
* Pilzbrut (Myzel): Das ist das “Saatgut” für deine Pilze. Du kannst Pilzbrut online oder in Gartencentern kaufen. Beliebte Sorten für die Schalenkultur sind Austernpilze (Pleurotus ostreatus) oder Seitlinge.
* Sprühflasche: Zum Befeuchten des Substrats.
* Plastikfolie oder Frischhaltefolie: Um die Schale abzudecken und eine hohe Luftfeuchtigkeit zu gewährleisten.
* Optional: Vermiculit oder Perlit (für eine bessere Feuchtigkeitsspeicherung).
* Optional: Kalk (zur pH-Wert-Regulierung, besonders bei Stroh).
Die Vorbereitung: Der Grundstein für eine reiche Ernte
Bevor wir mit dem eigentlichen Ansetzen beginnen, müssen wir das Substrat vorbereiten. Das ist ein wichtiger Schritt, um sicherzustellen, dass deine Pilze gesund und kräftig wachsen.
Kaffeesatz vorbereiten:
1. Sammle deinen Kaffeesatz: Sammle deinen gebrauchten Kaffeesatz über mehrere Tage. Achte darauf, dass er nicht schimmelt.
2. Pasteurisiere den Kaffeesatz: Um unerwünschte Mikroorganismen abzutöten, pasteurisiere den Kaffeesatz. Das geht ganz einfach: Gib den Kaffeesatz in einen Topf und übergieße ihn mit kochendem Wasser. Lass ihn 1-2 Stunden ziehen.
3. Lass den Kaffeesatz abkühlen und abtropfen: Gieße das überschüssige Wasser ab und lass den Kaffeesatz auf Raumtemperatur abkühlen. Er sollte feucht, aber nicht nass sein.
Stroh vorbereiten:
1. Schneide das Stroh: Schneide das Stroh in kleine Stücke (ca. 5-10 cm lang).
2. Pasteurisiere das Stroh: Gib das Stroh in einen großen Topf oder Eimer und übergieße es mit kochendem Wasser. Beschwere es mit einem Stein oder Teller, damit es unter Wasser bleibt. Lass es 1-2 Stunden ziehen.
3. Lass das Stroh abkühlen und abtropfen: Gieße das überschüssige Wasser ab und lass das Stroh auf Raumtemperatur abkühlen. Es sollte feucht, aber nicht nass sein.
4. Optional: Füge etwas Kalk hinzu, um den pH-Wert zu erhöhen. Das hilft, unerwünschte Mikroorganismen zu unterdrücken.
Sägemehl vorbereiten:
1. Wähle das richtige Sägemehl: Verwende unbehandeltes Sägemehl von Harthölzern wie Buche oder Eiche.
2. Pasteurisiere das Sägemehl: Gib das Sägemehl in einen Topf und füge Wasser hinzu, bis es gut durchfeuchtet ist. Koche das Sägemehl für 1-2 Stunden.
3. Lass das Sägemehl abkühlen und abtropfen: Gieße das überschüssige Wasser ab und lass das Sägemehl auf Raumtemperatur abkühlen. Es sollte feucht, aber nicht nass sein.
Die Aussaat: Dein Pilzgarten entsteht
Jetzt kommt der spannende Teil: Wir beimpfen das Substrat mit der Pilzbrut!
1. Reinige deine Schale: Stelle sicher, dass deine Schale sauber und desinfiziert ist.
2. Schichte das Substrat und die Pilzbrut: Gib eine Schicht Substrat (ca. 2-3 cm dick) in die Schale. Verteile dann eine Schicht Pilzbrut darüber. Wiederhole diesen Vorgang, bis die Schale fast voll ist. Die oberste Schicht sollte aus Substrat bestehen.
3. Drücke das Substrat leicht an: Drücke das Substrat leicht an, damit es kompakt ist.
4. Befeuchte das Substrat: Besprühe das Substrat mit Wasser, bis es gut durchfeuchtet ist. Achte darauf, dass es nicht zu nass ist.
5. Decke die Schale ab: Decke die Schale mit Plastikfolie oder Frischhaltefolie ab. Steche ein paar kleine Löcher in die Folie, um die Luftzirkulation zu gewährleisten.
Die Inkubation: Geduld ist gefragt
Jetzt heißt es warten und die Natur ihre Arbeit tun lassen. Die Inkubation ist die Phase, in der das Myzel (die Pilzwurzeln) das Substrat durchwächst.
1. Stelle die Schale an einen dunklen, kühlen Ort: Die ideale Temperatur für die Inkubation liegt zwischen 20 und 25 Grad Celsius. Vermeide direkte Sonneneinstrahlung.
2. Kontrolliere die Feuchtigkeit: Überprüfe regelmäßig die Feuchtigkeit des Substrats. Wenn es trocken aussieht, besprühe es mit Wasser.
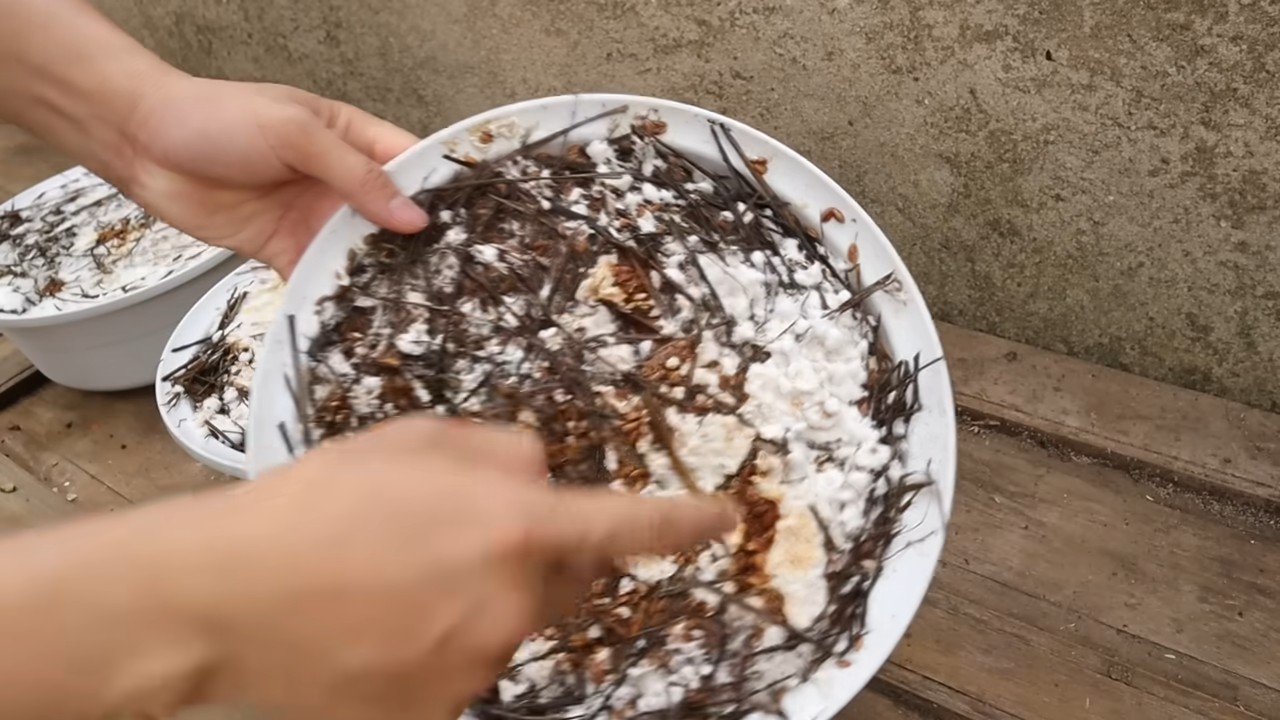
3. Warte geduldig: Die Inkubationszeit kann je nach Pilzsorte und Substrat variieren. In der Regel dauert es 2-4 Wochen, bis das Myzel das Substrat vollständig durchwachsen hat. Du erkennst es daran, dass das Substrat von einem weißen, flaumigen Belag überzogen ist.
Die Fruchtung: Die Belohnung für deine Mühe
Wenn das Myzel das Substrat vollständig durchwachsen hat, ist es Zeit für die Fruchtung. Das bedeutet, dass die Pilze zu wachsen beginnen.
1. Stelle die Schale an einen helleren Ort: Stelle die Schale an einen helleren Ort, aber vermeide direkte Sonneneinstrahlung.
2. Erhöhe die Luftfeuchtigkeit: Besprühe die Schale mehrmals täglich mit Wasser, um die Luftfeuchtigkeit zu erhöhen. Du kannst auch eine Plastiktüte über die Schale stülpen, um die Feuchtigkeit zu halten. Achte aber darauf, dass genügend Luftzirkulation vorhanden ist.
3. Sorge für gute Belüftung: Stelle sicher, dass die Schale gut belüftet ist. Öffne die Plastiktüte oder die Folie regelmäßig, um frische Luft hineinzulassen.
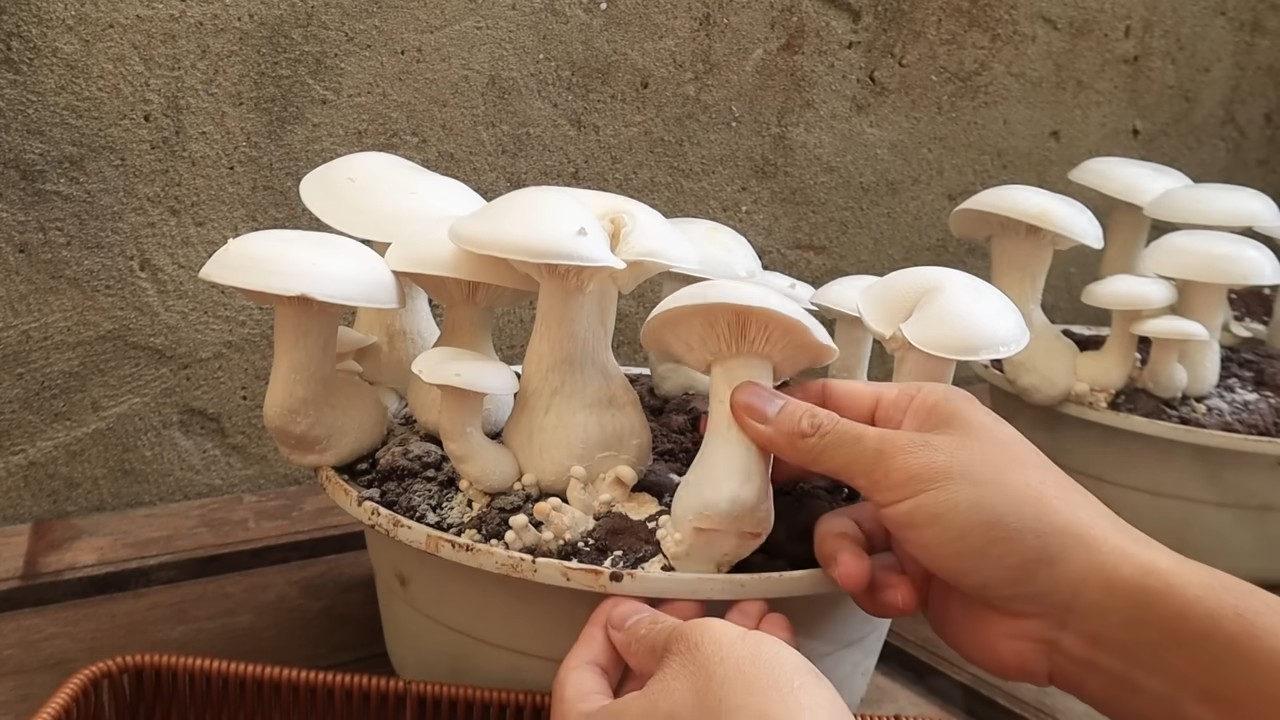
4. Beobachte das Wachstum: Beobachte das Wachstum der Pilze. Du wirst sehen, wie kleine Pilzköpfe aus dem Substrat sprießen.
5. Ernte die Pilze: Ernte die Pilze, wenn sie ausgewachsen sind, aber bevor sie ihre Sporen abwerfen. Das erkennst du daran, dass die Hüte sich leicht nach oben biegen und die Lamellen (die “Blättchen” unter dem Hut) sichtbar werden. Schneide die Pilze mit einem scharfen Messer am Stiel ab.
Nach der Ernte: Auf zu neuen Ernten
Nach der ersten Ernte ist noch lange nicht Schluss! Mit etwas Pflege kannst du mehrere Ernten aus deiner Schale herausholen.
1. Entferne die Stielreste: Entferne die Stielreste der geernteten Pilze, um Fäulnis zu vermeiden.
2. Befeuchte das Substrat: Befeuchte das Substrat erneut, um es für die nächste Ernte vorzubereiten.
3. Wiederhole den Fruchtungsprozess: Wiederhole den Fruchtungsprozess, indem du die Schale an einen helleren Ort stellst, die Luftfeuchtigkeit erhöhst und für gute Belüftung sorgst.
4.
Conclusion
So, there you have it! Growing mushrooms in a bowl isn’t just a quirky kitchen experiment; it’s a gateway to fresh, flavorful fungi right at your fingertips. Forget those expensive, pre-packaged mushrooms from the grocery store – with a little patience and this simple DIY trick, you can cultivate your own supply of deliciousness.
Why is this a must-try? Because it’s empowering! It connects you to the food you eat in a tangible way, allowing you to witness the magic of nature unfold in your own home. It’s also incredibly rewarding to harvest your own mushrooms, knowing you nurtured them from start to finish. Plus, it’s a fantastic conversation starter! Imagine serving a dish featuring mushrooms you grew yourself – your guests will be amazed.
But the benefits don’t stop there. This method is surprisingly space-efficient, making it perfect for apartment dwellers or anyone with limited gardening space. It’s also a sustainable way to enjoy mushrooms, reducing your reliance on commercially grown varieties that often travel long distances.
Ready to take your mushroom cultivation to the next level? Consider experimenting with different substrates. While coffee grounds are a readily available and effective option, you could also try using straw, sawdust, or even cardboard. Each substrate will impart a slightly different flavor and texture to your mushrooms.
Another exciting variation is to try growing different types of mushrooms. While oyster mushrooms are a great starting point due to their ease of cultivation, you can eventually branch out to other varieties like shiitake or lion’s mane, depending on the availability of spawn and your level of experience. Remember to research the specific requirements of each mushroom type to ensure optimal growth.
Don’t be afraid to get creative with your growing environment. While a dark, humid space is ideal, you can also use a humidity tent or a plastic bag to create a microclimate that encourages mushroom growth. Just be sure to provide adequate ventilation to prevent mold and mildew.
Ultimately, the key to success with this DIY trick is experimentation and observation. Pay close attention to your mushrooms, noting their color, texture, and growth patterns. Adjust your watering and ventilation as needed to create the perfect environment for them to thrive.
We are confident that you will find this method of growing mushrooms in a bowl to be both enjoyable and rewarding. So, gather your supplies, follow the steps outlined in this guide, and prepare to be amazed by the bounty you can create.
We encourage you to embark on this culinary adventure and share your experiences with us! Post photos of your mushroom harvests on social media using [Your Hashtag Here] and let us know what delicious dishes you’ve created with your homegrown fungi. We can’t wait to see what you come up with! Happy growing!
Frequently Asked Questions (FAQ)
What kind of mushrooms can I grow in a bowl?
Oyster mushrooms are generally considered the easiest and most reliable option for beginners. They are relatively fast-growing, tolerant of a range of conditions, and readily available in spawn form. Other varieties, such as shiitake or lion’s mane, can be grown using this method, but they may require more specific conditions and a higher level of experience. Always research the specific requirements of the mushroom variety you choose to ensure optimal growth.
What is the best substrate to use for growing mushrooms in a bowl?
Coffee grounds are a popular and readily available substrate, but you can also use straw, sawdust, or even cardboard. Coffee grounds are rich in nitrogen, which mushrooms need to grow. Straw and sawdust provide a good source of carbon, while cardboard can be broken down and used as a nutrient-rich base. The best substrate will depend on the type of mushroom you are growing and your personal preferences. Experimenting with different substrates can lead to interesting results and unique flavor profiles.
How long does it take to grow mushrooms in a bowl?
The time it takes to grow mushrooms in a bowl can vary depending on the mushroom variety, the substrate used, and the environmental conditions. Oyster mushrooms typically take 2-3 weeks to fruit after the substrate has been fully colonized by the mycelium. Shiitake mushrooms can take several months to fruit. Maintaining optimal humidity and temperature is crucial for faster growth.
How do I know when my mushrooms are ready to harvest?
Oyster mushrooms are ready to harvest when the caps have fully formed and are starting to curl upwards. The edges of the caps may also become slightly wavy. Shiitake mushrooms are ready to harvest when the caps have flattened out and the gills are visible. It’s best to harvest mushrooms before they start to drop spores, as this can make them less flavorful.
How do I harvest my mushrooms?
The best way to harvest mushrooms is to gently twist them off the substrate. Avoid pulling them, as this can damage the mycelium and prevent future flushes. You can also use a sharp knife to cut the mushrooms off at the base.
How often can I harvest mushrooms from the same bowl?
You can typically harvest multiple flushes of mushrooms from the same bowl. After harvesting the first flush, allow the substrate to rest for a few days, then rehydrate it by misting it with water. This will encourage the mycelium to produce another flush of mushrooms. You can usually get 2-3 flushes from the same substrate before it becomes depleted of nutrients.
What if my mushrooms don’t grow?
There are several reasons why your mushrooms might not be growing. The most common causes are lack of humidity, insufficient ventilation, or contamination. Make sure to keep the substrate moist but not waterlogged, and provide adequate ventilation to prevent mold and mildew. If you suspect contamination, discard the substrate and start over with fresh materials.
How do I prevent contamination?
Contamination is a common problem when growing mushrooms. To prevent contamination, use sterile techniques when preparing your substrate and handling your spawn. Clean your work area thoroughly and wear gloves to avoid introducing bacteria or fungi. You can also pasteurize your substrate by heating it to 160-180°F (71-82°C) for 1-2 hours. This will kill off any harmful microorganisms that may be present.
Can I eat the mushrooms I grow in a bowl?
Yes, you can eat the mushrooms you grow in a bowl, as long as you are certain that they are the variety you intended to grow and that they are free from contamination. Always cook your mushrooms thoroughly before eating them. If you are unsure about the identity of your mushrooms, it is best to err on the side of caution and discard them.
What do I do with the spent substrate after I’ve harvested all the mushrooms?
The spent substrate is a valuable resource that can be used in a variety of ways. You can add it to your compost pile, use it as a soil amendment in your garden, or even use it to grow other plants. The spent substrate is rich in nutrients and beneficial microorganisms that can improve soil health and promote plant growth.

Leave a Comment