
Upside Down Eggplant Growing: Imagine plucking plump, juicy eggplants from hanging baskets right outside your kitchen door! Sounds like something out of a futuristic garden, right? Well, it’s not only possible, but it’s also a surprisingly simple and rewarding DIY project. For centuries, gardeners have experimented with innovative techniques to maximize yields and overcome space limitations. While the exact origins of upside-down gardening are debated, the ingenuity behind it speaks to our enduring desire to connect with nature and cultivate our own food, even in the most unconventional ways.
Let’s face it, traditional gardening can be tough. Pests, diseases, and limited space can often leave us feeling defeated. That’s where the magic of upside down eggplant growing comes in! This method offers a fantastic solution for those with small patios, balconies, or even just a yearning for something a little different. By suspending your eggplant, you’ll not only save space but also potentially reduce pest problems and improve air circulation. I’m excited to share my favorite tips and tricks for successfully growing eggplants upside down, so you can enjoy a bountiful harvest with minimal effort. Get ready to transform your gardening game and impress your friends with this unique and productive technique!
Kopfstehende Auberginen: Dein DIY-Guide für eine ungewöhnliche Ernte
Ich liebe es, im Garten zu experimentieren, und eine meiner Lieblingsmethoden ist das Anpflanzen von Auberginen kopfüber. Es mag verrückt klingen, aber es ist eine tolle Möglichkeit, Platz zu sparen, Schädlinge fernzuhalten und eine reiche Ernte zu erzielen. In diesem Artikel zeige ich dir Schritt für Schritt, wie du deine eigenen hängenden Auberginen anbauen kannst.
Was du brauchst
Bevor wir loslegen, hier eine Liste der Materialien, die du benötigst:
* Auberginensamen oder Jungpflanzen (Ich empfehle, mit Jungpflanzen zu beginnen, da sie schneller wachsen)
* Zwei 5-Gallonen-Eimer (oder ähnliche Behälter)
* Bohrmaschine mit Lochsäge (ca. 5-7 cm Durchmesser)
* Pflanzerde von guter Qualität
* Kompost (optional, aber sehr empfehlenswert)
* Gartenvlies oder Jute (um die Pflanze zu schützen)
* Draht oder starke Schnur zum Aufhängen der Eimer
* Gießkanne oder Schlauch
* Handschuhe (optional, aber ratsam)
Schritt-für-Schritt-Anleitung
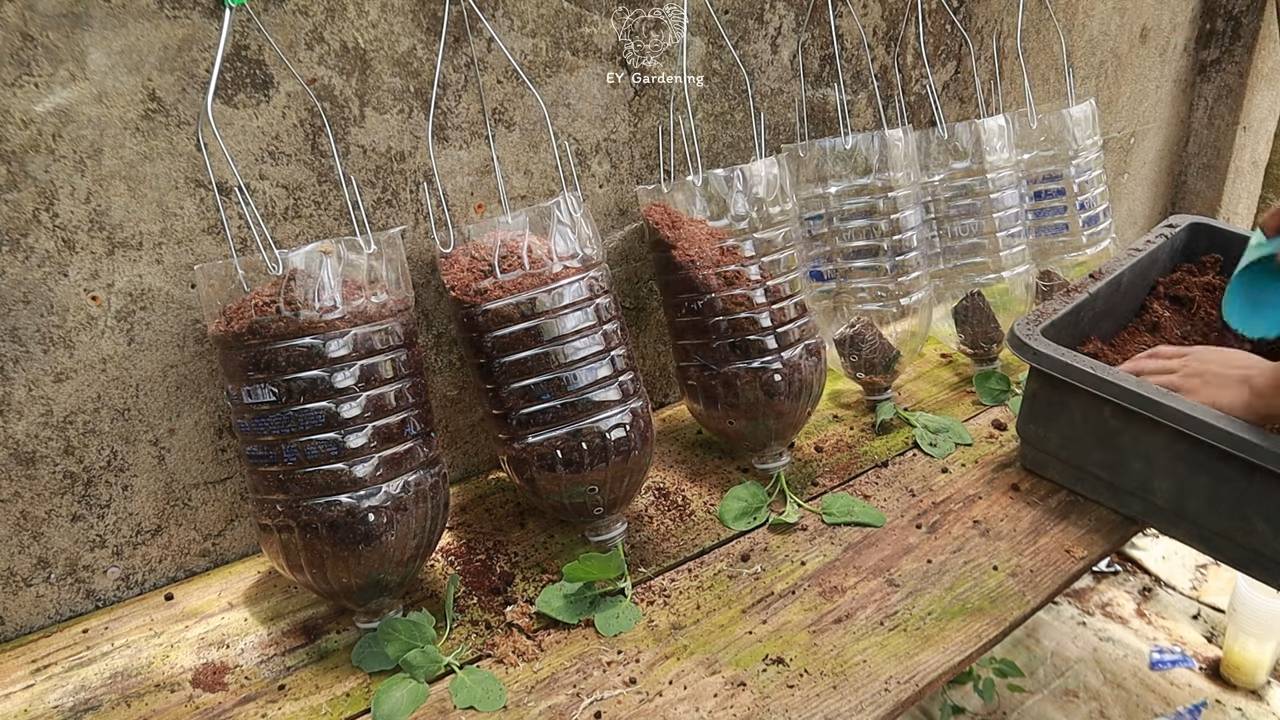
Phase 1: Vorbereitung der Eimer
1. Löcher bohren: Nimm einen der Eimer und bohre mit der Lochsäge ein Loch in den Boden des Eimers. Das Loch sollte groß genug sein, damit die Auberginenpflanze hindurchpasst, aber nicht so groß, dass die Erde herausfällt. Ich empfehle, mit einem kleineren Loch zu beginnen und es bei Bedarf zu vergrößern.
2. Drainagelöcher hinzufügen: Bohre mehrere kleinere Löcher (ca. 1 cm Durchmesser) in den Boden des Eimers, um eine gute Drainage zu gewährleisten. Staunässe ist der Feind der Auberginen!
3. Aufhängelöcher bohren: Bohre vier Löcher gleichmäßig um den oberen Rand des Eimers. Diese Löcher dienen dazu, den Eimer später aufzuhängen.
4. Zweiten Eimer vorbereiten (optional): Wenn du möchtest, kannst du den zweiten Eimer als Auffangbecken verwenden, um überschüssiges Wasser aufzufangen. Bohre dazu einfach ein paar Löcher in den Boden des zweiten Eimers.
Phase 2: Einpflanzen der Auberginen
1. Schutz anbringen: Schneide ein Stück Gartenvlies oder Jute zu, das groß genug ist, um den Wurzelballen der Auberginenpflanze zu bedecken. Das Vlies schützt die Pflanze, wenn sie kopfüber hängt.
2. Pflanze vorbereiten: Nimm die Auberginenpflanze vorsichtig aus ihrem Topf und lockere den Wurzelballen etwas auf.
3. Pflanze einsetzen: Führe die Auberginenpflanze vorsichtig von unten durch das Loch im Eimerboden. Achte darauf, die Wurzeln nicht zu beschädigen.
4. Schutz anbringen: Lege das Stück Gartenvlies oder Jute um den Wurzelballen, um ihn zu schützen und zu verhindern, dass Erde herausfällt.
5. Eimer befüllen: Fülle den Eimer vorsichtig mit Pflanzerde. Mische die Erde am besten mit etwas Kompost, um die Nährstoffversorgung zu verbessern. Drücke die Erde leicht an, aber nicht zu fest.
6. Gießen: Gieße die Pflanze gründlich, bis das Wasser aus den Drainagelöchern austritt.
Phase 3: Aufhängen und Pflegen
1. Eimer aufhängen: Führe Draht oder starke Schnur durch die Aufhängelöcher am oberen Rand des Eimers. Achte darauf, dass die Aufhängung stabil ist und das Gewicht des Eimers tragen kann.
2. Standort wählen: Hänge den Eimer an einem sonnigen Ort auf, der mindestens 6-8 Stunden Sonnenlicht pro Tag erhält. Ein geschützter Ort, der vor starkem Wind geschützt ist, ist ideal.
3. Regelmäßig gießen: Auberginen brauchen viel Wasser, besonders wenn sie in einem Eimer hängen. Gieße die Pflanze regelmäßig, besonders an heißen Tagen. Überprüfe die Erde regelmäßig, um sicherzustellen, dass sie nicht austrocknet.
4. Düngen: Dünge die Auberginenpflanze alle zwei Wochen mit einem Flüssigdünger für Gemüse. Befolge die Anweisungen auf der Düngemittelpackung.
5. Schädlinge kontrollieren: Überprüfe die Pflanze regelmäßig auf Schädlinge wie Blattläuse oder Spinnmilben. Bei Bedarf kannst du natürliche Schädlingsbekämpfungsmittel verwenden.
6. Drehen (optional): Um eine gleichmäßige Sonneneinstrahlung zu gewährleisten, kannst du den Eimer regelmäßig drehen.
Zusätzliche Tipps und Tricks
* Sortenwahl: Wähle Auberginensorten, die für den Anbau in Töpfen geeignet sind. Kleinere Sorten wie “Fairy Tale” oder “Hansel” eignen sich besonders gut.
* Unterstützung: Wenn die Auberginenfrüchte zu schwer werden, kann es notwendig sein, die Pflanze zusätzlich zu unterstützen. Du kannst dazu Stäbe oder Schnüre verwenden.
* Mulchen: Eine Schicht Mulch auf der Erde hilft, die Feuchtigkeit zu speichern und Unkraut zu unterdrücken.
* Überwinterung: In kälteren Klimazonen kannst du die Auberginenpflanze im Winter ins Haus holen und sie an einem hellen Ort aufbewahren.
Häufige Probleme und Lösungen
* Gelbe Blätter: Gelbe Blätter können ein Zeichen für Überwässerung oder Nährstoffmangel sein. Überprüfe die Bewässerung und dünge die Pflanze bei Bedarf.
* Blütenfall: Blütenfall kann durch Stress, wie z.B. extreme Temperaturen oder Wassermangel, verursacht werden. Sorge für eine gleichmäßige Bewässerung und schütze die Pflanze vor extremen Bedingungen.
* Schädlinge: Blattläuse, Spinnmilben und andere Schädlinge können Auberginen befallen. Verwende natürliche Schädlingsbekämpfungsmittel oder Insektizidseife, um sie zu bekämpfen.
Warum Auberginen kopfüber anbauen?
Es gibt viele Vorteile, Auberginen kopfüber anzubauen:
* Platzersparnis: Ideal für kleine Gärten oder Balkone.
* Schädlingsbekämpfung: Schädlinge haben es schwerer, die Pflanze zu erreichen.
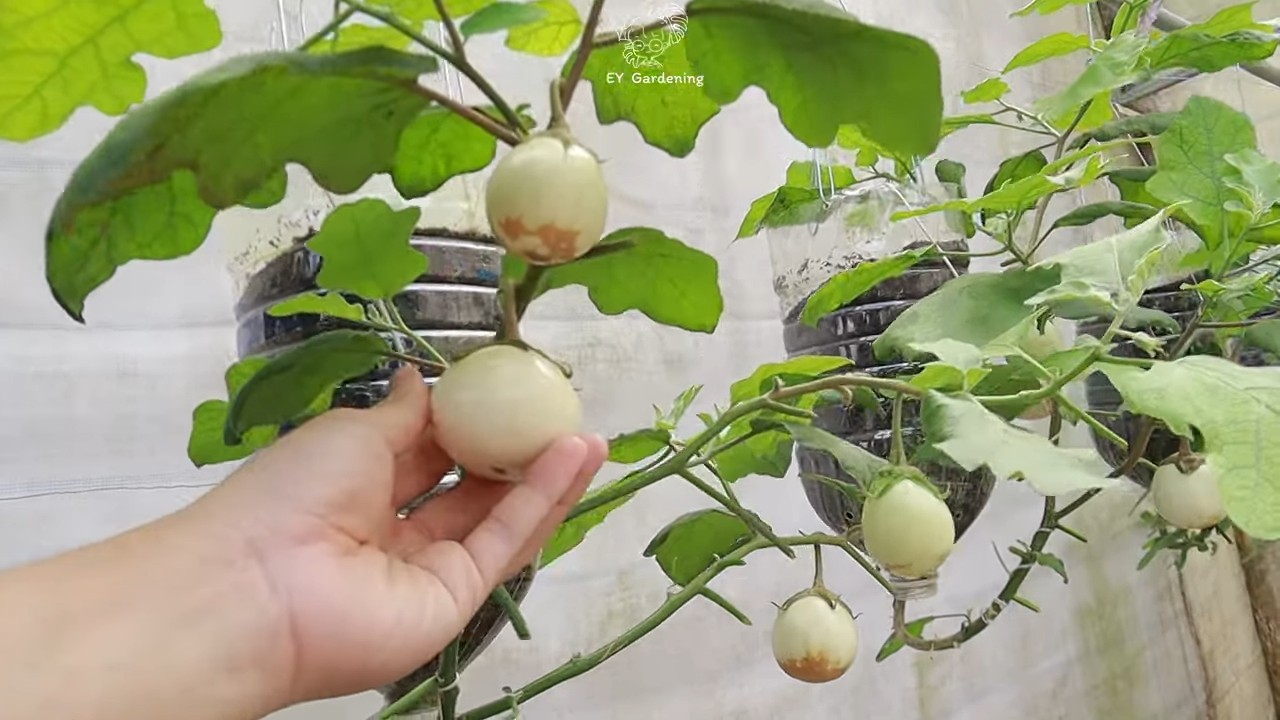
* Bessere Belüftung: Die Früchte hängen frei und werden besser belüftet, was das Risiko von Pilzkrankheiten reduziert.
* Einfache Ernte: Die Früchte sind leicht zu erreichen und zu ernten.
* Ungewöhnlicher Blickfang: Ein hängender Auberginengarten ist ein echter Hingucker!
Ich hoffe, dieser Guide hat dir geholfen, deine eigenen hängenden Auberginen anzubauen. Es ist ein lustiges und lohnendes Projekt, das dir eine reiche Ernte bescheren wird. Viel Spaß beim Gärtnern!
Conclusion
So, there you have it! Growing eggplant upside down isn’t just a quirky gardening trend; it’s a genuinely effective method for producing healthier, more abundant harvests, especially when space is at a premium. We’ve explored the numerous benefits, from improved air circulation and reduced pest infestations to the sheer convenience of harvesting your eggplants at eye level. The advantages are clear, and the process, as you’ve seen, is surprisingly straightforward.
This DIY trick is a must-try for any gardener, whether you’re a seasoned pro or just starting out. Imagine the satisfaction of watching your eggplant plants thrive, suspended gracefully in the air, laden with beautiful, glossy fruit. It’s a conversation starter, a space saver, and a proven way to boost your eggplant yield.
But don’t just take our word for it. We encourage you to experiment with different variations to find what works best for your specific climate and growing conditions. Consider trying different container sizes; larger containers will hold more soil and require less frequent watering. You could also experiment with different eggplant varieties. Some varieties, like the smaller, more compact types, may be particularly well-suited for upside-down growing.
Think about adding companion plants to your container. Herbs like basil and marigolds can help deter pests and attract beneficial insects, creating a healthier environment for your eggplant. You can also add a slow-release fertilizer to the soil mix to provide your plants with a steady supply of nutrients throughout the growing season.
Remember to monitor your plants closely and adjust your watering and fertilizing schedule as needed. Upside-down plants may dry out more quickly than those grown in the ground, so be sure to check the soil moisture regularly.
Ultimately, the best way to discover the magic of upside-down eggplant growing is to dive in and give it a try. We’re confident that you’ll be amazed by the results. The key is to be patient, observant, and willing to learn as you go.
We’re eager to hear about your experiences! Share your photos, tips, and challenges in the comments below. Let’s create a community of upside-down eggplant enthusiasts and learn from each other. What kind of container did you use? What variety of eggplant did you plant? Did you encounter any unexpected challenges? Your insights could help other gardeners succeed with this innovative growing method.
Don’t delay! Get started on your upside-down eggplant adventure today. You’ll be rewarded with a bountiful harvest of delicious, homegrown eggplants that you can enjoy in countless culinary creations. From classic eggplant parmesan to flavorful baba ghanoush, the possibilities are endless. Happy gardening!
Frequently Asked Questions (FAQ)
What are the best eggplant varieties for upside-down growing?
While most eggplant varieties can be grown upside down, smaller, more compact varieties tend to perform best. These varieties are less likely to become top-heavy and are generally easier to manage in a hanging container. Some popular choices include:
* Fairy Tale Eggplant: This variety produces small, elongated fruits with a mild flavor.
* Hansel Eggplant: Similar to Fairy Tale, Hansel eggplants are compact and produce clusters of small, glossy fruits.
* Little Fingers Eggplant: As the name suggests, this variety produces slender, finger-like eggplants that are perfect for grilling or stir-frying.
* Patio Baby Eggplant: This variety is specifically bred for container gardening and produces small, round fruits.
However, don’t be afraid to experiment with other varieties. Even larger eggplants can be grown upside down with proper support and care.
How often should I water my upside-down eggplant plant?
Upside-down plants tend to dry out more quickly than those grown in the ground, so it’s important to monitor the soil moisture regularly. Check the soil daily, and water when the top inch feels dry to the touch. The frequency of watering will depend on factors such as the weather, the size of the container, and the type of soil you’re using. In hot, sunny weather, you may need to water your plant every day.
A good rule of thumb is to water deeply until water drains out of the bottom of the container. This ensures that the entire root ball is thoroughly moistened. Avoid overwatering, as this can lead to root rot.
What kind of soil should I use for upside-down eggplant growing?
Use a high-quality potting mix that is well-draining and rich in organic matter. Avoid using garden soil, as it can be too heavy and may not drain properly. A good potting mix will provide the necessary nutrients and aeration for healthy root growth.
You can also amend your potting mix with compost or other organic materials to improve its fertility and water-holding capacity. Consider adding a slow-release fertilizer to provide your plants with a steady supply of nutrients throughout the growing season.
How much sunlight does an upside-down eggplant plant need?
Eggplants need at least 6-8 hours of direct sunlight per day to thrive. Choose a location for your upside-down plant that receives plenty of sunlight. If you live in a particularly hot climate, you may need to provide some afternoon shade to prevent the plant from overheating.
If you’re growing your eggplant indoors, you’ll need to supplement with artificial lighting. Use grow lights that provide a full spectrum of light to ensure healthy growth and fruit production.
How do I prevent pests and diseases from attacking my upside-down eggplant plant?
Upside-down growing can actually help reduce pest infestations by improving air circulation and making it more difficult for pests to reach the plant. However, it’s still important to monitor your plant regularly for signs of pests or diseases.
Some common eggplant pests include aphids, flea beetles, and spider mites. You can control these pests with insecticidal soap, neem oil, or other organic pesticides.
To prevent diseases, make sure to provide good air circulation and avoid overwatering. You can also use a fungicide to protect your plants from fungal diseases.
Companion planting can also help deter pests and attract beneficial insects. Basil, marigolds, and nasturtiums are all good companion plants for eggplants.
How do I support my upside-down eggplant plant as it grows?
As your eggplant plant grows and produces fruit, it may become top-heavy. You may need to provide additional support to prevent the plant from breaking or falling.
You can use a trellis, stake, or cage to support the plant. You can also use rope or twine to tie the plant to a sturdy support.
Make sure to check the support regularly and adjust it as needed as the plant grows.
Can I grow other vegetables upside down?
Yes, many other vegetables can be grown upside down, including tomatoes, peppers, cucumbers, and strawberries. The same principles apply to growing these vegetables upside down as to growing eggplants upside down.
Experiment with different vegetables to see what works best for you. Upside-down growing can be a fun and rewarding way to grow your own food.
What if my eggplant flowers but doesn’t produce fruit?
There are several reasons why your eggplant might flower but not produce fruit. One common reason is lack of pollination. Eggplants are self-pollinating, but they often benefit from assistance from bees or other pollinators. You can hand-pollinate your eggplants by gently shaking the flowers or using a small paintbrush to transfer pollen from one flower to another.
Another reason could be temperature. Eggplants need warm temperatures to set fruit. If the temperatures are too cool, the flowers may drop off without producing fruit.
Nutrient deficiencies can also prevent fruit production. Make sure your eggplant is getting enough phosphorus and potassium, which are essential for flowering and fruiting.
Finally, stress can also cause eggplants to drop their flowers. Make sure your plant is getting enough water, sunlight, and nutrients, and protect it from pests and diseases.


Leave a Comment