
Bitter Gourd Growing Tips: Ever dreamt of harvesting your own vibrant, bumpy, and yes, slightly bitter, gourds right from your backyard? I know I have! There’s something incredibly satisfying about nurturing a plant from seed to table, especially when it’s something as unique and beneficial as bitter gourd. For centuries, this fascinating vegetable has been a staple in Asian and African cuisines and traditional medicine, revered for its health benefits and distinctive flavor. Think of it as nature’s little powerhouse, packed with vitamins and antioxidants!
But let’s be honest, growing bitter gourd can sometimes feel like a challenge. Maybe your vines are thriving but producing no fruit, or perhaps your gourds are small and misshapen. That’s where these DIY tricks and hacks come in! I’m going to share my tried-and-true methods for successful bitter gourd growing tips, turning even the most novice gardener into a bitter gourd pro. We’ll cover everything from soil preparation and trellising to pest control and harvesting, ensuring you get a bountiful crop of these amazing vegetables. So, grab your gardening gloves, and let’s get started on this exciting journey to homegrown bitter gourd goodness!
Growing Bitter Gourd Like a Pro: My DIY Guide
Hey there, fellow gardening enthusiasts! I’m so excited to share my tried-and-true method for growing bitter gourd, also known as karela, right in your own backyard. It might seem intimidating at first, but trust me, with a little patience and these tips, you’ll be harvesting your own bitter gourds in no time. I’ve learned a lot over the years, and I’m happy to pass on my knowledge to you.
Understanding Bitter Gourd: A Quick Overview
Before we dive into the nitty-gritty, let’s understand what we’re dealing with. Bitter gourd is a tropical and subtropical vine belonging to the Cucurbitaceae family. It’s known for its distinctive bitter taste and is widely used in Asian cuisine and traditional medicine. It thrives in warm climates and requires plenty of sunlight and well-drained soil.
Essential Supplies You’ll Need
Here’s a list of everything you’ll need to get started. Don’t worry, most of these items are readily available at your local garden center or online.
* Bitter gourd seeds (choose a variety suited to your climate)
* Seed starting trays or small pots
* Seed starting mix
* Well-draining garden soil
* Compost or aged manure
* Trellis or support structure (bamboo poles, netting, or a fence work great)
* Gardening gloves
* Watering can or hose
* Fertilizer (organic or balanced NPK)
* Pruning shears or scissors
* Insecticidal soap or neem oil (for pest control)
Phase 1: Starting Your Bitter Gourd Seeds
Starting your seeds indoors gives them a head start, especially if you live in an area with a shorter growing season. I always recommend this method for the best results.
1. Soaking the Seeds: To improve germination, I like to soak my bitter gourd seeds in lukewarm water for 24 hours before planting. This helps soften the hard outer shell and encourages sprouting.
2. Preparing the Seed Starting Trays: Fill your seed starting trays or small pots with a seed starting mix. Make sure the mix is moist but not soggy.
3. Planting the Seeds: Make a small hole (about ½ inch deep) in the center of each cell or pot. Place one seed in each hole and gently cover it with the seed starting mix.
4. Watering and Providing Warmth: Water the trays gently to avoid disturbing the seeds. Place the trays in a warm location, ideally between 75-85°F (24-29°C). You can use a heat mat to maintain a consistent temperature.
5. Maintaining Moisture: Keep the seed starting mix consistently moist by misting it regularly. Avoid overwatering, as this can lead to fungal diseases.
6. Waiting for Germination: Bitter gourd seeds typically germinate within 7-14 days. Be patient and keep an eye on your trays.
Phase 2: Transplanting Your Seedlings
Once your seedlings have developed a few sets of true leaves (usually after 3-4 weeks), they’re ready to be transplanted into your garden.
1. Preparing the Garden Bed: Choose a sunny location in your garden with well-draining soil. Bitter gourd needs at least 6-8 hours of sunlight per day. Amend the soil with compost or aged manure to improve its fertility and drainage. I usually dig in about 2-3 inches of compost.
2. Hardening Off the Seedlings: Before transplanting, you need to “harden off” your seedlings. This means gradually exposing them to outdoor conditions to help them adjust. Start by placing the trays outside for a few hours each day, gradually increasing the time over a week.
3. Transplanting the Seedlings: Dig holes that are slightly larger than the root balls of your seedlings. Gently remove the seedlings from the trays and place them in the holes. Space the seedlings about 2-3 feet apart.
4. Backfilling and Watering: Backfill the holes with soil and gently firm the soil around the base of the plants. Water thoroughly after transplanting.
5. Adding a Trellis: Bitter gourd is a vine, so it needs a trellis or support structure to climb. Install your trellis near the seedlings immediately after transplanting. This will encourage them to grow upwards. I’ve used bamboo poles tied together with twine, and it works like a charm!
Phase 3: Caring for Your Bitter Gourd Plants
Now that your bitter gourd plants are in the ground, it’s time to provide them with the care they need to thrive.
1. Watering: Water your bitter gourd plants regularly, especially during dry periods. Aim to keep the soil consistently moist but not waterlogged. I usually water deeply 2-3 times a week, depending on the weather.
2. Fertilizing: Feed your bitter gourd plants with a balanced fertilizer every 2-3 weeks. You can use an organic fertilizer or a chemical fertilizer, following the instructions on the label. I prefer using compost tea or fish emulsion for a natural boost.
3. Pruning: Pruning can help improve air circulation and encourage fruit production. Remove any yellowing or dead leaves. You can also prune the lateral branches to encourage the plant to focus its energy on producing fruit. I usually prune lightly every few weeks.
4. Pest and Disease Control: Bitter gourd plants can be susceptible to pests like aphids, spider mites, and squash bugs. Regularly inspect your plants for signs of infestation. If you find any pests, treat them with insecticidal soap or neem oil. For fungal diseases, ensure good air circulation and avoid overwatering.
5. Supporting the Vines: As your bitter gourd vines grow, they will need support to climb the trellis. Gently guide the vines and tie them to the trellis with twine or plant ties. This will help them stay upright and prevent them from sprawling on the ground.
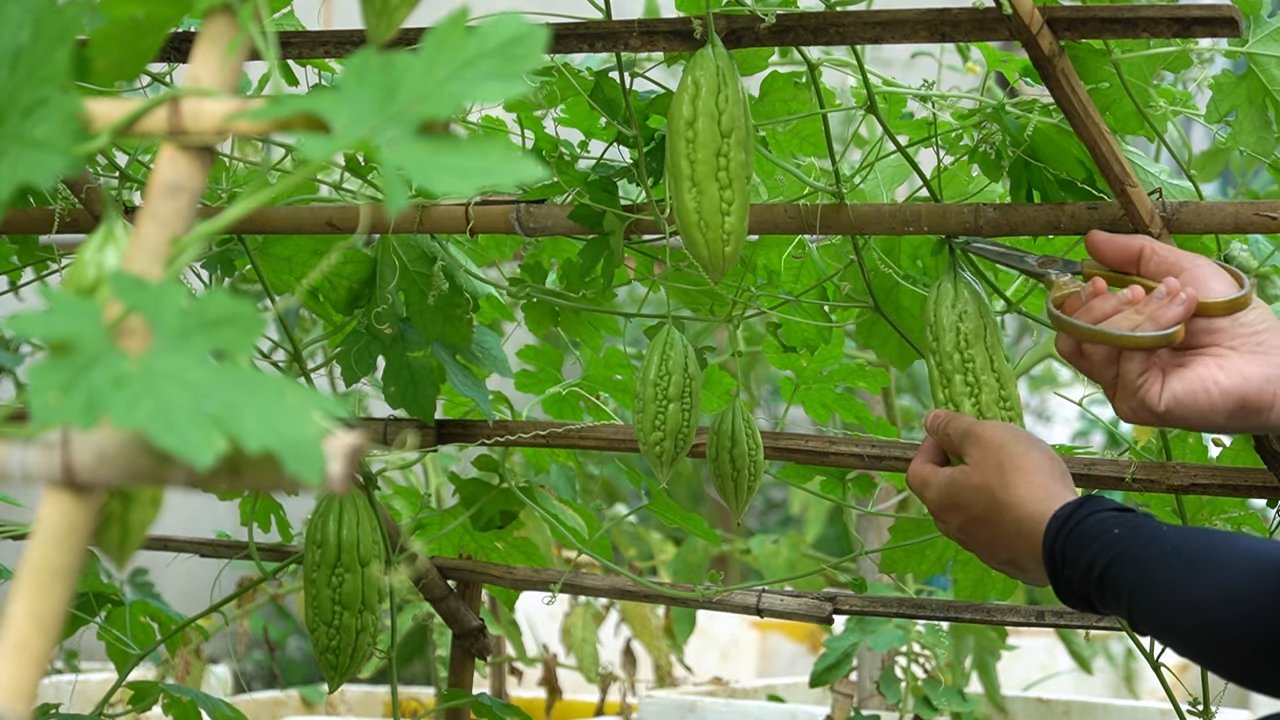
Phase 4: Harvesting Your Bitter Gourd
The moment you’ve been waiting for! Harvesting your own bitter gourd is incredibly rewarding.
1. Knowing When to Harvest: Bitter gourds are typically ready to harvest about 2-3 months after planting. The fruits should be firm, green, and about 6-8 inches long. They will start to turn yellow or orange as they mature, but it’s best to harvest them before they become too ripe, as they will become more bitter.
2. Harvesting the Fruits: Use pruning shears or a sharp knife to cut the bitter gourds from the vine. Leave a small stem attached to the fruit.
3. Storing Your Harvest: Bitter gourds can be stored in the refrigerator for up to a week. Wrap them in a paper towel and place them in a plastic bag to prevent them from drying out.
Troubleshooting Common Problems
Even with the best care, you might encounter some challenges along the way. Here are a few common problems and how to address them:
* Poor Germination: If your seeds aren’t germinating, make sure they are fresh and that the soil is warm enough. Soaking the seeds before planting can also help.
* Yellowing Leaves: Yellowing leaves can be a sign of overwatering, nutrient deficiency, or pest infestation. Adjust your watering schedule, fertilize your plants, and inspect them for pests.
* Lack of Fruit Production: Lack of fruit production can be caused by insufficient sunlight, poor pollination, or nutrient deficiency. Make sure your plants are getting enough sunlight, hand-pollinate the flowers if necessary, and fertilize your plants regularly.
* Pest Infestation: Regularly inspect your plants for pests and treat them with insecticidal soap or neem oil. You can also introduce beneficial insects like ladybugs to help control pests.
Tips for Maximizing Your Bitter Gourd Harvest
Here are a few extra tips to help you get the most out of your bitter gourd plants:
* Choose the Right Variety: Select a bitter gourd variety that is well-suited to your climate and growing conditions.
* Improve Soil Drainage: Bitter gourd plants need well-draining soil to prevent root rot. Amend your soil with compost or perlite to improve drainage.
* Provide Adequate Sunlight: Bitter gourd plants need at least 6-8 hours of sunlight per day. Choose a sunny location in your garden.
* Hand-Pollinate the Flowers: If you’re not seeing a lot of fruit production, you can try hand-pollinating the flowers. Use a small brush to transfer pollen from the male flowers to the female flowers. You can identify female flowers by the small fruit that is already forming behind the flower.
* Mulch Around the Plants: Mulching around your bitter gourd plants can help retain moisture, suppress weeds, and regulate soil temperature. Use organic mulch like straw, wood chips, or shredded leaves.
Enjoying Your Homegrown Bitter Gourd
Now that you’ve harvested your own bitter gourd, it’s time to enjoy the fruits (or vegetables!) of your labor. Bitter

Conclusion
So, there you have it! Mastering the art of growing bitter gourd doesn’t have to be a daunting task. By implementing these simple yet effective DIY tricks, you’re well on your way to harvesting a bountiful crop of this nutritious and versatile vegetable right in your own backyard. We’ve covered everything from soil preparation and seed germination to trellising techniques and pest control, providing you with a comprehensive guide to successful bitter gourd cultivation.
But why is this DIY approach a must-try? Because it empowers you to take control of your food source, ensuring that you’re consuming fresh, healthy produce free from harmful chemicals. It’s also incredibly rewarding to nurture a plant from seed to harvest, witnessing the miracle of nature unfold before your eyes. Plus, growing your own bitter gourd is a fantastic way to reduce your carbon footprint and contribute to a more sustainable lifestyle.
Beyond the basics, there’s plenty of room for experimentation and personalization. Consider trying different varieties of bitter gourd, each with its unique flavor profile and appearance. Some popular options include the long, slender Chinese bitter gourd and the shorter, more rounded Indian bitter gourd. You can also explore different trellising methods, such as using bamboo poles, netting, or even repurposing old materials like ladders or fences.
For those looking to enhance the flavor of their bitter gourd, try blanching the slices in boiling water for a few minutes before cooking. This helps to reduce the bitterness and make the vegetable more palatable. You can also pair bitter gourd with other ingredients that complement its flavor, such as coconut milk, lentils, or spices like turmeric and cumin.
Don’t be afraid to get creative and adapt these techniques to suit your specific needs and preferences. The beauty of DIY gardening is that it’s all about learning and growing (pun intended!) along the way.
We strongly encourage you to give these **bitter gourd growing tips** a try. Start small, be patient, and don’t be discouraged by initial setbacks. Gardening is a journey, not a destination, and every challenge is an opportunity to learn and improve.
And most importantly, we want to hear about your experiences! Share your successes, your failures, and any tips or tricks that you’ve discovered along the way. Let’s create a community of passionate bitter gourd growers who can support and inspire each other. Post your photos, videos, and stories on social media using relevant hashtags, or leave a comment below. Together, we can unlock the full potential of this amazing vegetable and enjoy the many benefits of homegrown goodness. Happy gardening!
Frequently Asked Questions (FAQ)
Q: How long does it take for bitter gourd to grow?
A: The time it takes for bitter gourd to grow from seed to harvest can vary depending on several factors, including the variety of bitter gourd, the climate, and the growing conditions. Generally, you can expect to harvest your first bitter gourds about 60 to 90 days after planting the seeds. However, some faster-maturing varieties may be ready in as little as 50 days, while others may take longer. To ensure a continuous harvest, consider staggering your planting schedule by sowing seeds every few weeks. This will allow you to enjoy fresh bitter gourds throughout the growing season. Remember to provide adequate sunlight, water, and nutrients to promote healthy growth and maximize your yield.
Q: What is the best soil for growing bitter gourd?
A: Bitter gourd thrives in well-drained, fertile soil that is rich in organic matter. The ideal soil pH for bitter gourd is between 6.0 and 7.0. Before planting, amend your soil with compost, well-rotted manure, or other organic materials to improve its structure, drainage, and nutrient content. If your soil is heavy clay, consider adding sand or perlite to improve drainage. If your soil is sandy, add organic matter to help retain moisture and nutrients. A soil test can help you determine the specific nutrient deficiencies in your soil and guide you in selecting the appropriate amendments. Regularly fertilizing your bitter gourd plants with a balanced fertilizer will also help to ensure healthy growth and abundant fruit production.
Q: How often should I water my bitter gourd plants?
A: Bitter gourd plants need consistent moisture, especially during hot and dry weather. Water your plants deeply and regularly, aiming to keep the soil consistently moist but not waterlogged. The frequency of watering will depend on the climate, soil type, and stage of growth. As a general rule, water your plants every 2-3 days during the growing season, or more often if the soil dries out quickly. Check the soil moisture by inserting your finger into the soil about an inch deep. If the soil feels dry, it’s time to water. Avoid overwatering, as this can lead to root rot and other fungal diseases. Mulching around your plants with organic materials like straw or wood chips can help to retain moisture in the soil and reduce the need for frequent watering.
Q: How do I control pests and diseases in my bitter gourd plants?
A: Bitter gourd plants can be susceptible to various pests and diseases, including aphids, spider mites, fruit flies, powdery mildew, and downy mildew. To prevent pest and disease problems, start by selecting disease-resistant varieties of bitter gourd. Practice good sanitation by removing any dead or diseased leaves and fruits from your garden. Encourage beneficial insects like ladybugs and lacewings, which prey on aphids and other pests. Use organic pest control methods like insecticidal soap, neem oil, or diatomaceous earth to control pests. For fungal diseases, improve air circulation around your plants by pruning excess foliage and spacing them properly. Apply a fungicide if necessary, following the manufacturer’s instructions carefully. Regularly inspect your plants for signs of pests or diseases and take action promptly to prevent them from spreading.
Q: Can I grow bitter gourd in containers?
A: Yes, you can successfully grow bitter gourd in containers, provided that you choose a large enough container and provide adequate support for the vines. Select a container that is at least 18 inches in diameter and 18 inches deep. Fill the container with a well-draining potting mix that is rich in organic matter. Provide a trellis or other support structure for the vines to climb on. Water your container-grown bitter gourd plants regularly, as they tend to dry out more quickly than plants grown in the ground. Fertilize your plants every 2-3 weeks with a balanced liquid fertilizer. Place the container in a sunny location that receives at least 6-8 hours of sunlight per day. With proper care, you can enjoy a bountiful harvest of bitter gourds even if you don’t have a traditional garden.
Q: How do I know when my bitter gourd is ripe and ready to harvest?
A: Bitter gourd is typically harvested when it is still slightly immature, before it turns completely orange or yellow. The skin should be firm and smooth, and the fruit should be relatively light in weight. The exact size and color of the ripe fruit will vary depending on the variety of bitter gourd. As a general rule, harvest your bitter gourds when they are about two-thirds of their mature size. Use a sharp knife or pruning shears to cut the fruit from the vine, leaving a short stem attached. Harvesting bitter gourd regularly will encourage the plant to produce more fruit. Overripe bitter gourds will become bitter and less palatable.


Leave a Comment