
Tomato growth plan: Ever dream of biting into a juicy, sun-ripened tomato, bursting with flavor, straight from your own backyard? I know I have! There’s something incredibly satisfying about nurturing a plant from a tiny seed to a bountiful harvest. But let’s be honest, sometimes our tomato dreams can turn into tomato nightmares – spindly plants, blossom end rot, and a whole lot of frustration.
For centuries, cultures around the globe have cultivated tomatoes, transforming them from exotic novelties to culinary staples. From the ancient Aztecs who first domesticated them to the Italian chefs who made them a cornerstone of their cuisine, tomatoes have a rich and vibrant history. But even with all that accumulated knowledge, growing perfect tomatoes can still feel like a mystery.
That’s where this DIY guide comes in! I’m going to share some of my favorite, tried-and-true tricks and hacks to help you create the ultimate tomato growth plan. Whether you’re a seasoned gardener or just starting out, these tips will help you maximize your yield, prevent common problems, and enjoy the most delicious tomatoes you’ve ever tasted. So, grab your gardening gloves, and let’s get started on your journey to tomato-growing success!
DIY Tomato Trellis: From Seedling to Sauce!
Hey fellow gardeners! I’m so excited to share my favorite DIY project that’s guaranteed to boost your tomato harvest: building a sturdy and effective tomato trellis. Forget those flimsy store-bought cages that topple over the moment your plants get heavy. This trellis is built to last and will support even the most prolific tomato varieties. Plus, it’s surprisingly easy and affordable to make!
Why Build a Trellis?
Before we dive in, let’s quickly cover why a trellis is so important for tomato plants.
* Improved Air Circulation: Trellising allows for better airflow around the plant, reducing the risk of fungal diseases like blight.
* Increased Sunlight Exposure: By keeping the plant upright, more leaves get access to sunlight, leading to better photosynthesis and more tomatoes.
* Easier Harvesting: No more bending over and searching through tangled foliage! Trellised tomatoes are easier to spot and pick.
* Space Saving: Trellising allows you to grow more tomatoes in a smaller space.
* Cleaner Fruit: Keeping the tomatoes off the ground prevents them from rotting and getting infested with pests.
Materials You’ll Need
Okay, let’s gather our supplies. Here’s what you’ll need for one trellis (adjust quantities based on how many trellises you plan to build):
* Wooden Stakes: Four 6-foot long wooden stakes (2×2 inch or 2×3 inch lumber works great). Cedar or redwood is ideal for longevity, but pressure-treated pine is a more budget-friendly option.
* Horizontal Supports: Approximately 20 feet of sturdy twine, rope, or wire. I prefer using garden twine because it’s biodegradable and gentle on the plants. You can also use metal wire, but make sure it’s coated to prevent rust.
* Measuring Tape: For accurate spacing.
* Hammer or Mallet: To drive the stakes into the ground.
* Scissors or Wire Cutters: To cut the twine or wire.
* Gloves: To protect your hands.
* Optional: Wood stain or sealant (to protect the wood from the elements).
* Optional: Staple gun and staples (if you prefer stapling the twine to the stakes instead of tying knots).
Step-by-Step Instructions: Building Your Tomato Trellis
Alright, let’s get building! This trellis design is a simple square or rectangular frame that provides excellent support.
1. Prepare the Stakes: If you’re using untreated wood, consider applying a wood stain or sealant to protect it from moisture and extend its lifespan. Let it dry completely before proceeding. This step is optional, but I highly recommend it, especially if you live in a rainy climate.
2. Position the Stakes: Decide where you want to place your trellis. For a single tomato plant, a square or rectangle about 2 feet by 2 feet is usually sufficient. For multiple plants, adjust the dimensions accordingly. Drive the first stake into the ground using a hammer or mallet. Make sure it’s firmly planted, at least 1 foot deep. Repeat this process for the remaining three stakes, forming a square or rectangle. Ensure the stakes are evenly spaced and the frame is relatively square.
3. First Row of Support: Starting at the bottom of the stakes, about 1 foot above the ground, tie the twine, rope, or wire to one stake. Wrap it tightly around the stake and secure it with a knot. I like to use a square knot or a clove hitch for extra security.
4. Continue Around the Frame: Run the twine horizontally to the next stake, keeping it taut. Wrap it around the stake and secure it with another knot. Repeat this process for the remaining two stakes, creating a continuous horizontal line around the entire frame.
5. Subsequent Rows of Support: Continue adding rows of horizontal support, spacing them about 8-12 inches apart. Each time, tie the twine securely to each stake. The closer the spacing, the more support your plants will have. I usually aim for about 5-6 rows of support in total.
6. Secure the Top: Once you reach the top of the stakes, make sure the twine is securely tied off. You can either tie it off to the last stake or wrap it around the entire frame a few times for extra stability.
7. Reinforce the Structure (Optional): For added stability, especially if you’re growing heavy tomato varieties, you can add diagonal supports. Simply tie twine from the top of one stake to the bottom of the opposite stake, forming an “X” shape. Repeat this for the other two stakes.
Planting Your Tomatoes
Now that your trellis is built, it’s time to plant your tomatoes!
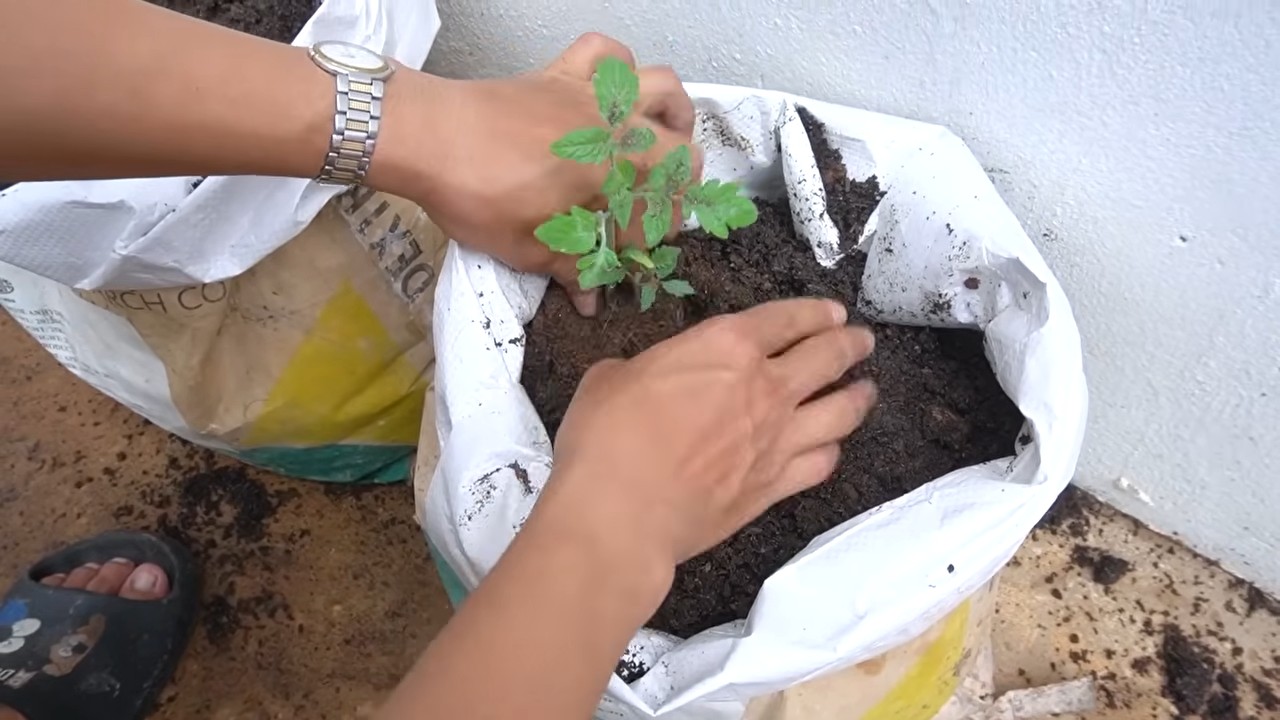
1. Prepare the Soil: Dig a hole at the base of the trellis, large enough to accommodate the tomato plant’s root ball. Amend the soil with compost or other organic matter to improve drainage and fertility.
2. Plant the Tomato: Gently remove the tomato plant from its container and loosen the roots. Place the plant in the hole and backfill with soil. Water thoroughly.
3. Initial Support: As the tomato plant grows, gently guide its stems through the trellis. You can use plant clips or soft ties to secure the stems to the twine. Be careful not to tie them too tightly, as this can damage the plant.
Maintaining Your Trellis and Tomato Plants
Your trellis is built, your tomatoes are planted, now what? Here are a few tips for maintaining your trellis and keeping your tomato plants healthy and productive:
* Water Regularly: Tomato plants need consistent watering, especially during hot weather. Water deeply at the base of the plant, avoiding wetting the foliage.
* Fertilize: Feed your tomato plants regularly with a balanced fertilizer. Follow the instructions on the fertilizer package.
* Prune: Prune your tomato plants regularly to remove suckers (the small shoots that grow between the main stem and the branches). This will encourage the plant to focus its energy on producing fruit.
* Pest Control: Keep an eye out for pests like aphids, tomato hornworms, and whiteflies. Treat infestations promptly with insecticidal soap or other appropriate methods.
* Disease Prevention: To prevent fungal diseases, ensure good air circulation around the plants and avoid overhead watering. If you notice any signs of disease, treat it promptly with a fungicide.
* Adjust Support as Needed: As your tomato plants grow and produce fruit, you may need to adjust the support system. Add extra ties or clips to keep the stems from breaking under the weight of the tomatoes.
Alternative Trellis Designs
While this square/rectangular trellis is my go-to, there are other trellis designs you might want to consider:
* Florida Weave: This method involves driving stakes into the ground in a row and weaving twine between the plants to provide support. It’s a good option for growing tomatoes in rows.
* Single Stake: For smaller tomato varieties, you can simply drive a single stake into the ground next to the plant and tie the main stem to the stake.
* A-Frame Trellis: This trellis is shaped like an “A” and provides excellent support for heavy tomato plants. It’s a bit more complex to build than the square/rectangular trellis, but it’s very sturdy.
Troubleshooting
* Trellis is leaning: If your trellis starts to lean, it could be due to the weight of the plants or the stakes not being driven deep enough. Reinforce the stakes by driving them deeper into the ground or adding additional stakes.
* Twine is breaking: If the twine is breaking, it could be due to the weight of the plants or the twine being too weak. Use a stronger twine or rope, or add more rows of support.
* Plants are falling off the trellis: If the plants are falling off the trellis, it could be due to the ties being too loose or the stems being too heavy. Tighten the ties or add more ties to provide better support.
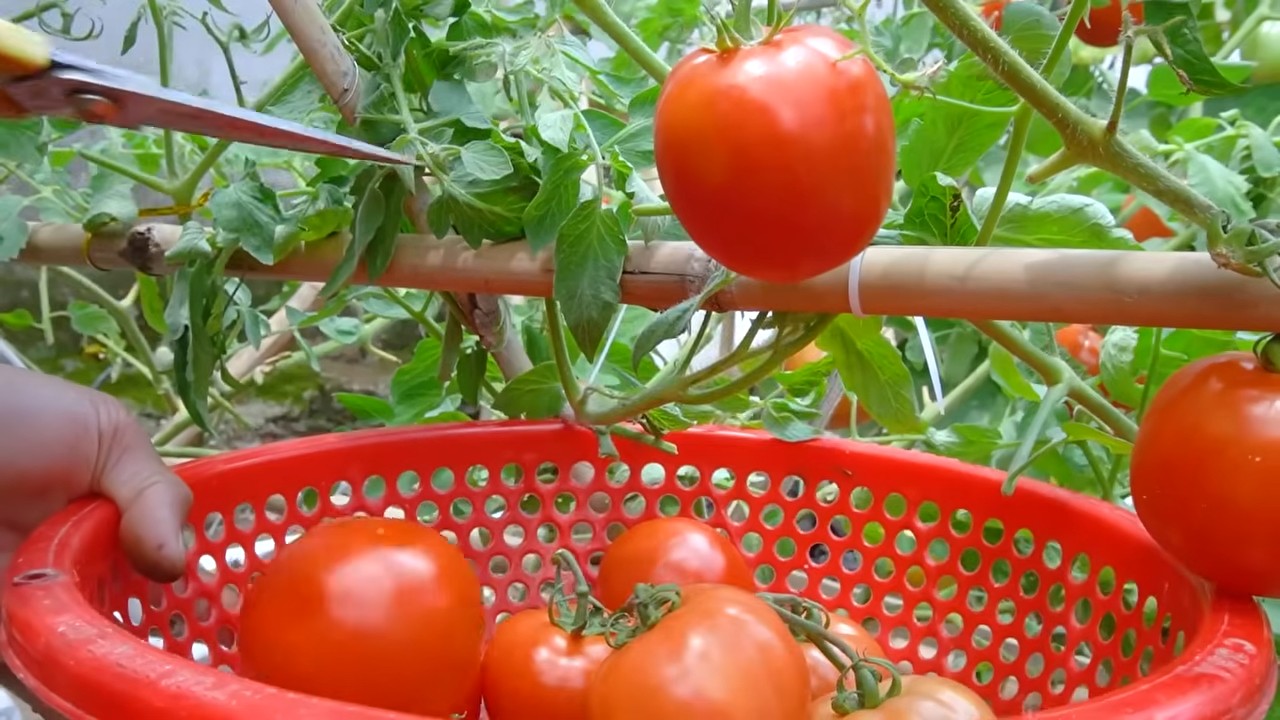
Harvesting Your Tomatoes
The best part of growing tomatoes is, of course, harvesting them! Tomatoes are typically ready to harvest when they are fully colored and slightly soft to the touch. Gently twist the tomato off the vine, being careful not to damage the plant. Enjoy your homegrown tomatoes in salads, sauces, sandwiches, or simply eat them fresh off the vine!
I hope this guide has inspired you to build your own tomato trellis. It’s a rewarding project that will not only improve your tomato harvest but also add a touch of beauty to your garden. Happy gardening!
Conclusion
So, there you have it! Transforming your tomato-growing game with this simple yet incredibly effective DIY trick is a game-changer. We’ve walked you through the process, highlighting how easy it is to implement and the significant benefits it brings to your tomato plants. From boosting root development and nutrient absorption to warding off common diseases, this method offers a holistic approach to cultivating healthier, more productive tomato plants.
Why is this a must-try? Because it’s a cost-effective, sustainable, and remarkably efficient way to enhance your tomato harvest. Forget expensive fertilizers and complicated gardening techniques. This DIY solution leverages readily available resources and a bit of ingenuity to unlock the full potential of your tomato plants. Imagine biting into juicy, flavorful tomatoes that you’ve nurtured from seedling to fruit, all thanks to this simple trick. The satisfaction is unparalleled!
But the beauty of this method lies not only in its simplicity but also in its adaptability. Feel free to experiment with variations to suit your specific needs and preferences. For instance, if you’re dealing with particularly acidic soil, consider adding a small amount of lime to your mixture to balance the pH. Or, if you’re looking to boost the potassium levels, incorporate banana peels into your compost. The possibilities are endless!
Consider using different types of containers for your tomato plants. While traditional pots work well, you might explore using fabric pots, which promote air pruning and prevent root circling. Or, if you’re short on space, try vertical gardening techniques to maximize your growing area.
Don’t be afraid to get creative with your support systems for your tomato plants. While standard tomato cages are effective, you might experiment with using stakes, trellises, or even repurposed materials like old ladders or branches. The key is to provide adequate support to prevent your plants from toppling over under the weight of their fruit.
Remember, gardening is a journey of continuous learning and experimentation. This DIY trick is just one tool in your arsenal, but it’s a powerful one that can make a significant difference in your tomato-growing success.
We wholeheartedly encourage you to try this DIY trick for yourself and witness the remarkable transformation in your tomato plants. We are confident that you’ll be amazed by the results. And most importantly, we want to hear about your experience! Share your photos, tips, and insights with us in the comments section below. Let’s build a community of tomato enthusiasts who are passionate about growing the best tomatoes possible. Let us know what worked for you, what challenges you faced, and any variations you tried. Your feedback is invaluable and will help us refine and improve this method for everyone.
So, grab your gardening gloves, gather your supplies, and get ready to embark on a tomato-growing adventure. With this DIY trick in your toolkit, you’ll be well on your way to harvesting a bountiful crop of delicious, homegrown tomatoes. Happy gardening! Let’s grow some amazing tomatoes together!
Frequently Asked Questions (FAQ)
What exactly is the DIY trick you’re referring to, and why is it so effective for tomato growth?
The DIY trick we’re highlighting involves creating a nutrient-rich planting environment for your tomato seedlings right from the start. This typically involves amending your soil with a specific blend of organic materials that promote strong root development, improve drainage, and provide essential nutrients. The effectiveness stems from the fact that it addresses the fundamental needs of tomato plants during their crucial early stages of growth. Strong roots mean better nutrient uptake, leading to healthier, more resilient plants that are better equipped to withstand pests and diseases. This proactive approach sets the stage for a more abundant harvest later in the season.
What are the key ingredients or materials needed for this DIY tomato growth trick?
The specific ingredients can vary depending on your soil type and available resources, but some common and highly effective components include:
* **Compost:** Provides a slow-release source of nutrients and improves soil structure.
* **Worm castings:** Rich in beneficial microbes and nutrients, promoting healthy root growth.
* **Bone meal:** A great source of phosphorus, which is essential for root development and flowering.
* **Epsom salts:** Provides magnesium, which helps with chlorophyll production and nutrient absorption.
* **Crushed eggshells:** Adds calcium to the soil, preventing blossom-end rot.
* **Coffee grounds:** Adds nitrogen and improves soil drainage.
The exact ratios will depend on your soil, but a good starting point is a mix of equal parts compost, worm castings, and your existing garden soil, with smaller amounts of bone meal, Epsom salts, eggshells, and coffee grounds added in.
How often should I apply this DIY trick to my tomato plants, and at what stage of growth is it most beneficial?
The most beneficial time to apply this DIY trick is at the time of planting your tomato seedlings. Incorporate the amended soil directly into the planting hole to give your plants a strong start. After that, you can side-dress your plants with additional compost or worm castings every few weeks throughout the growing season to provide a continuous supply of nutrients. A liquid fertilizer derived from compost tea can also be used as a foliar spray to boost nutrient uptake.
Are there any potential risks or drawbacks to using this DIY method for tomato growth?
While this DIY method is generally safe and effective, there are a few potential risks to be aware of:
* **Over-fertilization:** Adding too much of certain ingredients, such as bone meal or Epsom salts, can lead to nutrient imbalances and harm your plants. Always follow recommended ratios and observe your plants for signs of nutrient deficiencies or toxicities.
* **Soil pH imbalance:** Some ingredients, such as coffee grounds, can slightly acidify the soil. If your soil is already acidic, you may need to add lime to balance the pH.
* **Pest attraction:** Compost and other organic materials can attract pests, such as slugs and snails. Take precautions to protect your plants from these pests.
Can this DIY trick be used for other types of plants besides tomatoes?
Yes, this DIY trick can be adapted for use with other types of plants, particularly those that are heavy feeders, such as peppers, eggplants, and cucumbers. However, you may need to adjust the specific ingredients and ratios to suit the needs of different plants. For example, leafy greens may benefit from a higher nitrogen content, while flowering plants may require more phosphorus.
What if I don’t have access to all the ingredients listed for this DIY trick? Are there any alternatives I can use?
If you don’t have access to all the ingredients, don’t worry! You can still create a beneficial soil amendment using readily available resources. Some alternatives include:
* **Instead of worm castings:** Use well-rotted manure or composted leaves.
* **Instead of bone meal:** Use rock phosphate or a commercial phosphorus fertilizer.
* **Instead of Epsom salts:** Use a magnesium sulfate fertilizer.
* **Instead of crushed eggshells:** Use agricultural lime.
The key is to focus on providing a balanced blend of nutrients and improving soil structure.
How will I know if this DIY trick is actually working for my tomato plants? What are the signs of success?
You’ll know this DIY trick is working if you observe the following signs in your tomato plants:
* **Strong, healthy growth:** Your plants should exhibit vigorous growth with lush, green foliage.
* **Robust root system:** When transplanting or examining the roots, you should see a dense, well-developed root system.
* **Abundant flowering:** Your plants should produce a profusion of flowers, indicating their readiness to set fruit.
* **High fruit yield:** You should harvest a bountiful crop of delicious, flavorful tomatoes.
* **Resistance to pests and diseases:** Your plants should be less susceptible to common tomato pests and diseases.
By carefully observing your plants and comparing them to plants grown without this DIY trick, you’ll be able to assess the effectiveness of the method and make any necessary adjustments.

Leave a Comment