
Grow ginger backyard? Absolutely! Imagine stepping outside your back door and harvesting fresh, zesty ginger whenever you need it. No more last-minute grocery store runs or settling for dried-out roots. This isn’t just a dream; it’s a deliciously achievable reality with a few simple DIY tricks.
For centuries, ginger has been prized not only for its culinary prowess but also for its medicinal properties. Originating in South Asia, it has woven its way into cultures worldwide, becoming a staple in everything from traditional remedies to gourmet dishes. Think about it: ginger tea to soothe a sore throat, ginger snaps during the holidays, or a spicy ginger stir-fry on a weeknight. The possibilities are endless!
But why rely on store-bought ginger when you can cultivate your own thriving patch right outside your window? I know what you’re thinking: “Gardening is hard!” But trust me, growing ginger backyard is surprisingly easy, even for beginners. This DIY guide will walk you through every step, from selecting the perfect ginger rhizome to harvesting your very own homegrown spice.
In this article, I’ll share my favorite tips and tricks for successfully grow ginger backyard. We’ll cover everything from soil preparation and watering techniques to pest control and harvesting strategies. Get ready to unlock the secrets to a bountiful ginger harvest and elevate your cooking and wellness game!
Growing Ginger in Your Backyard: A Beginner’s Guide
Okay, so you want to grow ginger in your backyard? Awesome! It’s surprisingly easy and incredibly rewarding. Fresh, homegrown ginger is so much more flavorful than what you find in the store, and knowing you grew it yourself just adds to the satisfaction. I’m going to walk you through everything you need to know, from choosing the right ginger to harvesting your own spicy rhizomes. Let’s get started!
Choosing Your Ginger Rhizome
First things first, you need some ginger to plant! You can’t just use any old ginger from the grocery store, though. Here’s what to look for:
* Organic is best: Conventional ginger is often treated with growth inhibitors to prevent sprouting, which is exactly what we *want* it to do! Opt for organic ginger whenever possible.
* Look for plump rhizomes: Choose pieces that are firm, plump, and have visible “eyes” (small buds) on them. These are where the new shoots will emerge.
* Avoid shriveled or moldy ginger: Steer clear of any ginger that looks dried out, shriveled, or has any signs of mold or rot.
* Soaking the ginger: If you can only find non-organic ginger, try soaking it in water overnight. This can help wash away some of the growth inhibitors.
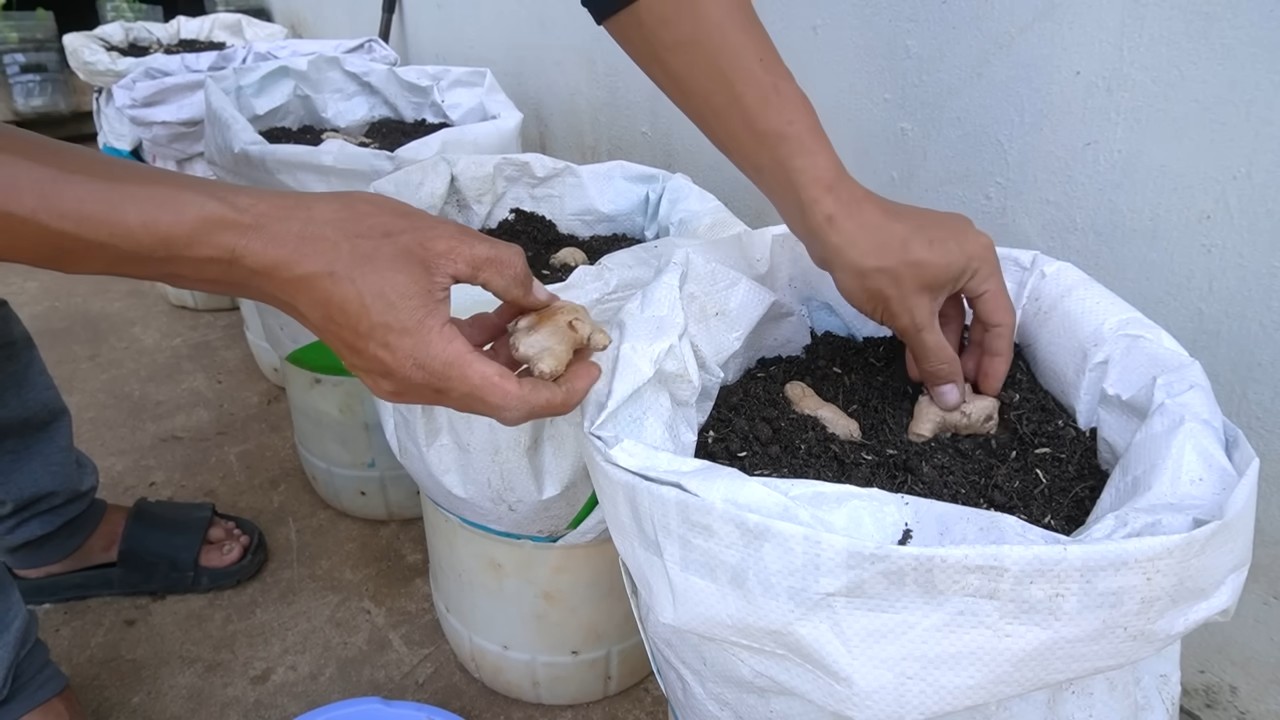
Preparing Your Ginger for Planting
Before you stick your ginger in the ground, it’s a good idea to give it a little head start. This will increase your chances of success and get you harvesting sooner.
1. Soak the rhizome (again!): Soak your chosen ginger rhizome in lukewarm water for 12-24 hours. This rehydrates it and encourages those “eyes” to wake up.
2. Cut into pieces (optional): If your ginger rhizome is large, you can cut it into smaller pieces, making sure each piece has at least one or two “eyes.” This will give you multiple plants. Let the cut ends callous over for a day or two before planting to prevent rot.
3. Sprouting indoors (recommended): This step isn’t strictly necessary, but I highly recommend it, especially if you live in a cooler climate. Place your ginger rhizome (or pieces) in a shallow container filled with moist potting mix. Cover it lightly with more potting mix.
4. Keep it warm and moist: Place the container in a warm, bright location (but not direct sunlight). Keep the potting mix consistently moist, but not soggy.
5. Wait for sprouts: In a few weeks, you should see little green shoots emerging from the “eyes.” Once the sprouts are a few inches tall, your ginger is ready to be planted outdoors.
Planting Your Ginger Outdoors
Now for the fun part – getting your ginger into the ground!
1. Choose the right location: Ginger loves warmth and humidity, but it doesn’t like direct sunlight. Choose a spot in your backyard that gets partial shade, especially during the hottest part of the day. Morning sun is ideal.
2. Prepare the soil: Ginger needs well-draining soil that’s rich in organic matter. Amend your soil with compost, aged manure, or other organic materials to improve drainage and fertility. The soil should be loose and crumbly.
3. Dig a shallow trench: Dig a trench that’s about 4-6 inches deep.
4. Plant the ginger: Place your sprouted ginger rhizome (or pieces) in the trench, with the sprouts facing upwards. Space the pieces about 8-12 inches apart.
5. Cover with soil: Gently cover the ginger with soil, leaving the tips of the sprouts exposed.
6. Water thoroughly: Water the area well after planting.
Caring for Your Ginger Plants
Ginger is relatively low-maintenance, but here are a few things to keep in mind to ensure a healthy and productive harvest:
* Watering: Keep the soil consistently moist, but not waterlogged. Water deeply whenever the top inch of soil feels dry.
* Fertilizing: Ginger is a heavy feeder. Fertilize every few weeks with a balanced organic fertilizer. You can also use compost tea or fish emulsion.
* Mulching: Mulch around your ginger plants with straw, wood chips, or other organic materials. This will help retain moisture, suppress weeds, and regulate soil temperature.
* Weeding: Keep the area around your ginger plants free of weeds. Weeds can compete with your ginger for nutrients and water.
* Protect from frost: Ginger is not frost-tolerant. If you live in an area with frost, you’ll need to protect your plants. You can cover them with a frost blanket or move them indoors.
* Pest and disease control: Ginger is generally pest and disease-resistant. However, keep an eye out for common garden pests like aphids and slugs. If you spot any problems, treat them with organic pest control methods.
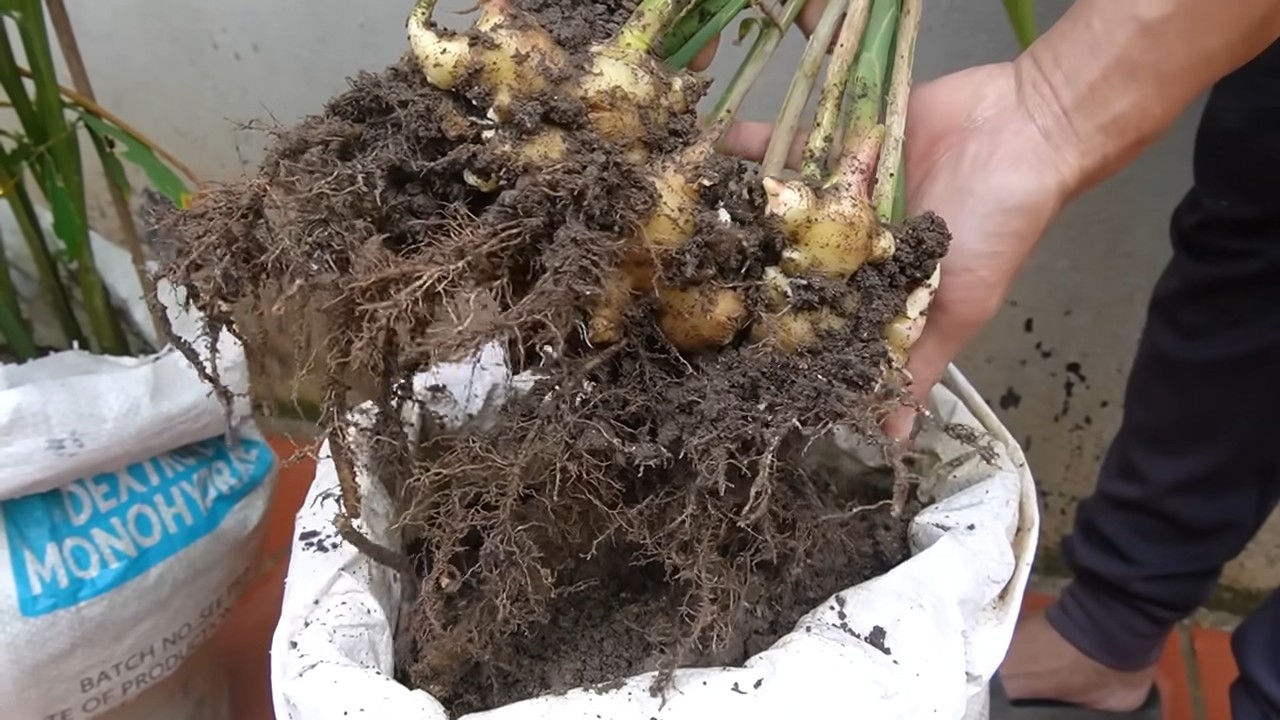
Harvesting Your Ginger
This is the moment you’ve been waiting for!
1. When to harvest: You can start harvesting ginger about 8-10 months after planting. The leaves will start to turn yellow and die back when the ginger is ready to harvest.
2. Gentle excavation: Carefully dig around the ginger plant with a garden fork or shovel. Be careful not to damage the rhizomes.
3. Lift the rhizomes: Gently lift the ginger rhizomes from the soil.
4. Cleaning: Brush off any excess soil.
5. Partial harvest (optional): If you don’t need to harvest the entire plant, you can carefully dig up a few rhizomes and leave the rest to continue growing.
6. Storing: Freshly harvested ginger can be stored in the refrigerator for several weeks. Wrap it in a paper towel and place it in a plastic bag. You can also freeze ginger for longer storage.
Troubleshooting Common Problems
Even with the best care, you might encounter a few challenges along the way. Here are some common problems and how to fix them:
* Ginger not sprouting: Make sure the ginger is getting enough warmth and moisture. Try soaking it for a longer period of time. If you’re sprouting it indoors, make sure it’s getting enough light.
* Yellowing leaves: Yellowing leaves can be a sign of overwatering, underwatering, or nutrient deficiency. Adjust your watering schedule and fertilize regularly.
* Rotting rhizomes: Rotting rhizomes are usually caused by overwatering or poor drainage. Make sure the soil is well-draining and avoid overwatering.
* Pests: Treat any pest infestations with organic pest control methods.
Enjoying Your Homegrown Ginger
Now that you’ve harvested your own ginger, it’s time to enjoy it! Here are just a few ways to use your fresh ginger:
* Cooking: Add it to stir-fries, soups, curries, and other dishes.
* Tea: Make a soothing and warming ginger tea.
Okay, so you want to grow ginger in your backyard? Awesome! It’s surprisingly easy and incredibly rewarding. Fresh, homegrown ginger is so much more flavorful than what you find in the store, and knowing you grew it yourself just adds to the satisfaction. I’m going to walk you through everything you need to know, from choosing the right ginger to harvesting your own spicy rhizomes. Let’s get started!
Choosing Your Ginger Rhizome
First things first, you need some ginger to plant! You can’t just use any old ginger from the grocery store, though. Here’s what to look for:
* Organic is best: Conventional ginger is often treated with growth inhibitors to prevent sprouting, which is exactly what we *want* it to do! Opt for organic ginger whenever possible.
* Look for plump rhizomes: Choose pieces that are firm, plump, and have visible “eyes” (small buds) on them. These are where the new shoots will emerge.
* Avoid shriveled or moldy ginger: Steer clear of any ginger that looks dried out, shriveled, or has any signs of mold or rot.
* Soaking the ginger: If you can only find non-organic ginger, try soaking it in water overnight. This can help wash away some of the growth inhibitors.
Preparing Your Ginger for Planting
Before you stick your ginger in the ground, it’s a good idea to give it a little head start. This will increase your chances of success and get you harvesting sooner.
1. Soak the rhizome (again!): Soak your chosen ginger rhizome in lukewarm water for 12-24 hours. This rehydrates it and encourages those “eyes” to wake up.
2. Cut into pieces (optional): If your ginger rhizome is large, you can cut it into smaller pieces, making sure each piece has at least one or two “eyes.” This will give you multiple plants. Let the cut ends callous over for a day or two before planting to prevent rot.
3. Sprouting indoors (recommended): This step isn’t strictly necessary, but I highly recommend it, especially if you live in a cooler climate. Place your ginger rhizome (or pieces) in a shallow container filled with moist potting mix. Cover it lightly with more potting mix.
4. Keep it warm and moist: Place the container in a warm, bright location (but not direct sunlight). Keep the potting mix consistently moist, but not soggy.
5. Wait for sprouts: In a few weeks, you should see little green shoots emerging from the “eyes.” Once the sprouts are a few inches tall, your ginger is ready to be planted outdoors.
Planting Your Ginger Outdoors
Now for the fun part – getting your ginger into the ground!
1. Choose the right location: Ginger loves warmth and humidity, but it doesn’t like direct sunlight. Choose a spot in your backyard that gets partial shade, especially during the hottest part of the day. Morning sun is ideal.
2. Prepare the soil: Ginger needs well-draining soil that’s rich in organic matter. Amend your soil with compost, aged manure, or other organic materials to improve drainage and fertility. The soil should be loose and crumbly.
3. Dig a shallow trench: Dig a trench that’s about 4-6 inches deep.
4. Plant the ginger: Place your sprouted ginger rhizome (or pieces) in the trench, with the sprouts facing upwards. Space the pieces about 8-12 inches apart.
5. Cover with soil: Gently cover the ginger with soil, leaving the tips of the sprouts exposed.
6. Water thoroughly: Water the area well after planting.
Caring for Your Ginger Plants
Ginger is relatively low-maintenance, but here are a few things to keep in mind to ensure a healthy and productive harvest:
* Watering: Keep the soil consistently moist, but not waterlogged. Water deeply whenever the top inch of soil feels dry.
* Fertilizing: Ginger is a heavy feeder. Fertilize every few weeks with a balanced organic fertilizer. You can also use compost tea or fish emulsion.
* Mulching: Mulch around your ginger plants with straw, wood chips, or other organic materials. This will help retain moisture, suppress weeds, and regulate soil temperature.
* Weeding: Keep the area around your ginger plants free of weeds. Weeds can compete with your ginger for nutrients and water.
* Protect from frost: Ginger is not frost-tolerant. If you live in an area with frost, you’ll need to protect your plants. You can cover them with a frost blanket or move them indoors.
* Pest and disease control: Ginger is generally pest and disease-resistant. However, keep an eye out for common garden pests like aphids and slugs. If you spot any problems, treat them with organic pest control methods.
Harvesting Your Ginger
This is the moment you’ve been waiting for!
1. When to harvest: You can start harvesting ginger about 8-10 months after planting. The leaves will start to turn yellow and die back when the ginger is ready to harvest.
2. Gentle excavation: Carefully dig around the ginger plant with a garden fork or shovel. Be careful not to damage the rhizomes.
3. Lift the rhizomes: Gently lift the ginger rhizomes from the soil.
4. Cleaning: Brush off any excess soil.
5. Partial harvest (optional): If you don’t need to harvest the entire plant, you can carefully dig up a few rhizomes and leave the rest to continue growing.
6. Storing: Freshly harvested ginger can be stored in the refrigerator for several weeks. Wrap it in a paper towel and place it in a plastic bag. You can also freeze ginger for longer storage.
Troubleshooting Common Problems
Even with the best care, you might encounter a few challenges along the way. Here are some common problems and how to fix them:
* Ginger not sprouting: Make sure the ginger is getting enough warmth and moisture. Try soaking it for a longer period of time. If you’re sprouting it indoors, make sure it’s getting enough light.
* Yellowing leaves: Yellowing leaves can be a sign of overwatering, underwatering, or nutrient deficiency. Adjust your watering schedule and fertilize regularly.
* Rotting rhizomes: Rotting rhizomes are usually caused by overwatering or poor drainage. Make sure the soil is well-draining and avoid overwatering.
* Pests: Treat any pest infestations with organic pest control methods.
Enjoying Your Homegrown Ginger
Now that you’ve harvested your own ginger, it’s time to enjoy it! Here are just a few ways to use your fresh ginger:
* Cooking: Add it to stir-fries, soups, curries, and other dishes.
* Tea: Make a soothing and warming ginger tea.
* Juicing: Add it to your favorite juice recipes.
* Baking: Use it in gingerbread, cookies, and other baked goods.
* Pickling: Pickle it for a delicious and tangy condiment.
Growing ginger in your backyard is a fun and rewarding experience. With a little bit of care and attention, you can enjoy fresh, homegrown ginger all year long. Happy gardening!
Conclusion
So, there you have it! Growing your own ginger in your backyard isn’t just a fun project; it’s a gateway to fresher, more flavorful ginger than you can ever find at the grocery store. Imagine the satisfaction of harvesting your own rhizomes, knowing exactly where they came from and how they were grown. Forget those shriveled, imported pieces – with this simple DIY trick, you’ll have a constant supply of vibrant, aromatic ginger right at your fingertips.
This method is a must-try for several reasons. First, the taste difference is undeniable. Homegrown ginger boasts a brighter, spicier, and more complex flavor profile compared to its store-bought counterpart. Second, you’re in control of the growing process, ensuring that your ginger is free from harmful pesticides and chemicals. Third, it’s incredibly rewarding! Watching your ginger plant thrive and eventually harvesting your own supply is a truly fulfilling experience. Finally, it’s cost-effective in the long run. While there’s an initial investment in a ginger rhizome and some potting mix, you’ll quickly recoup those costs as you harvest your own ginger over time.
Don’t be afraid to experiment with variations! Try growing different varieties of ginger, such as the common ginger (Zingiber officinale) or the more ornamental ginger lily. You can also adjust the growing conditions to suit your specific climate. If you live in a colder region, consider growing your ginger in containers that can be moved indoors during the winter months. For those in warmer climates, providing some afternoon shade can help prevent the leaves from scorching.
Consider companion planting to enhance your ginger’s growth and deter pests. Turmeric, another rhizome in the same family, makes an excellent companion plant. Marigolds can also help repel nematodes, which can damage ginger roots.
We’re confident that you’ll be amazed at how easy and rewarding it is to grow ginger in your backyard. It’s a simple yet impactful way to elevate your cooking, boost your health, and connect with nature. So, grab a ginger rhizome, follow our simple steps, and get ready to enjoy the freshest, most flavorful ginger you’ve ever tasted.
We encourage you to try this DIY trick and share your experience with us! Let us know how it goes, what challenges you faced, and what successes you celebrated. Share your photos and tips in the comments below. We can’t wait to hear about your homegrown ginger adventures! Happy gardening!
Frequently Asked Questions (FAQ)
1. What kind of ginger should I plant?
The most common type of ginger to plant is Zingiber officinale, the same ginger you find in most grocery stores. Look for rhizomes that are plump, firm, and have visible “eyes” or growth buds. Organic ginger is often a good choice, as it’s less likely to have been treated with growth inhibitors. You can also explore different varieties of ginger, such as galangal or ginger lily, depending on your preferences and climate.
2. When is the best time to plant ginger?
The ideal time to plant ginger is in early spring, after the last frost. Ginger thrives in warm temperatures, so waiting until the soil has warmed up will give it the best start. If you live in a colder climate, you can start your ginger indoors in a pot a few weeks before the last frost and then transplant it outdoors once the weather warms up.
3. What kind of soil does ginger need?
Ginger prefers well-draining, fertile soil that is rich in organic matter. A slightly acidic to neutral pH (around 6.0 to 6.5) is ideal. You can amend your soil with compost, aged manure, or other organic materials to improve its drainage and fertility. Avoid heavy clay soils, as they can become waterlogged and lead to root rot.
4. How much sunlight does ginger need?
Ginger thrives in partial shade. While it needs some sunlight to grow, too much direct sunlight can scorch the leaves. A location that receives morning sun and afternoon shade is ideal. If you’re growing ginger indoors, place it near a bright window but away from direct sunlight.
5. How often should I water ginger?
Ginger needs consistent moisture, but it doesn’t like to be waterlogged. Water deeply when the top inch of soil feels dry to the touch. Avoid overwatering, as this can lead to root rot. During hot, dry weather, you may need to water more frequently. Mulching around the base of the plant can help retain moisture and suppress weeds.
6. How long does it take for ginger to grow?
It typically takes around 8-10 months for ginger to mature and be ready for harvest. You can start harvesting small pieces of ginger after about 4 months, but the rhizomes will be smaller and less mature. For a larger harvest, wait until the plant has flowered or the leaves have started to die back.
7. How do I harvest ginger?
To harvest ginger, gently dig around the base of the plant and lift the rhizomes out of the soil. You can harvest the entire plant at once or harvest individual rhizomes as needed. After harvesting, wash the rhizomes thoroughly and store them in a cool, dry place.
8. Can I grow ginger in a container?
Yes, ginger grows very well in containers. Choose a pot that is at least 12 inches deep and wide to allow the rhizomes to spread. Use a well-draining potting mix and follow the same watering and fertilizing guidelines as for growing ginger in the ground. Container-grown ginger can be easily moved indoors during the winter months in colder climates.
9. What are some common problems when growing ginger?
Some common problems when growing ginger include root rot, nematodes, and fungal diseases. Root rot is caused by overwatering and poor drainage. Nematodes are microscopic worms that can damage ginger roots. Fungal diseases can cause leaf spots and other problems. To prevent these problems, ensure that your ginger is planted in well-draining soil, water it properly, and avoid overcrowding. You can also use organic pest control methods to control nematodes and fungal diseases.
10. How do I store harvested ginger?
Freshly harvested ginger can be stored in the refrigerator for several weeks. Wrap it in a paper towel and place it in a plastic bag to prevent it from drying out. You can also freeze ginger for longer storage. Peel and chop the ginger into small pieces and freeze it in a single layer on a baking sheet. Once frozen, transfer the ginger to a freezer bag or container. Frozen ginger can be used directly from the freezer in your cooking. You can also pickle ginger or make ginger syrup for longer-term storage.
11. Can I grow ginger indoors year-round?
Yes, you can grow ginger indoors year-round, especially if you live in a climate with cold winters. Provide your ginger plant with plenty of bright, indirect light, consistent moisture, and warm temperatures. You may need to supplement with artificial light during the winter months.
12. What are the health benefits of growing my own ginger?
Growing your own ginger allows you to have access to fresh, organic ginger that is free from harmful pesticides and chemicals. Ginger is known for its numerous health benefits, including its anti-inflammatory, antioxidant, and digestive properties. It can help relieve nausea, reduce muscle pain, and boost the immune system. By growing your own ginger, you can easily incorporate this healthy spice into your diet.

Leave a Comment