
Propagate chili plants easily and unlock a world of fiery flavor right in your own backyard! Have you ever admired those lush, vibrant chili plants bursting with colorful peppers and wished you could have an endless supply? Well, you’re in luck! This isn’t just another gardening article; it’s your personal guide to mastering the art of chili propagation, a skill that will save you money and allow you to cultivate a diverse collection of your favorite spicy varieties.
The history of chili peppers is as rich and vibrant as their flavor. Originating in South America, these fiery fruits have been cultivated for thousands of years, playing a vital role in culinary traditions and even medicinal practices across cultures. Imagine carrying on that legacy, nurturing your own chili plants from tiny seedlings to bountiful producers.
Why is learning to propagate chili plants easily so important? Because buying new plants every year can be expensive and limiting. With this simple DIY trick, you can clone your best-performing plants, ensuring a consistent harvest of your preferred heat levels and flavors. Plus, it’s incredibly rewarding to watch a tiny cutting transform into a thriving plant, knowing you played a part in its growth. I’m excited to share this easy-to-follow guide that will empower you to expand your chili garden and enjoy a continuous supply of fresh peppers for all your culinary adventures!
Propagating Chili Plants: A Beginner’s Guide to Cloning Your Peppers
Hey there, fellow chili enthusiasts! Ever wished you could magically multiply your favorite chili plant? Well, you practically can! Propagating chili plants is a fantastic way to get more of those fiery fruits without spending a fortune on new seeds or seedlings. I’m going to walk you through a super easy method: taking stem cuttings. Trust me, it’s simpler than you think, and the rewards are oh-so-spicy!
What You’ll Need
Before we dive in, let’s gather our supplies. Having everything ready will make the process smooth and enjoyable.
* A Healthy Chili Plant: Choose a plant that’s thriving and free from pests or diseases. This will give you the best chance of success.
* Sharp, Clean Scissors or Pruning Shears: Sterilize them with rubbing alcohol or a diluted bleach solution to prevent the spread of any potential diseases.
* Rooting Hormone (Optional, but Recommended): This will significantly increase your chances of successful rooting. You can find it at most garden centers. I personally prefer a powder form, but gel or liquid works too.
* Small Pots or Containers: 2-3 inch pots are perfect. Make sure they have drainage holes!
* Potting Mix: Use a well-draining potting mix. A mix specifically designed for seedlings or cuttings is ideal. You can also make your own by combining equal parts peat moss, perlite, and vermiculite.
* Water: Tap water is fine, but rainwater or distilled water is even better.
* Clear Plastic Bag or Humidity Dome: This will help create a humid environment, which is crucial for rooting.
* Spray Bottle: For misting the cuttings.
* A Warm, Bright Location: Indirect sunlight is best. Avoid direct sunlight, which can scorch the cuttings.
* Patience: Rooting takes time, so don’t get discouraged if you don’t see results immediately.
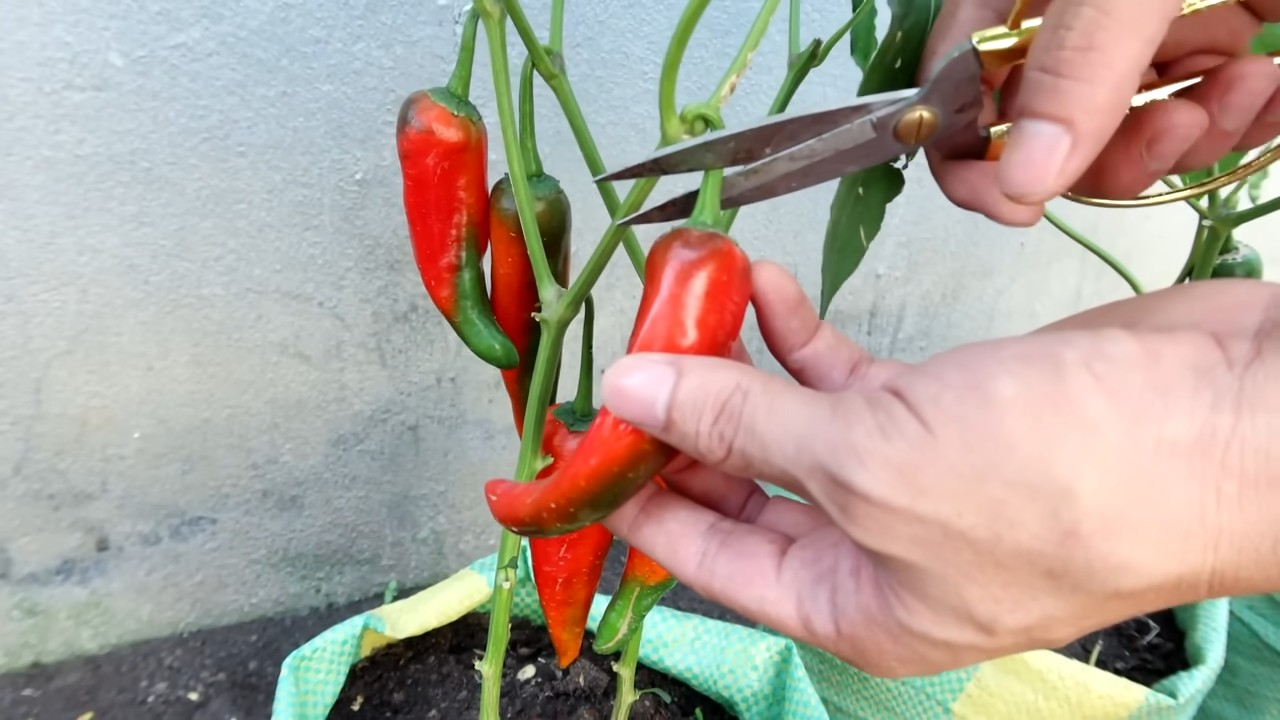
Taking the Cuttings
This is where the magic begins! We’re going to carefully select and snip off some healthy stems from our mother plant.
1. Choose Your Cuttings: Look for healthy, non-flowering stems that are about 4-6 inches long. The ideal cutting will have several leaves and a few nodes (the points where leaves emerge from the stem). Avoid stems that are too woody or too soft and flimsy.
2. Make the Cut: Using your sterilized scissors or pruning shears, make a clean cut just below a node. Cutting below a node encourages root growth from that point.
3. Remove Lower Leaves: Carefully remove the leaves from the bottom 1-2 inches of the cutting. This will prevent them from rotting when they’re buried in the potting mix. Leaving only the top few leaves will also reduce water loss.
4. Prepare the Cutting (Rooting Hormone): If you’re using rooting hormone, moisten the cut end of the stem slightly with water. Then, dip the moistened end into the rooting hormone powder, coating it lightly. Tap off any excess powder. If you’re using a gel or liquid rooting hormone, simply dip the cut end into the solution according to the product instructions. If you aren’t using rooting hormone, you can skip this step.
Planting the Cuttings
Now it’s time to give our cuttings a cozy home where they can develop roots.
1. Prepare the Pots: Fill your small pots with the well-draining potting mix. Gently tap the pots to settle the soil.
2. Make a Hole: Use a pencil or your finger to create a hole in the center of the potting mix, deep enough to accommodate the bottom 1-2 inches of the cutting.
3. Plant the Cutting: Carefully insert the cutting into the hole, making sure the bottom nodes are buried in the soil. Gently press the soil around the stem to secure it in place.
4. Water Thoroughly: Water the potting mix thoroughly until water drains out of the bottom of the pot. This will help settle the soil and provide the cutting with the moisture it needs to start rooting.
Creating a Humid Environment
Humidity is key to successful rooting. We need to create a mini-greenhouse for our cuttings.
1. Cover with Plastic Bag or Humidity Dome: Place a clear plastic bag over the pot, making sure the bag doesn’t touch the leaves. You can use skewers or chopsticks to prop up the bag if needed. Alternatively, you can use a humidity dome if you have one.
2. Misting: Mist the inside of the plastic bag or humidity dome with water. This will help maintain a high level of humidity.
3. Placement: Place the pot in a warm, bright location with indirect sunlight. Avoid direct sunlight, which can overheat the cuttings and cause them to wilt.
Caring for Your Cuttings
This is where the patience comes in! Consistent care is essential for successful rooting.
1. Maintain Humidity: Check the humidity level inside the plastic bag or humidity dome regularly. If it looks dry, mist the inside with water.
2. Watering: Keep the potting mix consistently moist, but not soggy. Water when the top inch of soil feels dry to the touch. Be careful not to overwater, as this can lead to root rot.
3. Ventilation: Once a day, remove the plastic bag or humidity dome for a few minutes to allow for ventilation. This will help prevent the growth of mold and mildew.
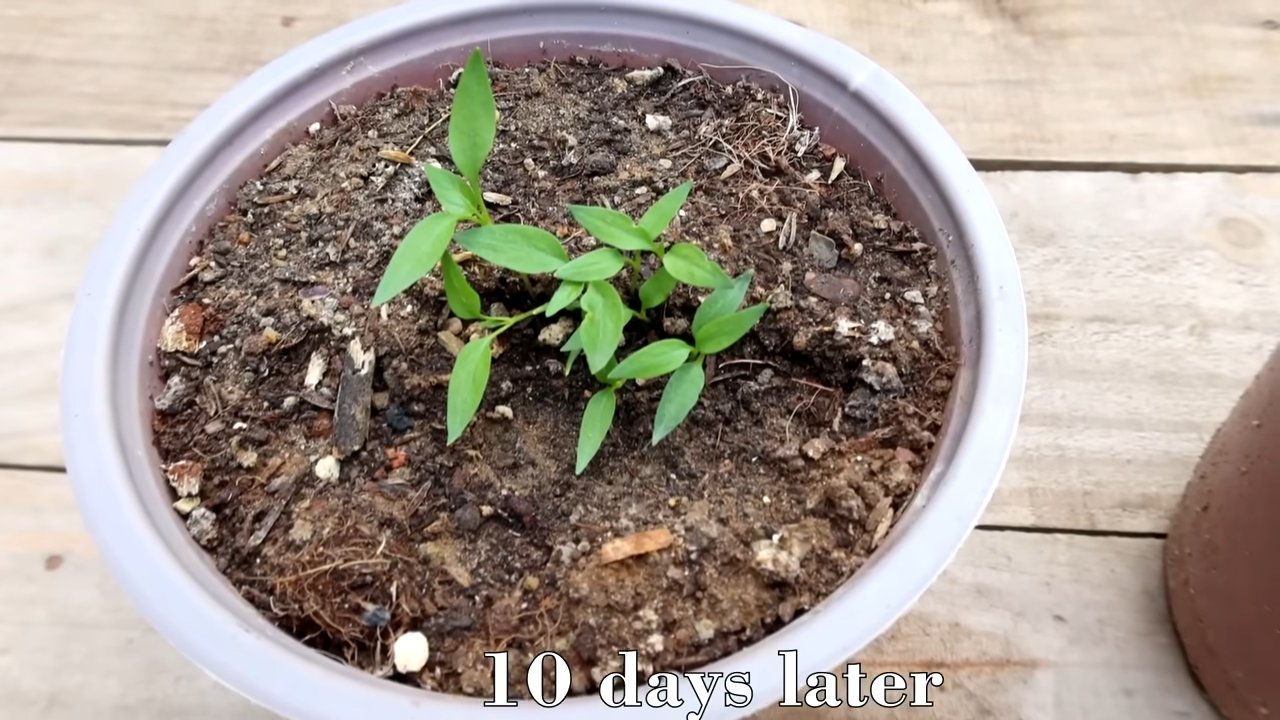
4. Check for Roots: After a few weeks (usually 2-4 weeks), gently tug on the cutting. If you feel resistance, it means roots have started to develop. You can also gently remove the cutting from the pot to check for roots.
5. Gradually Acclimate: Once the cuttings have developed a good root system, gradually acclimate them to lower humidity levels. Start by removing the plastic bag or humidity dome for a few hours each day, gradually increasing the time over the course of a week.
Transplanting Your New Chili Plants
Congratulations! Your cuttings have rooted and are ready to be transplanted into larger pots or into the garden.
1. Choose a Larger Pot or Location: Select a pot that is at least 6 inches in diameter or choose a sunny location in your garden with well-draining soil.
2. Prepare the Pot or Soil: Fill the larger pot with a good quality potting mix or amend the garden soil with compost or other organic matter.
3. Gently Remove the Cutting: Carefully remove the rooted cutting from its small pot, being careful not to damage the roots.
4. Plant the Cutting: Plant the cutting in the larger pot or in the garden, making sure the top of the root ball is level with the surrounding soil.
5. Water Thoroughly: Water the newly transplanted chili plant thoroughly.
6. Provide Support (Optional): If the plant is tall or leggy, you may want to provide support with a stake or trellis.
Tips for Success
Here are a few extra tips to help you succeed in propagating chili plants from cuttings:
* Take multiple cuttings: Not all cuttings will root, so it’s always a good idea to take several cuttings to increase your chances of success.
* Use a heat mat: A heat mat can help speed up the rooting process by providing bottom heat.
* Be patient: Rooting can take time, so don’t get discouraged if you don’t see results immediately.
* Observe your cuttings: Pay attention to the appearance of your cuttings. If they start to wilt or turn yellow, it could be a sign of a problem.
* Experiment: Don’t be afraid to experiment with different techniques and methods to find what works best for you.
Troubleshooting
Even with the best care, sometimes things don’t go as planned. Here are some common problems and how to address them:
* Cuttings Wilting: This is usually due to low humidity. Make sure the plastic bag or humidity dome is properly sealed and mist the cuttings regularly.
* Cuttings Turning Yellow: This could be due to overwatering or underwatering. Adjust your watering schedule accordingly.
* Cuttings Rotting: This is usually caused by overwatering or poor ventilation. Make sure the potting mix is well-draining and provide adequate ventilation.
* No Root Development: This could be due to a number of factors, including poor quality cuttings, lack of rooting hormone, or improper environmental conditions. Try taking new cuttings from a healthier plant, using rooting hormone, and ensuring adequate humidity and warmth.
Enjoy Your New Chili Plants!
That’s it! You’ve successfully propagated chili plants from cuttings. Now you can enjoy an abundance of your favorite peppers. Happy growing! I hope this guide helps you on your chili-growing journey. Remember, practice makes perfect, so don’t be afraid to experiment and learn along the way. Soon
Conclusion
So, there you have it! Propagating chili plants doesn’t have to be a daunting task reserved for seasoned gardeners. This simple, cost-effective DIY trick opens up a world of possibilities, allowing you to expand your chili garden exponentially without breaking the bank. Imagine the satisfaction of nurturing new chili plants from your existing favorites, knowing you’ve played an active role in their growth from the very beginning.
This method isn’t just about saving money; it’s about connecting with nature and understanding the life cycle of your plants. It’s about taking control of your garden and ensuring a continuous supply of your favorite spicy peppers. Think of the possibilities! You can propagate rare or heirloom varieties, ensuring their survival and sharing them with friends and fellow chili enthusiasts. You can experiment with different growing conditions to see how they affect the flavor and heat of your peppers.
Why is this DIY trick a must-try? Because it’s easy, affordable, and incredibly rewarding. It empowers you to become a more self-sufficient gardener, reducing your reliance on nurseries and allowing you to cultivate a truly unique and personalized chili garden. Plus, it’s a fantastic way to share your love of chili peppers with others. Imagine gifting friends and family with homegrown chili plants, knowing you propagated them yourself!
Don’t be afraid to experiment with variations on this method. For example, you can try using different rooting mediums, such as perlite or vermiculite, to see which works best for your specific chili variety. You can also experiment with different types of containers, from small plastic cups to repurposed yogurt containers. The key is to provide a warm, humid environment and to keep the rooting medium consistently moist.
Consider using a rooting hormone to further encourage root development, although it’s not strictly necessary. You can find rooting hormone in powder or liquid form at most garden centers. Simply dip the cut end of the chili stem into the rooting hormone before planting it in the rooting medium.
Another variation is to propagate chili plants from leaf cuttings. While this method is a bit more challenging, it can be a great way to propagate plants that are difficult to root from stem cuttings. To propagate from leaf cuttings, simply cut a healthy leaf from the chili plant and insert the cut end into the rooting medium. Keep the rooting medium moist and provide a warm, humid environment.
We encourage you to try this DIY trick for propagating chili plants and share your experiences with us! Let us know what varieties you’ve propagated, what rooting mediums you’ve used, and any tips or tricks you’ve discovered along the way. Your feedback will help us refine this method and make it even more accessible to other chili lovers. Share your photos and stories on social media using [Your Hashtag Here] so we can all celebrate your chili-growing success!
So, grab your clippers, gather your supplies, and get ready to embark on a chili-propagating adventure. You’ll be amazed at how easy and rewarding it is to create your own thriving chili garden. Happy growing!
FAQ
Can I propagate chili plants from any variety?
Yes, generally speaking, you can propagate chili plants from most varieties using this method. However, some varieties may be easier to propagate than others. Heirloom varieties, in particular, often respond well to propagation. Experiment with different varieties to see which ones are easiest for you to propagate. Keep in mind that the success rate can also depend on the overall health of the parent plant. A healthy, vigorous plant will produce cuttings that are more likely to root successfully.
What is the best time of year to propagate chili plants?
The best time of year to propagate chili plants is typically in the spring or early summer, when the plants are actively growing. This is when they have the most energy and are most likely to root successfully. However, you can propagate chili plants at other times of the year as well, as long as you provide them with the right conditions. Ensure adequate warmth and light, especially during the colder months. Using a grow light can be particularly helpful during the winter.
How long does it take for chili plant cuttings to root?
It typically takes 2-4 weeks for chili plant cuttings to root, depending on the variety, the growing conditions, and the rooting medium used. Be patient and keep the rooting medium consistently moist. You can check for root development by gently tugging on the cutting. If you feel resistance, it means that roots have formed. Once the cuttings have developed a good root system, you can transplant them into individual pots.
What kind of soil should I use for transplanting the rooted cuttings?
Use a well-draining potting mix that is specifically formulated for vegetables or herbs. Avoid using garden soil, as it can be too heavy and may contain pests or diseases. You can also amend the potting mix with perlite or vermiculite to improve drainage. A good potting mix will provide the necessary nutrients for the young chili plants to thrive.
How often should I water the newly transplanted chili plants?
Water the newly transplanted chili plants regularly, keeping the soil consistently moist but not waterlogged. Allow the top inch of soil to dry out slightly between waterings. Overwatering can lead to root rot, so it’s important to avoid letting the plants sit in standing water. Check the soil moisture regularly and adjust your watering schedule accordingly.
What kind of light do the newly transplanted chili plants need?
Newly transplanted chili plants need bright, indirect light. Avoid placing them in direct sunlight, as this can scorch their leaves. A south-facing window is ideal, but you can also use a grow light to supplement natural light. As the plants grow, you can gradually acclimate them to more direct sunlight.
Do I need to fertilize the newly transplanted chili plants?
Yes, you should fertilize the newly transplanted chili plants with a balanced fertilizer that is specifically formulated for vegetables or herbs. Start fertilizing about two weeks after transplanting, and follow the instructions on the fertilizer label. Avoid over-fertilizing, as this can damage the plants.
How do I prevent pests and diseases from affecting my chili plants?
To prevent pests and diseases from affecting your chili plants, it’s important to provide them with the right growing conditions. This includes well-draining soil, adequate light, and proper ventilation. You can also use organic pest control methods, such as neem oil or insecticidal soap, to control pests. Regularly inspect your plants for signs of pests or diseases and take action promptly if you notice any problems.
Can I propagate chili plants indoors?
Yes, you can propagate chili plants indoors, especially if you live in a climate with cold winters. Provide the plants with adequate light, warmth, and humidity. You can use a grow light to supplement natural light and a humidifier to increase humidity. Indoor propagation allows you to extend the growing season and enjoy fresh chili peppers year-round.
What if my chili plant cuttings don’t root?
If your chili plant cuttings don’t root, don’t give up! Try again with fresh cuttings and make sure you are providing the right growing conditions. Check the rooting medium to ensure it is consistently moist but not waterlogged. You can also try using a rooting hormone to further encourage root development. Sometimes, it just takes a little patience and experimentation to find what works best for your specific chili variety and growing environment.

Leave a Comment