
Growing Cantaloupe in Bags: Imagine biting into a juicy, sun-ripened cantaloupe, bursting with sweetness, and knowing you grew it yourself, even without a sprawling garden! For centuries, cantaloupe has been a symbol of summer abundance, enjoyed from ancient Egypt to modern-day picnics. But what if you’re short on space or dealing with challenging soil? That’s where this DIY trick comes in.
I’m here to tell you that you don’t need acres of land to enjoy this delicious fruit. This article is your ultimate guide to successfully growing cantaloupe in bags, a surprisingly simple and effective method that’s perfect for balconies, patios, or small yards. We’ll walk you through every step, from choosing the right bag and soil to providing the perfect amount of sunlight and water.
Why is this DIY hack so essential? Because everyone deserves the joy of fresh, homegrown produce! Store-bought cantaloupes often lack the intense flavor of vine-ripened fruit. Plus, you’ll be reducing your carbon footprint and saving money. So, grab your gardening gloves, and let’s get started on this exciting journey of growing cantaloupe in bags. You’ll be amazed at how easy and rewarding it is!
Growing Cantaloupe in Bags: A Sweet Success Story!
Hey there, fellow gardening enthusiasts! I’m so excited to share my experience growing cantaloupe in bags. Yes, you read that right! Forget sprawling vines taking over your entire garden; we’re going vertical (sort of) and contained. I’ve found this method to be surprisingly effective, especially if you’re short on space or dealing with less-than-ideal soil. Plus, there’s something incredibly satisfying about harvesting a juicy, homegrown cantaloupe from a bag you nurtured yourself. So, grab your gardening gloves, and let’s get started!
Why Grow Cantaloupe in Bags?
Before we dive into the how-to, let’s quickly touch on why this method is so appealing:
* Space Saving: Perfect for balconies, patios, or small gardens.
* Soil Control: You get to choose the perfect soil mix for optimal growth.
* Pest Management: Easier to monitor and protect your plants from pests.
* Portability: Move your plants around to chase the sun or protect them from harsh weather.
* Early Harvest: Bags warm up faster than the ground, potentially leading to an earlier harvest.
What You’ll Need
Okay, let’s gather our supplies. Here’s what you’ll need to embark on this cantaloupe-growing adventure:
* Cantaloupe Seeds: Choose a variety that’s known to be relatively compact or bush-type. Smaller varieties like ‘Minnesota Midget’ or ‘Bush Star’ are excellent choices.
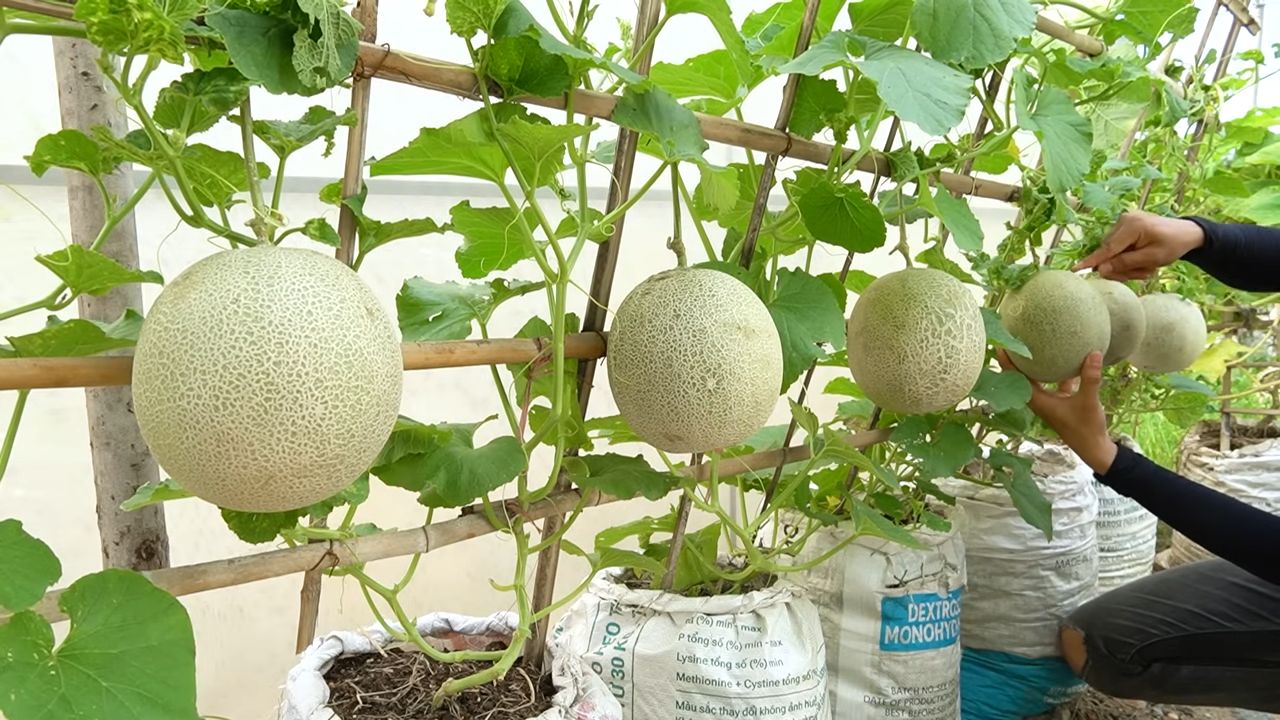
* Large Grow Bags: I recommend at least 15-gallon bags, but 20-gallon bags are even better. Fabric grow bags are ideal because they allow for good drainage and aeration.
* High-Quality Potting Mix: A well-draining mix is crucial. I like to use a blend of compost, peat moss (or coco coir), perlite, and vermiculite.
* Slow-Release Fertilizer: Cantaloupes are heavy feeders, so a slow-release fertilizer will provide them with a steady supply of nutrients. Look for one with a balanced NPK ratio (e.g., 10-10-10 or 14-14-14).
* Trellis or Support System: Even bush-type cantaloupes can produce fairly long vines, so a trellis or support system will help keep the fruit off the ground and prevent rot.
* Watering Can or Hose: For regular watering.
* Gardening Gloves: To protect your hands.
* Optional: Seed starting tray, heat mat (for starting seeds indoors), insecticidal soap (for pest control).
Step-by-Step Guide to Growing Cantaloupe in Bags
Alright, let’s get our hands dirty! Here’s a detailed guide to growing cantaloupe in bags, from seed to harvest:
1. Starting Your Seeds (Optional but Recommended)
Starting your seeds indoors gives you a head start on the growing season, especially if you live in a cooler climate.
1. Fill your seed starting tray with seed starting mix. Moisten the mix thoroughly.
2. Plant 2-3 cantaloupe seeds per cell, about ½ inch deep.
3. Cover the tray with a clear plastic dome or plastic wrap to create a humid environment.
4. Place the tray on a heat mat (optional) to speed up germination. Cantaloupe seeds germinate best at temperatures between 70-85°F (21-29°C).
5. Keep the soil moist but not soggy.
6. Once the seeds germinate (usually within 5-10 days), remove the plastic dome and place the tray under grow lights or in a sunny window.
7. Thin the seedlings to one strong plant per cell once they have their first true leaves (the leaves that appear after the initial seed leaves).
8. Harden off the seedlings by gradually exposing them to outdoor conditions for a week before transplanting them into the grow bags. Start with an hour or two of exposure each day and gradually increase the time.
2. Preparing Your Grow Bags
This is a crucial step to ensure your cantaloupes have a happy home.
1. Choose a sunny location for your grow bags. Cantaloupes need at least 6-8 hours of direct sunlight per day.
2. Place the grow bags in their final location before filling them with soil. They can be quite heavy once filled.
3. Fill the grow bags with your high-quality potting mix. Leave a few inches of space at the top of the bag.
4. Incorporate the slow-release fertilizer into the top few inches of the soil. Follow the instructions on the fertilizer package for the correct amount.
5. Water the soil thoroughly until water drains out of the bottom of the bag. This will help settle the soil and provide moisture for the seedlings.
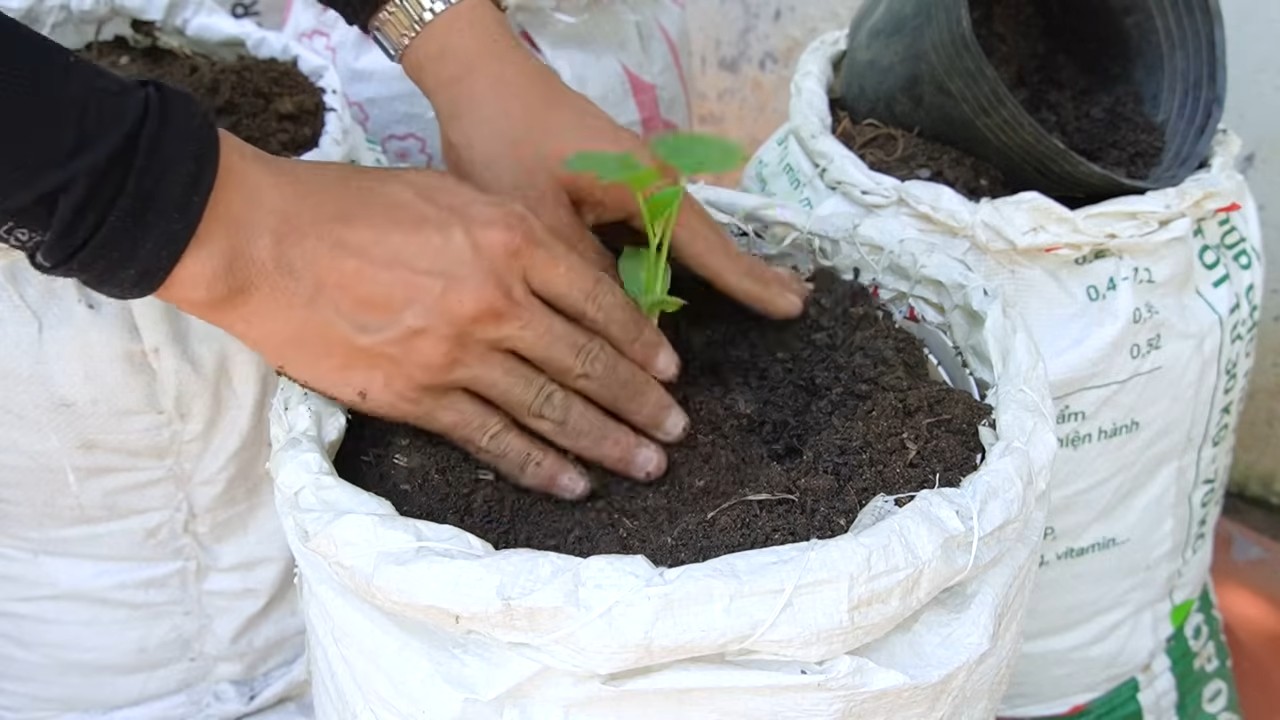
3. Transplanting Your Seedlings (or Direct Sowing)
Now it’s time to get those cantaloupe plants into their new homes!
1. If you started your seeds indoors, gently remove the seedlings from the seed starting tray. Be careful not to damage the roots.
2. Dig a hole in the center of each grow bag that is large enough to accommodate the root ball of the seedling.
3. Place the seedling in the hole and gently backfill with soil.
4. Water the seedling thoroughly.
5. If you are direct sowing, plant 2-3 seeds per bag, about ½ inch deep. Once the seedlings emerge, thin them to one strong plant per bag.
4. Setting Up Your Trellis or Support System
Even bush-type cantaloupes benefit from some support.
1. Install your trellis or support system near the grow bag. There are many options available, such as a tomato cage, a wooden trellis, or even a simple stake with twine.
2. As the cantaloupe vines grow, gently train them to climb the trellis or support system. You can use plant ties or twine to secure the vines.
3. If you are growing a larger variety of cantaloupe, you may need to provide additional support for the developing fruits. You can use slings made from pantyhose or netting to support the weight of the melons.
5. Watering and Fertilizing
Consistent watering and feeding are essential for healthy cantaloupe growth.
1. Water your cantaloupe plants regularly, especially during hot, dry weather. The soil should be kept consistently moist but not soggy. Check the soil moisture by sticking your finger into the soil. If the top inch of soil is dry, it’s time to water.
2. Water deeply and thoroughly, allowing the water to soak into the soil and reach the roots.
3. Avoid watering the foliage, as this can promote fungal diseases.
4. Fertilize your cantaloupe plants every 2-3 weeks with a liquid fertilizer that is high in potassium. Potassium is essential for fruit development. Follow the instructions on the fertilizer package for the correct amount.
5. You can also supplement with compost tea or other organic fertilizers.
6. Pest and Disease Control
Keep an eye out for common cantaloupe pests and diseases.
1. Inspect your plants regularly for signs of pests or diseases.
2. Common cantaloupe pests include aphids, squash bugs, and vine borers. You can control these pests with insecticidal soap, neem oil, or by handpicking them off the plants.
3. Common cantaloupe diseases include powdery mildew and fusarium wilt. You can prevent these diseases by providing good air circulation, avoiding overhead watering, and using disease-resistant varieties.
4. If you notice any signs of disease, remove the affected leaves or plants immediately.
7. Pollination
Cantaloupes need to be pollinated in order to produce fruit.
1. Cantaloupes have both male and female flowers. The female flowers have a small swelling at the base of the flower, which will eventually become the fruit.
2. Bees are the primary pollinators of cantaloupes. If you don’t see many bees in your garden, you may need to hand-pollinate the flowers.
3. To hand-pollinate, use a small paintbrush to transfer pollen from the male flowers to the female flowers. Do this in the morning, when the pollen is most viable.
8. Harvesting Your Cantaloupes
The moment we’ve all been waiting for!
1. Cantaloupes are typically ready to harvest about 80-90 days after planting.
2. Look for these signs of ripeness:
* The skin turns from green to a tan or yellowish color
Conclusion
So, there you have it! Growing cantaloupe in bags isn’t just a quirky gardening experiment; it’s a game-changer for anyone looking to maximize their yield, combat space constraints, or simply enjoy the satisfaction of nurturing these sweet melons from seed to harvest. We’ve walked you through the process, highlighting the key steps and offering insights to ensure your success.
But why is this DIY trick a must-try? The answer lies in its accessibility and effectiveness. Traditional cantaloupe cultivation often demands significant garden space and can be susceptible to soilborne diseases. Growing in bags bypasses these limitations, providing a controlled environment where you can tailor the soil composition, manage watering precisely, and even move your plants to optimize sunlight exposure. This method is particularly beneficial for urban gardeners, those with limited yard space, or anyone seeking a more manageable and rewarding gardening experience.
Beyond the core method, there’s ample room for experimentation and personalization. Consider these variations to tailor the process to your specific needs and preferences:
* Vertical Gardening: Utilize trellises or supports to train your cantaloupe vines upwards, further maximizing space efficiency. This is especially effective when using larger grow bags.
* Companion Planting: Incorporate companion plants like marigolds or basil around your cantaloupe bags to deter pests and attract beneficial insects.
* Fertilizer Adjustments: Monitor your plants closely and adjust your fertilizer regimen based on their growth and nutrient needs. Consider using organic fertilizers for a more sustainable approach.
* Variety Selection: While we’ve focused on cantaloupe, this method can be adapted for other melon varieties like honeydew or even smaller watermelons. Just be sure to select varieties that are well-suited to container gardening.
The beauty of this DIY project is its adaptability. Don’t be afraid to experiment and find what works best for your specific climate, growing conditions, and personal preferences. The key is to provide your cantaloupe plants with the essentials: ample sunlight, well-draining soil, consistent watering, and proper support.
We firmly believe that growing cantaloupe in bags is a rewarding and accessible gardening technique that can bring the joy of fresh, homegrown melons to anyone, regardless of their gardening experience or available space. It’s a testament to the power of ingenuity and a reminder that even the most challenging gardening endeavors can be simplified with a little creativity.
Now, it’s your turn! We encourage you to embrace this DIY trick and embark on your own cantaloupe-growing adventure. Share your experiences, successes, and challenges with us in the comments below. We’re eager to hear your stories and learn from your insights. Let’s cultivate a community of passionate gardeners who are pushing the boundaries of what’s possible in the world of homegrown produce. Happy gardening, and may your cantaloupes be sweet and plentiful! Remember, successful **cantaloupe growing** is within your reach with this simple method.
Frequently Asked Questions (FAQ)
What size bag is best for growing cantaloupe?
The ideal bag size for growing cantaloupe is typically between 10 and 20 gallons. A 10-gallon bag can work for smaller cantaloupe varieties, but a 20-gallon bag provides ample space for the roots to develop and support larger, more productive plants. Ensure the bag is sturdy and has drainage holes to prevent waterlogging. Fabric grow bags are a great option as they allow for better aeration and drainage compared to plastic containers.
What type of soil should I use in the bag?
A well-draining potting mix is crucial for growing cantaloupe in bags. Avoid using garden soil, as it can become compacted and hinder root growth. A good mix consists of equal parts of the following:
* Compost: Provides essential nutrients and improves soil structure.
* Peat moss or coco coir: Retains moisture and provides aeration.
* Perlite or vermiculite: Enhances drainage and prevents soil compaction.
You can also add slow-release fertilizer to the mix to provide a steady supply of nutrients throughout the growing season.
How often should I water my cantaloupe plants in bags?
Watering frequency depends on several factors, including the weather, the size of the bag, and the growth stage of the plant. Generally, you should water your cantaloupe plants deeply whenever the top inch of soil feels dry to the touch. During hot, dry weather, you may need to water daily. Avoid overwatering, as this can lead to root rot. Ensure the bag has adequate drainage to prevent water from pooling at the bottom. A good rule of thumb is to water until you see water draining from the bottom of the bag.
How much sunlight do cantaloupe plants need?
Cantaloupe plants require at least 6-8 hours of direct sunlight per day to thrive. Choose a location for your bags that receives ample sunlight throughout the day. If you live in a particularly hot climate, providing some afternoon shade can help prevent the plants from overheating. If you don’t have a sunny spot, consider using grow lights to supplement the natural sunlight.
Do I need to fertilize my cantaloupe plants in bags?
Yes, cantaloupe plants are heavy feeders and require regular fertilization to produce healthy vines and sweet melons. Start with a balanced fertilizer (e.g., 10-10-10) when planting and then switch to a fertilizer higher in phosphorus and potassium (e.g., 5-10-10) once the plants start to flower. Fertilize every 2-3 weeks, following the instructions on the fertilizer package. Organic fertilizers, such as compost tea or fish emulsion, are also excellent options.
How do I support the cantaloupe vines and fruits?
As the cantaloupe vines grow, they will need support to prevent them from sprawling on the ground. You can use a trellis, stakes, or even a tomato cage to support the vines. Once the fruits start to develop, they may need additional support to prevent them from breaking off the vine. You can use netting or slings made from old pantyhose to support the fruits.
How do I know when my cantaloupe is ripe?
Determining when a cantaloupe is ripe can be tricky, but there are a few telltale signs to look for:
* Color: The skin of the cantaloupe should turn from green to a tan or yellowish color.
* Aroma: A ripe cantaloupe will have a sweet, musky aroma.
* Stem: The stem should easily slip from the fruit with a gentle tug. This is known as the “full slip” stage.
* Sound: A ripe cantaloupe will have a dull, hollow sound when tapped.
Once the cantaloupe is ripe, harvest it immediately to prevent it from becoming overripe.
What are some common pests and diseases that affect cantaloupe plants?
Cantaloupe plants can be susceptible to various pests and diseases, including:
* Aphids: Small, sap-sucking insects that can weaken plants.
* Squash bugs: Pests that feed on the leaves and stems of cantaloupe plants.
* Powdery mildew: A fungal disease that causes a white, powdery coating on the leaves.
* Fusarium wilt: A soilborne disease that can cause the plants to wilt and die.
To prevent pests and diseases, practice good sanitation, such as removing dead leaves and weeds. You can also use insecticidal soap or neem oil to control pests and fungicides to control diseases. Choose disease-resistant cantaloupe varieties whenever possible.
Can I grow cantaloupe in bags indoors?
While it’s possible to grow cantaloupe in bags indoors, it requires a significant investment in grow lights and a controlled environment. Cantaloupe plants need a lot of light and warmth to thrive, so you’ll need to provide them with at least 12-16 hours of light per day. You’ll also need to ensure that the temperature is consistently warm, around 70-80°F. Indoor growing can be more challenging than outdoor growing, but it can be a rewarding experience if you’re willing to put in the effort.
How many cantaloupes can I expect to harvest from one plant grown in a bag?
The number of cantaloupes you can harvest from one plant grown in a bag depends on several factors, including the variety of cantaloupe, the size of the bag, and the growing conditions. Generally, you can expect to harvest 2-4 cantaloupes per plant. With proper care and optimal growing conditions, you may be able to harvest even more.
Leave a Comment