
Indoor Bok Choy Growing: Ever dreamt of having fresh, crisp greens right at your fingertips, no matter the season? Imagine stepping into your kitchen and harvesting vibrant Bok Choy, ready to add a burst of flavor to your stir-fries or salads. Well, dream no more! This DIY guide unlocks the secrets to successfully growing Bok Choy indoors, transforming your home into a miniature, edible oasis.
Bok Choy, also known as Pak Choi, boasts a rich history deeply rooted in Chinese cuisine and culture. For centuries, it has been a staple ingredient, celebrated not only for its delicious taste but also for its nutritional benefits. Now, you can bring this ancient tradition into your modern home, cultivating your own supply of this versatile vegetable.
Why should you embark on this indoor gardening adventure? Because let’s face it, store-bought produce can sometimes be disappointing – lacking flavor and freshness. Plus, knowing exactly where your food comes from is incredibly rewarding. With these simple DIY tricks, you’ll learn how to create the perfect environment for indoor Bok Choy growing, ensuring a continuous harvest of healthy, delicious greens. I’m excited to share these easy-to-follow steps that will empower you to grow your own Bok Choy, regardless of your gardening experience!
Growing Bok Choy Indoors: A Beginner’s Guide
Hey there, fellow plant enthusiasts! Ever thought about growing your own fresh veggies right in your kitchen? Bok choy, that crisp and delicious Asian green, is surprisingly easy to cultivate indoors. I’ve been doing it for a while now, and I’m excited to share my secrets with you. Get ready to enjoy homegrown bok choy in your stir-fries and salads!
What You’ll Need
Before we dive in, let’s gather all the necessary supplies. Trust me, having everything ready beforehand will make the whole process much smoother.
* Bok Choy Seeds: Choose a variety that’s well-suited for indoor growing. Dwarf varieties tend to do best. You can find these at most garden centers or online.
* Containers: You’ll need pots or containers with drainage holes. I recommend using pots that are at least 6 inches deep and wide to give the bok choy roots enough room to grow.
* Potting Mix: Use a high-quality, well-draining potting mix. Avoid using garden soil, as it can compact and hinder drainage.
* Grow Lights (Optional but Recommended): While bok choy can tolerate some shade, it thrives with plenty of light. If you don’t have a sunny windowsill, grow lights are a fantastic investment.
* Watering Can or Spray Bottle: For gentle watering.
* Fertilizer: A balanced liquid fertilizer formulated for leafy greens.
* Seed Starting Tray (Optional): If you prefer to start your seeds indoors before transplanting.
Getting Started: Planting Your Bok Choy Seeds
Okay, let’s get our hands dirty! This is where the magic begins.
1. Prepare Your Containers: Fill your chosen containers with the potting mix, leaving about an inch of space at the top. Gently pat down the soil to remove any air pockets.
2. Sow the Seeds: Sprinkle the bok choy seeds evenly over the surface of the soil. Aim for about 2-3 seeds per inch.
3. Cover the Seeds: Lightly cover the seeds with a thin layer of potting mix (about ¼ inch).
4. Water Gently: Use a watering can or spray bottle to moisten the soil thoroughly. Be careful not to dislodge the seeds.
5. Create a Humid Environment (Optional): To help with germination, you can cover the containers with plastic wrap or a humidity dome. This will trap moisture and create a warm, humid environment.
6. Find a Warm Spot: Place the containers in a warm location (around 65-75°F or 18-24°C). A sunny windowsill or a spot under grow lights works well.
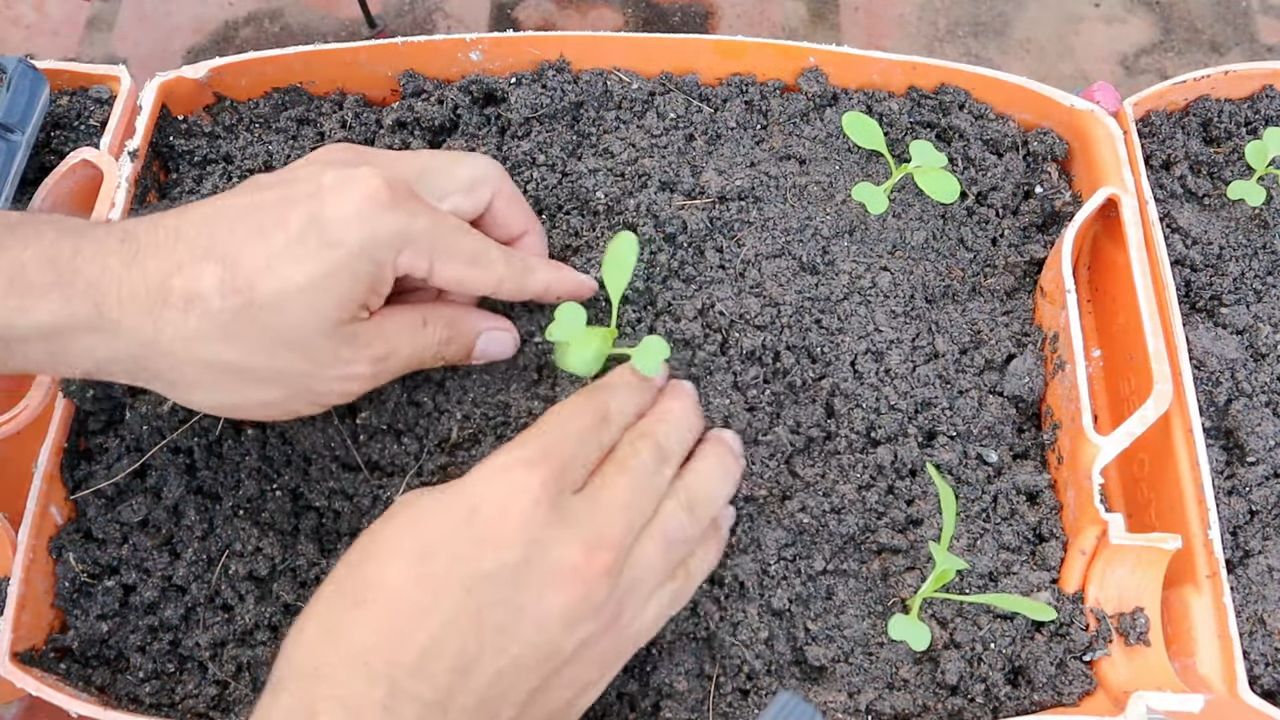
Germination and Early Growth
This is the waiting game! But don’t worry, it won’t be long before you see those tiny sprouts emerge.
1. Monitor Moisture Levels: Keep the soil consistently moist, but not soggy. Check the soil daily and water as needed.
2. Remove the Cover (If Used): Once the seedlings emerge (usually within 5-7 days), remove the plastic wrap or humidity dome.
3. Thin the Seedlings: Once the seedlings have developed their first true leaves (the second set of leaves after the initial seed leaves), thin them out. Choose the strongest seedling in each container and gently snip off the others at the soil line. This will give the remaining seedlings enough space to grow.
4. Provide Adequate Light: Ensure the seedlings receive at least 6 hours of direct sunlight per day, or 12-14 hours of light from grow lights. If using grow lights, position them a few inches above the seedlings.
5. Rotate the Containers: If you’re using a windowsill, rotate the containers regularly to ensure even light exposure. This will prevent the seedlings from leaning towards the light source.
Caring for Your Growing Bok Choy
Now that your bok choy plants are growing, it’s time to provide them with the care they need to thrive.
1. Watering: Water your bok choy plants regularly, keeping the soil consistently moist. Avoid overwatering, as this can lead to root rot. A good rule of thumb is to water when the top inch of soil feels dry to the touch.
2. Fertilizing: Feed your bok choy plants with a balanced liquid fertilizer every 2-3 weeks. Follow the instructions on the fertilizer label for proper dilution.
3. Temperature: Bok choy prefers cooler temperatures, ideally between 60-70°F (15-21°C). Avoid exposing your plants to extreme heat or cold.
4. Humidity: While bok choy can tolerate average humidity levels, it appreciates a slightly more humid environment. You can increase humidity by misting the plants regularly or placing a tray of water near them.
5. Pest Control: Keep an eye out for common pests like aphids and cabbage worms. If you spot any pests, you can remove them by hand or use an insecticidal soap.
6. Air Circulation: Ensure good air circulation around your plants to prevent fungal diseases. You can achieve this by spacing the plants properly and using a small fan to circulate the air.
Harvesting Your Homegrown Bok Choy
The moment you’ve been waiting for! Harvesting your own bok choy is incredibly rewarding.
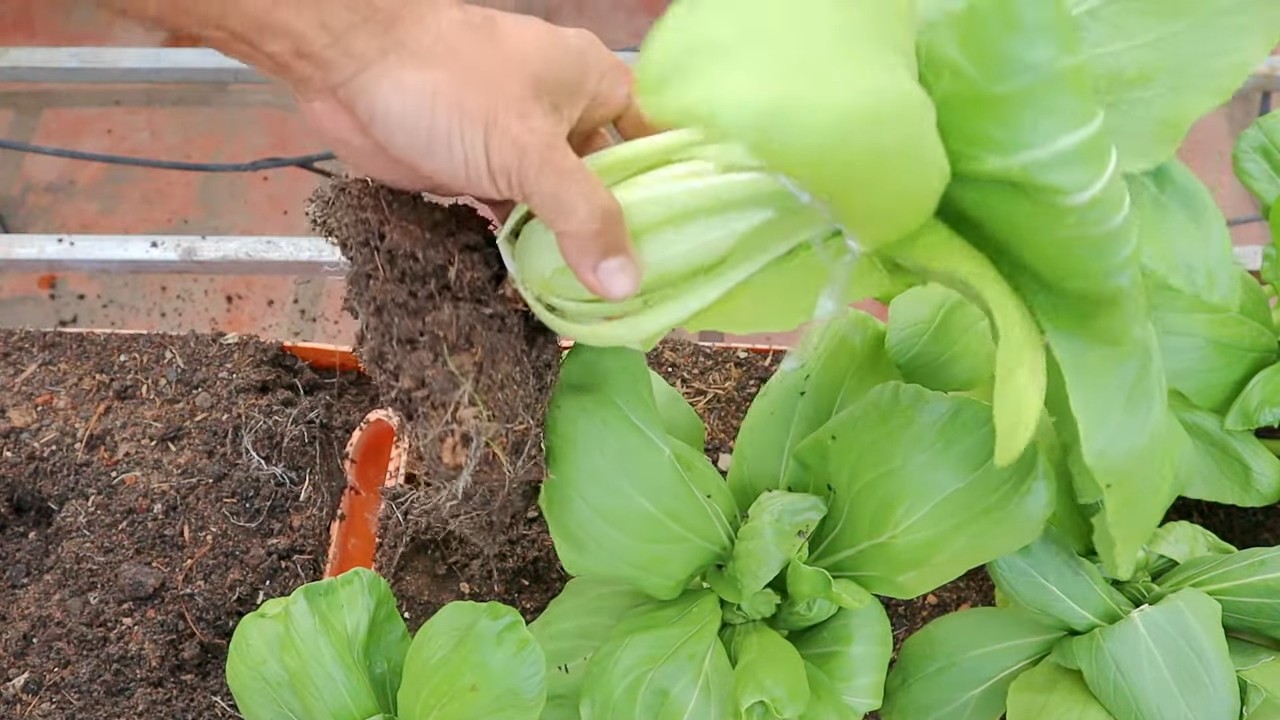
1. Harvest Time: You can start harvesting your bok choy when the leaves are about 6-8 inches long. This usually takes about 40-50 days from planting.
2. Harvesting Method: You can harvest the entire plant at once by cutting it off at the base, or you can harvest individual leaves as needed. If you harvest individual leaves, start with the outer leaves and work your way inwards.
3. Storage: Store your harvested bok choy in the refrigerator for up to a week. To keep it fresh, wrap it in a damp paper towel and place it in a plastic bag.
Troubleshooting Common Issues
Even with the best care, you might encounter some challenges along the way. Here are some common issues and how to address them:
* Yellowing Leaves: This could be a sign of overwatering, underwatering, or nutrient deficiency. Adjust your watering schedule and fertilize your plants as needed.
* Leggy Growth: This indicates insufficient light. Provide more light by moving your plants to a sunnier location or using grow lights.
* Slow Growth: This could be due to a variety of factors, including poor soil, inadequate light, or low temperatures. Ensure your plants have well-draining soil, sufficient light, and a comfortable temperature.
* Pest Infestations: Regularly inspect your plants for pests and take action promptly if you spot any.
Tips for Success
Here are a few extra tips to help you succeed in growing bok choy indoors:
* Choose the Right Variety: Opt for dwarf varieties that are specifically bred for indoor growing.
* Use High-Quality Potting Mix: This will ensure proper drainage and nutrient availability.
* Provide Adequate Light: Bok choy needs plenty of light to thrive. If you don’t have a sunny windowsill, invest in grow lights.
* Water Regularly: Keep the soil consistently moist, but avoid overwatering.
* Fertilize Regularly: Feed your plants with a balanced liquid fertilizer every 2-3 weeks.
* Monitor for Pests: Regularly inspect your plants for pests and take action promptly if you spot any.
* Be Patient: Growing bok choy takes time and effort. Don’t get discouraged if you encounter challenges along the way.
Enjoying Your Homegrown Bok Choy
Now that you’ve successfully grown your own bok choy, it’s time to enjoy the fruits (or rather, vegetables) of your labor! Bok choy is a versatile ingredient that can be used in a variety of dishes. Here are a few ideas:
* Stir-fries: Add bok choy to your favorite stir-fry recipes for a boost of flavor and nutrients.
* Salads: Use bok choy as a base for salads or add it to mixed green salads.
* Soups: Add bok choy to soups and stews for a hearty and nutritious meal.
* Steamed: Steam bok choy and serve it as a side dish.
* Grilled: Grill bok choy and serve it with a drizzle of olive oil and a sprinkle of salt and pepper.
Growing bok choy indoors is a fun and rewarding experience. With a little bit of care and attention, you can enjoy fresh, homegrown bok choy all year round. Happy gardening!
Conclusion
So, there you have it! Growing your own bok choy indoors is not only achievable, but it’s also a surprisingly rewarding experience. Forget those limp, overpriced heads of bok choy at the grocery store. Imagine stepping into your kitchen and harvesting crisp, vibrant leaves whenever you need them. This DIY approach puts you in control of the freshness and quality of your produce, ensuring you’re always enjoying the best possible flavor and nutritional value.
This isn’t just about saving money; it’s about connecting with your food on a deeper level. Watching those tiny seeds sprout and flourish under your care is incredibly satisfying. Plus, you’ll have the peace of mind knowing exactly what’s going into your bok choy, free from harmful pesticides and chemicals.
But the benefits don’t stop there. Indoor bok choy growing offers a fantastic opportunity to experiment and customize your harvest. Try different varieties of bok choy, such as the baby bok choy for a more delicate flavor or the Shanghai bok choy for its thicker stems. You can also adjust the lighting and nutrient levels to influence the growth rate and overall yield.
Consider adding companion plants to your indoor garden to further enhance the growing environment. Herbs like basil or chives can help deter pests and improve the flavor of your bok choy. You could even integrate your bok choy into a larger hydroponic system for a truly sustainable and efficient growing setup.
Don’t be afraid to get creative with your indoor bok choy growing setup. Repurpose old containers, build a vertical garden, or even use a simple windowsill. The possibilities are endless! The key is to provide your bok choy with adequate light, water, and nutrients, and to monitor its growth regularly.
This DIY trick is a must-try for anyone who loves fresh, healthy food and enjoys the satisfaction of growing their own produce. It’s a simple, affordable, and rewarding way to bring a touch of green into your home and elevate your culinary creations.
We encourage you to embark on your own indoor bok choy growing adventure. Start small, experiment with different techniques, and don’t be discouraged by initial setbacks. Every gardener, even the most experienced, has faced challenges along the way. The important thing is to learn from your mistakes and keep growing!
Once you’ve harvested your first batch of homegrown bok choy, we’d love to hear about your experience. Share your tips, tricks, and photos with us in the comments below. Let’s create a community of indoor bok choy enthusiasts and inspire others to discover the joys of growing their own food. Happy growing!
Frequently Asked Questions (FAQ)
What are the best varieties of bok choy to grow indoors?
While most bok choy varieties can be grown indoors, some are better suited for container gardening than others. Baby bok choy is a popular choice due to its compact size and quick growth rate. Shanghai bok choy, with its thicker, spoon-shaped leaves, is another excellent option. Dwarf bok choy varieties are also well-suited for indoor growing, as they require less space and mature quickly. Experiment with different varieties to find the ones that thrive best in your specific indoor environment. Consider factors like available space, lighting conditions, and personal taste preferences when making your selection.
How much light does indoor bok choy need?
Bok choy requires a significant amount of light to grow properly. Ideally, aim for at least 6-8 hours of direct sunlight per day. If you don’t have access to enough natural light, you’ll need to supplement with artificial grow lights. Fluorescent or LED grow lights are excellent choices, as they provide the necessary spectrum of light without generating excessive heat. Position the grow lights a few inches above the bok choy plants and adjust the height as they grow. Monitor the plants closely for signs of insufficient light, such as leggy growth or pale leaves.
What type of soil is best for growing bok choy indoors?
Bok choy prefers well-draining, nutrient-rich soil. A good potting mix specifically formulated for vegetables is an excellent choice. You can also create your own soil mix by combining equal parts of potting soil, compost, and perlite or vermiculite. The compost will provide essential nutrients, while the perlite or vermiculite will improve drainage and aeration. Avoid using garden soil, as it can be too heavy and may contain pests or diseases. Ensure that the container you’re using has drainage holes to prevent waterlogging.
How often should I water my indoor bok choy?
Bok choy needs consistent moisture to thrive, but it’s important to avoid overwatering. Water the plants when the top inch of soil feels dry to the touch. Water deeply, ensuring that the entire root ball is moistened. Allow excess water to drain out of the drainage holes. Avoid letting the plants sit in standing water, as this can lead to root rot. During hot or dry periods, you may need to water more frequently. Check the soil moisture regularly and adjust your watering schedule accordingly.
What are some common pests and diseases that affect indoor bok choy?
While indoor bok choy is generally less susceptible to pests and diseases than outdoor crops, it’s still important to be vigilant. Common pests that may affect indoor bok choy include aphids, spider mites, and whiteflies. These pests can be controlled with insecticidal soap or neem oil. Diseases such as powdery mildew and downy mildew can also affect bok choy, especially in humid environments. Ensure good air circulation around the plants and avoid overhead watering to prevent these diseases. If you notice any signs of pests or diseases, take action immediately to prevent them from spreading.
How long does it take to harvest indoor bok choy?
The time it takes to harvest indoor bok choy depends on the variety and growing conditions. Generally, you can expect to harvest baby bok choy in about 30-40 days, while larger varieties may take 45-60 days. You can harvest the entire plant at once or harvest individual leaves as needed. To harvest individual leaves, simply cut them off at the base of the plant. This will allow the plant to continue producing new leaves. Harvest bok choy when the leaves are tender and crisp. Avoid harvesting when the leaves are wilted or yellowing.
Can I grow bok choy indoors year-round?
Yes, you can grow bok choy indoors year-round, provided you provide the plants with adequate light, water, and nutrients. Indoor growing allows you to control the growing environment, protecting your plants from extreme weather conditions and pests. With proper care, you can enjoy fresh, homegrown bok choy throughout the year. Consider using a timer to regulate the grow lights and ensure consistent light exposure. You may also need to adjust your watering and fertilization schedule depending on the season.
What are some creative ways to use homegrown bok choy?
Homegrown bok choy is incredibly versatile and can be used in a wide variety of dishes. It’s delicious stir-fried with garlic and ginger, added to soups and stews, or used in salads. You can also grill or roast bok choy for a smoky flavor. The tender leaves can be used in wraps or sandwiches, while the thicker stems can be pickled or fermented. Experiment with different recipes and flavor combinations to discover your favorite ways to enjoy your homegrown bok choy. Don’t be afraid to get creative and try new things!

Leave a Comment