
Garden bed free potato harvest – sounds like a dream, right? Imagine plump, delicious potatoes without the back-breaking digging and potential for accidentally slicing into your precious crop! I’m here to tell you, it’s not just a dream; it’s an achievable reality with a simple DIY trick. For centuries, potatoes have been a staple food, cultivated across continents and woven into the culinary traditions of countless cultures. From the Andes Mountains, where they were first domesticated, to the humble gardens of today, potatoes have nourished and sustained us.
But let’s be honest, harvesting them can be a pain! That’s where this game-changing DIY comes in. We’re talking about growing potatoes in containers or grow bags, allowing for an effortless garden bed free potato harvest. No more wrestling with compacted soil or wondering if you’ve unearthed every last spud. This method is perfect for urban gardeners with limited space, beginners who want a less intimidating introduction to potato growing, or anyone who simply wants to enjoy a bountiful harvest with minimal effort.
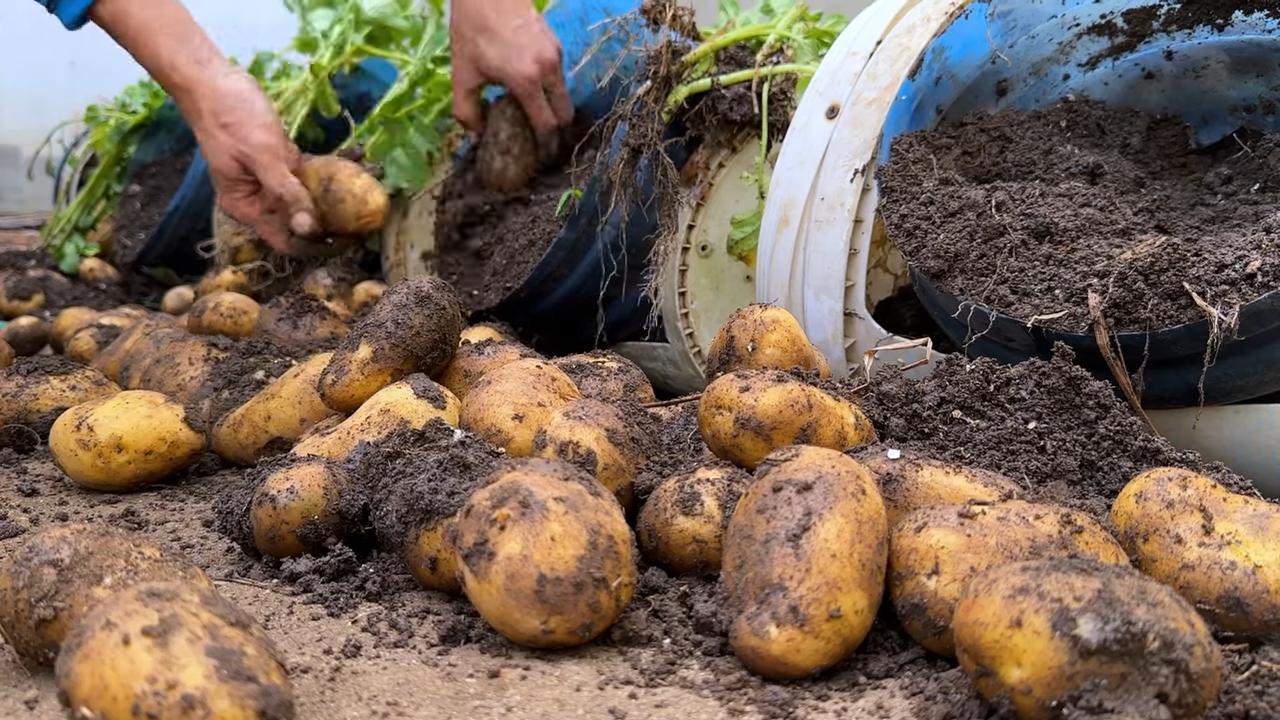
This DIY trick is a must-try because it simplifies the entire process, reduces the risk of damaging your potatoes, and makes harvesting a joy rather than a chore. Plus, it’s incredibly satisfying to simply tip over a container and reveal a treasure trove of homegrown potatoes. So, are you ready to ditch the shovel and embrace a smarter way to harvest? Let’s dive in!
Grow Potatoes in a Bag: A Bountiful Harvest Without the Digging!
Hey there, fellow garden enthusiasts! Are you dreaming of a potato harvest so abundant you’ll be giving them away to neighbors? And are you *also* dreading the back-breaking work of digging them up from a traditional garden bed? Well, I’ve got fantastic news! You can grow potatoes in a bag, and it’s a game-changer. Trust me, this method is easier, cleaner, and often yields a surprisingly large crop. Let’s dive into how you can make this happen!
What You’ll Need
Before we get started, let’s gather our supplies. This is a pretty simple project, so the list isn’t too daunting:
* A Large, Sturdy Bag: Think burlap sacks, heavy-duty plastic grow bags (at least 15-20 gallons), or even a large, reinforced trash bag. The key is durability and good drainage. I personally love using burlap sacks because they look rustic and allow the soil to breathe.
* Seed Potatoes: These aren’t just any potatoes! Seed potatoes are specifically grown for planting and are certified disease-free. You can find them at your local garden center or online. Choose a variety you love to eat!
* Good Quality Soil: A well-draining potting mix is essential. I like to use a mix of compost, peat moss (or coconut coir), and perlite. This ensures good drainage and provides plenty of nutrients for your potatoes.
* Water: Obviously! Potatoes need consistent moisture, especially when they’re actively growing.
* Sunlight: Potatoes need at least 6-8 hours of sunlight per day. Choose a sunny spot for your bag.
* Fertilizer (Optional): A balanced, slow-release fertilizer can give your potatoes an extra boost. I often use an organic fertilizer blend.
* Gardening Gloves: To keep your hands clean and protected.
* Scissors or a Knife: For cutting the seed potatoes (if needed).
Preparing Your Seed Potatoes
This step is crucial for maximizing your potato yield.
* Chitting (Sprouting): This is the process of encouraging your seed potatoes to sprout before planting. It gives them a head start and results in earlier and more abundant harvests.
* Place your seed potatoes in a cool, bright location (but not direct sunlight) for a few weeks. An egg carton works great for this.
* You’ll notice small “eyes” or sprouts starting to form.
* Once the sprouts are about 1/2 to 1 inch long, you’re ready to plant.
* Cutting (If Necessary): If your seed potatoes are large (about the size of a tennis ball or bigger), you can cut them into smaller pieces.
* Make sure each piece has at least 2-3 “eyes” or sprouts.
* Let the cut pieces dry for a day or two to allow the cut surfaces to callous over. This helps prevent rot.
Planting Your Potatoes
Now for the fun part! Let’s get those potatoes in the bag.
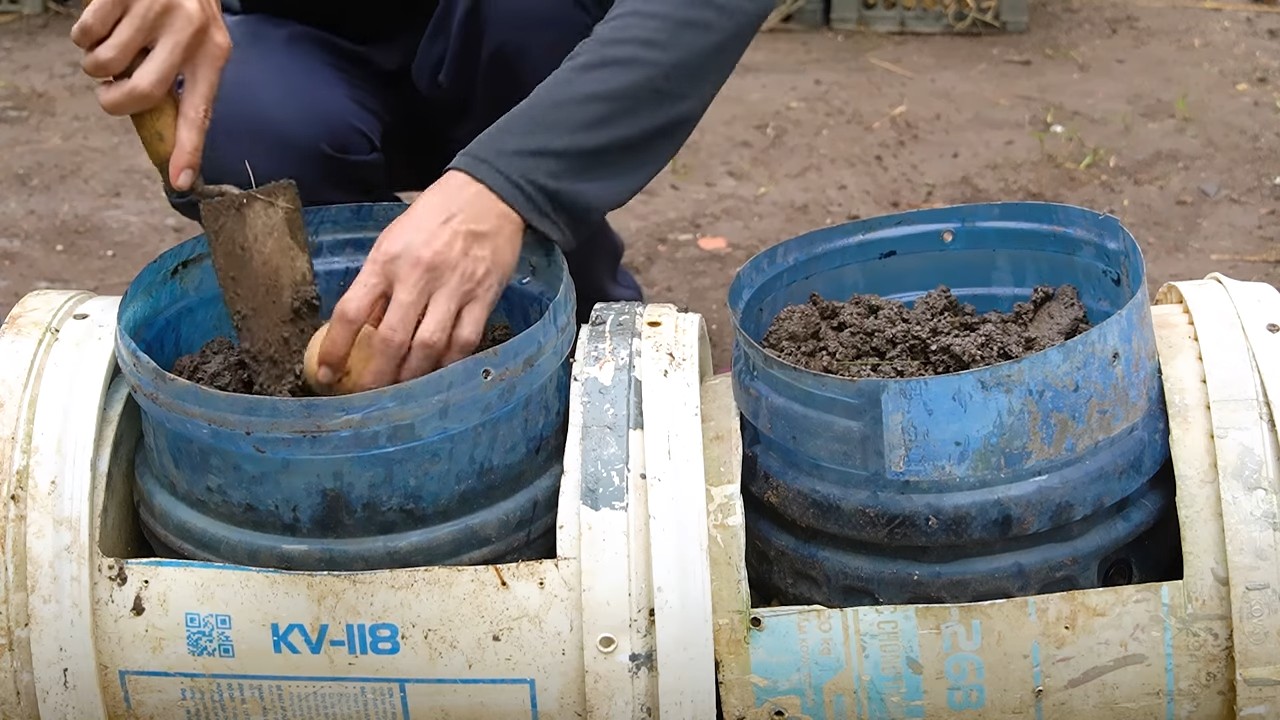
1. Prepare the Bag: If you’re using a plastic bag, make sure to poke several drainage holes in the bottom. This is super important to prevent waterlogging, which can rot your potatoes.
2. Add Soil: Fill the bag with about 4-6 inches of your potting mix.
3. Plant the Seed Potatoes: Place the seed potato pieces (or whole small seed potatoes) on top of the soil, with the sprouts facing upwards. Space them about 8-10 inches apart if you’re planting multiple pieces in the same bag.
4. Cover with Soil: Cover the seed potatoes with another 4-6 inches of soil.
5. Water Thoroughly: Water the soil well until it’s evenly moist but not soggy.
The “Hilling” Process: Key to a Big Harvest
This is where the magic happens! “Hilling” is the process of gradually adding more soil to the bag as the potato plants grow. This encourages the plants to produce more potatoes along the buried stem.
1. Wait for Growth: Once the potato plants emerge from the soil and reach about 6-8 inches tall, it’s time to start hilling.
2. Add More Soil: Add another 4-6 inches of soil to the bag, burying the lower part of the stems. Leave the top few inches of leaves exposed.
3. Repeat: Continue this process every few weeks as the plants grow taller. Each time, add more soil until you reach the top of the bag.
4. Water Regularly: Keep the soil consistently moist throughout the growing season. Potatoes need plenty of water, especially during hot weather.
5. Fertilize (Optional): If you’re using fertilizer, apply it according to the package directions. I usually fertilize every few weeks.
Caring for Your Potato Plants
Besides hilling and watering, here are a few other things to keep in mind:
* Sunlight: Make sure your potato plants are getting at least 6-8 hours of sunlight per day.
* Pest Control: Keep an eye out for pests like aphids, potato beetles, and flea beetles. If you spot any, take action immediately. You can use insecticidal soap, neem oil, or hand-pick the pests off the plants.
* Disease Prevention: Potatoes can be susceptible to diseases like blight. To prevent disease, make sure your plants have good air circulation, avoid overwatering, and use disease-resistant seed potato varieties.
* Support (If Needed): If your potato plants get very tall and top-heavy, you may need to provide some support. You can use stakes or a tomato cage to keep them from falling over.
Harvesting Your Potatoes
This is the moment you’ve been waiting for!
1. When to Harvest: Potatoes are typically ready to harvest about 80-100 days after planting, depending on the variety. You’ll know they’re ready when the plants start to flower and the foliage begins to turn yellow and die back.
2. The Easy Part: Simply tip the bag over and dump out the soil! You’ll be amazed at the number of potatoes you find.
3. Sort and Store: Sort your potatoes and remove any that are damaged or diseased. Store them in a cool, dark, and dry place. A root cellar is ideal, but a basement or garage can also work.
Troubleshooting
Even with the best planning, things don’t always go perfectly. Here are a few common problems you might encounter and how to fix them:
* Yellowing Leaves: This could be a sign of overwatering, underwatering, nutrient deficiency, or disease. Check the soil moisture and adjust your watering accordingly. If you suspect a nutrient deficiency, fertilize your plants. If you suspect disease, treat with an appropriate fungicide.
* Small Potatoes: This could be due to insufficient sunlight, lack of water, or poor soil. Make sure your plants are getting enough sunlight and water, and amend your soil with compost or fertilizer.
* Rotting Potatoes: This is usually caused by overwatering or poor drainage. Make sure your bag has good drainage holes and avoid overwatering.
* Pests: As mentioned earlier, keep an eye out for pests and take action immediately if you spot any.
Choosing the Right Potato Variety
The type of potato you choose to grow will impact the flavor, texture, and storage life of your harvest. Here are a few popular varieties to consider:
* Yukon Gold: These are all-purpose potatoes with a creamy texture and buttery flavor. They’re great for boiling, baking, mashing, and roasting.
* Red Potatoes: These have a waxy texture and hold their shape well when cooked. They’re perfect for potato salads, boiling, and roasting.
* Russet Potatoes: These are starchy potatoes that are ideal for baking and frying. They’re also good for making mashed potatoes.
* Fingerling Potatoes: These are small, elongated potatoes with a unique flavor and texture. They’re great for roasting and adding to salads.
* Purple Potatoes: These have a vibrant purple color and a slightly nutty flavor. They’re a fun and colorful addition to any meal.
Tips for Success
Here are a few extra tips to help you get the most out of your bag potato growing experience:
* Use a dark-colored bag: Dark colors absorb more heat, which can help warm the soil and promote faster growth.
* Rotate your crops: Avoid planting potatoes in the same bag year after year. This can help prevent soilborne diseases.
* Don’t overwater: Potatoes need consistent moisture, but they don’t like to be waterlogged.
* Harvest early potatoes: You can harvest “new potatoes” (small, immature potatoes
Conclusion
So, there you have it! Ditching the traditional garden bed for this innovative, space-saving, and frankly, incredibly fun method of growing potatoes is a game-changer. We’ve walked you through the simple steps, highlighting how easy it is to create your own potato tower and reap the rewards of a bountiful harvest. But why is this DIY trick a must-try?
Firstly, it’s about maximizing your yield. Forget digging endlessly through compacted soil, hoping to unearth a few scattered spuds. This method encourages vertical growth, allowing you to pack more potato plants into a smaller footprint. Imagine the satisfaction of harvesting pounds of potatoes from a single, manageable tower!
Secondly, it’s about convenience. Harvesting becomes a breeze. No more back-breaking labor or accidentally slicing through your precious potatoes with a shovel. Simply tip the container and watch your homegrown treasures tumble out. It’s like a potato piñata, but instead of candy, you get delicious, earthy goodness.
Thirdly, it’s about control. You have complete control over the soil composition, ensuring your potatoes receive the perfect blend of nutrients for optimal growth. Plus, the contained environment minimizes the risk of soilborne diseases and pests.
But the beauty of this method lies in its adaptability. Feel free to experiment with different containers. Large trash cans, repurposed barrels, even sturdy fabric grow bags can all work wonders. Consider adding layers of compost or well-rotted manure to enrich the soil and boost your potato production. You can also try different varieties of potatoes, from classic Russets to colorful fingerlings, to create a truly unique and personalized harvest.
Don’t be afraid to get creative! Try interplanting your potatoes with companion plants like marigolds or basil to deter pests and attract beneficial insects. You could even add a layer of straw mulch to the top of the tower to help retain moisture and suppress weeds.
This garden bed free potato harvest method isn’t just about growing potatoes; it’s about embracing a more sustainable, efficient, and enjoyable way to garden. It’s about connecting with your food and experiencing the satisfaction of nurturing something from seed to table.
We wholeheartedly encourage you to give this DIY trick a try. We are confident that you’ll be amazed by the results. And most importantly, we want to hear about your experience! Share your photos, tips, and triumphs in the comments below. Let’s build a community of potato-growing enthusiasts and inspire others to ditch the traditional garden bed and embrace the vertical revolution! Let us know what worked for you, what challenges you faced, and any innovative tweaks you made along the way. Together, we can unlock the full potential of this incredible gardening technique and enjoy a truly bountiful harvest. Happy growing!
Frequently Asked Questions (FAQ)
What type of potatoes are best suited for this method?
While you can grow almost any type of potato using this method, some varieties tend to perform better than others. Early-maturing potatoes, such as Yukon Gold, Red Pontiac, and Irish Cobbler, are often recommended because they have a shorter growing season and are less susceptible to diseases. Fingerling potatoes also thrive in containers due to their compact size and prolific yields. However, don’t be afraid to experiment with other varieties to see what works best in your specific climate and growing conditions. Consider factors like disease resistance, storage potential, and your personal taste preferences when selecting your potato varieties.
How often should I water my potato tower?
Watering frequency depends on several factors, including the size of your container, the type of soil you’re using, the climate, and the stage of growth. Generally, you should aim to keep the soil consistently moist but not waterlogged. Check the moisture level by sticking your finger a few inches into the soil. If it feels dry, it’s time to water. During hot, dry weather, you may need to water daily, while during cooler, wetter periods, you can reduce the frequency. Ensure that your container has adequate drainage to prevent root rot. A good rule of thumb is to water deeply and less frequently, allowing the water to penetrate the entire soil profile.
What kind of soil should I use for my potato tower?
The ideal soil mix for growing potatoes in a tower is well-draining, nutrient-rich, and slightly acidic. A good starting point is a mix of equal parts compost, potting soil, and perlite or vermiculite. Compost provides essential nutrients and improves soil structure, while potting soil offers good drainage and aeration. Perlite or vermiculite helps to further improve drainage and prevent compaction. Avoid using heavy clay soil, as it can become waterlogged and inhibit root growth. You can also amend your soil with organic fertilizers, such as bone meal or rock phosphate, to provide additional nutrients for your potatoes.
How do I know when my potatoes are ready to harvest?
The timing of your potato harvest depends on the variety you’re growing and your desired size. Generally, early-maturing potatoes can be harvested when the plants begin to flower, while later-maturing varieties should be harvested after the foliage has died back. To check for readiness, gently dig around the base of a plant and feel for the size of the potatoes. If they are the size you desire, you can begin harvesting. For storage potatoes, it’s best to wait until the foliage has completely died back, as this allows the skins to thicken and the potatoes to store better.
Can I reuse the soil from my potato tower?
Yes, you can reuse the soil from your potato tower, but it’s important to amend it with fresh compost and nutrients before planting again. Potatoes are heavy feeders, so they deplete the soil of essential nutrients. Adding compost will replenish these nutrients and improve the soil structure. You may also want to consider rotating your crops to prevent the buildup of soilborne diseases and pests. If you suspect that your soil is contaminated with diseases or pests, it’s best to sterilize it before reusing it. You can do this by baking the soil in the oven at 180°F (82°C) for 30 minutes or by solarizing it in the sun.
What are some common problems I might encounter when growing potatoes in a tower, and how can I prevent them?
Some common problems include potato blight, potato beetles, and nutrient deficiencies. Potato blight is a fungal disease that can cause the foliage to turn brown and the potatoes to rot. To prevent blight, choose disease-resistant varieties, ensure good air circulation, and avoid overhead watering. Potato beetles are voracious pests that can defoliate your plants. You can control them by handpicking them off the plants, using insecticidal soap, or introducing beneficial insects like ladybugs. Nutrient deficiencies can manifest as yellowing leaves or stunted growth. To prevent deficiencies, amend your soil with compost and organic fertilizers, and monitor the pH level of your soil.
How much sunlight do potatoes need when grown in a tower?
Potatoes need at least six to eight hours of direct sunlight per day to thrive. Choose a location for your potato tower that receives plenty of sunlight throughout the day. If you live in a particularly hot climate, you may want to provide some afternoon shade to prevent the plants from overheating. Insufficient sunlight can result in weak, leggy growth and reduced yields.
Can I grow potatoes in a tower indoors?
While it’s possible to grow potatoes indoors, it can be challenging to provide them with the necessary amount of light and space. If you want to try growing potatoes indoors, you’ll need to use grow lights to supplement natural sunlight. You’ll also need a large container and a well-draining soil mix. Be sure to monitor the moisture level of the soil and provide adequate ventilation to prevent fungal diseases. Indoor potato growing is often more of a novelty than a practical way to produce a significant harvest.
What are some good companion plants for potatoes in a tower?
Companion planting can help to deter pests, attract beneficial insects, and improve the overall health of your potato plants. Some good companion plants for potatoes include marigolds, basil, thyme, and nasturtiums. Marigolds repel nematodes and other soil pests, while basil deters potato beetles. Thyme attracts beneficial insects like ladybugs and lacewings, which prey on aphids and other pests. Nasturtiums attract aphids away from your potato plants, acting as a trap crop. Avoid planting potatoes near members of the nightshade family, such as tomatoes, peppers, and eggplants, as they can attract similar pests and diseases.
Leave a Comment