
DIY Pumpkin Container Gardening: Ever dreamed of harvesting your own plump, vibrant pumpkins right from your patio or balcony? I know I have! Forget sprawling fields; with a little ingenuity, you can cultivate these autumn icons in containers, no matter how limited your space. This isn’t just about growing pumpkins; it’s about embracing a sustainable, space-saving, and utterly charming way to connect with nature.
Pumpkin cultivation boasts a rich history, deeply intertwined with indigenous cultures of North America. For centuries, pumpkins have been a staple food source and a symbol of abundance and harvest. Now, we’re taking this ancient tradition and adapting it for the modern urban gardener.
Why should you try DIY Pumpkin Container Gardening? Well, imagine the satisfaction of carving a pumpkin you nurtured from a tiny seed! Beyond the fun, it’s a fantastic way to teach kids about plant life cycles, reduce your carbon footprint by growing your own food, and add a touch of seasonal beauty to your outdoor space. Plus, let’s be honest, store-bought pumpkins just don’t have the same charm as the ones you’ve lovingly grown yourself. So, let’s dive into the secrets of successful pumpkin container gardening and transform your small space into a mini pumpkin patch!
DIY Pumpkin Container Gardening: Grow Your Own Patch on a Patio!
Hey there, fellow gardening enthusiasts! Ever dreamed of having a pumpkin patch but lack the sprawling acreage? Well, dream no more! I’m going to walk you through creating a thriving pumpkin container garden, perfect for patios, balconies, or even small yards. It’s easier than you think, and the reward of harvesting your own pumpkins is incredibly satisfying.
Choosing the Right Pumpkin Variety
Before we dive into the nitty-gritty, let’s talk pumpkins. Not all pumpkins are created equal, especially when it comes to container gardening. We need to choose varieties that are compact and well-suited for confined spaces.
* Consider Size: Miniature and small-sized pumpkins are your best bet. Think ‘Jack Be Little,’ ‘Baby Boo’ (white!), ‘Spookies,’ or even some of the smaller pie pumpkin varieties. Avoid the giant pumpkins like ‘Atlantic Giant’ – they’ll quickly outgrow your container.
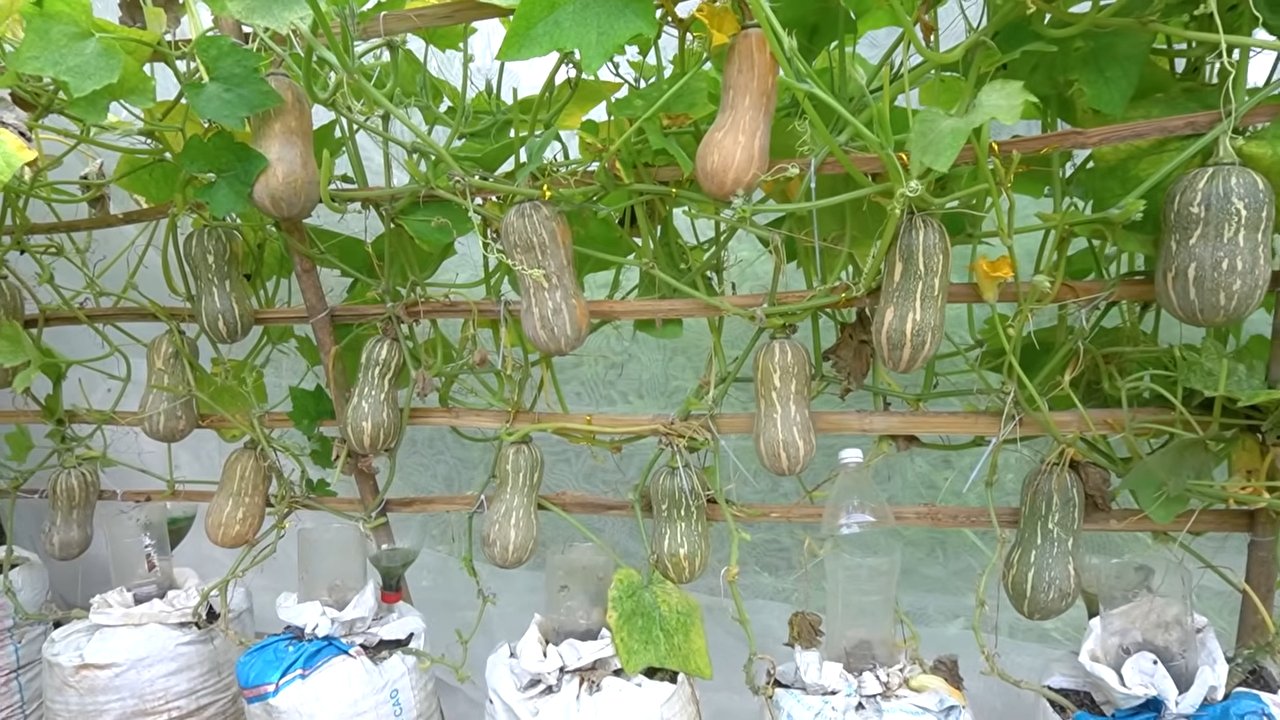
* Bush vs. Vine: Look for bush varieties if possible. These tend to be more compact than vining types. If you opt for a vining variety, be prepared to provide support like a trellis or tomato cage.
* Days to Maturity: Check the seed packet for the “days to maturity.” Shorter maturity times are ideal for container gardening, especially if you have a shorter growing season.
Gathering Your Supplies
Okay, now for the fun part – gathering our supplies! Here’s what you’ll need:
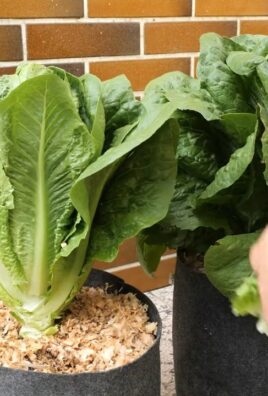
* Large Container(s): This is crucial! Pumpkins need plenty of space for their roots to grow. I recommend a container that’s at least 24 inches in diameter and 18 inches deep. The bigger, the better, really. Think large resin pots, half whiskey barrels, or even sturdy plastic tubs. Make sure it has drainage holes!
* High-Quality Potting Mix: Don’t skimp on the potting mix! Use a well-draining, nutrient-rich mix specifically formulated for containers. Avoid using garden soil, as it can compact and hinder drainage. I like to add some compost to my potting mix for an extra boost of nutrients.
* Pumpkin Seeds: Choose your desired pumpkin variety and purchase seeds from a reputable source.
* Slow-Release Fertilizer: This will provide your pumpkins with a steady supply of nutrients throughout the growing season. Look for a fertilizer formulated for vegetables or flowering plants.
* Watering Can or Hose: Essential for keeping your pumpkins hydrated.
* Trowel or Shovel: For planting and transplanting.
* Optional: Trellis or Tomato Cage: If you’re growing a vining variety, you’ll need something for the vines to climb.
* Optional: Mulch: Mulch helps retain moisture and suppress weeds. Straw, wood chips, or shredded bark work well.
Planting Your Pumpkin Seeds
Alright, let’s get our hands dirty! Here’s how to plant your pumpkin seeds:
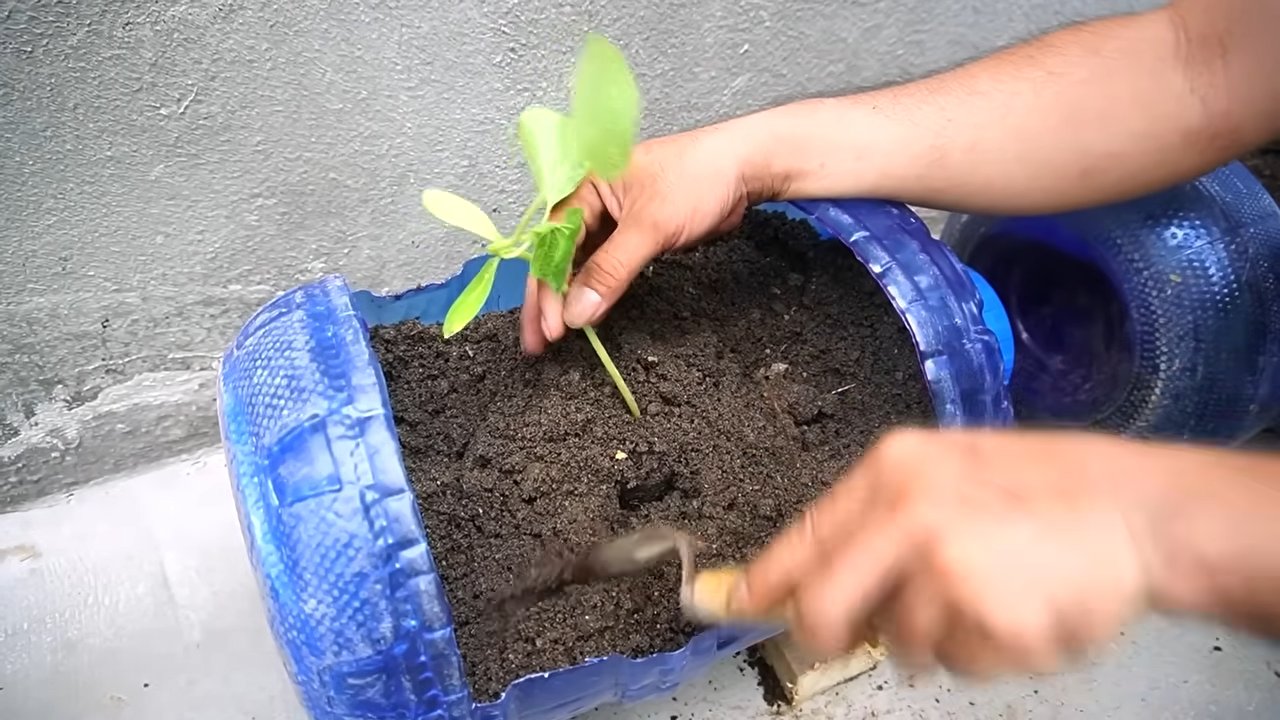
1. Prepare the Container: Fill your container with the potting mix, leaving a few inches of space at the top.
2. Sow the Seeds: Plant 2-3 seeds per container, about 1 inch deep. Space them a few inches apart. Planting multiple seeds ensures at least one will germinate.
3. Water Gently: Water the soil thoroughly but gently, being careful not to dislodge the seeds.
4. Provide Warmth: Pumpkins love warmth! Place your container in a sunny location where it will receive at least 6-8 hours of direct sunlight per day.
5. Keep the Soil Moist: Keep the soil consistently moist, but not waterlogged. Check the soil moisture daily and water when the top inch feels dry.
Caring for Your Pumpkin Plants
Once your pumpkin seedlings emerge, it’s time to provide them with the care they need to thrive.
1. Thin the Seedlings: Once the seedlings have developed a few true leaves, thin them to one plant per container. Choose the strongest, healthiest-looking seedling and snip off the others at the soil line.
2. Fertilize Regularly: Start fertilizing your pumpkin plants about two weeks after they emerge. Use a slow-release fertilizer according to the package directions. You can also supplement with a liquid fertilizer every few weeks.
3. Water Deeply: Water your pumpkin plants deeply and regularly, especially during hot, dry weather. Aim to water at the base of the plant to avoid wetting the foliage, which can lead to fungal diseases.
4. Provide Support (if needed): If you’re growing a vining variety, train the vines to climb a trellis or tomato cage. This will help keep the pumpkins off the ground and prevent them from rotting.
5. Pollination Assistance (if needed): Pumpkins have separate male and female flowers. Bees are usually responsible for pollination, but if you’re not seeing many bees in your area, you may need to hand-pollinate. To do this, use a small paintbrush to transfer pollen from the male flower to the female flower. Female flowers have a small, immature pumpkin at the base.
6. Pest and Disease Control: Keep an eye out for pests like squash bugs, squash vine borers, and aphids. You can control these pests with insecticidal soap or neem oil. Also, watch out for fungal diseases like powdery mildew. Improve air circulation and avoid overhead watering to prevent these diseases. If you spot any signs of disease, treat with a fungicide.
Harvesting Your Pumpkins
The moment we’ve all been waiting for – harvesting! Here’s how to know when your pumpkins are ready to pick:
1. Check the Color: The pumpkin should be a deep, rich color, typical of the variety you’re growing.
2. Tap the Pumpkin: A ripe pumpkin will sound hollow when you tap it.
3. Check the Stem: The stem should be dry and hard.
4. Harvest Carefully: Use a sharp knife or pruning shears to cut the pumpkin from the vine, leaving a few inches of stem attached. This will help prevent the pumpkin from rotting.
Troubleshooting Common Problems
Even with the best care, you might encounter some challenges along the way. Here are a few common problems and how to address them:
* Lack of Flowers: If your pumpkin plant isn’t producing flowers, it could be due to a lack of sunlight, nutrients, or water. Make sure your plant is getting enough sunlight, fertilize regularly, and water deeply.
* Flowers Dropping Off: If the flowers are dropping off before they can be pollinated, it could be due to a lack of pollinators or extreme temperatures. Try hand-pollinating the flowers and provide shade during the hottest part of the day.
* Rotting Pumpkins: If the pumpkins are rotting on the vine, it could be due to fungal diseases or pests. Improve air circulation, avoid overhead watering, and treat with a fungicide or insecticide as needed.
* Slow Growth: If your pumpkin plant is growing slowly, it could be due to a lack of nutrients or water. Fertilize regularly and water deeply.
Section: Maximizing Your Pumpkin Yield
Want to get the most pumpkins possible from your container garden? Here are a few extra tips:
* Choose a Sunny Location: Pumpkins need at least 6-8 hours of direct sunlight per day. The more sun, the better!
* Use a Large Container: The bigger the container, the more room the roots have to grow, and the more pumpkins your plant can produce.
* Fertilize Regularly: Pumpkins are heavy feeders, so fertilize them regularly with a balanced fertilizer.
* Water Deeply: Water deeply an
Hey there, fellow gardening enthusiasts! Ever dreamed of having a pumpkin patch but lack the sprawling acreage? Well, dream no more! I’m going to walk you through creating a thriving pumpkin container garden, perfect for patios, balconies, or even small yards. It’s easier than you think, and the reward of harvesting your own pumpkins is incredibly satisfying.
Choosing the Right Pumpkin Variety
Before we dive into the nitty-gritty, let’s talk pumpkins. Not all pumpkins are created equal, especially when it comes to container gardening. We need to choose varieties that are compact and well-suited for confined spaces.
* Consider Size: Miniature and small-sized pumpkins are your best bet. Think ‘Jack Be Little,’ ‘Baby Boo’ (white!), ‘Spookies,’ or even some of the smaller pie pumpkin varieties. Avoid the giant pumpkins like ‘Atlantic Giant’ – they’ll quickly outgrow your container.
* Bush vs. Vine: Look for bush varieties if possible. These tend to be more compact than vining types. If you opt for a vining variety, be prepared to provide support like a trellis or tomato cage.
* Days to Maturity: Check the seed packet for the “days to maturity.” Shorter maturity times are ideal for container gardening, especially if you have a shorter growing season.
Gathering Your Supplies
Okay, now for the fun part – gathering our supplies! Here’s what you’ll need:
* Large Container(s): This is crucial! Pumpkins need plenty of space for their roots to grow. I recommend a container that’s at least 24 inches in diameter and 18 inches deep. The bigger, the better, really. Think large resin pots, half whiskey barrels, or even sturdy plastic tubs. Make sure it has drainage holes!
* High-Quality Potting Mix: Don’t skimp on the potting mix! Use a well-draining, nutrient-rich mix specifically formulated for containers. Avoid using garden soil, as it can compact and hinder drainage. I like to add some compost to my potting mix for an extra boost of nutrients.
* Pumpkin Seeds: Choose your desired pumpkin variety and purchase seeds from a reputable source.
* Slow-Release Fertilizer: This will provide your pumpkins with a steady supply of nutrients throughout the growing season. Look for a fertilizer formulated for vegetables or flowering plants.
* Watering Can or Hose: Essential for keeping your pumpkins hydrated.
* Trowel or Shovel: For planting and transplanting.
* Optional: Trellis or Tomato Cage: If you’re growing a vining variety, you’ll need something for the vines to climb.
* Optional: Mulch: Mulch helps retain moisture and suppress weeds. Straw, wood chips, or shredded bark work well.
Planting Your Pumpkin Seeds
Alright, let’s get our hands dirty! Here’s how to plant your pumpkin seeds:
1. Prepare the Container: Fill your container with the potting mix, leaving a few inches of space at the top.
2. Sow the Seeds: Plant 2-3 seeds per container, about 1 inch deep. Space them a few inches apart. Planting multiple seeds ensures at least one will germinate.
3. Water Gently: Water the soil thoroughly but gently, being careful not to dislodge the seeds.
4. Provide Warmth: Pumpkins love warmth! Place your container in a sunny location where it will receive at least 6-8 hours of direct sunlight per day.
5. Keep the Soil Moist: Keep the soil consistently moist, but not waterlogged. Check the soil moisture daily and water when the top inch feels dry.
Caring for Your Pumpkin Plants
Once your pumpkin seedlings emerge, it’s time to provide them with the care they need to thrive.
1. Thin the Seedlings: Once the seedlings have developed a few true leaves, thin them to one plant per container. Choose the strongest, healthiest-looking seedling and snip off the others at the soil line.
2. Fertilize Regularly: Start fertilizing your pumpkin plants about two weeks after they emerge. Use a slow-release fertilizer according to the package directions. You can also supplement with a liquid fertilizer every few weeks.
3. Water Deeply: Water your pumpkin plants deeply and regularly, especially during hot, dry weather. Aim to water at the base of the plant to avoid wetting the foliage, which can lead to fungal diseases.
4. Provide Support (if needed): If you’re growing a vining variety, train the vines to climb a trellis or tomato cage. This will help keep the pumpkins off the ground and prevent them from rotting.
5. Pollination Assistance (if needed): Pumpkins have separate male and female flowers. Bees are usually responsible for pollination, but if you’re not seeing many bees in your area, you may need to hand-pollinate. To do this, use a small paintbrush to transfer pollen from the male flower to the female flower. Female flowers have a small, immature pumpkin at the base.
6. Pest and Disease Control: Keep an eye out for pests like squash bugs, squash vine borers, and aphids. You can control these pests with insecticidal soap or neem oil. Also, watch out for fungal diseases like powdery mildew. Improve air circulation and avoid overhead watering to prevent these diseases. If you spot any signs of disease, treat with a fungicide.
Harvesting Your Pumpkins
The moment we’ve all been waiting for – harvesting! Here’s how to know when your pumpkins are ready to pick:
1. Check the Color: The pumpkin should be a deep, rich color, typical of the variety you’re growing.
2. Tap the Pumpkin: A ripe pumpkin will sound hollow when you tap it.
3. Check the Stem: The stem should be dry and hard.
4. Harvest Carefully: Use a sharp knife or pruning shears to cut the pumpkin from the vine, leaving a few inches of stem attached. This will help prevent the pumpkin from rotting.
Troubleshooting Common Problems
Even with the best care, you might encounter some challenges along the way. Here are a few common problems and how to address them:
* Lack of Flowers: If your pumpkin plant isn’t producing flowers, it could be due to a lack of sunlight, nutrients, or water. Make sure your plant is getting enough sunlight, fertilize regularly, and water deeply.
* Flowers Dropping Off: If the flowers are dropping off before they can be pollinated, it could be due to a lack of pollinators or extreme temperatures. Try hand-pollinating the flowers and provide shade during the hottest part of the day.
* Rotting Pumpkins: If the pumpkins are rotting on the vine, it could be due to fungal diseases or pests. Improve air circulation, avoid overhead watering, and treat with a fungicide or insecticide as needed.
* Slow Growth: If your pumpkin plant is growing slowly, it could be due to a lack of nutrients or water. Fertilize regularly and water deeply.
Section: Maximizing Your Pumpkin Yield
Want to get the most pumpkins possible from your container garden? Here are a few extra tips:
* Choose a Sunny Location: Pumpkins need at least 6-8 hours of direct sunlight per day. The more sun, the better!
* Use a Large Container: The bigger the container, the more room the roots have to grow, and the more pumpkins your plant can produce.
* Fertilize Regularly: Pumpkins are heavy feeders, so fertilize them regularly with a balanced fertilizer.
* Water Deeply: Water deeply and regularly, especially during hot, dry weather.
* Prune the Vines: Pruning the vines can help direct the plant’s energy towards producing pumpkins. Remove any dead or yellowing leaves and any side shoots that are not producing flowers.
* Support the Pumpkins: As the pumpkins grow larger, they may need support to prevent them from breaking off the vine. You can use slings made from old t-shirts or pantyhose to support the pumpkins.
* Protect from Pests and Diseases: Keep an eye out for pests and diseases and take action to control them as soon as possible.
Section: Creative Container Ideas
Don’t feel limited to just plain pots! Get creative with your container choices. Here are a few ideas:
* Repurposed Items: Old bathtubs, galvanized tubs, and even large tires can make great pumpkin containers. Just make sure they have drainage holes.
* Stacked Containers: Create a tiered pumpkin garden by stacking different-sized containers on top of each other.
* Hanging Baskets: For smaller pumpkin varieties like ‘Jack Be Little,’ you can even try growing them in hanging baskets.
* Fabric Grow Bags: These are lightweight and breathable, making them a good option for container gardening.
Section: Extending the Growing Season
Conclusion
So, there you have it! Transforming a humble pumpkin into a vibrant, eye-catching container garden is not only surprisingly simple, but it’s also a fantastic way to embrace the autumn spirit and add a touch of whimsical charm to your porch, patio, or even your kitchen windowsill. Forget those generic plastic pots; this DIY pumpkin container gardening project is a guaranteed conversation starter and a unique expression of your personal style.
But why is this a must-try? Beyond the sheer novelty, consider the environmental benefits. You’re repurposing a seasonal item that might otherwise end up in the compost heap, giving it a second life as a beautiful home for your favorite plants. Plus, the pumpkin itself will eventually decompose, enriching the soil and providing valuable nutrients to your growing greens. It’s a win-win!
And the possibilities are truly endless. While we’ve focused on succulents and herbs, don’t be afraid to experiment! Imagine a miniature fall-themed flower arrangement bursting from a pumpkin, or a collection of colorful pansies adding a splash of vibrancy to your doorstep. You could even try planting cool-season vegetables like kale or spinach for a truly edible display.
For a more rustic look, consider leaving the pumpkin’s stem intact and allowing some of the natural imperfections to shine through. Or, for a more polished aesthetic, you can paint the pumpkin in a complementary color or add decorative embellishments like ribbons, stencils, or even small gourds. The only limit is your imagination!
Remember to adjust the size of your pumpkin and the type of plants you choose based on your available space and the amount of sunlight your location receives. Smaller pumpkins are perfect for indoor displays or apartment balconies, while larger pumpkins can accommodate a wider variety of plants and make a bold statement in larger outdoor spaces.
We’re confident that you’ll find this DIY project to be both rewarding and enjoyable. It’s a fantastic way to get creative, connect with nature, and add a touch of seasonal flair to your home. So, grab a pumpkin, gather your supplies, and get ready to unleash your inner gardener!
We can’t wait to see what you create! Don’t forget to share your pumpkin container gardening creations with us on social media using #PumpkinGardenDIY. We’re eager to see your unique interpretations and inspire others to try this fun and eco-friendly project. Happy gardening!
Frequently Asked Questions (FAQ)
How long will my pumpkin container garden last?
The lifespan of your pumpkin container garden depends on several factors, including the size of the pumpkin, the weather conditions, and the type of plants you’ve chosen. Generally, you can expect your pumpkin to last anywhere from a few weeks to a couple of months. Smaller pumpkins will decompose faster than larger ones. To prolong the life of your pumpkin, keep it out of direct sunlight and avoid overwatering. You can also apply a sealant to the inside of the pumpkin to help prevent it from rotting. Once the pumpkin starts to soften or show signs of decay, it’s time to transplant your plants into a more permanent container.
What type of plants are best for pumpkin container gardening?
The best plants for your pumpkin container garden are those that thrive in well-draining soil and don’t require a lot of space. Succulents and herbs are excellent choices, as they are relatively low-maintenance and can tolerate drier conditions. Other good options include:
* **Succulents:** Echeveria, Sedum, Sempervivum, Aloe
* **Herbs:** Thyme, Rosemary, Sage, Oregano, Mint (plant mint in a separate container to prevent it from spreading)
* **Flowers:** Pansies, Violas, Mums, Calendula
* **Vegetables:** Lettuce, Spinach, Kale, Radishes (for smaller pumpkins)
Consider the size of your pumpkin when choosing plants. Smaller pumpkins are best suited for smaller plants, while larger pumpkins can accommodate larger plants or a greater variety of plants.
How do I prepare the pumpkin for planting?
Preparing the pumpkin is a crucial step in ensuring the success of your container garden. First, carefully cut a hole in the top of the pumpkin, large enough to accommodate your plants. Remove the seeds and pulp from inside the pumpkin, scraping the sides clean. This will create a space for the soil and prevent the pumpkin from rotting too quickly. Be sure to create drainage holes at the bottom of the pumpkin to allow excess water to escape. You can use a drill or a sharp knife to create these holes.
What type of soil should I use?
Use a well-draining potting mix specifically designed for container gardening. Avoid using garden soil, as it can become compacted and prevent proper drainage. A good potting mix will provide the necessary nutrients for your plants and allow for adequate air circulation. You can also add some perlite or vermiculite to the potting mix to improve drainage.
How often should I water my pumpkin container garden?
Water your pumpkin container garden when the soil feels dry to the touch. Avoid overwatering, as this can lead to root rot. The frequency of watering will depend on the weather conditions, the type of plants you’ve chosen, and the size of your pumpkin. In general, you’ll need to water more frequently during hot, dry weather and less frequently during cool, wet weather.
Can I use a carved pumpkin for container gardening?
While you can technically use a carved pumpkin for container gardening, it’s not recommended. Carved pumpkins tend to decompose much faster than uncarved pumpkins, as the exposed flesh is more susceptible to rot. If you do choose to use a carved pumpkin, be sure to line the inside with plastic or a sealant to help prolong its life.
How do I prevent my pumpkin from rotting?
There are several things you can do to prevent your pumpkin from rotting:
* Choose a healthy, unblemished pumpkin.
* Keep the pumpkin out of direct sunlight.
* Avoid overwatering.
* Ensure proper drainage.
* Apply a sealant to the inside of the pumpkin.
* Consider using a faux pumpkin for a longer-lasting display.
Can I compost the pumpkin after I’m done with the container garden?
Yes, absolutely! Once your pumpkin container garden has reached the end of its life, you can compost the pumpkin along with the soil and any remaining plant material. The pumpkin will decompose and add valuable nutrients to your compost pile. Just be sure to remove any non-compostable materials, such as plastic liners or decorations. This makes DIY pumpkin container gardening an environmentally friendly choice.
What if I don’t have a garden? Can I still do this?
Absolutely! That’s one of the best things about this project. You don’t need a traditional garden to enjoy the beauty of plants. Pumpkin container gardens are perfect for balconies, patios, porches, windowsills, or even indoor spaces with sufficient sunlight. It’s a great way to bring a touch of nature into your home, regardless of your living situation.
Are there any safety precautions I should take?
When carving the pumpkin, use caution and supervise children closely. Use sharp tools carefully and consider wearing gloves to protect your hands. Also, be mindful of the weight of the filled pumpkin, especially if you’re placing it on a raised surface. Make sure the surface is sturdy enough to support the weight.
Leave a Comment