
Backyard melon growing tips are your ticket to juicy, sun-ripened sweetness right outside your door! Forget those bland, store-bought melons – imagine sinking your teeth into a perfectly ripe cantaloupe or watermelon that you nurtured from seed to table. Sounds dreamy, right?
For centuries, cultivating melons has been a cherished tradition across cultures. From ancient Egypt, where watermelons were buried with pharaohs, to the vibrant markets of Asia overflowing with honeydew and muskmelons, these fruits have always held a special place in our hearts (and stomachs!). I think it’s time we bring that tradition home!
But let’s be honest, growing melons can seem a little intimidating. They need space, sunshine, and a bit of know-how. That’s where these DIY tricks and hacks come in! I’m going to share my favorite, tried-and-true methods for maximizing your melon harvest, even if you have limited space or a less-than-perfect green thumb. With the right backyard melon growing tips, you can avoid common pitfalls like blossom-end rot, pest infestations, and underwhelming fruit. So, get ready to transform your backyard into a melon oasis – let’s get growing!
DIY Backyard Melon Oasis: From Seed to Sweetness
Hey there, fellow garden enthusiasts! I’m so excited to share my tried-and-true methods for growing juicy, delicious melons right in your own backyard. Forget those bland supermarket melons – with a little know-how, you can be enjoying homegrown sweetness all summer long. This guide is packed with tips and tricks I’ve learned over the years, so let’s get started!
Choosing Your Melon Variety
Before we even think about planting, we need to decide what kind of melon we want to grow. There are so many options, each with its own unique flavor and growing requirements. Here’s a quick rundown of some popular choices:
* Watermelon: The classic summer treat! Watermelons need plenty of space and sunshine. Consider smaller “icebox” varieties if you have limited space.
* Cantaloupe: These fragrant melons are relatively easy to grow and offer a delightful sweetness.
* Honeydew: Similar to cantaloupe in terms of growing requirements, honeydews have a smooth, pale green rind and a mild, refreshing flavor.
* Galia Melon: A cross between a cantaloupe and a honeydew, Galia melons are known for their distinctive netted rind and aromatic flesh.
* Casaba Melon: These melons have a teardrop shape, a smooth yellow rind, and a mild, slightly tangy flavor.
Important Considerations:
* Climate: Make sure the variety you choose is suitable for your climate. Some melons need a longer growing season than others.
* Space: Consider the size of your garden. Watermelons, in particular, need a lot of room to sprawl.
* Personal Preference: Ultimately, choose the melon you enjoy eating the most!
Preparing Your Melon Patch
Melons are sun-loving, nutrient-hungry plants, so proper soil preparation is crucial for success.
* Sunlight: Melons need at least 6-8 hours of direct sunlight per day. Choose a location in your yard that gets plenty of sun.
* Soil: Melons thrive in well-drained, fertile soil. Amend your soil with plenty of compost or well-rotted manure to improve drainage and add nutrients.
* pH: Melons prefer a slightly acidic soil pH of around 6.0 to 6.8. You can test your soil pH with a home testing kit or by sending a sample to your local agricultural extension office.
* Spacing: Give your melon plants plenty of room to grow. Watermelons need at least 3-4 feet between plants, while cantaloupes and honeydews can be spaced 2-3 feet apart.
Step-by-Step Soil Preparation:
1. Clear the Area: Remove any weeds, rocks, or debris from the planting area.
2. Amend the Soil: Spread a 2-3 inch layer of compost or well-rotted manure over the soil surface.
3. Till or Dig: Use a garden fork or tiller to incorporate the compost into the soil to a depth of 8-12 inches.
4. Create Mounds or Rows: Melons grow well on slightly raised mounds or rows. This helps improve drainage and warms the soil.
5. Water Thoroughly: Water the prepared soil thoroughly to settle it and provide moisture for the seedlings.
Starting Your Melon Seeds (Indoors or Outdoors)
You can start melon seeds indoors 3-4 weeks before the last expected frost, or you can direct sow them outdoors once the soil has warmed up to at least 70°F (21°C). I usually start mine indoors to get a head start on the growing season.
* Starting Indoors:
* Use peat pots or biodegradable pots to avoid disturbing the roots when transplanting.
* Fill the pots with a seed-starting mix.
* Sow 2-3 seeds per pot, about ½ inch deep.
* Water gently and keep the soil moist but not soggy.
* Place the pots in a warm, sunny location or under grow lights.
* Once the seedlings emerge, thin them to one plant per pot.
* Harden off the seedlings by gradually exposing them to outdoor conditions for a week before transplanting.
* Direct Sowing:
* Sow seeds directly into the prepared soil, about ½ inch deep.
* Space the seeds according to the recommended spacing for your chosen variety.
* Water gently and keep the soil moist.
* Thin the seedlings to one plant per spacing once they emerge.
Step-by-Step Seed Starting:
1. Gather Your Supplies: You’ll need seeds, seed-starting mix, pots (if starting indoors), a watering can, and a warm, sunny location or grow lights.
2. Sow the Seeds: Follow the instructions above for starting indoors or direct sowing.
3. Water Regularly: Keep the soil consistently moist but not waterlogged.
4. Provide Light: If starting indoors, provide adequate light with a sunny window or grow lights.
5. Thin Seedlings: Once the seedlings emerge, thin them to one plant per pot or spacing.
6. Harden Off (If Starting Indoors): Gradually expose the seedlings to outdoor conditions for a week before transplanting.
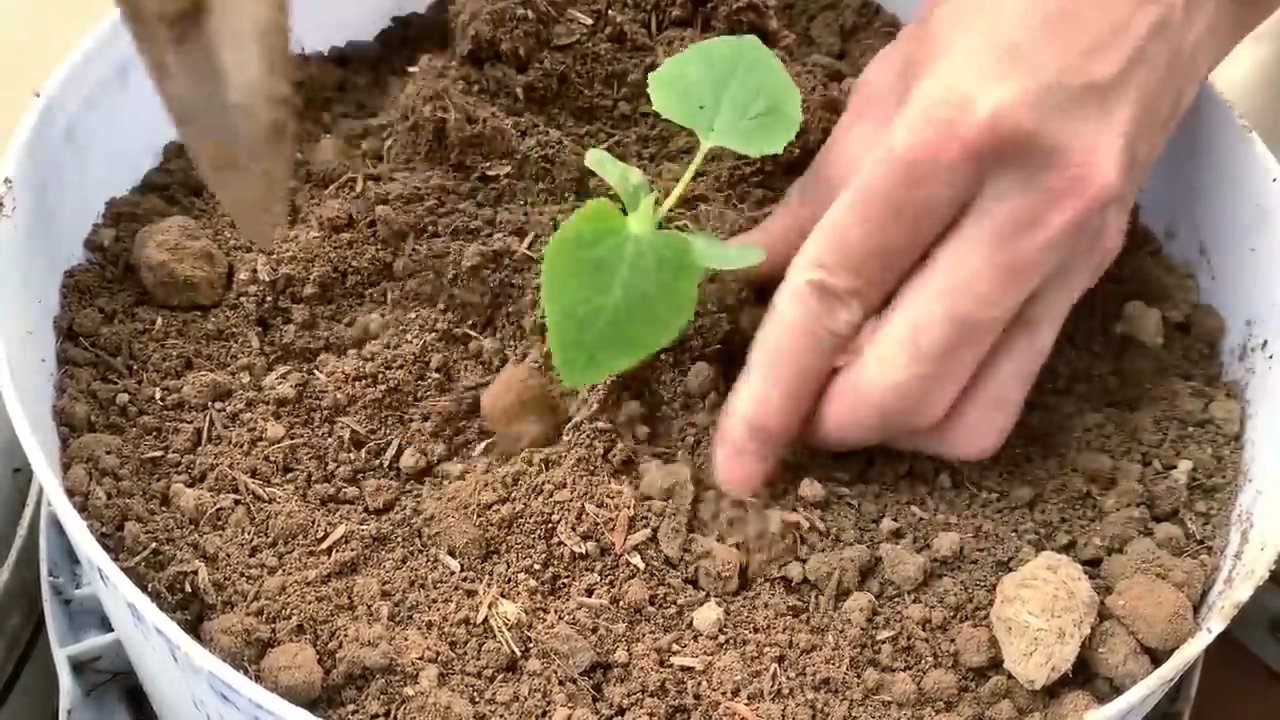
Transplanting Your Melon Seedlings
Once the danger of frost has passed and the soil has warmed up, it’s time to transplant your melon seedlings into the garden.
* Choose a Cloudy Day: Transplanting on a cloudy day will help reduce stress on the seedlings.
* Water the Seedlings: Water the seedlings thoroughly before transplanting.
* Dig Holes: Dig holes that are slightly larger than the root balls of the seedlings.
* Gently Remove Seedlings: Carefully remove the seedlings from their pots, being careful not to damage the roots.
* Place Seedlings in Holes: Place the seedlings in the holes, ensuring that the top of the root ball is level with the soil surface.
* Fill Holes with Soil: Fill the holes with soil and gently firm the soil around the seedlings.
* Water Thoroughly: Water the transplanted seedlings thoroughly.
* Mulch: Apply a layer of mulch around the plants to help retain moisture, suppress weeds, and regulate soil temperature. I like to use straw or shredded leaves.
Step-by-Step Transplanting:
1. Prepare the Planting Area: Make sure the soil is well-prepared and the planting area is ready.
2. Water Seedlings: Water the seedlings thoroughly before transplanting.
3. Dig Holes: Dig holes that are slightly larger than the root balls of the seedlings.
4. Remove Seedlings: Carefully remove the seedlings from their pots.
5. Place Seedlings: Place the seedlings in the holes.
6. Fill Holes: Fill the holes with soil and firm gently.
7. Water Thoroughly: Water the transplanted seedlings thoroughly.
8. Mulch: Apply a layer of mulch around the plants.
Caring for Your Melon Plants
Once your melon plants are established, it’s important to provide them with proper care to ensure a bountiful harvest.
* Watering: Melons need consistent moisture, especially during fruit development. Water deeply and regularly, especially during dry spells. Avoid overhead watering, as this can promote fungal diseases. Drip irrigation is ideal.
* Fertilizing: Melons are heavy feeders and benefit from regular fertilization. Use a balanced fertilizer or a fertilizer specifically formulated for melons. Follow the instructions on the fertilizer label. I like to side-dress my plants with compost tea every few weeks.
* Weeding: Keep the area around your melon plants free of weeds. Weeds compete with the melons for water and nutrients.
* Pest and Disease Control: Monitor your plants regularly for pests and diseases. Common melon pests include aphids, squash bugs, and cucumber beetles. Common diseases include powdery mildew and fusarium wilt. Use organic pest control methods whenever possible.
* Pollination: Melons require pollination to set fruit. If you’re not seeing any fruit developing, you may need to hand-pollinate the flowers. To hand-pollinate, use a small paintbrush to transfer pollen from the male flowers to the female flowers. Female flowers have a small fruit at the base of the flower.
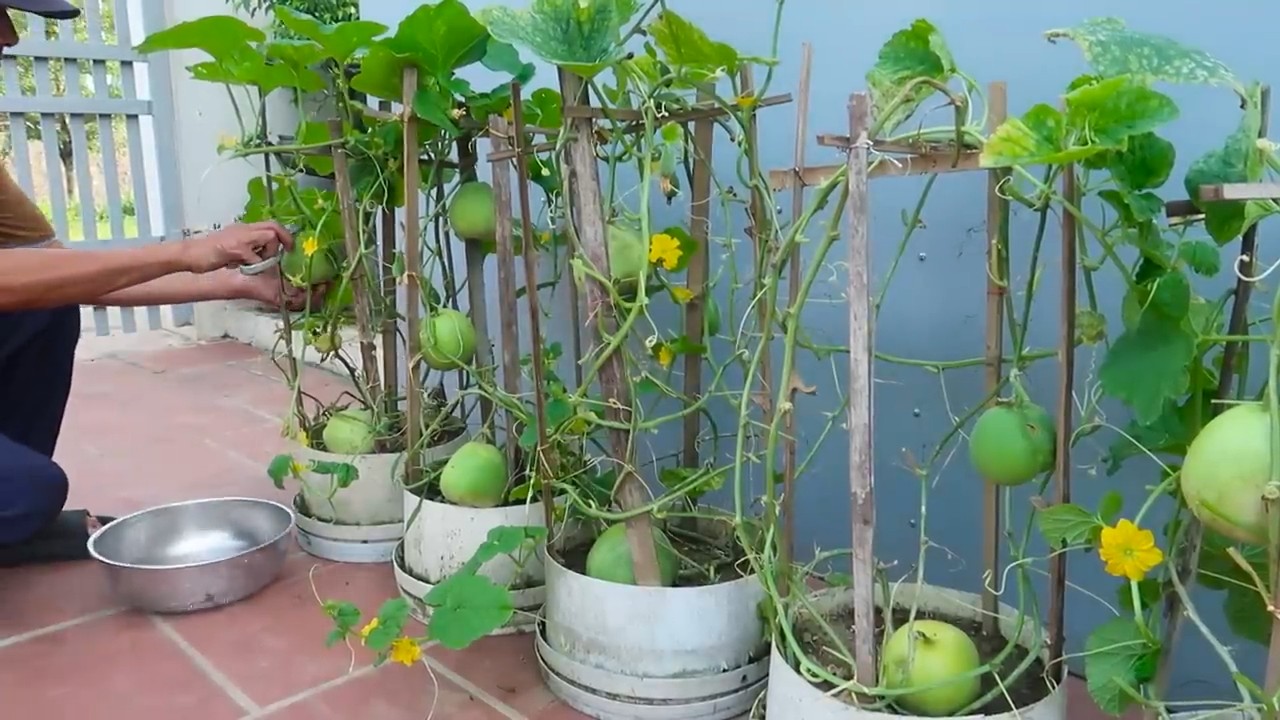
* Support: For smaller melon varieties, you can use trellises or cages to support the vines and keep the fruit off the ground. This can help prevent rot and improve air circulation.
Step-by-Step Melon Care:
1. Water Regularly: Water deeply and consistently, especially during dry spells.
2. Fertilize Regularly: Use a balanced fertilizer or compost tea.
3. Weed Regularly: Keep the area around the
Conclusion
So, there you have it! Mastering the art of backyard melon growing doesn’t require a sprawling farm or years of experience. With a few simple adjustments and this easy DIY trick, you can transform your garden into a melon paradise. We’ve shown you how to optimize your soil, provide the right support, and even create a microclimate that encourages those sweet, juicy fruits to flourish.
Why is this DIY approach a must-try? Because it empowers you to take control of your melon-growing journey. You’re not just passively waiting for nature to take its course; you’re actively creating the ideal environment for success. This method is particularly beneficial for those with limited space, as it maximizes yield and minimizes the risk of common melon-growing problems like ground rot and pest infestations. Plus, there’s immense satisfaction in knowing you nurtured these delicious treats from seed to table.
But the possibilities don’t end here! Feel free to experiment with different melon varieties. Try growing cantaloupe, honeydew, or even watermelon using this same technique. You can also adapt the support system to suit your specific needs and garden layout. For example, if you’re growing smaller melons, you might be able to use smaller, more discreet supports. If you’re in a particularly windy area, consider adding extra reinforcement to protect your precious melons.
Consider these variations to further enhance your backyard melon growing experience:
* Vertical Growing for Small Spaces: If you’re short on ground space, explore vertical growing options. Train your melon vines to climb a trellis or fence, providing support as they grow. This not only saves space but also improves air circulation, reducing the risk of fungal diseases.
* Companion Planting: Enhance your melon patch by incorporating companion plants. Marigolds, for example, deter pests, while basil can improve the flavor of your melons. Research which plants thrive alongside melons and create a mutually beneficial ecosystem in your garden.
* DIY Pollination: While bees are excellent pollinators, you can also hand-pollinate your melon flowers to ensure a higher fruit set. Use a small paintbrush to transfer pollen from the male flowers to the female flowers. This is especially helpful if you have limited bee activity in your area.
* Soil Amendments: Regularly amend your soil with compost or other organic matter to provide essential nutrients for your melon plants. A well-nourished plant is more resistant to pests and diseases and produces more flavorful fruit.
We are confident that this DIY trick will revolutionize your backyard melon growing efforts. Don’t be intimidated by the process; it’s easier than you think! The rewards – fresh, homegrown melons bursting with flavor – are well worth the effort.
So, what are you waiting for? Grab your seeds, gather your supplies, and get ready to embark on a melon-growing adventure. We can’t wait to hear about your success! Share your experiences, photos, and tips in the comments below. Let’s build a community of backyard melon enthusiasts and learn from each other. Happy growing!
Frequently Asked Questions (FAQ)
What kind of soil is best for growing melons?
Melons thrive in well-drained, sandy loam soil that is rich in organic matter. The ideal pH range is between 6.0 and 6.8. Before planting, amend your soil with compost, aged manure, or other organic materials to improve drainage and fertility. Avoid heavy clay soils, as they can retain too much water and lead to root rot. If you have clay soil, consider growing your melons in raised beds or containers filled with a suitable potting mix.
How often should I water my melon plants?
Melons need consistent watering, especially during fruit development. Water deeply and regularly, aiming for about 1-2 inches of water per week. Avoid overhead watering, as it can promote fungal diseases. Instead, use a soaker hose or drip irrigation to deliver water directly to the roots. Check the soil moisture regularly and adjust your watering schedule accordingly, depending on the weather conditions. During hot, dry periods, you may need to water more frequently.
When is the best time to plant melon seeds or transplants?
The best time to plant melon seeds or transplants is after the last frost, when the soil has warmed up to at least 65°F (18°C). Melons are warm-season crops and are sensitive to cold temperatures. Starting seeds indoors 4-6 weeks before the last frost can give you a head start. Harden off the seedlings gradually before transplanting them outdoors. In warmer climates, you can plant melons directly in the ground after the soil has warmed up.
How do I know when my melons are ripe?
Determining when a melon is ripe can be tricky, but there are several indicators to look for. For cantaloupes, the stem should slip easily from the vine with a gentle tug. The skin should also have a distinct aroma and a slight softening at the blossom end. For watermelons, look for a dull thud when you tap the melon. The tendril closest to the melon should also be brown and dry. The underside of the melon, where it rests on the ground, should be a creamy yellow color. Honeydew melons are ripe when the skin turns a pale yellow and feels slightly waxy.
What are some common pests and diseases that affect melons, and how can I prevent them?
Common pests that affect melons include aphids, squash bugs, cucumber beetles, and vine borers. Diseases include powdery mildew, fusarium wilt, and anthracnose. To prevent these problems, practice good garden hygiene, such as removing plant debris and weeds. Use row covers to protect young plants from pests. Encourage beneficial insects, such as ladybugs and lacewings, to control aphids. Choose disease-resistant melon varieties. Rotate your crops each year to prevent soilborne diseases from building up. If you encounter pests or diseases, treat them promptly with appropriate organic or chemical controls.
Can I grow melons in containers?
Yes, you can grow melons in containers, but you’ll need to choose a large container (at least 20 gallons) and a compact melon variety. Use a high-quality potting mix and provide adequate support for the vines. Water and fertilize regularly, as container-grown plants tend to dry out and deplete nutrients more quickly. Place the container in a sunny location that receives at least 6-8 hours of sunlight per day.
How do I prevent my melons from rotting on the ground?
Ground rot is a common problem with melons, especially in humid climates. To prevent it, elevate the melons off the ground by placing them on straw, wood, or plastic mulch. You can also use a trellis or other support system to keep the vines and fruits off the ground. Ensure good air circulation around the plants by spacing them properly and pruning excess foliage. Avoid overwatering, as this can create a damp environment that promotes fungal growth.
What kind of fertilizer should I use for my melon plants?
Melons benefit from a balanced fertilizer with a higher phosphorus content to promote fruit development. Use a fertilizer with an NPK ratio of 5-10-5 or 10-10-10. Apply the fertilizer according to the package instructions, typically every 2-3 weeks during the growing season. You can also supplement with compost tea or other organic fertilizers. Avoid over-fertilizing, as this can lead to excessive foliage growth and reduced fruit production.
How can I improve the flavor of my melons?
The flavor of your melons depends on several factors, including the variety, soil conditions, and weather. To improve the flavor, ensure that your plants receive adequate sunlight and water. Amend your soil with compost or other organic matter to provide essential nutrients. Avoid overwatering, as this can dilute the flavor. Harvest your melons at the peak of ripeness. Some gardeners also believe that stressing the plants slightly by withholding water a few days before harvest can concentrate the sugars and enhance the flavor.
Is backyard melon growing worth the effort?
Absolutely! While it requires some effort and attention, the reward of harvesting your own homegrown melons is well worth it. The flavor of a freshly picked melon from your garden is far superior to anything you can buy in the store. Plus, you’ll have the satisfaction of knowing that you nurtured these delicious fruits from seed to table. Backyard melon growing is a fun and rewarding experience that can bring joy and deliciousness to your life.


Leave a Comment