
Balcony container gardening red cabbage might sound intimidating, but trust me, it’s easier (and more rewarding!) than you think. Have you ever dreamed of snipping fresh, vibrant red cabbage right from your own balcony, ready to add a pop of color and nutrition to your salads or slaws? I know I have! And the best part? You don’t need acres of land to make it happen.
Container gardening, in general, has a rich history, dating back to ancient civilizations who utilized pots and planters to cultivate herbs and vegetables in limited spaces. Think of the Hanging Gardens of Babylon – a testament to the ingenuity of growing plants vertically and in containers! Today, this practice is more relevant than ever, especially for urban dwellers and those with limited garden space.
Why should you try this DIY project? Well, for starters, growing your own food is incredibly satisfying. Plus, you have complete control over what goes into your plants, ensuring you’re eating healthy, organic produce. And let’s be honest, store-bought red cabbage can sometimes be a bit bland. But when you grow your own, you’ll be amazed at the depth of flavor and the vibrant color. This DIY guide will provide you with all the tricks and hacks you need to successfully grow balcony container gardening red cabbage, even if you’re a complete beginner. So, grab your gardening gloves, and let’s get started!
DIY Balcony Container Gardening: Grow Your Own Red Cabbage!
Hey there, fellow balcony gardeners! I’m so excited to share my experience with growing red cabbage in containers. It’s surprisingly easy, rewarding, and adds a beautiful pop of color to your outdoor space. Plus, nothing beats the taste of homegrown veggies! This guide will walk you through every step, from choosing the right container to harvesting your vibrant red cabbage.
Choosing the Right Container and Soil
Before we even think about seeds, let’s talk about the foundation of our red cabbage garden: the container and the soil.
* Container Size: Red cabbage needs room to grow. I recommend a container that’s at least 12 inches in diameter and 12 inches deep. A 5-gallon bucket or a large planter pot works perfectly. Bigger is generally better, as it gives the roots more space to spread out and access nutrients.
* Drainage: This is crucial! Make sure your container has drainage holes. Cabbage doesn’t like sitting in soggy soil, which can lead to root rot. If your container doesn’t have holes, you can drill some yourself.
* Soil Type: Red cabbage thrives in well-draining, fertile soil. I prefer using a mix of:
* Potting mix (for good drainage)
* Compost (for nutrients)
* A little bit of perlite (to further improve drainage)
* You can buy pre-mixed potting soil specifically designed for vegetables, which is a convenient option.
Starting Your Red Cabbage Seeds (or Buying Seedlings)
You have two options here: starting from seeds or buying seedlings. Starting from seeds gives you more control and is generally cheaper, but it requires a bit more time and effort. Buying seedlings is faster and easier, but you’ll have less variety to choose from.
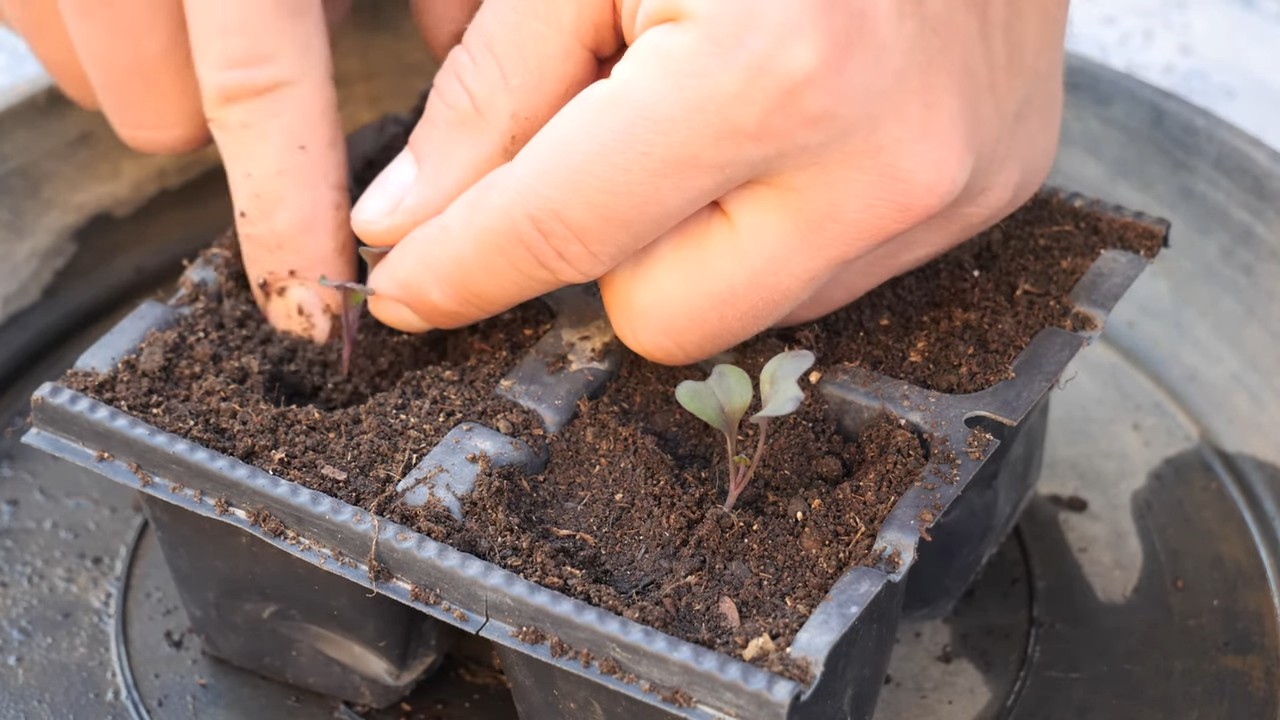
Starting from Seeds (Indoor Method)
1. Timing is Key: Start your seeds indoors about 6-8 weeks before the last expected frost in your area. This gives them a head start before transplanting them outdoors.
2. Seed Starting Trays: Use seed starting trays or small pots filled with seed starting mix. This mix is finer and easier for delicate seedlings to grow in.
3. Sowing the Seeds: Sow the seeds about ¼ inch deep and gently water them.
4. Warmth and Light: Keep the trays in a warm place (around 70-75°F) and provide plenty of light. A sunny windowsill might work, but I highly recommend using grow lights for consistent and strong growth.
5. Watering: Keep the soil consistently moist, but not soggy. Use a spray bottle to gently water the seedlings.
6. Thinning: Once the seedlings have their first true leaves (the second set of leaves), thin them out so that only the strongest seedling remains in each cell or pot.
7. Hardening Off: About a week before transplanting, gradually acclimate the seedlings to outdoor conditions. Start by placing them outside for an hour or two each day, increasing the time each day. This helps them adjust to the sun, wind, and temperature changes.
Buying Seedlings
1. Choose Healthy Seedlings: Look for seedlings that are vibrant green, sturdy, and free from pests or diseases. Avoid seedlings that are leggy (tall and spindly) or have yellowing leaves.
2. Check the Roots: Gently remove a seedling from its container and inspect the roots. They should be white or light brown and not root-bound (tightly circling the bottom of the container).
Transplanting Your Red Cabbage
Whether you started from seeds or bought seedlings, transplanting is a crucial step.
1. Prepare the Container: Fill your chosen container with the soil mix we discussed earlier.
2. Dig a Hole: Dig a hole in the center of the container that’s large enough to accommodate the root ball of the seedling.
3. Gently Remove the Seedling: Carefully remove the seedling from its tray or pot, being careful not to damage the roots.
4. Place the Seedling: Place the seedling in the hole and gently backfill with soil. Make sure the top of the root ball is level with the soil surface.
5. Water Thoroughly: Water the newly transplanted seedling thoroughly.
6. Mulch (Optional): Add a layer of mulch around the base of the plant to help retain moisture and suppress weeds. Straw, wood chips, or shredded leaves work well.
Caring for Your Red Cabbage
Now that your red cabbage is planted, it’s time to provide the care it needs to thrive.
* Sunlight: Red cabbage needs at least 6 hours of sunlight per day. Choose a sunny spot on your balcony.
* Watering: Water regularly, especially during hot, dry weather. The soil should be consistently moist, but not soggy. Check the soil moisture by sticking your finger about an inch deep. If it feels dry, it’s time to water.
* Fertilizing: Red cabbage is a heavy feeder, meaning it needs plenty of nutrients. Fertilize every 2-3 weeks with a balanced liquid fertilizer or compost tea. Follow the instructions on the fertilizer label.
* Pest Control: Keep an eye out for common cabbage pests like cabbage worms, aphids, and slugs.
* Cabbage Worms: These green caterpillars can quickly devour your cabbage leaves. Handpicking them off the plants is an effective method. You can also use Bacillus thuringiensis (Bt), a natural insecticide that’s safe for humans and pets.
* Aphids: These tiny insects suck the sap from plants. Spray them off with a strong stream of water or use insecticidal soap.
* Slugs: These slimy creatures can damage leaves and stems. Use slug bait or create a barrier around your plants with copper tape or diatomaceous earth.
* Weed Control: Remove any weeds that pop up in your container. Weeds compete with your cabbage for nutrients and water.
* Crop Rotation (Important for Future Seasons): While not immediately relevant to a single container, remember that in future seasons, avoid planting cabbage (or other brassicas like broccoli, cauliflower, kale) in the same container year after year. This helps prevent the buildup of soilborne diseases.
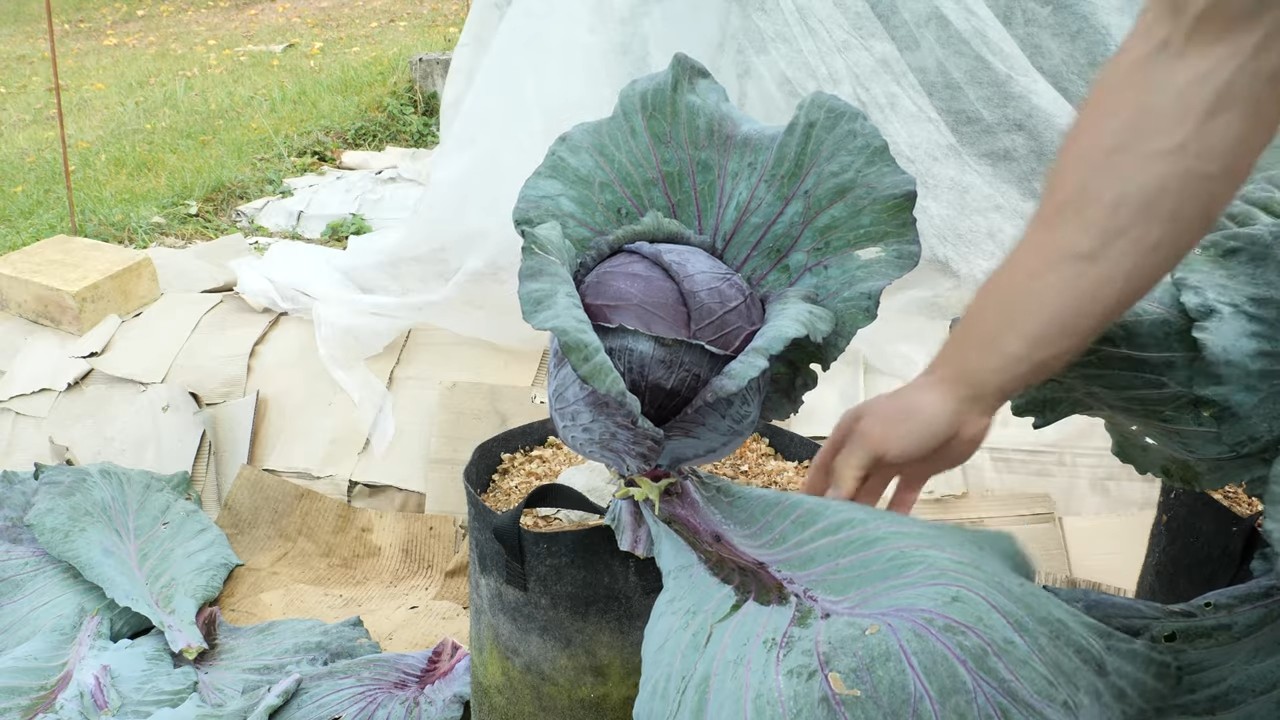
Harvesting Your Red Cabbage
The moment you’ve been waiting for! Harvesting your own red cabbage is incredibly satisfying.
1. Timing: Red cabbage is typically ready to harvest about 80-100 days after planting. The head should be firm and dense.
2. Check for Firmness: Gently squeeze the cabbage head. If it feels solid and compact, it’s ready to harvest.
3. Cut the Head: Use a sharp knife to cut the cabbage head from the stem, leaving a few outer leaves attached.
4. Enjoy Your Harvest: Bring your beautiful red cabbage indoors and enjoy it in salads, slaws, soups, or roasted dishes.
Troubleshooting
Even with the best care, you might encounter some challenges along the way. Here are a few common problems and how to address them:
* Yellowing Leaves: This could be a sign of overwatering, underwatering, or nutrient deficiency. Check the soil moisture and adjust your watering accordingly. Fertilize with a balanced fertilizer.
* Stunted Growth: This could be caused by poor soil, lack of sunlight, or pests. Make sure your soil is well-draining and fertile, and that your cabbage is getting enough sunlight. Check for pests and treat them accordingly.
* Splitting Heads: This can happen if the cabbage receives too much water after a period of drought. Water consistently and evenly.
* Bolting (Going to Seed): This can happen if the cabbage is exposed to prolonged periods of hot weather. Provide shade during the hottest part of the day.
Tips for Success
Here are a few extra tips to help you grow the best red cabbage possible:
* Choose the Right Variety: Some red cabbage varieties are better suited for container gardening than others. Look for compact varieties like ‘Red Express’ or ‘Ruby Perfection’.
* Succession Planting: Plant a few seeds or seedlings every few weeks to extend your harvest season.
* Companion Planting: Plant companion plants like marigolds, nasturtiums, or dill near your cabbage to help deter pests.
* Record Keeping: Keep a gardening journal to track your progress, successes, and failures. This will help you learn and improve your gardening skills over time.
Growing red cabbage on your balcony is a fun and rewarding experience. With a little bit of care and attention, you can enjoy fresh, homegrown cabbage all season long. Happy gardening!
Conclusion
So, there you have it! Transforming your balcony into a vibrant, edible landscape with container-grown red cabbage is not only achievable but also incredibly rewarding. We’ve explored the ins and outs of this DIY trick, from selecting the right containers and soil to nurturing your cabbage plants for optimal growth. But why is this a must-try?
First and foremost, growing your own red cabbage offers unparalleled freshness and flavor. Imagine harvesting a crisp, vibrant head of cabbage just moments before adding it to your salad or stir-fry. The taste difference compared to store-bought varieties is remarkable. Secondly, it’s an incredibly sustainable and eco-friendly practice. You’re reducing your carbon footprint by minimizing transportation and packaging waste. Plus, you have complete control over the growing process, ensuring that your cabbage is free from harmful pesticides and chemicals.
Beyond the practical benefits, balcony container gardening with red cabbage is a deeply satisfying experience. Witnessing the transformation from tiny seedlings to mature, colorful heads is a testament to your nurturing skills and a connection to the natural world. It’s a therapeutic activity that can reduce stress and improve your overall well-being.
But the beauty of this DIY project lies in its adaptability. Feel free to experiment with different container sizes and shapes to suit your balcony space. Consider companion planting with herbs like rosemary or thyme to deter pests and enhance the flavor of your cabbage. You can also try different varieties of red cabbage, such as ‘Red Acre’ for its compact size or ‘Ruby Perfection’ for its deep red color.
Don’t be afraid to get creative with your presentation. Use decorative pots and planters to add a touch of personality to your balcony garden. Arrange your containers in visually appealing ways to create a stunning focal point. You can even incorporate other edible plants like lettuce, spinach, or strawberries to create a diverse and productive balcony ecosystem.
We wholeheartedly encourage you to embark on this exciting journey of growing your own red cabbage in containers. It’s a simple, affordable, and incredibly rewarding way to connect with nature, enjoy fresh, healthy produce, and transform your balcony into a beautiful and functional space.
And now, we want to hear from you! Share your experiences, tips, and photos of your balcony container gardening red cabbage projects in the comments below. Let’s create a community of urban gardeners who are passionate about growing their own food and making the most of their limited spaces. What challenges did you face? What successes did you celebrate? Your insights can inspire and help others to embark on their own gardening adventures. Remember, every little bit helps in creating a more sustainable and flavorful world, one container of red cabbage at a time. So, grab your seeds, soil, and containers, and let’s get growing!
Frequently Asked Questions (FAQ)
What is the best time of year to plant red cabbage in containers?
The ideal time to plant red cabbage depends on your climate. In general, red cabbage thrives in cooler temperatures. For spring planting, start seeds indoors 6-8 weeks before the last expected frost. Transplant seedlings outdoors after the danger of frost has passed. For fall planting, start seeds indoors in mid-summer and transplant seedlings outdoors in late summer or early fall. This allows the cabbage to mature before the first hard frost. Check your local gardening resources for specific planting dates in your region.
What size container is needed for growing red cabbage?
Red cabbage requires a container that is at least 12 inches in diameter and 12 inches deep. A 5-gallon container is generally sufficient for one plant. Larger containers, such as half-barrels or large tubs, can accommodate multiple plants. Ensure that the container has adequate drainage holes to prevent waterlogging.
What type of soil is best for container-grown red cabbage?
Red cabbage prefers well-draining, fertile soil with a slightly acidic pH (6.0-6.8). A good potting mix for containers should consist of a blend of peat moss, perlite, and vermiculite. You can also add compost or aged manure to enrich the soil and provide essential nutrients. Avoid using garden soil in containers, as it can become compacted and hinder drainage.
How often should I water my container-grown red cabbage?
Water your red cabbage regularly, especially during hot and dry weather. The soil should be kept consistently moist but not waterlogged. Check the soil moisture by inserting your finger about an inch deep. If the soil feels dry, it’s time to water. Water deeply, allowing the water to drain out of the bottom of the container. Avoid overhead watering, as it can promote fungal diseases.
What are some common pests and diseases that affect red cabbage?
Common pests that affect red cabbage include cabbage worms, aphids, and flea beetles. Cabbage worms can be controlled by handpicking or using Bacillus thuringiensis (Bt), a natural insecticide. Aphids can be washed off with a strong stream of water or treated with insecticidal soap. Flea beetles can be deterred by using row covers or applying diatomaceous earth. Common diseases that affect red cabbage include black rot and clubroot. Prevent these diseases by using disease-resistant varieties, practicing crop rotation, and ensuring good drainage.
How much sunlight does red cabbage need?
Red cabbage requires at least 6 hours of direct sunlight per day. Choose a sunny location on your balcony for your containers. If your balcony receives less than 6 hours of sunlight, consider using grow lights to supplement the natural light.
How do I fertilize my container-grown red cabbage?
Fertilize your red cabbage every 2-3 weeks with a balanced fertilizer, such as 10-10-10. Follow the instructions on the fertilizer label for application rates. You can also use organic fertilizers, such as compost tea or fish emulsion. Avoid over-fertilizing, as it can lead to excessive foliage growth and reduced head formation.
When is red cabbage ready to harvest?
Red cabbage is typically ready to harvest 70-80 days after transplanting. The head should be firm and compact. To harvest, cut the head from the plant with a sharp knife, leaving a few outer leaves intact.
Can I grow red cabbage in the shade?
While red cabbage prefers full sun, it can tolerate partial shade. However, plants grown in partial shade may produce smaller heads and take longer to mature.
What are some companion plants for red cabbage?
Good companion plants for red cabbage include herbs like rosemary, thyme, and sage, which can deter pests. Other beneficial companion plants include marigolds, nasturtiums, and garlic. Avoid planting red cabbage near other members of the brassica family, such as broccoli, cauliflower, and kale, as they can attract the same pests and diseases.
Can I grow red cabbage indoors?
While it’s possible to grow red cabbage indoors, it requires a lot of light and space. You’ll need a large container, a strong grow light, and a well-ventilated area. It’s generally easier and more rewarding to grow red cabbage outdoors on a balcony or patio.
How do I store harvested red cabbage?
Store harvested red cabbage in the refrigerator for up to 2 weeks. Wrap the head in plastic wrap or store it in a plastic bag to prevent it from drying out. You can also shred or chop the cabbage and store it in an airtight container in the refrigerator.
Is red cabbage good for you?
Yes! Red cabbage is a nutritional powerhouse. It’s packed with vitamins, minerals, and antioxidants. It’s a good source of vitamin C, vitamin K, and fiber. Red cabbage also contains anthocyanins, which are powerful antioxidants that have been linked to various health benefits. Incorporating red cabbage into your diet can help boost your immune system, improve digestion, and protect against chronic diseases.

Leave a Comment