
Balcony pepper growing tips are your ticket to fresh, flavorful peppers right outside your door! Imagine plucking a ripe, juicy bell pepper or a fiery chili straight from your balcony garden – that’s the magic we’re unlocking today. For centuries, humans have cultivated peppers, tracing back to ancient civilizations in South America where they were not just food, but also medicine and even currency. Now, even without a sprawling backyard, you can participate in this rich history.
But why should you bother with balcony pepper growing? Well, store-bought peppers can be expensive and often lack the vibrant flavor of homegrown varieties. Plus, there’s something incredibly satisfying about nurturing a plant from seed to harvest. This DIY guide is packed with simple, effective balcony pepper growing tips and hacks that will help you overcome common challenges like limited space, sunlight, and pest control. I’m going to share my secrets to maximizing your yield and enjoying a bountiful pepper harvest, no matter how small your balcony is. Let’s get growing!
Balkon-Paprika-Paradies: Dein DIY-Guide für eine reiche Ernte
Hallo liebe Gartenfreunde! Ich liebe es, frische Zutaten direkt vor meiner Haustür zu haben, und Paprika sind da keine Ausnahme. Sie sind nicht nur unglaublich vielseitig in der Küche, sondern auch überraschend einfach auf dem Balkon anzubauen. In diesem Artikel zeige ich dir, wie du deinen eigenen Balkon in ein kleines Paprika-Paradies verwandelst. Keine Angst, auch wenn du keinen grünen Daumen hast, mit diesen Tipps und Tricks wirst du bald eine reiche Ernte genießen können!
Die richtige Paprika-Sorte wählen
Nicht jede Paprika-Sorte ist gleich gut für den Balkon geeignet. Einige wachsen riesig und brauchen viel Platz, während andere kompakter sind und sich in Töpfen wohler fühlen. Hier sind meine Empfehlungen:
* **Kompakte Sorten:** ‘Mini Bell’, ‘Snackpaprika’, ‘Jalapeño’ (für die Schärfe-Liebhaber!), ‘Patio Fire’ (Zierpaprika mit essbaren Früchten)
* **Buschige Sorten:** ‘California Wonder’, ‘Yolo Wonder’ (klassische Gemüsepaprika, die sich gut beschneiden lassen)
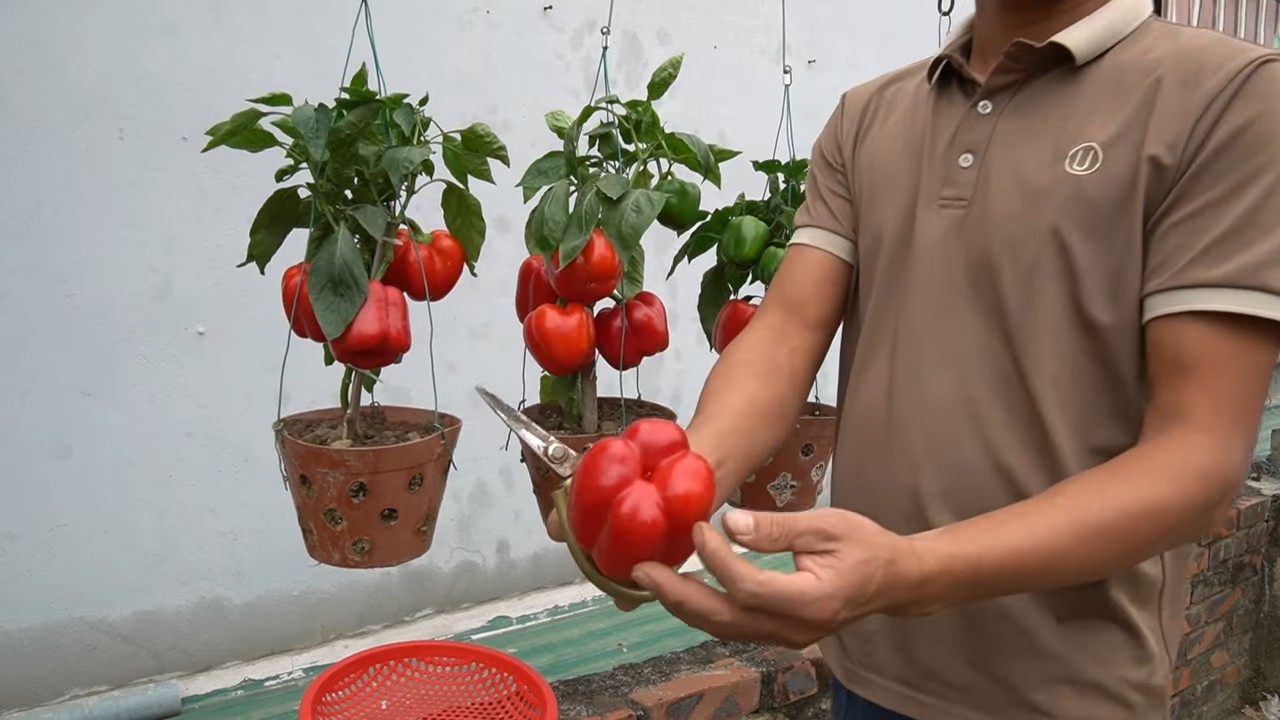
* **Hängepaprika:** Ideal für Ampeln, z.B. ‘Cascabella’
Tipp: Achte beim Kauf auf die Beschreibung der Sorte. Dort findest du Angaben zur Wuchshöhe und zum Platzbedarf.
Die Vorbereitung: Was du brauchst
Bevor wir loslegen, solltest du sicherstellen, dass du alles Notwendige zur Hand hast. Hier ist eine Liste:
* **Paprika-Samen oder Jungpflanzen:** Samen sind günstiger, aber Jungpflanzen sparen Zeit.
* **Töpfe oder Kübel:** Mindestens 10 Liter Volumen pro Pflanze, besser größer. Achte auf Abzugslöcher!
* **Hochwertige Pflanzerde:** Spezielle Gemüseerde ist ideal, da sie bereits mit Nährstoffen angereichert ist.
* **Dünger:** Flüssigdünger für Gemüse oder Langzeitdünger.
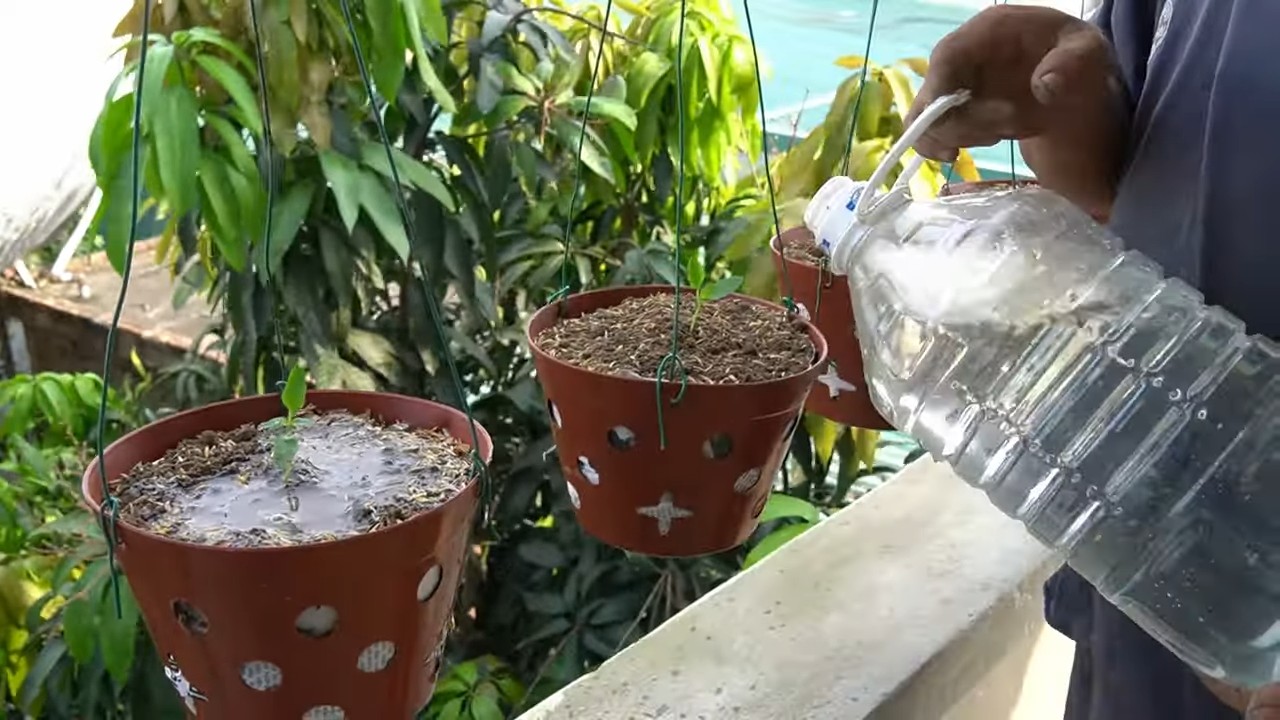
* **Gießkanne oder Gartenschlauch:** Zum Bewässern.
* **Pflanzstäbe oder Rankhilfen:** Für Sorten, die Unterstützung brauchen.
* **Schere oder Messer:** Zum Beschneiden.
* **Handschuhe:** Zum Schutz deiner Hände.
* **Optional: Anzuchttöpfe und Anzuchterde:** Wenn du deine Paprika selbst aus Samen ziehen möchtest.
Aussaat oder Kauf von Jungpflanzen?
Du hast die Wahl: Entweder du ziehst deine Paprika selbst aus Samen vor oder du kaufst bereits vorgezogene Jungpflanzen. Beide Optionen haben ihre Vor- und Nachteile.
* **Aussaat:**
* **Vorteile:** Günstiger, größere Sortenvielfalt, du hast den gesamten Prozess unter Kontrolle.
* **Nachteile:** Mehr Aufwand, dauert länger, Risiko des Misserfolgs.
* **Jungpflanzen:**
* **Vorteile:** Schnellere Ernte, weniger Aufwand, höhere Erfolgsquote.
* **Nachteile:** Teurer, geringere Sortenvielfalt.
Ich persönlich ziehe es vor, einen Teil meiner Paprika selbst auszusäen und einen Teil als Jungpflanzen zu kaufen. So habe ich eine größere Auswahl und kann den Anbauprozess besser kennenlernen.
Aussaat: Schritt für Schritt
Wenn du dich für die Aussaat entschieden hast, hier ist eine detaillierte Anleitung:
1. **Vorbereitung:** Fülle Anzuchttöpfe mit Anzuchterde. Befeuchte die Erde leicht.
2. **Aussaat:** Lege 1-2 Samen pro Topf auf die Erde. Bedecke die Samen mit einer dünnen Schicht Erde (ca. 0,5 cm).
3. **Bewässerung:** Befeuchte die Erde vorsichtig mit einer Sprühflasche. Vermeide Staunässe.
4. **Standort:** Stelle die Anzuchttöpfe an einen warmen und hellen Ort (z.B. Fensterbank). Die ideale Keimtemperatur liegt bei 22-25°C.
5. **Feuchtigkeit:** Halte die Erde feucht, aber nicht nass. Du kannst die Töpfe mit einer transparenten Folie oder einem Mini-Gewächshaus abdecken, um die Luftfeuchtigkeit zu erhöhen.
6. **Keimung:** Die Keimung dauert in der Regel 1-2 Wochen.
7. **Pikieren:** Sobald die Sämlinge 2-4 Blätter haben, kannst du sie in größere Töpfe pikieren. Verwende dafür Gemüseerde.
Pflanzung: Der Umzug auf den Balkon
Sobald die Jungpflanzen kräftig genug sind (ca. 15-20 cm hoch) und keine Frostgefahr mehr besteht (Mitte Mai), können sie auf den Balkon umziehen.
1. **Vorbereitung:** Fülle die Töpfe oder Kübel mit Gemüseerde.
2. **Pflanzung:** Grabe ein Loch, das groß genug für den Wurzelballen ist. Setze die Pflanze vorsichtig ein und fülle das Loch mit Erde auf. Drücke die Erde leicht an.
3. **Bewässerung:** Gieße die Pflanze gründlich an.
4. **Standort:** Stelle die Töpfe an einen sonnigen und windgeschützten Ort. Paprika lieben Wärme und Licht!
5. **Stütze:** Bei größeren Sorten solltest du Pflanzstäbe oder Rankhilfen anbringen, um die Pflanzen zu stützen.
Pflege: Damit deine Paprika sich wohlfühlen
Die richtige Pflege ist entscheidend für eine reiche Ernte. Hier sind die wichtigsten Punkte:
* **Bewässerung:** Paprika brauchen regelmäßig Wasser, besonders an heißen Tagen. Die Erde sollte immer leicht feucht sein, aber vermeide Staunässe. Gieße am besten morgens oder abends, wenn die Sonne nicht scheint.
* **Düngung:** Paprika sind Starkzehrer und brauchen regelmäßig Nährstoffe. Dünge sie alle 2-3 Wochen mit Flüssigdünger für Gemüse oder verwende Langzeitdünger.
* **Beschneiden:** Entferne regelmäßig Seitentriebe, die aus den Blattachseln wachsen. So förderst du die Bildung von Früchten. Bei buschigen Sorten kannst du auch die Triebspitzen einkürzen, um die Verzweigung anzuregen.
* **Schädlinge:** Kontrolliere deine Pflanzen regelmäßig auf Schädlinge wie Blattläuse oder Spinnmilben. Bei Befall kannst du natürliche Schädlingsbekämpfungsmittel einsetzen.
* **Bestäubung:** Paprika sind Selbstbestäuber, aber du kannst die Bestäubung unterstützen, indem du die Blüten leicht schüttelst.
Ernte: Der Lohn deiner Mühe
Endlich ist es soweit: Die Paprika sind reif und können geerntet werden!
* **Reife:** Die Reifezeit hängt von der Sorte ab. In der Regel sind Paprika reif, wenn sie ihre endgültige Farbe erreicht haben und sich leicht vom Stiel lösen lassen.
* **Ernte:** Schneide die Paprika mit einem scharfen Messer oder einer Schere ab.
* **Lagerung:** Frische Paprika halten sich im Kühlschrank einige Tage. Du kannst sie auch einfrieren oder einlegen.
Häufige Probleme und Lösungen
Auch beim Paprikaanbau auf dem Balkon können Probleme auftreten. Hier sind einige der häufigsten und wie du sie lösen kannst:
* **Gelbe Blätter:** Können ein Zeichen für Nährstoffmangel sein. Dünge deine Pflanzen regelmäßig.
* **Blattläuse:** Sprühe die Pflanzen mit einer Seifenlauge oder einem natürlichen Schädlingsbekämpfungsmittel ab.
* **Spinnmilben:** Erhöhe die Luftfeuchtigkeit und sprühe die Pflanzen mit Wasser ab.
* **Faule Früchte:** Können durch Staunässe oder Pilzbefall verursacht werden. Sorge für eine gute Drainage und entferne befallene Früchte.
* **Keine Früchte:** Kann an mangelnder Bestäubung oder zu wenig Sonne liegen. Schüttele die Blüten leicht und stelle die Pflanzen an einen sonnigeren Ort.
Extra-Tipps für eine noch bessere Ernte
* **Mulchen:** Bedecke die Erde mit einer Schicht Mulch (z.B. Stroh oder Rasenschnitt), um die Feuchtigkeit zu halten und Unkraut zu unterdrücken.
* **Begleitpflanzen:** Pflanze Basilikum oder Ringelblumen neben deine Paprika.
Conclusion
So, there you have it! Transforming your balcony into a thriving pepper paradise is not only achievable but incredibly rewarding. We’ve explored the ins and outs of balcony pepper growing, from selecting the right varieties and containers to mastering watering and fertilization techniques. But why is this DIY approach a must-try?
Firstly, growing your own peppers offers unparalleled freshness and flavor. Imagine plucking a sun-ripened jalapeno straight from the plant to add a fiery kick to your homemade salsa, or snipping a sweet bell pepper for a vibrant salad. The taste difference between homegrown and store-bought peppers is simply undeniable. You control the entire process, ensuring that your peppers are free from harmful pesticides and bursting with natural goodness.
Secondly, balcony pepper growing is a fantastic way to connect with nature, even in the heart of the city. Nurturing your plants, watching them grow, and harvesting your own food is a deeply satisfying experience that can reduce stress and improve your overall well-being. It’s a mini-garden oasis right outside your door!
Thirdly, it’s a cost-effective way to enjoy fresh peppers. While there’s an initial investment in seeds, containers, and soil, you’ll quickly recoup your expenses as you harvest a bountiful crop of peppers throughout the growing season. Plus, you can save seeds from your best peppers to grow even more plants next year, creating a sustainable cycle of deliciousness.
But the benefits don’t stop there. Balcony pepper growing is also a great way to add beauty and vibrancy to your outdoor space. Pepper plants come in a wide range of colors, shapes, and sizes, so you can create a visually stunning display that will impress your neighbors and brighten your day.
Ready to take your balcony pepper growing to the next level? Consider experimenting with different pepper varieties to find your favorites. Try growing a mix of sweet, mild, and hot peppers to cater to all your culinary needs. You can also explore companion planting, pairing your peppers with herbs like basil or marigolds to deter pests and improve growth.
For those with limited space, consider growing peppers in hanging baskets or vertical planters. This is a great way to maximize your growing area and add visual interest to your balcony. You can also try growing peppers indoors during the winter months to extend your growing season.
Don’t be afraid to get creative and personalize your balcony pepper garden to suit your own tastes and preferences. The possibilities are endless!
We encourage you to embark on your own balcony pepper growing adventure and share your experiences with us. Post photos of your pepper plants, share your tips and tricks, and let us know what varieties you’re growing. Together, we can create a community of balcony pepper enthusiasts and inspire others to discover the joys of growing their own food. So, grab your seeds, get your hands dirty, and get ready to enjoy the delicious rewards of balcony pepper growing! This is more than just a hobby; it’s a lifestyle.
Share Your Success!
We’d love to see your balcony pepper gardens in action! Use #BalconyPepperPower on social media to share your photos and tips. Let’s build a community of thriving balcony gardeners!
Frequently Asked Questions (FAQ)
What are the best pepper varieties to grow on a balcony?
Choosing the right pepper varieties is crucial for successful balcony pepper growing. Compact varieties that don’t grow too tall are ideal. Some excellent choices include:
* **Bell Peppers:** These are a classic choice, offering a mild, sweet flavor. Look for varieties like ‘Mini Bell’ or ‘Patio Bell’ that are specifically bred for container gardening.
* **Jalapenos:** These peppers are relatively easy to grow and produce a good yield. ‘Early Jalapeno’ is a popular choice for its early maturity.
* **Serrano Peppers:** If you prefer a bit more heat, serrano peppers are a great option. They are compact and productive.
* **Cayenne Peppers:** These long, thin peppers are perfect for drying and making your own chili powder. They are also relatively easy to grow in containers.
* **Thai Peppers:** For those who love intense heat, Thai peppers are a must-try. They are small but pack a powerful punch.
* **Sweet Banana Peppers:** These mild, slightly sweet peppers are great for pickling or adding to salads.
Consider your climate and personal preferences when selecting your pepper varieties. Research the specific needs of each variety to ensure optimal growth.
What size containers should I use for balcony pepper growing?
The size of the container depends on the pepper variety you’re growing. As a general rule, aim for a container that is at least 12 inches in diameter and 12 inches deep. Larger containers are always better, as they provide more room for the roots to grow and hold more moisture.
For smaller pepper varieties like Thai peppers or ornamental peppers, you can get away with using smaller containers, such as 8-inch pots. However, for larger varieties like bell peppers or jalapenos, a 5-gallon container is recommended.
Ensure that your containers have drainage holes to prevent waterlogging, which can lead to root rot. You can also add a layer of gravel or pebbles to the bottom of the container to improve drainage.
What type of soil is best for balcony pepper growing?
Peppers thrive in well-draining, nutrient-rich soil. A good potting mix is essential for successful balcony pepper growing. Avoid using garden soil, as it can be too heavy and compact for containers.
Look for a potting mix that contains a blend of peat moss, perlite, and vermiculite. These ingredients provide good drainage, aeration, and water retention. You can also amend your potting mix with compost or aged manure to add extra nutrients.
Consider using a potting mix specifically formulated for vegetables or tomatoes, as these mixes are often enriched with nutrients that peppers need.
How often should I water my balcony pepper plants?
Watering frequency depends on several factors, including the weather, the size of the container, and the type of soil you’re using. As a general rule, water your pepper plants when the top inch of soil feels dry to the touch.
During hot, sunny weather, you may need to water your plants daily. In cooler weather, you can water them every few days. Avoid overwatering, as this can lead to root rot.
When watering, water deeply until the water drains out of the drainage holes. This ensures that the roots are thoroughly saturated.
How much sunlight do balcony pepper plants need?
Peppers need at least 6-8 hours of direct sunlight per day to thrive. Choose a location on your balcony that receives plenty of sunlight. If your balcony doesn’t get enough direct sunlight, you can supplement with grow lights.
How do I fertilize my balcony pepper plants?
Peppers are heavy feeders and require regular fertilization to produce a good yield. Start fertilizing your plants a few weeks after transplanting them into their containers.
Use a balanced fertilizer with an NPK ratio of 10-10-10 or 14-14-14. You can also use a fertilizer specifically formulated for vegetables or tomatoes.
Fertilize your plants every 2-3 weeks during the growing season. Follow the instructions on the fertilizer package for proper application rates.
How do I protect my balcony pepper plants from pests and diseases?
Balcony pepper plants can be susceptible to various pests and diseases, including aphids, spider mites, whiteflies, and fungal diseases.
To prevent pest and disease problems, inspect your plants regularly for signs of infestation or disease. Remove any affected leaves or plants immediately.
You can also use organic pest control methods, such as insecticidal soap or neem oil, to control pests. To prevent fungal diseases, ensure that your plants have good air circulation and avoid overwatering.
When should I harvest my balcony peppers?
The harvesting time depends on the pepper variety and your personal preferences. Bell peppers are typically harvested when they are fully colored and firm to the touch. Jalapenos are usually harvested when they are green and about 2-3 inches long.
Use a sharp knife or scissors to cut the peppers from the plant, leaving a small stem attached.
Can I grow peppers indoors during the winter?
Yes, you can grow peppers indoors during the winter, but you’ll need to provide them with adequate light and warmth. Place your pepper plants in a sunny window or under grow lights. Keep the temperature between 65-75°F.
You may also need to hand-pollinate your pepper plants indoors, as there will be no bees or other pollinators to do the job.
Leave a Comment