
Beginner Tomato Growing Method: Dreaming of juicy, sun-ripened tomatoes bursting with flavor, fresh from your own backyard? You’re not alone! For centuries, cultures around the globe have cherished the tomato, from its origins in South America to its adoption as a culinary staple worldwide. But let’s be honest, the thought of growing your own can feel a little daunting, especially if you’re a beginner.
That’s where this DIY guide comes in! Forget complicated gardening jargon and endless research. I’m going to share a simple, step-by-step beginner tomato growing method that will have you harvesting delicious tomatoes in no time, even if you’ve never touched a trowel before.
Why do you need this? Because store-bought tomatoes simply can’t compare to the taste of homegrown. Plus, gardening is a fantastic way to de-stress, connect with nature, and enjoy the satisfaction of nurturing something from seed to table. So, ditch the grocery store tomatoes and get ready to embark on a rewarding gardening adventure! Let’s get started!
Tomatenanbau für Anfänger: Mein kinderleichter DIY-Guide für eine reiche Ernte
Hallo liebe Gartenfreunde! Ich bin so aufgeregt, euch heute meine super einfache Methode für den Tomatenanbau zu zeigen. Keine Angst, auch wenn ihr absolute Anfänger seid, werdet ihr mit dieser Anleitung eine tolle Ernte einfahren. Ich verspreche es! Wir werden uns Schritt für Schritt durch den Prozess arbeiten, von der Aussaat bis zur Ernte. Los geht’s!
Was du brauchst: Die Einkaufsliste
Bevor wir loslegen, hier eine Liste mit allem, was du für dein Tomatenabenteuer benötigst:
* Tomatensamen: Wähle deine Lieblingssorten! Achte darauf, dass sie für dein Klima geeignet sind. Ich liebe Cherrytomaten und San Marzano für Soßen.
* Anzuchterde: Diese Erde ist speziell für junge Pflanzen formuliert und enthält die richtigen Nährstoffe. Normale Blumenerde ist oft zu reichhaltig.
* Anzuchttöpfe oder -schalen: Kleine Töpfe oder Schalen mit Drainagelöchern sind ideal. Du kannst auch Eierkartons oder Joghurtbecher verwenden (mit Löchern!).
* Mini-Gewächshaus oder Klarsichtfolie: Um die Feuchtigkeit zu halten und die Keimung zu beschleunigen.
* Pikierstab oder Löffel: Zum vorsichtigen Vereinzeln der Sämlinge.
* Blumenerde: Für das Umpflanzen in größere Töpfe oder ins Freiland.
* Tomatenstäbe oder -gitter: Um die Pflanzen zu stützen, sobald sie größer werden.
* Tomatendünger: Speziell für Tomaten formuliert, um eine reiche Ernte zu fördern.
* Gießkanne oder Sprühflasche: Für die Bewässerung.
* Geduld und Liebe: Das Wichtigste!
Phase 1: Die Aussaat – Der Start in dein Tomatenparadies
Die Aussaat ist der erste Schritt und eigentlich ganz einfach. Ich mache das immer im Haus, damit die kleinen Pflänzchen einen guten Start haben.
1. Vorbereitung der Anzuchttöpfe: Fülle deine Anzuchttöpfe oder -schalen mit Anzuchterde. Drücke die Erde leicht an, aber nicht zu fest.
2. Aussaat der Samen: Lege 2-3 Samen pro Topf oder Zelle. Die Samen sollten etwa 0,5-1 cm tief in die Erde.
3. Bedecken der Samen: Bedecke die Samen vorsichtig mit einer dünnen Schicht Anzuchterde.
4. Bewässerung: Befeuchte die Erde mit einer Sprühflasche. Die Erde sollte feucht, aber nicht nass sein.
5. Abdeckung: Stelle die Töpfe in ein Mini-Gewächshaus oder decke sie mit Klarsichtfolie ab. Das sorgt für eine hohe Luftfeuchtigkeit, die die Keimung fördert.
6. Standort: Stelle das Gewächshaus oder die abgedeckten Töpfe an einen warmen, hellen Ort. Eine Fensterbank ist ideal. Vermeide direkte Sonneneinstrahlung, da die Erde sonst zu schnell austrocknet.
7. Geduld haben: Jetzt heißt es warten! Die Keimung dauert in der Regel 7-14 Tage. Achte darauf, dass die Erde immer feucht bleibt. Lüfte das Gewächshaus oder die Folie regelmäßig, um Schimmelbildung zu vermeiden.
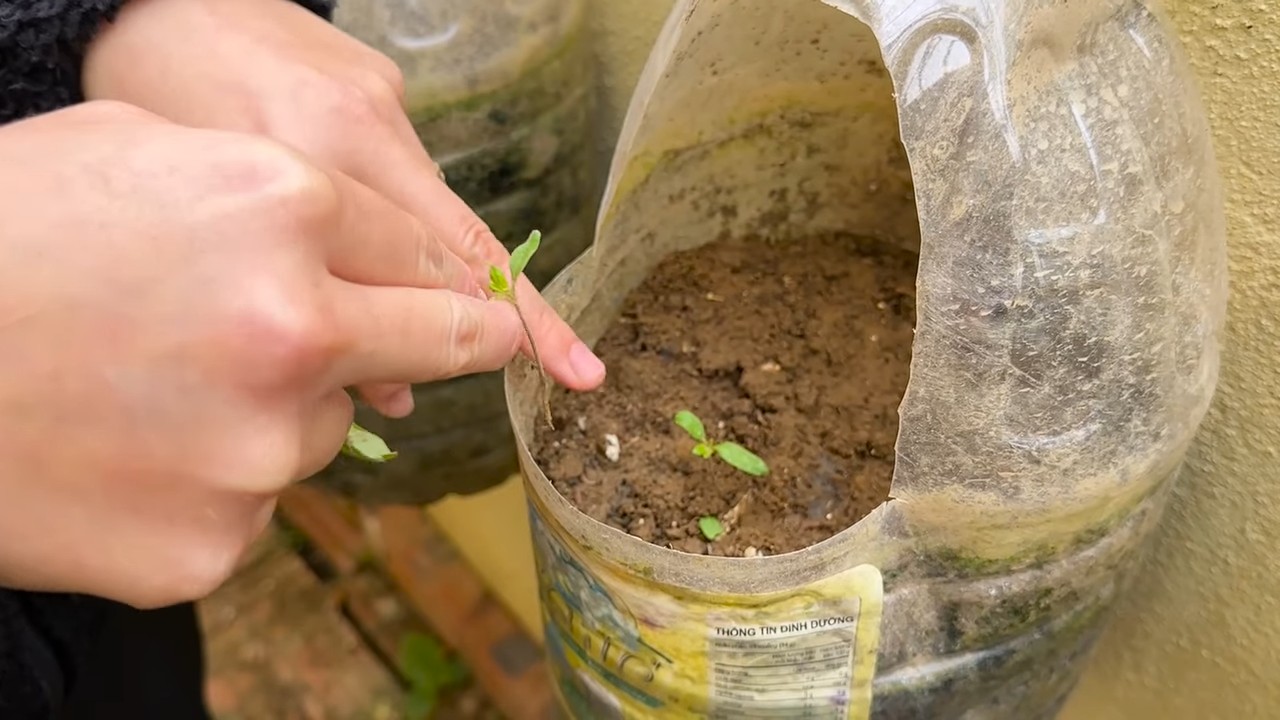
Phase 2: Pikieren – Den kleinen Tomaten mehr Raum geben
Sobald die ersten Blätter (die sogenannten Keimblätter) zu sehen sind und sich die ersten “echten” Blätter entwickeln, ist es Zeit zum Pikieren. Das bedeutet, dass wir die kleinen Pflänzchen vereinzeln und in größere Töpfe umsetzen.
1. Vorbereitung der neuen Töpfe: Fülle größere Töpfe (ca. 8-10 cm Durchmesser) mit Blumenerde.
2. Vorsichtiges Ausheben: Befeuchte die Erde in den Anzuchttöpfen leicht. Löse dann vorsichtig die kleinen Tomatenpflanzen mit einem Pikierstab oder Löffel aus der Erde. Versuche, die Wurzeln so wenig wie möglich zu beschädigen.
3. Vereinzeln: Wähle die kräftigste Pflanze pro Topf aus. Wenn mehrere Samen gekeimt sind, kannst du die schwächeren Pflanzen entfernen.
4. Einsetzen in die neuen Töpfe: Mache ein Loch in die Blumenerde in den neuen Töpfen. Setze die Tomatenpflanze vorsichtig hinein und fülle das Loch mit Erde auf. Die Pflanze kann etwas tiefer gesetzt werden als zuvor, das fördert die Wurzelbildung.
5. Bewässerung: Gieße die Pflanzen vorsichtig an.
6. Standort: Stelle die pikierten Tomaten an einen hellen, aber nicht zu sonnigen Ort.
7. Pflege: Gieße die Pflanzen regelmäßig und dünge sie nach etwa zwei Wochen mit einem flüssigen Tomatendünger.
Phase 3: Abhärten – Vorbereitung auf das Leben im Freien
Bevor du deine Tomatenpflanzen ins Freiland pflanzt, musst du sie an die Bedingungen draußen gewöhnen. Das nennt man Abhärten.
1. Beginne langsam: Stelle die Pflanzen tagsüber für ein paar Stunden ins Freie, an einen geschützten Ort ohne direkte Sonneneinstrahlung.
2. Steigere die Zeit: Verlängere die Zeit im Freien jeden Tag um ein paar Stunden.
3. Achte auf das Wetter: Vermeide es, die Pflanzen bei starkem Wind, Regen oder Frost ins Freie zu stellen.
4. Nach einer Woche: Nach etwa einer Woche sollten die Pflanzen an die Bedingungen draußen gewöhnt sein und können ins Freiland gepflanzt werden.
Phase 4: Auspflanzen – Ab ins Tomatenbeet!
Jetzt kommt der spannende Teil: Das Auspflanzen ins Freiland!
1. Wähle den richtigen Zeitpunkt: Warte, bis keine Frostgefahr mehr besteht. In der Regel ist das Mitte Mai nach den Eisheiligen.
2. Vorbereitung des Beetes: Wähle einen sonnigen Standort mit gut durchlässigem Boden. Lockere den Boden auf und reicher ihn mit Kompost oder organischem Dünger an.
3. Pflanzabstand: Halte einen Pflanzabstand von etwa 50-60 cm zwischen den Pflanzen ein.
4. Pflanzlöcher: Grabe Pflanzlöcher, die etwas größer sind als die Töpfe.
5. Einsetzen der Pflanzen: Nimm die Tomatenpflanzen vorsichtig aus den Töpfen und setze sie in die Pflanzlöcher. Die Pflanzen können etwas tiefer gesetzt werden als zuvor.
6. Auffüllen: Fülle die Pflanzlöcher mit Erde auf und drücke sie leicht an.
7. Bewässerung: Gieße die Pflanzen gründlich an.
8. Stütze: Setze Tomatenstäbe oder -gitter neben die Pflanzen, um sie zu stützen.
9. Mulchen: Bedecke den Boden um die Pflanzen mit Mulch (z.B. Stroh oder Rasenschnitt). Das hält die Feuchtigkeit im Boden und unterdrückt Unkraut.
Phase 5: Pflege – Damit deine Tomaten prächtig gedeihen
Die Pflege ist entscheidend für eine reiche Ernte. Hier sind ein paar Tipps:
* Bewässerung: Gieße die Tomaten regelmäßig, besonders bei trockenem Wetter. Gieße am besten morgens, damit die Blätter über den Tag abtrocknen können. Vermeide es, die Blätter zu gießen, da dies Pilzkrankheiten fördern kann.
* Düngung: Dünge die Tomaten regelmäßig mit einem Tomatendünger. Befolge die Anweisungen auf der Packung.
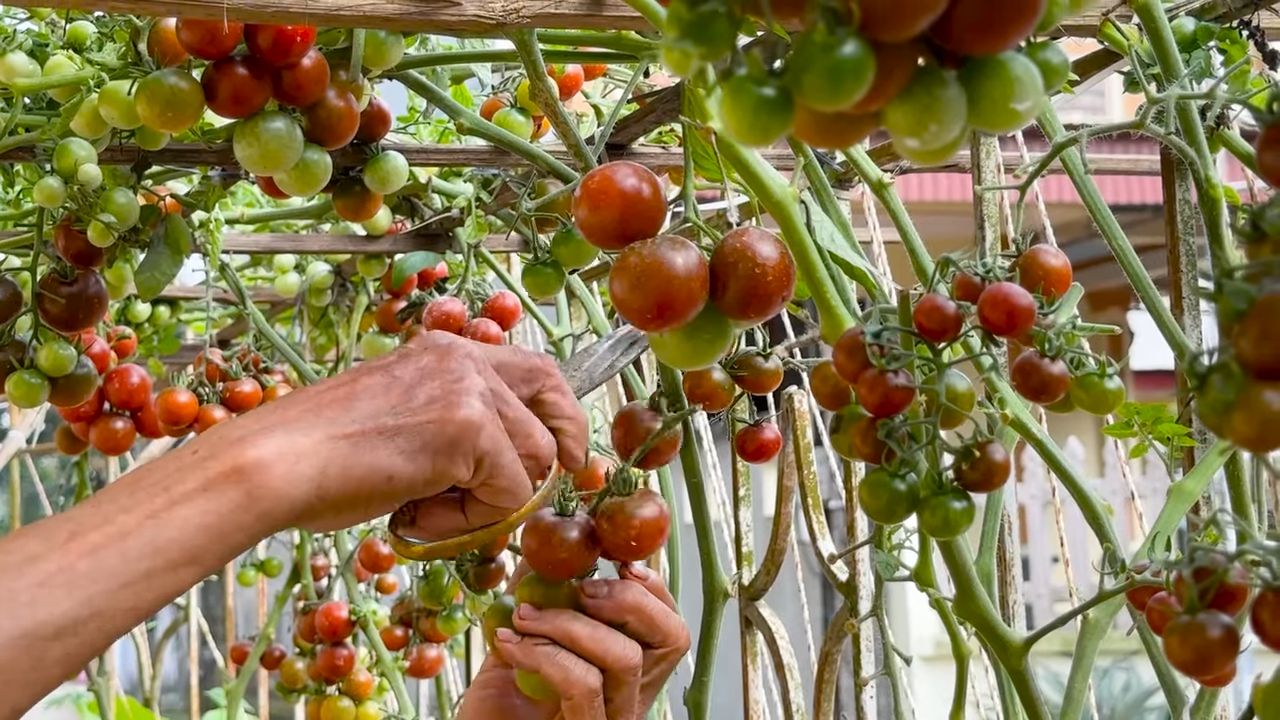
* Ausgeizen: Entferne regelmäßig die Seitentriebe (Geiztriebe), die sich in den Blattachseln bilden. Das fördert das Wachstum der Haupttriebe und sorgt für eine bessere Belüftung der Pflanzen.
* Krankheiten und Schädlinge: Achte auf Anzeichen von Krankheiten oder Schädlingen. Bei Bedarf kannst du biologische Pflanzenschutzmittel einsetzen.
* Belüftung: Sorge für eine gute Belüftung der Pflanzen, indem du sie regelmäßig auslichtest.
Phase 6
Conclusion
So, there you have it! This beginner tomato growing method isn’t just about planting seeds and hoping for the best; it’s about creating a thriving environment where your tomato plants can flourish, even if you’re a complete novice. We’ve walked through the essential steps, from selecting the right variety and preparing your soil to providing consistent care and addressing common problems. The beauty of this approach lies in its simplicity and adaptability. It’s designed to be accessible to everyone, regardless of their gardening experience or the size of their growing space.
Why is this DIY trick a must-try? Because it empowers you to grow your own delicious, sun-ripened tomatoes, bursting with flavor that you simply can’t find in store-bought varieties. Imagine the satisfaction of harvesting your first juicy tomato, knowing that you nurtured it from a tiny seed into a bountiful fruit. Beyond the taste, you’ll also gain a deeper appreciation for the natural world and the process of growing your own food. Plus, you’ll be reducing your carbon footprint by avoiding the transportation and packaging associated with commercially grown tomatoes.
But the journey doesn’t end here! Feel free to experiment with different tomato varieties to discover your favorites. Try adding companion plants like basil or marigolds to your tomato patch to deter pests and attract beneficial insects. You can also explore different methods of staking or caging your tomato plants to provide support and prevent them from sprawling. Consider using a DIY compost tea to give your plants an extra boost of nutrients.
Don’t be afraid to get your hands dirty and embrace the learning process. Gardening is all about trial and error, and every mistake is an opportunity to learn and grow. The most important thing is to have fun and enjoy the journey.
We’re confident that this beginner tomato growing method will set you up for success. But we also want to hear from you! Share your experiences, tips, and photos in the comments below. Let us know what worked well for you, what challenges you faced, and any variations you tried. Together, we can create a community of tomato growers who are passionate about sharing their knowledge and helping each other succeed.
So, grab your seeds, prepare your soil, and get ready to embark on a rewarding gardening adventure. Your own homegrown tomatoes are just a few steps away! We can’t wait to see what you grow. Happy gardening!
Frequently Asked Questions (FAQ)
What are the best tomato varieties for beginners?
Choosing the right tomato variety is crucial for success, especially for beginners. Determinate varieties, like Roma or Celebrity, are generally easier to manage because they grow to a specific size and produce their fruit all at once. This makes them ideal for container gardening or smaller spaces. Indeterminate varieties, such as cherry tomatoes or beefsteak tomatoes, continue to grow and produce fruit throughout the season, but they require more staking and pruning. For beginners, we recommend starting with determinate varieties to gain confidence and experience before moving on to more demanding indeterminate types. Consider your local climate and growing conditions when selecting your varieties. Look for varieties that are disease-resistant and well-suited to your region.
How often should I water my tomato plants?
Watering is a critical aspect of tomato care. Overwatering can lead to root rot, while underwatering can stunt growth and reduce fruit production. The ideal watering frequency depends on several factors, including the weather, soil type, and size of your plants. As a general rule, water deeply and less frequently, allowing the soil to dry out slightly between waterings. Check the soil moisture by sticking your finger about an inch into the soil. If it feels dry, it’s time to water. During hot, dry weather, you may need to water daily, while during cooler, wetter periods, you may only need to water every few days. Water at the base of the plant to avoid wetting the foliage, which can increase the risk of fungal diseases.
What are some common tomato plant problems and how can I fix them?
Tomato plants are susceptible to a variety of pests and diseases. Some common problems include aphids, whiteflies, tomato hornworms, blossom end rot, and fungal diseases like early blight and septoria leaf spot. Regularly inspect your plants for signs of pests or diseases. If you spot any problems, take action immediately. For aphids and whiteflies, you can try spraying your plants with a strong stream of water or using insecticidal soap. Tomato hornworms can be hand-picked off the plants. Blossom end rot is caused by a calcium deficiency and can be prevented by ensuring consistent watering and adding calcium to the soil. Fungal diseases can be treated with fungicides. Proper air circulation and avoiding overhead watering can also help prevent fungal problems.
Do I need to prune my tomato plants?
Pruning can help improve air circulation, reduce the risk of disease, and encourage fruit production. However, not all tomato plants need to be pruned. Determinate varieties generally don’t require much pruning, while indeterminate varieties benefit from regular pruning. When pruning indeterminate tomatoes, focus on removing suckers, which are small shoots that grow between the main stem and the branches. Removing suckers will help direct the plant’s energy towards fruit production. You can also remove any yellowing or diseased leaves.
How do I know when my tomatoes are ripe?
The color of the tomato is the most obvious indicator of ripeness. Tomatoes will typically turn from green to red, yellow, or orange, depending on the variety. However, color alone is not always a reliable indicator. Ripe tomatoes should also feel slightly soft to the touch and have a pleasant aroma. Gently squeeze the tomato; it should give slightly but not be mushy. The stem should also detach easily from the plant when the tomato is ripe.
Can I grow tomatoes in containers?
Yes, tomatoes can be successfully grown in containers, making this beginner tomato growing method accessible to those with limited space. Choose a large container, at least 20 gallons in size, with good drainage. Use a high-quality potting mix and provide adequate support for the plants. Container-grown tomatoes may require more frequent watering and fertilization than those grown in the ground. Select determinate varieties or compact indeterminate varieties that are well-suited for container gardening.
What kind of fertilizer should I use for my tomato plants?
Tomato plants need a balanced fertilizer that provides essential nutrients like nitrogen, phosphorus, and potassium. A fertilizer with a ratio of 5-10-5 or 10-10-10 is a good choice. Avoid fertilizers that are too high in nitrogen, as this can promote excessive foliage growth at the expense of fruit production. You can also use organic fertilizers like compost tea or fish emulsion. Fertilize your tomato plants every few weeks, following the instructions on the fertilizer package.
How can I protect my tomato plants from pests?
There are several ways to protect your tomato plants from pests. Companion planting, such as planting basil or marigolds near your tomatoes, can help deter pests. You can also use row covers to protect your plants from insects. Regularly inspect your plants for signs of pests and take action immediately if you spot any problems. Insecticidal soap or neem oil can be used to control many common tomato pests.
What is blossom end rot and how can I prevent it?
Blossom end rot is a common problem that affects tomatoes, causing a dark, leathery spot to appear on the bottom of the fruit. It is caused by a calcium deficiency, which can be triggered by inconsistent watering, poor soil drainage, or high levels of nitrogen in the soil. To prevent blossom end rot, ensure consistent watering, improve soil drainage, and avoid over-fertilizing with nitrogen. You can also add calcium to the soil by incorporating bone meal or crushed eggshells.
How can I improve the flavor of my homegrown tomatoes?
The flavor of your homegrown tomatoes can be influenced by several factors, including the variety, soil quality, watering practices, and sunlight exposure. Choose tomato varieties that are known for their flavor. Amend your soil with compost or other organic matter to improve its fertility. Water deeply and less frequently to encourage strong root growth. Ensure that your tomato plants receive at least six hours of sunlight per day. Allow your tomatoes to ripen fully on the vine for the best flavor.

Leave a Comment