
Bitter Melon Terrace Gardening: Ever dreamed of transforming your bland terrace into a lush, productive oasis overflowing with vibrant greenery and delicious, homegrown vegetables? I know I have! For centuries, terrace gardening has been a vital part of many cultures, from the ancient Hanging Gardens of Babylon to the ingenious rice terraces of Southeast Asia. It’s a testament to human ingenuity and our deep connection to the land.
But let’s be honest, sometimes the idea of starting your own terrace garden can feel overwhelming, especially when you’re dealing with unique plants like bitter melon. That’s where this DIY guide comes in! We’re going to unlock the secrets to successful bitter melon terrace gardening, even if you’re a complete beginner.
Why bitter melon, you ask? Well, besides its unique and slightly acquired taste, bitter melon is packed with nutrients and offers a beautiful, vining display. Plus, growing your own food is incredibly rewarding! This DIY article will provide you with simple, effective tricks and hacks to overcome common challenges, maximize your yield, and create a thriving bitter melon paradise right on your terrace. Get ready to roll up your sleeves and transform your outdoor space into a productive and beautiful garden!
Balkongarten-Projekt: Bittermelone selbst anbauen – So geht’s!
Ich liebe es, frische Zutaten direkt vor der Haustür zu haben. Und was gibt es Besseres, als sich seinen eigenen kleinen Gemüsegarten auf dem Balkon anzulegen? Heute zeige ich euch, wie ihr Bittermelone (auch bekannt als Bittergurke oder Karela) erfolgreich im Topf anbauen könnt. Keine Angst, es ist einfacher als ihr denkt!
Was du für den Bittermelonen-Anbau brauchst:
* Bittermelonen-Samen: Am besten Bio-Qualität, um sicherzustellen, dass sie nicht behandelt wurden.
* Anzuchttöpfe oder -schalen: Kleine Töpfe (ca. 8-10 cm Durchmesser) sind ideal für die Voranzucht.
* Anzuchterde: Diese ist nährstoffarm und locker, perfekt für die Keimung.
* Große Pflanzgefäße: Mindestens 20 Liter Volumen pro Pflanze, da Bittermelonen viel Platz zum Wachsen brauchen.
* Gute Pflanzerde: Eine Mischung aus Gartenerde, Kompost und etwas Sand sorgt für eine gute Drainage und Nährstoffversorgung.
* Rankhilfe: Bittermelonen sind Kletterpflanzen und brauchen unbedingt eine Rankhilfe, z.B. ein Spalier, ein Rankgitter oder Schnüre.
* Gießkanne oder Gartenschlauch: Zum regelmäßigen Gießen.
* Flüssigdünger: Für Gemüse, um die Pflanzen während der Wachstumsphase mit ausreichend Nährstoffen zu versorgen.
* Geduld und Liebe: Das Wichtigste überhaupt!
Phase 1: Die Voranzucht (ca. 4-6 Wochen vor dem letzten Frost)
Bittermelonen brauchen eine lange Wachstumsperiode, daher ist die Voranzucht im Haus unerlässlich.
1. Samen vorbereiten: Um die Keimung zu beschleunigen, kannst du die Samen vor dem Einpflanzen anrauen. Reibe sie vorsichtig mit Schleifpapier oder einer Nagelfeile an, um die harte Schale etwas zu beschädigen. Das hilft dem Wasser, besser einzudringen.
2. Samen einweichen: Lege die angerauten Samen für 24 Stunden in lauwarmes Wasser. Das weicht die Schale weiter auf und fördert die Keimung.
3. Anzuchttöpfe befüllen: Fülle die Anzuchttöpfe mit Anzuchterde. Drücke die Erde leicht an.
4. Samen säen: Lege in jeden Topf 1-2 Samen, ca. 1-2 cm tief.
5. Gießen: Befeuchte die Erde vorsichtig mit einer Sprühflasche oder einer Gießkanne mit feinem Brausekopf. Die Erde sollte feucht, aber nicht nass sein.
6. Warm stellen: Stelle die Anzuchttöpfe an einen warmen Ort (ca. 25-30°C). Ein Mini-Gewächshaus oder eine Heizmatte können helfen, die Temperatur konstant zu halten.
7. Feucht halten: Achte darauf, dass die Erde immer leicht feucht bleibt. Besprühe sie bei Bedarf mit Wasser.
8. Geduld haben: Die Keimung kann 1-3 Wochen dauern. Sobald die ersten Keimlinge erscheinen, stelle die Töpfe an einen helleren Ort, z.B. auf eine Fensterbank.
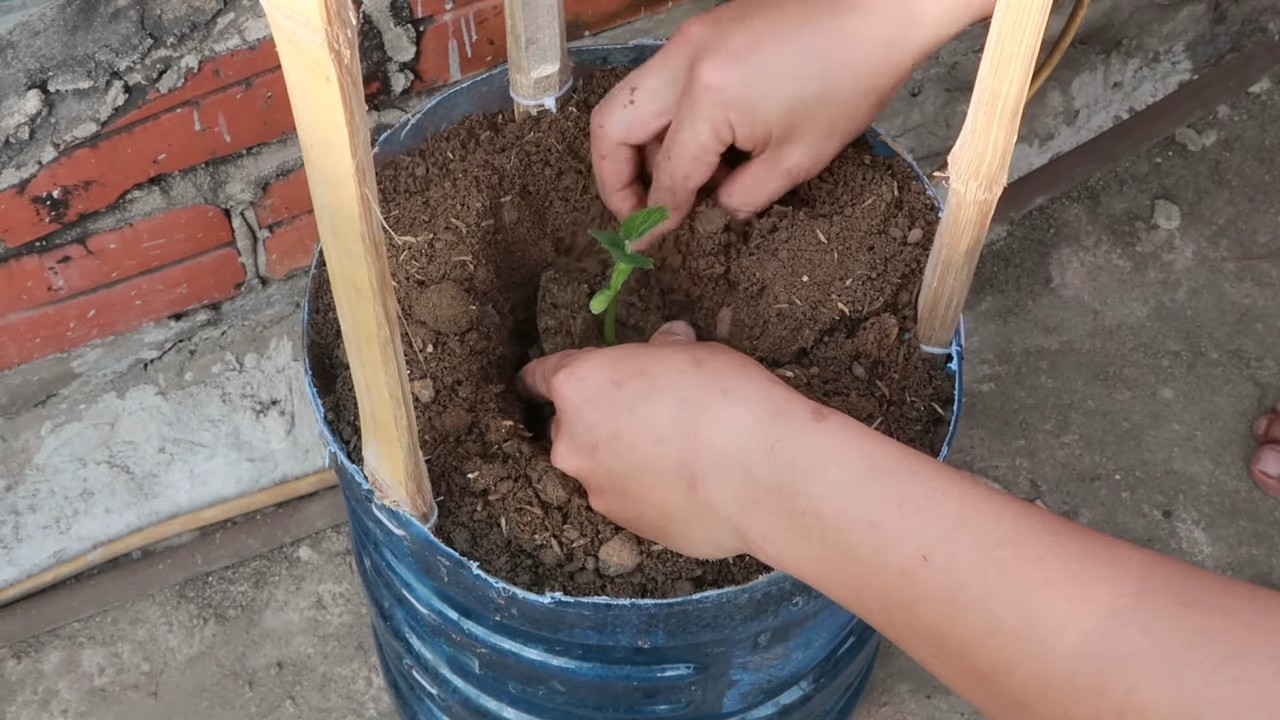
Phase 2: Das Umpflanzen in größere Töpfe
Sobald die Keimlinge einige Blätter entwickelt haben und kräftig genug aussehen, ist es Zeit, sie in größere Töpfe umzupflanzen.
1. Vorbereitung der Pflanzgefäße: Fülle die großen Pflanzgefäße mit einer Mischung aus Gartenerde, Kompost und Sand. Achte darauf, dass die Töpfe Abzugslöcher haben, damit überschüssiges Wasser ablaufen kann.
2. Pflanzen vorsichtig aus den Anzuchttöpfen nehmen: Drücke vorsichtig von unten gegen den Topf, um die Pflanze mit dem Wurzelballen herauszulösen. Sei dabei sehr vorsichtig, um die Wurzeln nicht zu beschädigen.
3. Pflanzen einsetzen: Setze die Pflanzen in die vorbereiteten Pflanzgefäße. Die Oberkante des Wurzelballens sollte mit der Erdoberfläche abschließen.
4. Mit Erde auffüllen: Fülle die Töpfe mit Erde auf und drücke sie leicht an.
5. Gießen: Gieße die Pflanzen gründlich an.
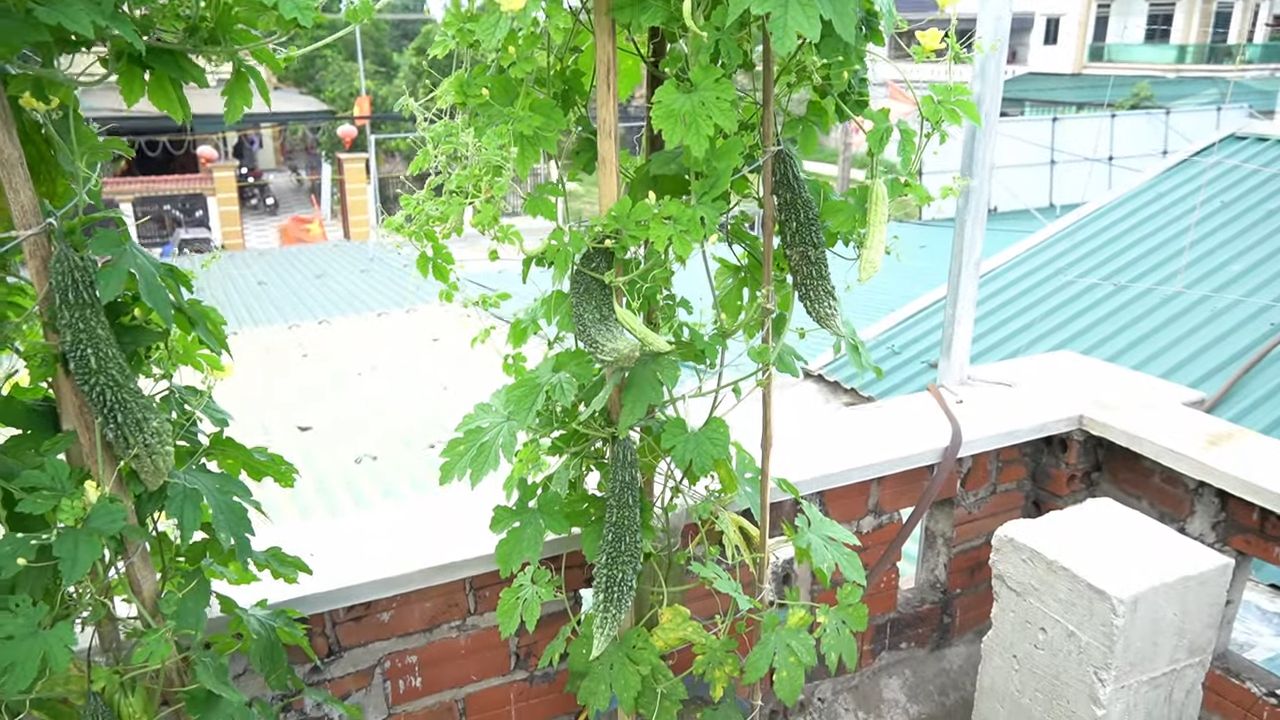
6. Rankhilfe anbringen: Installiere die Rankhilfe (Spalier, Rankgitter oder Schnüre) in den Töpfen. Die Bittermelonen werden sich daran festhalten und nach oben klettern.
Phase 3: Die Pflege der Bittermelonen
Jetzt beginnt die eigentliche Arbeit, aber keine Sorge, mit ein paar einfachen Tipps und Tricks werden deine Bittermelonen prächtig gedeihen.
1. Standort: Bittermelonen lieben die Sonne! Stelle die Töpfe an einen sonnigen Standort auf deinem Balkon, wo sie mindestens 6-8 Stunden Sonne pro Tag bekommen.
2. Gießen: Gieße die Pflanzen regelmäßig, besonders an heißen Tagen. Die Erde sollte immer leicht feucht sein, aber vermeide Staunässe. Am besten gießt du morgens oder abends, wenn die Sonne nicht so stark scheint.
3. Düngen: Dünge die Pflanzen regelmäßig mit einem Flüssigdünger für Gemüse. Beginne damit etwa 2 Wochen nach dem Umpflanzen und wiederhole die Düngung alle 2-3 Wochen. Befolge dabei die Anweisungen auf der Düngerpackung.
4. Rankhilfe unterstützen: Hilf den Pflanzen beim Klettern, indem du die Triebe regelmäßig an der Rankhilfe befestigst.
5. Ausgeizen: Entferne regelmäßig Seitentriebe, die aus den Blattachseln wachsen. Das fördert das Wachstum der Haupttriebe und die Fruchtbildung.
6. Bestäubung: Bittermelonen sind einhäusig, d.h. sie haben männliche und weibliche Blüten auf derselben Pflanze. Die Bestäubung erfolgt in der Regel durch Insekten. Wenn du auf Nummer sicher gehen willst, kannst du die Blüten auch von Hand bestäuben. Übertrage dazu mit einem Pinsel Pollen von den männlichen auf die weiblichen Blüten. Du erkennst die weiblichen Blüten an dem kleinen Fruchtansatz direkt unter der Blüte.
7. Schädlinge und Krankheiten: Achte auf Schädlinge wie Blattläuse oder Spinnmilben. Bei Befall kannst du die Pflanzen mit einem natürlichen Insektizid behandeln. Auch Pilzkrankheiten können auftreten, besonders bei feuchtem Wetter. Sorge für eine gute Belüftung und entferne befallene Blätter.
Phase 4: Die Ernte
Nach etwa 2-3 Monaten kannst du die ersten Bittermelonen ernten.
1. Erntezeitpunkt: Die Bittermelonen sind reif, wenn sie eine grüne Farbe haben und sich leicht vom Stiel lösen lassen. Sie sollten noch nicht gelb oder orange sein, da sie dann überreif und bitter werden.
2. Ernten: Schneide die Bittermelonen mit einem scharfen Messer oder einer Schere vom Stiel ab.
3. Regelmäßig ernten: Ernte die Bittermelonen regelmäßig, um die Fruchtbildung anzuregen.
Tipps und Tricks für den erfolgreichen Bittermelonen-Anbau:
* Gute Drainage: Achte darauf, dass die Töpfe eine gute Drainage haben, um Staunässe zu vermeiden.
* Windschutz: Schütze die Pflanzen vor starkem Wind, da dieser die Blätter beschädigen und die Fruchtbildung beeinträchtigen kann.
* Mulchen: Bedecke die Erde mit einer Schicht Mulch (z.B. Stroh oder Holzhackschnitzel), um die Feuchtigkeit zu speichern und das Unkrautwachstum zu reduzieren.
* Sortenwahl: Es gibt verschiedene Bittermelonen-Sorten. Informiere dich vor dem Kauf, welche Sorte am besten für den Anbau im Topf geeignet ist.
* Geduld: Der Anbau von Bittermelonen braucht Zeit und Geduld. Lass dich nicht entmutigen, wenn es nicht gleich klappt. Mit etwas Übung und den richtigen Tipps wirst du bald deine eigenen Bittermelonen ernten können.
Ich hoffe, diese Anleitung hilft dir dabei, deine eigenen Bittermelonen auf dem Balk
Conclusion
So, there you have it! Transforming your terrace into a thriving bitter melon garden is not only achievable, but also incredibly rewarding. We’ve explored the ins and outs of cultivating this unique vegetable in a limited space, from selecting the right varieties to providing optimal support and care. But why should you embark on this green adventure?
First and foremost, growing your own bitter melon guarantees access to fresh, organic produce, free from harmful pesticides and chemicals. You’ll know exactly what you’re putting into your body, a priceless advantage in today’s world. Beyond the health benefits, terrace gardening with bitter melon offers a fantastic opportunity to connect with nature, relieve stress, and beautify your living space. Imagine stepping onto your terrace each morning to admire the vibrant green vines and anticipate the harvest to come.
But the real magic lies in the unique flavor and versatility of bitter melon itself. While its bitterness might be an acquired taste, it’s a taste worth acquiring! This vegetable is packed with nutrients and boasts a range of culinary applications. From stir-fries and soups to juices and even teas, bitter melon can add a distinctive and healthy twist to your meals.
Don’t be afraid to experiment with different varieties of bitter melon to find your favorite. Some are more intensely bitter than others, while others offer a milder, more palatable flavor. Consider trying the Chinese variety, known for its longer, smoother fruit, or the Indian variety, characterized by its smaller, more bumpy appearance.
And the possibilities don’t stop there! You can also explore different trellising methods to maximize your space and create a visually stunning display. A simple bamboo structure works wonders, but you could also get creative with repurposed materials like old ladders or metal fencing.
Ready to take the plunge and create your own bitter melon paradise?
We encourage you to give this DIY terrace gardening trick a try. It’s easier than you might think, and the rewards are well worth the effort. Remember to start small, be patient, and don’t be afraid to learn from your mistakes. Gardening is a journey, not a destination, and every step of the way is an opportunity to grow, both literally and figuratively.
Once you’ve harvested your first crop of homegrown bitter melon, we’d love to hear about your experience! Share your photos, tips, and recipes in the comments below. Let’s create a community of passionate terrace gardeners and inspire others to embrace the joy of growing their own food. Your success story could be the motivation someone else needs to get started. So, grab your seeds, prepare your soil, and get ready to transform your terrace into a thriving bitter melon oasis! Happy gardening!
Frequently Asked Questions (FAQ)
What is the best time of year to plant bitter melon on my terrace?
The ideal time to plant bitter melon is during the late spring or early summer, after the last frost has passed. Bitter melon thrives in warm weather and requires plenty of sunlight to grow and produce fruit. In regions with mild winters, you may be able to extend the growing season by starting seeds indoors and transplanting them outdoors once the weather warms up. Pay attention to your local climate and adjust your planting schedule accordingly. Generally, aim for soil temperatures above 65°F (18°C) for optimal germination.
How much sunlight does bitter melon need when grown on a terrace?
Bitter melon requires at least 6-8 hours of direct sunlight per day to thrive. Choose a location on your terrace that receives ample sunlight throughout the day. If your terrace is partially shaded, consider using reflective surfaces or grow lights to supplement the sunlight. Insufficient sunlight can lead to stunted growth, reduced fruit production, and a higher susceptibility to pests and diseases. Monitor your plants closely and adjust their position as needed to ensure they receive adequate sunlight.
What type of soil is best for growing bitter melon in containers?
Bitter melon prefers well-draining, fertile soil with a slightly acidic to neutral pH (6.0-7.0). A good potting mix for containers should consist of a combination of garden soil, compost, and perlite or vermiculite. Compost provides essential nutrients, while perlite or vermiculite improves drainage and aeration. Avoid using heavy clay soil, as it can become waterlogged and hinder root growth. You can also amend your soil with organic matter, such as aged manure or leaf mold, to improve its fertility and water-holding capacity.
How often should I water my bitter melon plants on the terrace?
Water your bitter melon plants regularly, especially during hot and dry weather. The soil should be kept consistently moist, but not waterlogged. Water deeply whenever the top inch of soil feels dry to the touch. Avoid overhead watering, as it can promote fungal diseases. Instead, water at the base of the plants, using a watering can or a soaker hose. Mulching around the plants can help retain moisture and suppress weeds. Adjust your watering schedule based on the weather conditions and the moisture level of the soil.
What kind of support system does bitter melon need on a terrace?
Bitter melon is a climbing vine and requires a sturdy support system to grow vertically. A trellis, fence, or arbor can provide adequate support for the vines. You can also use bamboo stakes or netting to create a simple trellis. Ensure that the support system is strong enough to withstand the weight of the mature vines and fruits. Train the vines to climb the support system by gently guiding them and tying them with soft twine or plant ties. Pruning the vines can also help maintain their shape and prevent them from becoming too heavy.
How do I deal with pests and diseases affecting my bitter melon plants?
Bitter melon plants can be susceptible to various pests and diseases, such as aphids, spider mites, whiteflies, and powdery mildew. Regularly inspect your plants for signs of infestation or disease. If you detect any problems, take action immediately to prevent them from spreading. You can use organic pest control methods, such as insecticidal soap, neem oil, or horticultural oil, to control pests. For fungal diseases, improve air circulation around the plants and avoid overhead watering. You can also use a fungicide if necessary. Remove any infected leaves or fruits to prevent the disease from spreading.
When and how do I harvest bitter melon from my terrace garden?
Bitter melon is typically ready to harvest about 8-12 weeks after planting. The fruits should be firm, green, and slightly tender to the touch. Harvest the fruits before they turn yellow or orange, as they will become more bitter as they ripen. Use a sharp knife or pruning shears to cut the fruits from the vine, leaving a short stem attached. Handle the fruits carefully to avoid bruising them. Store the harvested bitter melon in the refrigerator for up to a week.
Can I grow bitter melon in a small container on my terrace?
Yes, you can grow bitter melon in a small container, but it’s important to choose a container that is at least 12 inches in diameter and 12 inches deep. This will provide enough space for the roots to grow and develop. Use a well-draining potting mix and provide regular watering and fertilization. You may also need to prune the vines more frequently to keep them manageable. While you may not get as many fruits as you would from a larger container, you can still enjoy a decent harvest from a small container.
How can I reduce the bitterness of bitter melon before cooking?
There are several ways to reduce the bitterness of bitter melon before cooking. One method is to soak the sliced or chopped bitter melon in salted water for about 30 minutes. The salt helps to draw out the bitter compounds. Another method is to blanch the bitter melon in boiling water for a few minutes, then rinse it with cold water. You can also rub the bitter melon with salt before cooking to help reduce its bitterness. Some people also prefer to remove the seeds and pith from the center of the bitter melon, as these parts are often the most bitter. Experiment with different methods to find what works best for you.
What are some creative ways to use bitter melon in cooking?
Bitter melon can be used in a variety of dishes, both savory and sweet. It is commonly used in stir-fries, soups, stews, and curries. You can also juice bitter melon or make it into a tea. Some people even pickle or candy bitter melon. When cooking with bitter melon, it’s important to balance its bitterness with other flavors, such as sweetness, sourness, or spiciness. Try pairing it with ingredients like onions, garlic, ginger, chili peppers, soy sauce, honey, or vinegar. Don’t be afraid to experiment and get creative with your bitter melon recipes!

Leave a Comment